Thingiverse
1:18 Scale OpenRC F1 by NigelWest
by Thingiverse
Last crawled date: 3 years ago
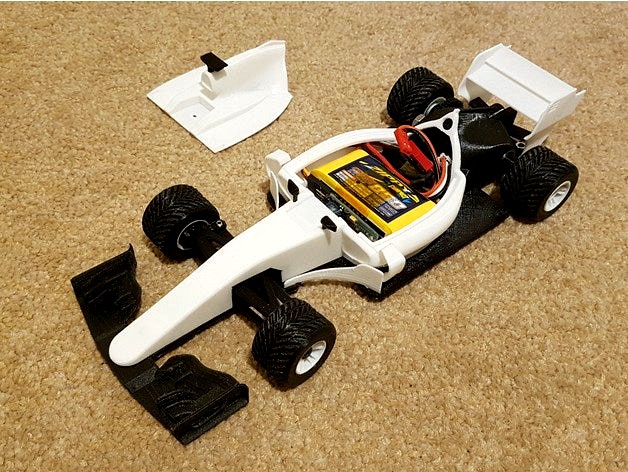
This is my 1:18 Scale version of Daniel Norée's fantastic OpenRC F1.
3D Printed Parts:
I printed all of the 3D printed parts in PLA apart from the tires and the front wing which I printed in FFF World FlexiSMART.
The PLA parts were printed with a 0.4mm nozzle, 0.16mm layer height, 2 shell/perimiters, 4 top layers, 4 bottom layers and 15% infill
The rain tires were printed with a 0.4mm nozzle, 0.2mm layer height, 1 shell/perimiter, 4 top layers, 4 bottom layers and no infill
The front wing was printed with a 0.4mm nozzle, 0.2mm layer height, 2 shell/perimiters, 4 top layers, 4 bottom layers and 50% infill
1 x Chassis - This is now in a single piece whereas the original 1:10 version was in 2 parts. 2nd Feb 2019 - There is also a 2 part Chassis in my 'Experimental Thing' that can be printed on small printers (please see link below).
1 x Front Upper BOM
1 x Front Lower BOM
1 x BOM Block
2 x Front Wheel Hub
2 x Track Rod
1 x Servo Saver Part 1
1 x Servo Saver Part 2
1 x Servo Saver Part 3
1 x Spur Gear
1 x Pinion
1 x Right Wheel Spacer
1 x Left Wheel Spacer
1 x Right Rear Axle Holder
1 x Left Rear Axle Holder
1 x Rear Axle - Vertical + Carbon Rod (see note 1 below)
1 x Rear Axle - Horizontal (see note 1 below)
1 x Rear Wing Mount
1 x Front Body + Nose - This is now a single piece whereas the original 1:10 version was in 2 parts. This will easily fit on a 100x100 printer but you will need to be able to print 110 high parts (on the z axis). However this may even fit a 100x100x100 printer if the part is angled over more on the printer and printed with extra supports.
1 x Main Body
1 x Motor Cover
1 x Lid
1 x Locating Peg
1 x Rear Wing
1 x Front Wing
2 x Front Rim
2 x Rear Rim
1 x Main Turning Vane Left
1 x Main Turning Vane Right
1 x Barge Board Left
1 x Barge Board Right
1 x Left Rear View Mirror
1 x Right Rear View Mirror
1 x Camera
There are also STL files for 2 types of tire -
You will either need:
1 x Front Left Rain Tire, 1 x Front Right Rain Tire, 1 x Rear Left Rain Tire, 1 x Rear Right Rain Tire
or:
2 x Front Slick Tire, 2 x Rear Slick Tire
Fixings:
2x M3x8 Grub screws
22x M3x5 Countersunk Screws. I managed to find some M3x5 screws that have a shallower head than usual. If you can’t find these the you may need to file down the heads on the 4 screws that hold the front hubs to the top and bottom front ‘wishbones’. I think the standard pozi head or socket head countersunk screws should be ok for all the other 18 M3x5 Countersunk screws.
4x Hex M3 Nuts, 2 are used on the rear wing and 2 are on the engine cover where the main body tub fixes to it.
17x Square M3 Nuts
1x M5 Nut – used to secure the pinion to the motor.
2x M2 Washer – use with the motor fixing screws.
1x M3x16 Pan Head – servo saver.
2x M3x14 Socket Countersunk - for holding the front wheels on
2x M3x5 Socket Countersunk - for holding the rear wheels on
Other parts that I bought for the build of my 1:18 Scale F1 Car:
Motor - DYS BE1806, other 1806 motors may fit but you may need to space the pinon or adapt it to fit. Whilst there isn’t much variation in the size of the 1806 motors themselves the distance between the fixing face and the propeller (or in our case pinon) mounting face do vary.
ESC - There are a number of small car specific ESCs available that may or may not fit and may be a better choice than the ESC that I used. Space is very limited so you are very much on your own with this. I personally went for a Quadcopter ESC - The Afro 20A with BEC from HobbyKing. I haven’t done much testing yet so I’m not sure how well this ESC will stand up long term, or even short term come to that. If you manage to get some real grip from the tyres a 20A ESC without heatsink may not be enough, but I’ll have to let you decide that. Like I say, you are on your own with this one! As supplied the quadcopter ESC does not work well as the neutral point on the transmitter is 50% on the ESC, and full reverse on the transmitter is neutral on the ESC., so when you let go of the throttle the car goes shooting off at half speed. To get around this I installed the BLHeli firmware on the ESC which then allows me to change the throttle setup to forward + reverse, intended for 3D flying of quadcopters but gives forward, neutral and reverse on the car.
Battery - I used a small LIPO from HobbyKing - a Zippy 850mAh, which just about fits. There is also a 500mAh version which would allow more space. Your choice of receiver and ESC will all need to be factored in when working out which battery to use.
Servo – The servo I used is a cheap 3.7g Servo from China. The fixing tabs were removed and it is held in place and sandwiched between the chassis and the tunnel section.
Radio Gear – This is very much up to you. I already have a Futaba T4GRS, but there are much, much , much more cheaper options out there. One of the main factors that may influence your choice of radio is the size of the receiver. I had to remove my Corona CR4SF receiver from its plastic case and put it in heatshrink to reduce its size quite significantly
Ball Joint – This is for the steering coupling and is used between the servo arm and the servo saver. The part I used is a Schumacher Racing U3495. Other ball joints may work, but the ball size and length are quite critical to prevent the parts fouling against each other when in use.
Bearings – You’ll need 6 bearing in total 4 for the front and 2 for the rear. I purchased these from www.rcbearings.co.uk :
2x Bearings 8mmx12mmx3.5mm (ID, OD, Width)
4x Bearings 3mmx6mmx2.5mm (ID, OD, Width)
Note 1:
You only need to print 1 rear axle. You can use either the "Vertical + Carbon Rod" version or the "Horizontal" version. The "Horizontal" version is designed to print horizontally on the printer bed and prints quick and easy and only needs a small number of supports. The "Vertical + Carbon Rod" version prints vertically. This makes it weaker so I have left a 2mm hole up the middle so that you can glue in a 2mm carbon rod for extra strength. The vertical version needs lots of supports and has a + shape at the top which is removed after printing. I found that the vertical version runs more true as there is very little warping.
You can also find some experimental parts here:https://www.thingiverse.com/thing:2921004/
Current experimental parts are:
Knobbly Tires
Spur & Pinion gears with bigger teeth
Ball Differential - Tested and works great.
2017 Sharkfin Parts
2 Part Chassis for printing on small printers. Should fit on a 100x100 printer
You can see a really cool FullThrottleRC build of the 1:18 Scale OpenRC F1 here:https://youtu.be/YWjofWg-HuI
Similar models
cg_trader
$40

Diecast Hemi Trike Rocket 2 Scale 1 to 25 | 3D
...iameter 2 mm. hemi trike rocket trikerocket2 concept race drag dragster v8 diecast toy scaled print printable miniatures vehicles
thingiverse
free

Car tire markers by lukeskymuh
...e much around. if you plan to move your tires much around you may design a remix to be printed with the layers in the horizontal.
cg_trader
$3

Beech Starship | 3D
...body rear
-body connection part
-front left wing
-front right wing
-left fan
-right fan
-left wing
-right wing
-mount
-full model
3dwarehouse
free

Parts to Build your own John Deere.
...el) if you used a part, i like to watch models from other guys! #build_your_own #cabin #hitch #john_deere #parts #tractor #wheels
thingiverse
free

OpenRC F1 modified servo holder, front axle, chassis by billyrud10
...erse.com/thing:1462917
the tire cutout on the rear of the chassis has been shortened so the tamiya f104 tires will no longer rub.
thingiverse
free

Motorbike fun design PART 2 by Hex17
...e engine next.
you need to print 2 of the front end 4 and the front disk brakes as well as 2 of each the front and rear axle hubs
thingiverse
free

OPENRC F1 Servo Saver Redesign by Superclodbuster
...the original steering.
you will need to fabricate your own servo linkage, i used an old airplane flap adjustable linkage in mine.
thingiverse
free

Cantilever Suspension for Axial SCX10 by RMTCTRL
... push rod (the connection between the cantilever itself to the axle), i used the extra rod ends that you get when you buy a scx10
cg_trader
$40

Diecast Pulling Tractor John Deere 7310R Pro Stock Scale 1 to 25 | 3D
...tor pullingtractor tractorpulling puller power drag dragster prostock race diecast toy scaled print printable miniatures vehicles
cg_trader
$40

Diecast pulling truck 2wd Hot rod with turbo V12 Scale 1 to 25 | 3D
...uller hotrod 2wd drag dragster supermodified v12 turbo concept race diecast toy scaled print printable racing miniatures vehicles
Nigelwest
thingiverse
free

SR Logo by NigelWest
...sr logo by nigelwest
thingiverse
sr logo
thingiverse
free

Fixed Hemera Volcano Part Cooler by NigelWest
...fixed hemera volcano part cooler by nigelwest
thingiverse
fixed hemera volcano part cooler
thingiverse
free

Experimental Parts for 18th scale OpenRC F1 by NigelWest
... these parts are not yet intended for general use. the may not work properly or even print properly. use them at your own risk.
thingiverse
free

Ford Keyring Button Protector by NigelWest
...rk through walls and easily opens the car from anywhere in the house.
the guard replaces the standard bezel on the ford key-ring.
thingiverse
free

Under Cupboard Detachable Spool Holder by NigelWest
...2 x m8 nuts
1 x m8 washer
1 x m8 threaded rod x 146mm long
2 x wood screws or similar for fixing the mount to a cupboard or shelf
thingiverse
free

Hemera Part Cooler for 5015 Radial Blower - V1.0 by NigelWest
...8 and cut them down to size). note: make sure not to damage the stepper motor case by using too long screws or over tightening.
thingiverse
free

Removable Hemera Part Cooler for 5015 Radial Blower - V1.1 by NigelWest
... the stepper motor case by using too long screws or over tightening.
1 off m3x12 set screw - used to adjust the height of the fan
thingiverse
free

Removable Hemera VOLCANO Part Cooler for 5015 Radial Blower - V1.1 by NigelWest
... the stepper motor case by using too long screws or over tightening.
1 off m3x12 set screw - used to adjust the height of the fan
thingiverse
free

Servo arm for 18th scale OpenRC F1 by Backmann
...making the 1:10 scale f1. and nigel west aka nigelwest for making the 1:18 scale version that i'm able...
Openrc
thingiverse
free

Battery holder for OpenRC by Wiero
...battery holder for openrc by wiero
thingiverse
battery holder for openrc
thingiverse
free

Front Wing OpenRC F1 by scarpantes
...front wing openrc f1 by scarpantes
thingiverse
front wing openrc f1
thingiverse
free

OpenRC f1 GoPro Mount by iClint
...openrc f1 gopro mount by iclint
thingiverse
pov mount for openrc f1 car
thingiverse
free

OpenRC F1 Bushings by rbrutsky
...openrc f1 bushings by rbrutsky
thingiverse
rear 12x18x4 bushings for the openrc formula 1 car. you must scale the bushings x10
thingiverse
free

OpenRC Truggy Trailer by Steamerzone
...verse
openrc truggy trailer with working suspension. the white suspension parts in the pictures are printed with taulman bridge.
thingiverse
free

Wall mount OpenRC F1 horizontal
...wall mount openrc f1 horizontal
thingiverse
this is a wall mount for the openrc f1 car in a horizontal position.
thingiverse
free

OpenRC Wheel Nut Wrench by barspin
...openrc wheel nut wrench by barspin
thingiverse
wheel nut wrench for the 1:10 openrc project cars.
thingiverse
free

OpenRC Tractor Trailer by Merikisseli
...openrc tractor trailer by merikisseli
thingiverse
...
thingiverse
free

OpenRC Logo by SSwede
... logo, i haven't made the logo, just the 3d model and i'm uploading it by request.
feel free to use it anyway you like :)
thingiverse
free

Bumper/Skidplate for the OpenRC Truggy by Steamerzone
...nted the plate in abs and the damper in taulman bridge. it uses existing holes/mounting points of the openrc truggy for mounting.
F1
3d_export
free

f1
...f1
3dexport
model 3d f1
3d_export
$5

mercedes f1
...mercedes f1
3dexport
racing car mercedes f1
3ddd
$1

McLaren F1
...mclaren f1
3ddd
mclaren f1 без текстур.
3d_ocean
$25
RC F1
...rc f1
3docean
auto car control f1 formula race rc remote speed
remote control f1 car
3d_export
$7

f1 toy
...f1 toy
3dexport
this is a f1 car toy representative of mexcan artists.
3d_export
$15

f1 car mercedes
...f1 car mercedes
3dexport
f1 racing f1 car mercedes
3d_ocean
$19

F1 Tractor
...f1 tractor
3docean
f1 futuristic race tractor red tractor
simple futuristic race tractor model.
3d_ocean
$30

Formula F1
...ic f1 formula indianapolis indy luxury muscle race racer sedan sports street transport tuner vehicle
generic formula f1 race car.
3d_ocean
$50

McLaren F1
...uxury mc mclaren muscle race sedan sports street transport tuner vehicle
highly detailed exterior and interior of the mclaren f1.
turbosquid
$100

F1 Car
...
turbosquid
royalty free 3d model f1 car for download as obj on turbosquid: 3d models for games, architecture, videos. (1263925)
18
3ddd
$1

Remains / Sorenson 18 Lantern HL2617 18
... remains , светильник
remains - sorenson 18 lantern hl2617 18
3d_export
$6

rocks 18
...rocks 18
3dexport
rocks 3d model 18
3ddd
$1

Bed 18
...bed 18
3ddd
постельное белье
bed 18
3d_export
$6

tap-18
...tap-18
3dexport
3d_export
$17

F-18 Performance
...f-18 performance
3dexport
f-18 performance
3ddd
$1

Curtains 18
...curtains 18
3ddd
curtains 18 (3 models)
polys: 543000
other models:http://3ddd.ru/users/brast/models
3ddd
$1

ALBA p160-18
...alba p160-18
3ddd
alba
alba p160-18
turbosquid
$40

cottage 18
...bosquid
royalty free 3d model cottage 18 for download as max on turbosquid: 3d models for games, architecture, videos. (1377004)
turbosquid
$10

building 18
...osquid
royalty free 3d model building 18 for download as max on turbosquid: 3d models for games, architecture, videos. (1362221)
turbosquid
$7

Rock 18
...turbosquid
royalty free 3d model rock 18 for download as obj on turbosquid: 3d models for games, architecture, videos. (1486413)
Scale
turbosquid
$20
Weight scale or Bathroom Scale
...ght scale or bathroom scale for download as max, fbx, and obj on turbosquid: 3d models for games, architecture, videos. (1664576)
turbosquid
$19

Scale
...e
turbosquid
royalty free 3d model scale for download as fbx on turbosquid: 3d models for games, architecture, videos. (1411722)
turbosquid
$5
Scales
...s
turbosquid
royalty free 3d model scales for download as ma on turbosquid: 3d models for games, architecture, videos. (1393439)
turbosquid
$40

Scale
... available on turbo squid, the world's leading provider of digital 3d models for visualization, films, television, and games.
turbosquid
$17

Scales
... available on turbo squid, the world's leading provider of digital 3d models for visualization, films, television, and games.
turbosquid
$12

Scale
... available on turbo squid, the world's leading provider of digital 3d models for visualization, films, television, and games.
turbosquid
free
Scale
... available on turbo squid, the world's leading provider of digital 3d models for visualization, films, television, and games.
3d_export
$7

of scales
...s have a flat point of support. the samples are rendered in the standard cinema 4d renderer. enjoy your use and creative success.
3d_export
$5
scale knob
...scale knob
3dexport
scale knob
3d_export
$20
cartoon weight scale or bathroom scale
...cartoon weight scale or bathroom scale
3dexport
texture size:512px number of texture:1 texture format: png
1
turbosquid
$69

armchairs(1)(1)
... available on turbo squid, the world's leading provider of digital 3d models for visualization, films, television, and games.
turbosquid
$15

ring 1+1
... available on turbo squid, the world's leading provider of digital 3d models for visualization, films, television, and games.
turbosquid
$10

chair(1)(1)
... available on turbo squid, the world's leading provider of digital 3d models for visualization, films, television, and games.
turbosquid
$8

Chair(1)(1)
... available on turbo squid, the world's leading provider of digital 3d models for visualization, films, television, and games.
turbosquid
$2

RING 1(1)
... available on turbo squid, the world's leading provider of digital 3d models for visualization, films, television, and games.
turbosquid
$1

Table 1(1)
... available on turbo squid, the world's leading provider of digital 3d models for visualization, films, television, and games.
turbosquid
$1

house 1(1)
... available on turbo squid, the world's leading provider of digital 3d models for visualization, films, television, and games.
turbosquid
$59

Formula 1(1)
...lty free 3d model formula 1 for download as max, fbx, and obj on turbosquid: 3d models for games, architecture, videos. (1567088)
design_connected
$11

No 1
...no 1
designconnected
sibast no 1 computer generated 3d model. designed by sibast, helge.
turbosquid
$2

desert house(1)(1)
...3d model desert house(1)(1) for download as 3ds, max, and obj on turbosquid: 3d models for games, architecture, videos. (1055095)