Thingiverse
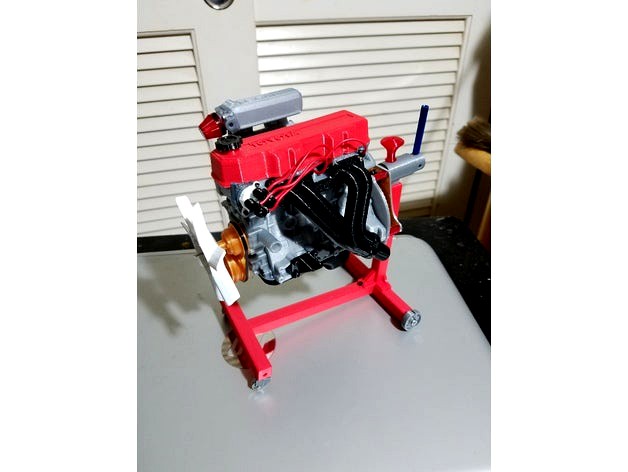
1/10 scale Toyota 22RE Motor. working model by Dblnaknak
by Thingiverse
Last crawled date: 3 years ago
Update: 1/4/18 After checking the scale it is closer to 1/10 scale. Maybe a little larger. Also added throttle body linkage and a cap for the oil bell mount in the head. Adds a little more detail to an already awesome model.
UPDATE: 12-2-17 added missing water pump gears. Also added parts list and assembly diagrams. Assembly diagrams are for assembly reference only. it is the original design PDF files and show the larger screws. refer to the parts list for the screw sizes. Also compatible with my 1/10 scale rolling engine stand. https://www.thingiverse.com/thing:2657483
This is a 1/10 scale remix of ericthepoolboy's famous 22RE Toyota engine. Everything was scaled down to be fully functional like the larger 1/3 scale engine. Majority of the parts had to be edited in the CAD program to accommodate the smaller hardware. I also scaled down and redesigned my Side Draft Carb Kit to look neater with the smaller scale.
You tube video of it in operation can be found here https://youtu.be/IWnkiVm_SU4
In my opinion this kit was harder to build than the larger motor. You must have lots of patience and a decently tuned printer to build this model. The best thing to do is SLOW YOUR PRINTER SPEED DOWN.
Refer to the original motor diagrams created by Ericthepoolboy for assembly directions. https://www.thingiverse.com/thing:644933
Almost every part will need to be honed, sanded, or filed due to the variance in printer settings, tight tolerance's, and your availability of hardware. Pistons and cylinders need to be sanded so there is little to no resistance when the piston moves up and down. I used some hi temp gun grease to lube the cylinder walls.
Rockers and cam brace need to filed, drilled, and or sanded so the rockers rotate freely. The valve springs were made out of .020 safety wire wrapped around a 13/16 drill bit. The spring keeper pushes over the push rods and held with a little dab of CA glue.
The screws I used were 1.6mm, and 2mm screws. Most of my screws were sourced from www.RC4WD.com http://store.rc4wd.com/M16_c_311.html or you can order the 1/24 crawler screw kit from https://www.ebay.com/itm/Losi-LOSB1724-Complete-Hardware-Screw-Set-1-24-Micro-Rock-Crawler-Trail-Trekker/292335863298?ssPageName=STRK%3AMEBIDX%3AIT&_trksid=p2057872.m2749.l2649
The bearings I used were 11x4x4 for the crank (SMR694-ZZ) 2x5x2.5 (MR52-ZZ) for the pistons, cam shaft, and water pump gears. I sourced those bearings from ebay and or Banggood. A simple search of the part number will bring them up.
A 1.8mm rod was used for the cam shaft and some CA glue was used to lock it down. 1mm flight control rod was used for the rods in the cam brace assembly. Large Paper clips will work fine. Large paper clips were cut to 20mm and used for the intake and exhaust valve push rods.
I used 2x1mm neodymium magnets. I sourced the magnets from banggood or ebay. https://www.banggood.com/100pcs-N50-2mm-x-1mm-Round-Magnets-Rare-Earth-Neodymium-NdFeB-p-942082.html?rmmds=myorder&cur_warehouse=CN
The electric 6v, 200rpm geared motor was sourced from https://www.banggood.com/DC-6V-200RPM-Mini-Metal-Gear-Motor-With-Gearwheel-p-969275.html
The motor controller was sourced from https://www.banggood.com/90W-DC-3V-35V-Motor-PWM-Speed-Controller-Switch-LED-Fan-Dimmer-p-1056903.html. Make sure to use a 7.4v battery. If you use the 6v motor listed above, DO NOT USE a 12v battery.
Similar models
thingiverse
free

1/10 Scale working 5 speed transmission for 1/10 22RE motor by Dblnaknak
...d printer variances you may have to sand, flie, or ream parts for fitment. entire project can be printed and assembled in 2 days.
thingiverse
free

Motor Adapter for Marble Machine #3 by AndyHegemann
...ttps://hobbyking.com/en_us/brushed-motor-15mm-6v-20000kv-w-100-1-ratio-gearbox-1.html
https://www.youtube.com/watch?v=buch8zvraes
thingiverse
free

1/10 Scale Camaro LS3 motor. Working model by Dblnaknak
...e.. https://www.thingiverse.com/thing:1996991
rolling engine stand can be fount here... https://www.thingiverse.com/thing:2657483
thingiverse
free

1-10 Scale Mazda RX7 Wankel rotary engine by Dblnaknak
...tps://www.banggood.com/90w-dc-3v-35v-motor-pwm-speed-controller-switch-led-fan-dimmer-p-1056903.html
https://youtu.be/9peki4u3brm
grabcad
free

DC 3V-6V TT Motor
...xpress.com/item/dc-3v-6v-intelligent-car-gear-motor-tt-motor-strong-magnetic-interference-robot-gear-motor-smart/32434622843.html
thingiverse
free

Shifter H box for Toyota 22re transmission by mmongeon
... keep the shifter in place a bit better. see the original source below...
http://www.thingiverse.com/make:131014#comment-602211
thingiverse
free

Tank truck by redrobrc
... escs with breakhttp://www.banggood.com/10a-esc-brushed-speed-controller-for-rc-car-and-boat-p-908719.html?p=la1820677103201407rs
thingiverse
free

Gravitrax Motorized Marble Lift
...ww.youtube.com/watch?v=dnk3wqf1nxe
link to the motor: https://www.banggood.com/ga12-n20-mini-dc-6v-30rpm-gear-motor-p-971121.html
thingiverse
free

Starter Motor Mount for assembly with transmission by jdell42
...cudes mount and 4mm bore pinion gear
https://www.amazon.com/gp/product/b0147xc79w/ref=oh_aui_detailpage_o01_s00?ie=utf8&psc=1
thingiverse
free

Crank End Modified for 3MM Screws by jdell42
...crank end modified for 3mm screws by jdell42
thingiverse
modified crank end for 22re engine by @ericthepoolboy
22Re
thingiverse
free

Shift Knob for 22RE by Dblnaknak
...shift knob for 22re by dblnaknak
thingiverse
simple shift knob for the shifter. show the shifter pattern
thingiverse
free

toyota 22re solid cam by ReznorRays
...e. should be printed standing on end. with .4 or lower tip. i like 220 heat on extruder and 70 on the bed with pla for this part.
thingiverse
free

22RE Turbo add on by RandomChicken
...he mazda rx7 wankel engine https://www.thingiverse.com/thing:3006071
my finished project https://www.thingiverse.com/make:941854#
thingiverse
free

Toyota+4+Cylinder+Engine+22RE+model+Ignitioncoil by joergsimon
... working model. coil can be placed right from the distributor and connected via the original distributor boot to the distributor.
thingiverse
free

Toyota+4+Cylinder+Engine+22RE+model+Ignitioncoil by joergsimon
...king engine model. can be placed right of the distributor. use the original distributor boot for cable connection to distributor.
thingiverse
free

Toyota 22RE Engine Expansion Pack resized to 1:10 by storm4710
...1:10 by storm4710
thingiverse
i just resized mindless´s great pack to 1:10 to fit all the other 22re things,
ive resized to 1:10
thingiverse
free

Toyota 22RE solid crank for reducing model size. by ReznorRays
...ut it is the original size. no bearing though. this was made for a smaller version. something the size you cant get bearings for.
thingiverse
free
Shifter H box for Toyota 22re transmission by mmongeon
... keep the shifter in place a bit better. see the original source below...
http://www.thingiverse.com/make:131014#comment-602211
thingiverse
free

Toyota 4 Cylinder Engine 22RE resized to 1:10 by storm4710
...ngine to 1:10 for anybody wanting a scale engine for their rc´s
i have a 1:10 hilux waiting for when i get my printer to print it
thingiverse
free

Toyota 22RE make in china by mofada
...
所有的材料可以参考这里
【腾讯文档】toyota 22re bomhttps://docs.qq.com/sheet/drw1ru2z4t2hswfdm
不可打印部分材料总花费一共 136.68 元
https://youtu.be/ygbogff_txg
Dblnaknak
thingiverse
free
Shift Knob for 22RE by Dblnaknak
...shift knob for 22re by dblnaknak
thingiverse
simple shift knob for the shifter. show the shifter pattern
thingiverse
free

Chamber Cowl by Dblnaknak
...
just something i pu together to cover the cowl. i could not find a clear pvc in my area. i used set screws to hold it together.
thingiverse
free

Shrieker Whale Pod by Dblnaknak
...se
a remix of the shrieker pod. added a whale tail, enlarged the hole for the stack, and enlarged the vtx hole for standard vtxs
thingiverse
free

Tomoquads Swift LED bar by Dblnaknak
...uads swift led bar by dblnaknak
thingiverse
remixed to mount a rear rgb led bar. created for a 3 led bar. dimensions are 10x33mm
thingiverse
free

1/10 Scale beer cans by Dblnaknak
...1/10 scale beer cans by dblnaknak
thingiverse
created this for my scale crawler build. goes perfect for the yeti scale cooler.
thingiverse
free

Pyro Drone Tooth Fairy Axii Mount by Dblnaknak
...pyro drone tooth fairy axii mount by dblnaknak
thingiverse
axii moiunt for the 3" hyperlite floss
thingiverse
free

TRX-4 Rock bumper by Dblnaknak
...this bumper to use the d-rings. i also rounded the bottom edge to prevent it from getting snagged on the rocks. it works awesome.
thingiverse
free

Shaft for the High Pressure Combustion chamber by Dblnaknak
...ed this shaft for the high pressure combustion chamber. id is 13.9 mm and od is 19.5 to allow for a tolerance between the blades.
thingiverse
free

TBS Crossfire Protector and Stand by Dblnaknak
...al design so i did a total redesign of the file to suit my needs. i also created both a mini stand and a full length stand. enjoy
thingiverse
free

TRX-4 SQ12 micro HD camera mount by Dblnaknak
...ompatible with the trx 4. it mounts to the lower front cross bar. it works awesome for a $20 camera.
https://youtu.be/kgr_9dvp_qg
Toyota
3ddd
$1

Toyota Crown
...toyota crown
3ddd
toyota
toyota crown
3d_ocean
$19

Toyota A-BAT
...toyota a-bat
3docean
a a-bat arman arman3dg bat game toyota toyota a-bat
toyota a-bat
3d_export
$20

toyota 1969
...toyota 1969
3dexport
toyota 1969
turbosquid
$1

toyota
...d
royalty free 3d model toyota for download as blend and fbx on turbosquid: 3d models for games, architecture, videos. (1673444)
3d_export
$5

toyota wheals
...toyota wheals
3dexport
toyota supra a90 wheals
3ddd
$1

toyota camry 2012
...toyota camry 2012
3ddd
toyota
toyota camry 2012
3ddd
$1

Toyota Mark 2
...toyota mark 2
3ddd
toyota
toyota mark 2 в 90 кузове
3d_ocean
$89

Toyota Prius V
...le’s versatility, will meet the needs of growing families with active lifestyles while providing the same attributes tradition...
3d_ocean
$2

Toyota Logo
...go mark motor symbol toyota trade
high detailed 3d model of toyota logo. originally created in blender3d 2.5 and exported to .obj
3d_ocean
$50

Toyota Supra
...le race racer sedan sports street supra toyota transport tuner vehicle
highly detailed exterior and interior of the toyota supra.
Motor
archibase_planet
free

Motor
...base planet
motor motor engine engine electric motor
motor wagner n250213 - 3d model (*.gsm+*.3ds) for interior 3d visualization.
archibase_planet
free

Motor
...motor
archibase planet
motor motor engine engine
motor n151112 - 3d model (*.gsm+*.3ds) for interior 3d visualization.
archibase_planet
free

Motor
...motor
archibase planet
motor motor engine engine
motor n150615 - 3d model (*.gsm+*.3ds+*.max) for interior 3d visualization.
turbosquid
$15

Motor
...otor
turbosquid
royalty free 3d model motor for download as on turbosquid: 3d models for games, architecture, videos. (1639404)
3d_ocean
$5

Electric motor
...electric motor
3docean
car electric engine industry motor phase train vehicle
an electric motor enjoy!
3d_ocean
$18

Electric Motor
...electric motor
3docean
electric motor engine machine mover parts
3d model electric motor for hoist crane
turbosquid
$29

Motor
... available on turbo squid, the world's leading provider of digital 3d models for visualization, films, television, and games.
turbosquid
$5

Motor
... available on turbo squid, the world's leading provider of digital 3d models for visualization, films, television, and games.
3d_export
$5

electric motor
...electric motor
3dexport
electric motor use for industrial purposes
3d_export
$5

servo motor
...tor
3dexport
it's a simple part of servo motor 0.75kw for used in machines assembly to show specified motor in own project.
10
turbosquid
$25

10
... available on turbo squid, the world's leading provider of digital 3d models for visualization, films, television, and games.
turbosquid
$10

a-10
... available on turbo squid, the world's leading provider of digital 3d models for visualization, films, television, and games.
3ddd
$1

EX 10
...ex 10
3ddd
samsung , фотоаппарат
ex 10
3ddd
$1

Bed 10
...bed 10
3ddd
постельное белье
bed 10
evermotion
$25

Scene 10 Archinteriors vol. 10
...dering design interior
take a look at textured and shadered visualization scene ready to be rendered.. evermotion 3d models shop.
3ddd
$1

Curtains 10
...curtains 10
3ddd
curtains 10
3ds max 2011,fbx + textures
polys: 100355
3ddd
free

PLANTS 10
...plants 10
3ddd
цветок , горшок
plants 10,, with 3 different color planter boxes
turbosquid
$24

Chandelier MD 89310-10+10 Osgona
... chandelier md 89310-10+10 osgona for download as max and fbx on turbosquid: 3d models for games, architecture, videos. (1218762)
design_connected
$29

Nuvola 10
...nuvola 10
designconnected
gervasoni nuvola 10 computer generated 3d model. designed by navone, paola.
design_connected
$22

Kilt 10
...kilt 10
designconnected
zanotta kilt 10 computer generated 3d model. designed by progetti, emaf.
Scale
turbosquid
$20
Weight scale or Bathroom Scale
...ght scale or bathroom scale for download as max, fbx, and obj on turbosquid: 3d models for games, architecture, videos. (1664576)
turbosquid
$19

Scale
...e
turbosquid
royalty free 3d model scale for download as fbx on turbosquid: 3d models for games, architecture, videos. (1411722)
turbosquid
$5
Scales
...s
turbosquid
royalty free 3d model scales for download as ma on turbosquid: 3d models for games, architecture, videos. (1393439)
turbosquid
$40

Scale
... available on turbo squid, the world's leading provider of digital 3d models for visualization, films, television, and games.
turbosquid
$17

Scales
... available on turbo squid, the world's leading provider of digital 3d models for visualization, films, television, and games.
turbosquid
$12

Scale
... available on turbo squid, the world's leading provider of digital 3d models for visualization, films, television, and games.
turbosquid
free

Scale
... available on turbo squid, the world's leading provider of digital 3d models for visualization, films, television, and games.
3d_export
$7

of scales
...s have a flat point of support. the samples are rendered in the standard cinema 4d renderer. enjoy your use and creative success.
3d_export
$5
scale knob
...scale knob
3dexport
scale knob
3d_export
$20
cartoon weight scale or bathroom scale
...cartoon weight scale or bathroom scale
3dexport
texture size:512px number of texture:1 texture format: png
Working
3d_export
$5
WORKING PLATFORM
...working platform
3dexport
working platform 4000x3000x1500mm
design_connected
$16

Working set
...working set
designconnected
smallaccents working set computer generated 3d model.
3ddd
free

Pinao / Stelar Works
...pinao / stelar works
3ddd
stelar works , stellar works
стулья pinao от stelar works
design_connected
$13

Work Lamp
...work lamp
designconnected
design house stockholm work lamp computer generated 3d model. designed by form us with love.
turbosquid
$6

Road Works
...turbosquid
royalty free 3d model road works for download as on turbosquid: 3d models for games, architecture, videos. (1151328)
3ddd
free

Stellar Works Lumar
...llar works , lumar , барный
stellar works lumar
turbosquid
$20
Work boots
...bosquid
royalty free 3d model work boots for download as stl on turbosquid: 3d models for games, architecture, videos. (1313566)
turbosquid
$8
Desk Work
...osquid
royalty free 3d model desk work for download as blend on turbosquid: 3d models for games, architecture, videos. (1381338)
turbosquid
$5

Work Desk
...osquid
royalty free 3d model work desk for download as blend on turbosquid: 3d models for games, architecture, videos. (1435344)
turbosquid
$1

Plant for work
...uid
royalty free 3d model plant for work for download as obj on turbosquid: 3d models for games, architecture, videos. (1557514)
1
turbosquid
$69

armchairs(1)(1)
... available on turbo squid, the world's leading provider of digital 3d models for visualization, films, television, and games.
turbosquid
$15

ring 1+1
... available on turbo squid, the world's leading provider of digital 3d models for visualization, films, television, and games.
turbosquid
$10

chair(1)(1)
... available on turbo squid, the world's leading provider of digital 3d models for visualization, films, television, and games.
turbosquid
$8

Chair(1)(1)
... available on turbo squid, the world's leading provider of digital 3d models for visualization, films, television, and games.
turbosquid
$2

RING 1(1)
... available on turbo squid, the world's leading provider of digital 3d models for visualization, films, television, and games.
turbosquid
$1

house 1(1)
... available on turbo squid, the world's leading provider of digital 3d models for visualization, films, television, and games.
turbosquid
$1

Table 1(1)
... available on turbo squid, the world's leading provider of digital 3d models for visualization, films, television, and games.
turbosquid
$59

Formula 1(1)
...lty free 3d model formula 1 for download as max, fbx, and obj on turbosquid: 3d models for games, architecture, videos. (1567088)
design_connected
$11

No 1
...no 1
designconnected
sibast no 1 computer generated 3d model. designed by sibast, helge.
turbosquid
$2

desert house(1)(1)
...3d model desert house(1)(1) for download as 3ds, max, and obj on turbosquid: 3d models for games, architecture, videos. (1055095)