Thingiverse
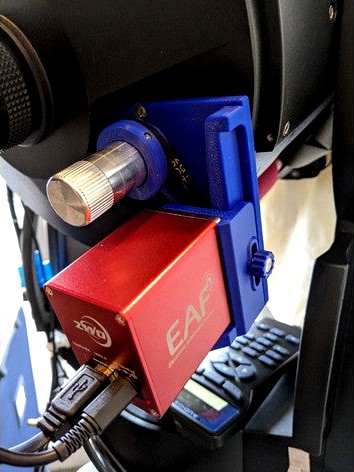
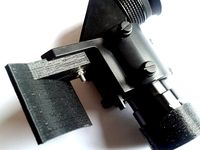
ZWO EAF Mounting Bracket for Meade LX90 8inch by TrevOinAus
by Thingiverse
Last crawled date: 3 years, 3 months ago
This is a remix of the ZWO EAF Holder for Celestron Nexstar 6/8/9 by jamesdedij (February 29, 2020) for the Celstron SCTs and I thank him for sharing the editable design files with me.
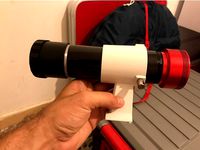
I have modified all of the parts in Fusion 360 to fit the geometry of the Meade LX90 8inch SCT and possibly other Meade SCTs depending on the Focus Knob used.
The EAF positioning allows adjustment and removal of the EAF for transport and avoids collision with the LX90 fork arms
It also makes it possible to remove the EAF quickly or to "disengage it" to perform manual focusing.
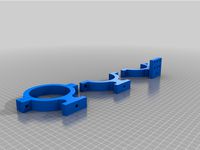
To improve the gearing between the EAF and the Focus knob, I have added a 32 tooth gear wheel to replace the 16 tooth Alloy gear wheel used initially. To accommodate the new larger gear wheel, a 158mm or 160mm loop belt should be used instead of the 140mm or 142mm belt used with the alloy gear.
I printed all parts in ABS to avoid warping in use, with 70% infill, layer height of 0.15mm. Only the Angled Motor Base may need supports. Recommended 3D print orientation is in the images.
Installation:
After testing for fit and alignment with the Hex Screws, Glue the M4 nuts into the recesses in the Angled Base Bracket
Set the Telescope Tube Horizontal to avoid parts moving when screws are removed.
Wind the Mirror to the rear of the Telescope (Clockwise) and back off half a turn anticlockwise.
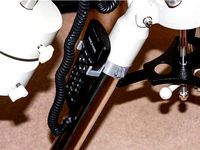
Carefully remove the three screws holding the Focus assembly to the telescope rear plate. (Image 1)
Mount the Angled Base Bracket to the telescope rear plate with the new 6-32 UNC 5/8inch screws. (Image 2)
The Focus Collar should be squarely and firmly pressed onto the Focus knob past the knurled finger grip. (It will be tight and it may be necessary to remove any irregularities from the inside of the Focus Collar for it to fit past the Knurled finger grip.)
Carefully rap about 1.5 turns of electrical tape around the base of the Focus Knob to take up the slack and centre to Focus Knob and Focus collar.
The Collar should be located on the focus knob, so that it is close to, but does not rub, on the Angled Base Bracket when the Focus knob is turned.
If the collar is too high on the Focus Knob, the top of it will foul against the chrome faceplate of the EAF during assembly for operation.
Tighten the Headless Screws firmly, so there is no movement between the knob and collar. (Image 3)
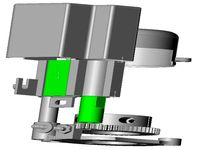
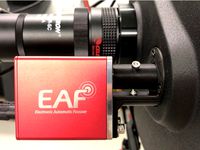
Mount the 16 or 32 teeth pulley on the EAF drive shaft so that the centre line of the pully teeth matches the centre line of the Focus collar teeth when assembled. You may need to try this a few times with the EAF not screwed to the Motor base before you tighten the headless screws firmly.
Fasten the EAF to the Angled Motor Base with the 2 CHC M4x12 screws
Glue the Knob-M4s onto the 2 hex screws M4x20. These are used to attach and adjust the Motor Base to the Angled Bracket.
Extra Parts:
GT2 pulley 16 teeth for 5mm axle (to fit on EAF drive shaft)
and
142 (or 140) mm GT2 Loop belt
or
3D Printed 32 teeth pulley for 5mm axle (to fit on EAF drive shaft)
and
158 or 160 mm GT2 Loop belt
3 x Cross Head or Hex 6-32 x 5/8inch) UNC Button Head screws (To secure Angled Base Bracket to LX90)
3 x M4x8 headless screws (From EAF Kit) (To secure Focus Collar to Focus Knob)
2 x CHC M4x12 screws (From EAF Kit) (To secure EAF to Angled Motor Base)
2 Hex M4x20 screws (For use with printed knobs to secure Motor Base to Bracket)
2 M4 nuts (Glued into Angled Base Bracket)
I have modified all of the parts in Fusion 360 to fit the geometry of the Meade LX90 8inch SCT and possibly other Meade SCTs depending on the Focus Knob used.
The EAF positioning allows adjustment and removal of the EAF for transport and avoids collision with the LX90 fork arms
It also makes it possible to remove the EAF quickly or to "disengage it" to perform manual focusing.
To improve the gearing between the EAF and the Focus knob, I have added a 32 tooth gear wheel to replace the 16 tooth Alloy gear wheel used initially. To accommodate the new larger gear wheel, a 158mm or 160mm loop belt should be used instead of the 140mm or 142mm belt used with the alloy gear.
I printed all parts in ABS to avoid warping in use, with 70% infill, layer height of 0.15mm. Only the Angled Motor Base may need supports. Recommended 3D print orientation is in the images.
Installation:
After testing for fit and alignment with the Hex Screws, Glue the M4 nuts into the recesses in the Angled Base Bracket
Set the Telescope Tube Horizontal to avoid parts moving when screws are removed.
Wind the Mirror to the rear of the Telescope (Clockwise) and back off half a turn anticlockwise.
Carefully remove the three screws holding the Focus assembly to the telescope rear plate. (Image 1)
Mount the Angled Base Bracket to the telescope rear plate with the new 6-32 UNC 5/8inch screws. (Image 2)
The Focus Collar should be squarely and firmly pressed onto the Focus knob past the knurled finger grip. (It will be tight and it may be necessary to remove any irregularities from the inside of the Focus Collar for it to fit past the Knurled finger grip.)
Carefully rap about 1.5 turns of electrical tape around the base of the Focus Knob to take up the slack and centre to Focus Knob and Focus collar.
The Collar should be located on the focus knob, so that it is close to, but does not rub, on the Angled Base Bracket when the Focus knob is turned.
If the collar is too high on the Focus Knob, the top of it will foul against the chrome faceplate of the EAF during assembly for operation.
Tighten the Headless Screws firmly, so there is no movement between the knob and collar. (Image 3)
Mount the 16 or 32 teeth pulley on the EAF drive shaft so that the centre line of the pully teeth matches the centre line of the Focus collar teeth when assembled. You may need to try this a few times with the EAF not screwed to the Motor base before you tighten the headless screws firmly.
Fasten the EAF to the Angled Motor Base with the 2 CHC M4x12 screws
Glue the Knob-M4s onto the 2 hex screws M4x20. These are used to attach and adjust the Motor Base to the Angled Bracket.
Extra Parts:
GT2 pulley 16 teeth for 5mm axle (to fit on EAF drive shaft)
and
142 (or 140) mm GT2 Loop belt
or
3D Printed 32 teeth pulley for 5mm axle (to fit on EAF drive shaft)
and
158 or 160 mm GT2 Loop belt
3 x Cross Head or Hex 6-32 x 5/8inch) UNC Button Head screws (To secure Angled Base Bracket to LX90)
3 x M4x8 headless screws (From EAF Kit) (To secure Focus Collar to Focus Knob)
2 x CHC M4x12 screws (From EAF Kit) (To secure EAF to Angled Motor Base)
2 Hex M4x20 screws (For use with printed knobs to secure Motor Base to Bracket)
2 M4 nuts (Glued into Angled Base Bracket)
Similar models
grabcad
free

GT2 Kit for autofocus Sky-Watcher Evoguide 50ED with ZWO EAF electronic focuser
...ith sky-watcher evoguide 50ed dedicated flattener. i suppose it can work with starizona flattener as is or with small adjustment.
thingiverse
free

ZWO EAF mount for William Optics RedCat 51 (SpaceCat) by domino89
...extra stability. it is optional. two m4 screws are probably enough.
bracket is secured to the telescope mount by two m3x45 bolts.
thingiverse
free
Focuser for my Meade LX90 Telescope
...he #1244 focuser for the etx-90 telescope, removed the stepper motor and circuit board to build a focuser that works for my lx90.
grabcad
free

ZWO EAF Motor bracket
...zwo eaf motor bracket
grabcad
zwo eaf electronic automatic focuser motor bracket
thingiverse
free

Dew Shield for ZWO EAF by Hackschnitzel
...dew shield for zwo eaf by hackschnitzel
thingiverse
dew shield for the zwo focus motor eaf
thingiverse
free

Samyang 135mm f/2.0 ED for astronomy with EAF by RomanHujer
... 16teeth/bore 5mm
4x m3x10mm imbus screew
4x self tapping screw 2x6
1x rj45 - pcb on easyeda
update
2021-01-01 add beld tensioner
thingiverse
free

ZWO EAF Adapter for GSO Linear Bearing Crayford Focuser by johnnyturpin
...ing the four screws of the focuser plate - remove the screws but keep holding the piece in place when screwing in the base-plate.
thingiverse
free

Telescope Dovetail Rail. iOptron to Meade 8inch SCT by toguan
...n instead of the standard. not a perfect solution, but better than the nothing that was had previously.
have a good day.
bill.
3dwarehouse
free

ZWO EAF Meade LX65 6 inch mount
...de lx65 6 inch mount
3dwarehouse
mount for attaching a zwo electric automatic focuser to a meade lx65 6' maksutov-cassegrain
grabcad
free

Tri-bahtinov mask for MEADE 10'' telescope
...tri-bahtinov mask for meade 10'' telescope
grabcad
tri-bahtinov mask for meade lx90 10" telescope.
Trevoinaus
thingiverse
free

Tape Dispenser Spindle by TrevOinAus
...sticky tape) dispenser.
this is the part that often gets lost or accidentally thrown away when the first spool of tape is emptied
thingiverse
free

LX200 ACF Stepper Motor Mounting Bracket by smitchelus
...design for the c8 (https://www.thingiverse.com/thing:4191869) i then started from trevoinaus#39;s design for the lx90 (https://www.thingiverse.com/thing:4592948) which needed to be...
Lx90
thingiverse
free
Focuser for my Meade LX90 Telescope
...he #1244 focuser for the etx-90 telescope, removed the stepper motor and circuit board to build a focuser that works for my lx90.
thingiverse
free

Meade Autostar holder for LXD75/LX90 mount by Nicolas_T
...meade autostar holder for lxd75/lx90 mount by nicolas_t
thingiverse
this holder is made for the 50mm tube of the lxd75 mount.
thingiverse
free
Remix of Meade Autostar holder for LXD75/LX90 mount by GeoDave
... added 1mm extra around the holes.
i used 2 - m3x16mm screws with locknuts & printed at 40% infill with esun silver pla pro.
thingiverse
free

Remix of JMI focuser Holder by tannenba
...m6 hammerhead t-nuts. remix of jmi microfocuser handbox meade lx90 tripod mount : 3192372 by zlatko84 i needed a...
thingiverse
free
LX200 ACF Stepper Motor Mounting Bracket by smitchelus
...(https://www.thingiverse.com/thing:4191869) i then started from trevoinaus's design for the lx90 (https://www.thingiverse.com/thing:4592948) which needed to be adjusted to work with...
thingiverse
free

Laser Holder by FChirico
...i cercatori. questo disegno è ottimizzato per un meade lx90 ma si fissa semplicemente con delle fettucce intorno al...
grabcad
free
Tri-bahtinov mask for MEADE 10'' telescope
...for meade 10'' telescope grabcad tri-bahtinov mask for meade lx90 10"...
3dwarehouse
free
Pioneer SUSANO High Definition Amplifier SC-LX90
...icepower аппарат обладает выдающимися способностями, которые позволяют реализовать общую выходную мощность 1400 вт на 10 каналов.
Eaf
3d_export
$120
Ch47 EAF Helicopter 3D Model
...licopter desert transport military heavy lift tandem rotoa textures materials
ch47 eaf helicopter 3d model tartino 38054 3dexport
thingiverse
free

EAF Mount for C5 by green_spider
...eaf mount for c5 by green_spider
thingiverse
simple bracket to mount the zwo eaf onto a celestron c5
thingiverse
free
Dew Shield for ZWO EAF by Hackschnitzel
...dew shield for zwo eaf by hackschnitzel
thingiverse
dew shield for the zwo focus motor eaf
thingiverse
free

Zwo EAF 3D Model by icimdengelen
...zwo eaf 3d model by icimdengelen
thingiverse
zwo eaf 3d model
i did it to develop accessories on it.
thingiverse
free

Skywatcher 150750 EAF rack by reticyte
... skywatcher 150750 eaf-compatible with my astroberry. inspired by astroberry focusor: https://github.com/rkaczorek/astroberry-diy
thingiverse
free

ZWO EAF RAP2,5 Mount by K_Bahr
...e zwo eaf on the ts optics 2.5" rap draw tube
additional material used:
grub screws,
t5/200 belt
two thin but strong springs
thingiverse
free

EAF adapter for ES127 FCD100 focuser
... telescope. it only uses the original locking screw from the focuser for attachment, and allows access to the adjustment screws.
thingiverse
free

ZWO EAF RAP2,5 Mount by K_Bahr
...rub screws (to attach the gears)
2 long screws e.g. (60mm x 4mm) or 4 grub screws to attach the cover
2 small but strong springs
thingiverse
free

EAF bracket for Explore Scientific 102 Telescope by skislalom1
... addition, it provides a hole for the optional temperature sensor and a slotted hole for a wire tie to hold excess wire in place.
thingiverse
free
ZWO EAF adapter for Celestron C9.25 by latunen
...own in slicer to get right dimensions.
this model doesn't fit to c8 of edgehd8 but i will make models for these scopes soon.
Zwo
3d_export
$10

gerb zwo rf
...gerb zwo rf
3dexport
emblem of the western military district of the russian federation
thingiverse
free
Finderscope to ZWO by Galvenize
...finderscope to zwo by galvenize
thingiverse
adapts a zwo to a skywatcher (and alike) stock finderscope
thingiverse
free

ZWO asi 120 mc by Maniaquera
...zwo asi 120 mc by maniaquera
thingiverse
scale model of the zwo camera.
thingiverse
free
Dew Shield for ZWO EAF by Hackschnitzel
...dew shield for zwo eaf by hackschnitzel
thingiverse
dew shield for the zwo focus motor eaf
thingiverse
free

Dovetail Camera ZWO ASI by dester
...dovetail camera zwo asi by dester
thingiverse
dovetail camera zwo asi without fan
thingiverse
free

ZWO ASI Nikon Adapter by andrea_carminati
...zwo asi nikon adapter by andrea_carminati
thingiverse
zwo asi nikon adapter with 1,25" filter
thingiverse
free

ZWO ASI 294 Pro support by Gh14Cc10
...294 pro support by gh14cc10
thingiverse
remix of the great swiss body support for zwo asi2600mc pro, modified for zwo asi294 pro
thingiverse
free

ZWO 2600MM Cable Support by tooth_dr
...zwo 2600mm cable support by tooth_dr
thingiverse
zwo 2600mc cable support updated with '2600mm' lettering.
thingiverse
free
Zwo EAF 3D Model by icimdengelen
...zwo eaf 3d model by icimdengelen
thingiverse
zwo eaf 3d model
i did it to develop accessories on it.
thingiverse
free
ZWO ASi 294MCPRO Halter Schelle_78mm by rabit9
...zwo asi 294mcpro halter schelle_78mm by rabit9
thingiverse
zwo asi 294mcprohalter schelle_78mm
8Inch
3d_export
$49

Samsung Galaxy Tab 3 8inch 3D Model
...droid droid ipad mobile cellular smartphone touchscreen touch screen
samsung galaxy tab 3 8inch 3d model humster3d 79975 3dexport
3d_export
$25

KHE TripleThreat BMX complete 3D Model
...threat pro 21inch, sanko crmo, midbbfork: cirrus, sanko crmohandlebar: 8inch anchor, sanko crmocrank: hindenburg, crmo, 2-pc, s/b,sprocket: ninja, 25tpedals:...
thingiverse
free

5mm to 3/8inch (9.525mm) coupler by Flytech81
...r by flytech81
thingiverse
this is meant for a 5mm stepper motor shaft to 3/8inch (9.525mm) threaded rod conversion. z - coupler
thingiverse
free

Tablet holder - Joyfar 8inches
...tablet holder - joyfar 8inches
thingiverse
allows to hold the tablet against a tubular ik*a lamp
needs two screws
thingiverse
free
knife sharpening for 20cm/8inch grinding machine by arturas123
...knife sharpening for 20cm/8inch grinding machine by arturas123
thingiverse
a support for sharpening knifes with grinding
thingiverse
free
Dobsonian 8Inch 3D Modeling by knoxxr
...1ea , 25cm/1m x 4
25cm bar length is different by primary mirror focus length
this modeling is need to least 20x20cm print stage.
thingiverse
free

SR Suntour FAA122 for 3/8inch Ratchet by Kaskadeur111
...suntour faa122 for 3/8inch ratchet by kaskadeur111
thingiverse
remix to fit a 3/8 inch ratchet. perfect fit no upscaling needed.
thingiverse
free
Telescope Dovetail Rail. iOptron to Meade 8inch SCT by toguan
...n instead of the standard. not a perfect solution, but better than the nothing that was had previously.
have a good day.
bill.
thingiverse
free

Beyma 8ag/n 8inch Protection Cover by sogidaned
...protection cover by sogidaned
thingiverse
protection cover for 8 inch loudspeaker.
two 6 mm x 215 mm stainless steel rods needed
thingiverse
free

Wide Backscratcher 3/8inch (9.5mm) rod by FuzzyMetal
... better scratch power to body curvature.
also the angle minimizes the edge tong from digging into your skin when slightly turned.
Meade
3ddd
$1

Телескоп Meade LX 200
...аботка материалов в 2014 г.
габариты: 845 х 2400 мм
аналогhttp://www.telescopeplanet.co.uk/meade-lx200-acf-gps/20168
turbosquid
free

Syd Mead Entertainment center Home
...yd mead entertainment center home for download as max and 3ds on turbosquid: 3d models for games, architecture, videos. (1523167)
3ddd
$1
Axel Occasional Table Belle Meade
...ble belle meade
•dimensions: 24d 22h
•features: acrylic base with satin brass hub
•starphire glass top with flat polished edge
3d_export
$200

Telescope 3D Model
...model 3dexport telescope telescop scop scope lunette glass astronomy meade space star stars galaxy observatory zoom optic detail detailed...
3d_export
$7

brooklyn museum
...tain its building and collection, only to be revitalized in the late 20th century, thanks to major renovations. source: wikipedia
unrealengine
$35

Mead Hall UE5
...mead hall ue5
unreal engine marketplace
mead hall. 44 unique assets + interior
thingiverse
free
Meade Eyepiece Cover by lanemaxwell
...meade eyepiece cover by lanemaxwell
thingiverse
eyepiece dust cap for meade etx telescopes
3dcadbrowser
free
MEADS
...e system.this 3d object can be downloaded in .max, .obj, .3ds, .fbx, .dxf, .lwo, .stl, .wrl, .ma, .dae, .x and .asc file formats.
thingiverse
free
Meade Spotting Scope Mount by RobertCL
...potting scope on the side of the meade etx125 scope body rather than using the standard mount point that tends to get in the way.
sketchfab
$10

Ornate Medieval Mead Tankard
...
polygons 3,602
vertices 3,600
textures png 4k - ornate medieval mead tankard - buy royalty free 3d model by getdeadentertainment
Bracket
archibase_planet
free

Bracket
...bracket
archibase planet
bracket corbel holder
bracket 1 - 3d model (*.gsm+*.3ds) for interior 3d visualization.
archibase_planet
free

Bracket
...bracket
archibase planet
bracket corbel console
bracket 5 - 3d model (*.gsm+*.3ds) for interior 3d visualization.
archibase_planet
free

Bracket
...bracket
archibase planet
corbel holder bracket
bracket 6 - 3d model (*.gsm+*.3ds) for interior 3d visualization.
archibase_planet
free

Bracket
...bracket
archibase planet
bracket corbel console
bracket 8 - 3d model (*.gsm+*.3ds) for interior 3d visualization.
archibase_planet
free

Bracket
...bracket
archibase planet
bracket corbel holder
bracket n280911 - 3d model (*.gsm+*.3ds) for interior 3d visualization.
archibase_planet
free

Bracket
...bracket
archibase planet
holder corbel bracket
bracket 9 - 3d model (*.gsm+*.3ds) for interior 3d visualization.
archibase_planet
free

Bracket
...bracket
archibase planet
corbel holder bracket
bracket 10 - 3d model (*.gsm+*.3ds) for interior 3d visualization.
archibase_planet
free

Bracket
...bracket
archibase planet
corbel console bracket
bracket 11 - 3d model (*.gsm+*.3ds) for interior 3d visualization.
archibase_planet
free

Bracket
...bracket
archibase planet
holder console bracket
bracket 12 - 3d model (*.gsm+*.3ds) for interior 3d visualization.
archibase_planet
free

Bracket
...bracket
archibase planet
bracket corbel holder
bracket 13 - 3d model (*.gsm+*.3ds) for interior 3d visualization.
Mounting
3d_export
free

mounting bracket
...mounting plate is the portion of a hinge that attaches to the wood. mounting plates can be used indoors, cabinetry and furniture.
turbosquid
$2

MOUNTING
... available on turbo squid, the world's leading provider of digital 3d models for visualization, films, television, and games.
turbosquid
free

Mounts
... available on turbo squid, the world's leading provider of digital 3d models for visualization, films, television, and games.
turbosquid
free

Mount Fuji
...fuji
turbosquid
free 3d model mount fuji for download as obj on turbosquid: 3d models for games, architecture, videos. (1579977)
3d_export
$5

Headphone mount LR
...headphone mount lr
3dexport
headphone mount l+r
turbosquid
$39

Mount rainier
...quid
royalty free 3d model mount rainier for download as fbx on turbosquid: 3d models for games, architecture, videos. (1492586)
turbosquid
$5

pipe mounting
...quid
royalty free 3d model pipe mounting for download as obj on turbosquid: 3d models for games, architecture, videos. (1293744)
turbosquid
$3

Mounting Tires
...uid
royalty free 3d model mounting tires for download as fbx on turbosquid: 3d models for games, architecture, videos. (1708511)
3d_export
$5

Magnetic GoPro Mount
...pro mount
3dexport
cool magnetic mount for gopro. allows you to mount the camera on flat metal surfaces and get exclusive shots.
turbosquid
$5

Stone Mount
...ty free 3d model stone mount for download as ma, obj, and fbx on turbosquid: 3d models for games, architecture, videos. (1370306)