Thingiverse

Z-endstop shim for Witbox + FlexPlate by buildtak
by Thingiverse
Last crawled date: 3 years ago
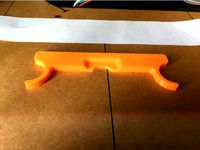
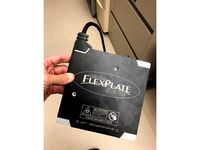
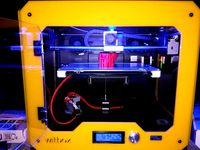
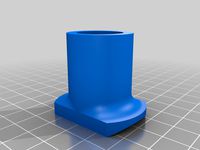
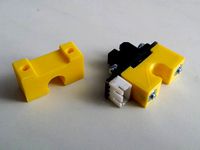
Before you install your new BuildTak FlexPlate System on your BQ Witbox, you'll need to install this shim so the bed can be leveled properly. The FlexPlate System adds about 3mm to your bed height; You'll need to compensate for this extra height by installing this shim, which adds 3mm of material to the area of the build plate frame which contacts the z-axis end stop. Without this shim, you may find that you cannot tighten your leveling screws enough to keep your nozzle from hitting the bed.
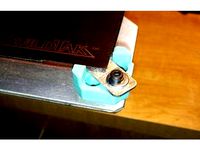
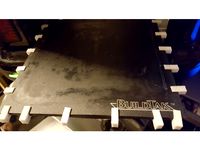
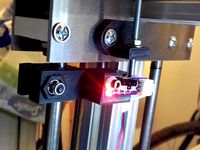
Before installing your FlexPlate, run the Witbox's "home axes" routine. As the bed rises up, notice the area on the bed's frame which contacts the z-endstop. (The z-endstop looks like a small black square with a metal arm, mounted near the top of the Witbox's back wall.)
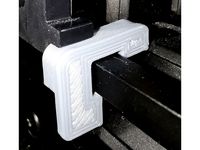
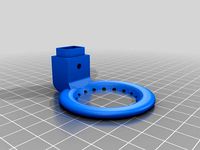
Once you've identified the area which contacts the z-endstop, it's time to install the shim. Raise the bed to about halfway up the z-axis so you can see the area of the bed's frame which contacts the z-endstop. Using adhesive or glue, mount this shim to the print bed's metal frame so that it will contact the z-endstop once the bed finishes rising. Home your axes again and watch to make sure the shim contacts the z-endstop. Now you're ready to install your new FlexPlate System!
Before installing your FlexPlate, run the Witbox's "home axes" routine. As the bed rises up, notice the area on the bed's frame which contacts the z-endstop. (The z-endstop looks like a small black square with a metal arm, mounted near the top of the Witbox's back wall.)
Once you've identified the area which contacts the z-endstop, it's time to install the shim. Raise the bed to about halfway up the z-axis so you can see the area of the bed's frame which contacts the z-endstop. Using adhesive or glue, mount this shim to the print bed's metal frame so that it will contact the z-endstop once the bed finishes rising. Home your axes again and watch to make sure the shim contacts the z-endstop. Now you're ready to install your new FlexPlate System!
Similar models
thingiverse
free

Klic N Print 3D Z-axis shim by raylo32
... bed... and be sure to install the shim before you install the glass or the extruder might be driven into it and break something.
thingiverse
free
3mm/5mm Z-Axis Shim for Flashforge Creator Pro Glass Bed by JoshuaShaw
... shim for flashforge creator pro glass bed by joshuashaw
thingiverse
3mm/5mm z-axis shim for flashforge creator pro glass bed
thingiverse
free
Lulzbot TAZ5 bed corner for BuildTak FlexPlate system by MarcElbichon
...tal ~ 12mm x 26mm, max 1,5mm thick.
these corners help to center the flexplate on the base.
use heat resitant filament, like abs.
thingiverse
free

Lulzbot Taz 4/5 Flexplate Mod by oozeBot
...l for maximum durability. i heat pressed the bolt into the plastic and used a touch of superglue to make certain they were solid.
thingiverse
free
Ender 3 Z Axis EndStop Lifter by Ricky_Lomax
...lifter by ricky_lomax
thingiverse
a small z axis endstop lifter for your ender 3, useful if you have installed a 4 mm glass bed.
thingiverse
free

3mm/5mm Z-Axis Shim for Flashforge Creator Pro Glass Bed by unfilterd
...bed from my local supplier, so i remixed it to come up with a 5mm version of my own. while i was at it, i also did a 3mm version.
thingiverse
free

Z-Axis end stop shim Ender 3 V2 by bwelch3800
...have no idea if it works on any other set up)
please comment to let me know if it works for you or if you have a different z-gap?
thingiverse
free

Z EndStop Regulator by twproject
.... it's my first scad so it's not perfert but it does the work :)
remember to rotate before print if you modify the scad
thingiverse
free
Vertex k8400 z-endstop extender by scottrlindsey
.../4 of the endstop extender away -- you the amount of extension you will need of course depends on the modification you are doing.
thingiverse
free

Second Z axis endstop handle for Anycubic i3 Mega by mjedlinski
...3 mega, you should follow this topic:https://www.lesimprimantes3d.fr/forum/topic/9051-double-endstop-axe-z-modification-officiel/
Flexplate
thingiverse
free

Hiprecy LEO Flexplate Backstop
...t the notches cut in it, the screws in the heater bed will be in the way. take them out and add this piece using the same screws.
thingiverse
free
Lulzbot TAZ5 bed corner for BuildTak FlexPlate system by MarcElbichon
...tal ~ 12mm x 26mm, max 1,5mm thick.
these corners help to center the flexplate on the base.
use heat resitant filament, like abs.
thingiverse
free

TEVO Tornado FlexPlate Compatible Screw Plate Upgrade by AlexSteele
...e included two new files that have been resized to fit the flexplate system on the tornado. these are named alex_fl and alex_fr.
thingiverse
free
Lulzbot Taz 4/5 Flexplate Mod by oozeBot
...l for maximum durability. i heat pressed the bolt into the plastic and used a touch of superglue to make certain they were solid.
thingiverse
free

Lulzbot TAZ5 FlexPlate Fingers by c4v3man
...eel free to edit.https://cad.onshape.com/documents/9e0532c3d225e722620cec28/w/0e964e0970054184f3061036/e/36fdd486d1217da31d71706e
thingiverse
free

Optical sensor spacer Bene4 Mono for flexplate by trohn_javolta
...bly works with others too)
you will need a bit longer m3 bolts and don't forget to relevel the printer after installing this.
thingiverse
free

Rostock Max v3 Low Profile Bed Clip for BuildTak FlexPlate by TimStough
...tightened.
be sure to print out of petg or, better yet, abs. it will be subjected to temperatures that pla will not put up with.
thingiverse
free
Creality Ender 2 Heated Bed Strain Relief For Buildtak Flexplate by goopyplastic
...tion.
on onshape:https://cad.onshape.com/documents/d56c1b8c1cd04fe76a0cc221/w/6943c30fd7095875ca74ae13/e/8a330e69ba6d5af5a22db41c
thingiverse
free

i3 Buildtak Flexplate System guide by TeachingTech
...curately. it is recommended to fit this before installing the adhesive magnetic base.
https://www.youtube.com/watch?v=5pvhswcyc-8
Buildtak
thingiverse
free

BuildTak Calendar Base 2017 by buildtak
... calendar base 2017 by buildtak
thingiverse
no supports necessary!
once printed simply insert the buildtak calendar we sent you!
thingiverse
free

Blade Holder for BuildTak Surface by MyMicrofactory
...blade holder for buildtak surface by mymicrofactory
thingiverse
blade holder for buildtak surface
thingiverse
free

BuildTak/File Holder by Infinite3Dsolutions
...rse
made to hold 8x8 buildtak sheets but can hold anysize!
print horizontal for fastest print time(pictured)
just screw in place
thingiverse
free

BuildTak Z limit switch spacer by jafaunce
...he additional thickness. it slides on & off easily and it only takes 5 min to print!
the chamfered edge goes toward the back.
thingiverse
free

BuildTak Spatula Wall Mount - Print Removal Tool Hanger by tonyyoungblood
...tula-print-removal-tool/sk/mhqjhz52
check out my other mounts and things here: https://www.thingiverse.com/tonyyoungblood/designs
thingiverse
free
Lulzbot TAZ5 bed corner for BuildTak FlexPlate system by MarcElbichon
...tal ~ 12mm x 26mm, max 1,5mm thick.
these corners help to center the flexplate on the base.
use heat resitant filament, like abs.
thingiverse
free

3D Printer Business Card Holder by buildtak
... card holder! just a little something fun for #3dprintingday.
print with dense supports to hold up the spool holder on the side.
thingiverse
free

CR SE-6 lowered heat bed for buildtak system by vikimake
...u'll need 11 of them.
i printed it in pla, but maybe reprint with smth. more heat resistent. so far pla didn't melt away.
thingiverse
free
i3 Buildtak Flexplate System guide by TeachingTech
...curately. it is recommended to fit this before installing the adhesive magnetic base.
https://www.youtube.com/watch?v=5pvhswcyc-8
thingiverse
free
Clip to hold buildtak to daVinci mini build plate by ShinyBlueThing
...lear both the enclosure and the machinery.
also a plain shorter clip in case you don't like the length of the back edge clip.
Witbox
thingiverse
free
Material support for Witbox by Hirudi3d
...material support for witbox by hirudi3d
thingiverse
material support for witbox
thingiverse
free

Foot for Witbox by BQEducacion
...printer to protect your desk in case you do not want to stack the printer.
just print four of them and fit them to your witbox!
thingiverse
free
Witbox Bed Platform by javisanz
...witbox bed platform by javisanz
thingiverse
witbox 1 bed plate.
thingiverse
free
witbox heat bed by enzz
...witbox heat bed by enzz
thingiverse
head bed for witbox bq
thingiverse
free
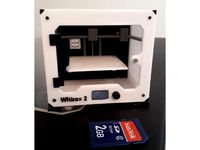
Mini witbox 2 by vidatox
...mini witbox 2 by vidatox
thingiverse
mini witbox 2
printed at 75%
thingiverse
free
Cooler for bq witbox by 3dmakerItalia
...cooler for bq witbox by 3dmakeritalia
thingiverse
cooler prusa i3 hephestos remixed for bq witbox
thingiverse
free

Filaflex filament holder for Witbox by Hirudi3d
...filaflex filament holder for witbox by hirudi3d
thingiverse
filaflex filament holder for witbox
thingiverse
free

Witbox FanGuard Sixagon by Liontek1985
...ek1985
thingiverse
this is a fanguard for the 40mm extruder-fan for the bq witbox
screwlessmount screws covereasy click instable
thingiverse
free

Witbox heat bed by PENBERIC
...witbox heat bed by penberic
thingiverse
piezas para adaptar una cama caliente de 30x20cm al cristal de una bq witbox
thingiverse
free

Filaflex Holder for Witbox by EduardoAlvarado
...aflex holder for witbox (basic version, with any brand on it).
original version: http://www.thingiverse.com/thing:333154/#files
Shim
3d_export
$5

Hockey puck 3D Model
...puck 3d model 3dexport hockey puck spacer washer disk shim hockey puck 3d model gizmo_fbi 28754...
3d_export
$44
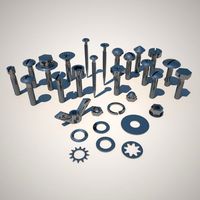
Bolts and screws 3D Model
...3d model 3dexport bolt nut screw detailed grover tool shim collection pack chrome bolts and screws 3d model download...
thingiverse
free
Tree Shim
...tree shim
thingiverse
i used this to shim my christmas tree because the trunk was too narrow for the stand.
thingiverse
free
Shims - Metric
...shims - metric
thingiverse
i made a set of 50x15mm metric shims, in the sizes 0,5-1-2-3-5mm.
thingiverse
free

Door Shim by ggglitch
...door shim by ggglitch
thingiverse
a shim for a door hinge.
thingiverse
free

shim for a pram by bscheshir
...shim for a pram by bscheshir
thingiverse
front-mount shim for hapich aviator
thingiverse
free

Crankbrothers cleat shim
...crankbrothers cleat shim
thingiverse
a shim for crankbrothers cleats. 1 mm thick
thingiverse
free

Closet Door Shim
...closet door shim
thingiverse
door shim for my dads closet doors.
thingiverse
free

Simple shimming bracket
...simple shimming bracket
thingiverse
these are a sample shimming backet in order to mount the table with the exacted height
thingiverse
free

Toilet shim by Johnny4
... used.
shove these under the toilet or whatever with the legs down, then cut it flush.
worked great for me, no need to buy shims.
Endstop
thingiverse
free
Endstop-holder for endstop v1.2 by albiuz
...endstop-holder for endstop v1.2 by albiuz
thingiverse
endstop-holder designed for mech endstop v1.2
thingiverse
free
Endstop by 3dboxpro
...endstop by 3dboxpro
thingiverse
endstop
thingiverse
free

Endstop by 1sPiRe
...endstop by 1spire
thingiverse
endstop model for conceptions
thingiverse
free

Endstop holder for Opto or Mechanical endstops by LulzBot
... endstops by lulzbot
thingiverse
these are the standard 1.0 prusa endstops with an added mounting hole for mechanical endstops.
thingiverse
free

Endstop Holder by onurhamdiuzun
...endstop holder by onurhamdiuzun
thingiverse
endstop holder for makerbot endstop and other endstops
thingiverse
free

Endstop Cover
...endstop cover
thingiverse
cover for endstop boards for makerbot design.
thingiverse
free
Endstop Mount for optical Endstops by Whitehawk2000
...whitehawk2000
thingiverse
use two 20mm m3 screws and nuts to screw the endstop onto the mount and just clip it onto the 8mm rod.
thingiverse
free

C-beam endstop mount for Makerbot type endstops
...c-beam endstop mount for makerbot type endstops
thingiverse
c-beam endstop mount for makerbot type endstop boards.
thingiverse
free

Endstop Mount for MakerBot Mecanical Endstop. by nka
...v-slots carriage.
endstop is screw with m3 (8mm) tapped hole and the endstop hold on the extrusion using a m5 (8mm) and t-nuts.
thingiverse
free
ENDSTOP 10mm by desert500
...endstop 10mm by desert500
thingiverse
endstop
Z
3d_export
$5

nissan z
...nissan z
3dexport
nissan z
3ddd
$1

Vase Z
...vase z
3ddd
vase z
3ddd
$1

полотенцесушить Z
...полотенцесушить z
3ddd
полотенцесушитель
полотенцесушить z
design_connected
free

Z-Chair
...z-chair
designconnected
free 3d model of z-chair designed by karman, aleksei.
design_connected
$11

Z Lamp
...z lamp
designconnected
phillips z lamp computer generated 3d model. designed by kalff, louis.
3d_export
$5

Dragon balls z
...dragon balls z
3dexport
dragon ball z
turbosquid
$20

Fighter Z
...
turbosquid
royalty free 3d model fighter z for download as on turbosquid: 3d models for games, architecture, videos. (1292563)
turbosquid
$9

Pen Z
...pen z
turbosquid
free 3d model pen z for download as obj on turbosquid: 3d models for games, architecture, videos. (1686775)
turbosquid
free

z chair
...z chair
turbosquid
free 3d model z chair for download as max on turbosquid: 3d models for games, architecture, videos. (1410230)
turbosquid
$5

Letter Z
...urbosquid
royalty free 3d model letter z for download as max on turbosquid: 3d models for games, architecture, videos. (1408540)