Thingiverse
Z-Axis_synchronisation system: A8_ by tinker3dmodel
by Thingiverse
Last crawled date: 4 years, 11 months ago
Hi 'thingy people'....
I have reviewed as many as possible of the Z synch & anti-wobble systems for any 3D printer on 'thingiverse'.
They all looked very good but some for me, were too complicated, so I have adapted, changed, remixed, to a system I feel works for me; I hope you fell the same?
The Anti-wobble Top Plates I have adapted from https://www.thingiverse.com/thing:2288314 thanks to 'SmallArtFly'
A GT2 Smooth Idler pulley https://www.thingiverse.com/thing:2618509 thanks '3D_PP'
The 'synchronisation system' I have designed is specifically for the Anet A8, I am sure that this could be modified for other printers.
I do not use a LCD2004 Controller, I use a 12864 LCD Controller so have no use for the button holes.
Extras you may need...
2 x 698ZZ 8mm x 19mm x 6mm Bearing
1 x GT2 Closed Timing Belt 6mm Wide 2mm Pitch: Length & Tooth; L 800mm; T 400. (from Ebay)
2 x GT2 Timing Belt Pulley: 20 Teeth - Bore 8mm (from Amazon) or Print your own
2 x m3 x 30mm set screw
1 x m3 x 18mm set screw
2 x m3 nyloc nut - 2 x m3 washers
1 x m3 nut + washer
2 x 683 ZZ miniature bearings (optional) (from Ebay) + washers
Fitting process...
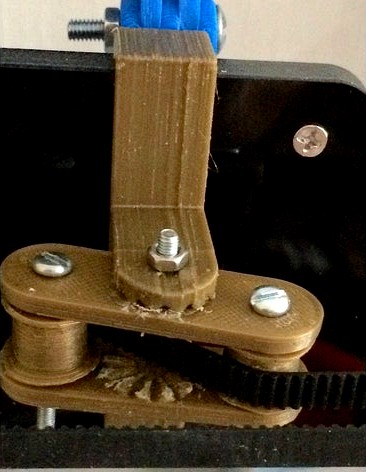
1 Print anti-wobble 'top-plate brackets' (may need a little 'fettling') and fit 698ZZ bearings
2 Put GT2 drive pulley on to Z drive lead screws (grub screws down)
3 Place GT2 drive loop belt over both Z lead screws
4 Refit L & R top corners of your printer frame
5 Slide the anti-wobble assembly up, screw in place with the 'tear-drop' cover
6 Slide GT2 drive pulley up to the bearing, tighten both grub screws
7 Place looped drive belt across Z drive GT2 pulleys
I have reviewed as many as possible of the Z synch & anti-wobble systems for any 3D printer on 'thingiverse'.
They all looked very good but some for me, were too complicated, so I have adapted, changed, remixed, to a system I feel works for me; I hope you fell the same?
The Anti-wobble Top Plates I have adapted from https://www.thingiverse.com/thing:2288314 thanks to 'SmallArtFly'
A GT2 Smooth Idler pulley https://www.thingiverse.com/thing:2618509 thanks '3D_PP'
The 'synchronisation system' I have designed is specifically for the Anet A8, I am sure that this could be modified for other printers.
I do not use a LCD2004 Controller, I use a 12864 LCD Controller so have no use for the button holes.
Extras you may need...
2 x 698ZZ 8mm x 19mm x 6mm Bearing
1 x GT2 Closed Timing Belt 6mm Wide 2mm Pitch: Length & Tooth; L 800mm; T 400. (from Ebay)
2 x GT2 Timing Belt Pulley: 20 Teeth - Bore 8mm (from Amazon) or Print your own
2 x m3 x 30mm set screw
1 x m3 x 18mm set screw
2 x m3 nyloc nut - 2 x m3 washers
1 x m3 nut + washer
2 x 683 ZZ miniature bearings (optional) (from Ebay) + washers
Fitting process...
1 Print anti-wobble 'top-plate brackets' (may need a little 'fettling') and fit 698ZZ bearings
2 Put GT2 drive pulley on to Z drive lead screws (grub screws down)
3 Place GT2 drive loop belt over both Z lead screws
4 Refit L & R top corners of your printer frame
5 Slide the anti-wobble assembly up, screw in place with the 'tear-drop' cover
6 Slide GT2 drive pulley up to the bearing, tighten both grub screws
7 Place looped drive belt across Z drive GT2 pulleys