Thingiverse

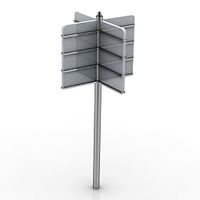
Z Axis Guide by Heathmang
by Thingiverse
Last crawled date: 3 years, 1 month ago
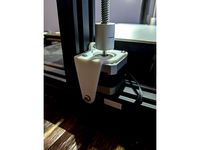
I didn't have a lot of luck with the cantilever Z axis on the D-Bot printer. Here is a design that positions the guide wheels between the side supports and has a wider spread on them. The installation only requires that the beam be square to the upright and a slight amount of pressure against the supports by all four wheels.
This setup is rock solid and the stepper motor now mounts in the middle of the support. There is also a spacer included for this setup so that the stepper and lead nut mount in the same plane. You will need 5Mx16 screws to attach the spacer and the nut holder.
Be careful not to overtighten the bolts that capture the wheels. Only a small amount of pressure is needed to keep the inner race from turning.
I haven't worked out the homing switch because I'm using a sensor.
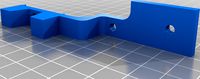
The end supports use the cantilever arms. Two new pieces will be needed across the ends to support the bed. If the stepper cross mount from the bottom is used as one of them then only one is needed. A person might be able to just use 4 stubs for bed mounting. If you saved your scraps from the original build, this can be done using the original back support and the longest scrap.
Lastly....there is no adjuster tor the wheel pressure. I am tossing ideas around in my head and may come up with something, I'm trying not to come up with something that would cause a reprint. I HATE REPRINTS!!!! Hence, the stepper nut spacer.
Update 11/2/17 You will lose about 16 mm of y axis using this arrangement. I'm working on a fix for that but in the meantime I'm using a spacer behind my bed mount to recapture part of it.
Update 11/08/17: I took a different approach with this addition. Use one of each of the new items on a side. One piece has a cap that will rest against the bean while the other is open and can be moved to adjust the wheel pressure. My plans were to try spring loading that piece but I don't think they will move easily enough. Not giving up though. Adjusters are coming!!!
This setup is rock solid and the stepper motor now mounts in the middle of the support. There is also a spacer included for this setup so that the stepper and lead nut mount in the same plane. You will need 5Mx16 screws to attach the spacer and the nut holder.
Be careful not to overtighten the bolts that capture the wheels. Only a small amount of pressure is needed to keep the inner race from turning.
I haven't worked out the homing switch because I'm using a sensor.
The end supports use the cantilever arms. Two new pieces will be needed across the ends to support the bed. If the stepper cross mount from the bottom is used as one of them then only one is needed. A person might be able to just use 4 stubs for bed mounting. If you saved your scraps from the original build, this can be done using the original back support and the longest scrap.
Lastly....there is no adjuster tor the wheel pressure. I am tossing ideas around in my head and may come up with something, I'm trying not to come up with something that would cause a reprint. I HATE REPRINTS!!!! Hence, the stepper nut spacer.
Update 11/2/17 You will lose about 16 mm of y axis using this arrangement. I'm working on a fix for that but in the meantime I'm using a spacer behind my bed mount to recapture part of it.
Update 11/08/17: I took a different approach with this addition. Use one of each of the new items on a side. One piece has a cap that will rest against the bean while the other is open and can be moved to adjust the wheel pressure. My plans were to try spring loading that piece but I don't think they will move easily enough. Not giving up though. Adjusters are coming!!!
Similar models
thingiverse
free

D-Bot 3 Wheel Guide by Heathmang
... nuts. i may add a more convenient adjustment method in the future but for now, it works. this also works on the print carriage.
thingiverse
free

Adjustable Bed Supports by Vlerherg
...unt to 2020 extrusion with standard m5 bolt and v-slot nut, using an m3 nut in the wheel and an m3 bolt coming down from the bed.
thingiverse
free

Ender 3 Z-Axis Support with Offset
...build my own.
a bearing 608 is needed, no screws, just slide it in.
used stepper mount: https://www.thingiverse.com/thing:2752080
thingiverse
free

Tevo Tarantula Y-Axis Print Bed Spacer (No more wobble) by carbochip
...inst the aluminum extrusion.
just replace the bed spacer with the printed part. printed with pla to make it as stiff as possible.
thingiverse
free

Ender3 Z axis lead screw plate replacement
...the one i'm using is from https://www.thingiverse.com/thing:2684832, but anything similar should work. update - two variants of the main...
thingiverse
free

TTpro adjustable Z stepper mount
...o allow the steppers position to be adjusted. works perfect! print in the orientation it comes and there is no need for supports.
thingiverse
free
Ortur laser master 2 dragchain mounts by Jaytjuh575
...o of those.
i know it's a confusing mess, but i hope everything is clear! show me your builds if you decide to use my design!
thingiverse
free

Filament guide by Realsville
... only.
works with spool holder:https://www.thingiverse.com/thing:4692031
print:
2-wheel halves.
1-line guide
2-shims
1-nut
1-bolt
thingiverse
free
Sovol SV01 Adjustable Z Axis Stepper Mount by shagbag913
... used digital calipers to make everything as lined up as possible, then tightened everything down (including the lead screw nut).
thingiverse
free

My D-Bot's Z-axis Setup by 1sPiRe
...ng)
-and you can level the back and the front of the bed by adjusting the wheels pressures.
part of my d-bot upgrades collection.
Heathmang
thingiverse
free

AR2 Robot Remix by Heathmang
...t is now printed with it.
it will require some modest supports but i find it prints quite well standing on the main bearing hub.
thingiverse
free

Parameterized Corner Lead Nut Mount by Heathmang
...ne side or the other. good luck!
update 12/7: added v slot profile to the back sides for positioning. can be turned on or off.
thingiverse
free
D-Bot 3 Wheel Guide by Heathmang
... nuts. i may add a more convenient adjustment method in the future but for now, it works. this also works on the print carriage.
thingiverse
free

Not Just another Fully Parameterized Cable Track by Heathmang
...e 16x20x24link but am having trouble with it.
11/28/2017 uploaded 2 new connectors. code to follow as soon as i can clean it up
Guide
turbosquid
$15
Guide drawer
...squid
royalty free 3d model guide drawer for download as dwg on turbosquid: 3d models for games, architecture, videos. (1261387)
turbosquid
$1
Road Guide
... available on turbo squid, the world's leading provider of digital 3d models for visualization, films, television, and games.
archive3d
free
Guide-board 3D Model
...ion sign guide sign
guide-board n170112 - 3d model (*.gsm+*.3ds) for exterior 3d visualization.
turbosquid
$2

soap cutter guide
...
royalty free 3d model soap cutter guide for download as stl on turbosquid: 3d models for games, architecture, videos. (1694030)
turbosquid
$15

Blind Guiding tiles
...free 3d model blind guiding tiles for download as 3dm and dae on turbosquid: 3d models for games, architecture, videos. (1156598)
turbosquid
$69

Japanese Tour Guide
...d model japanese tour guide for download as max, fbx, and obj on turbosquid: 3d models for games, architecture, videos. (1614288)
turbosquid
$10
CNC Linear Guide
... available on turbo squid, the world's leading provider of digital 3d models for visualization, films, television, and games.
turbosquid
$1

Tank Model Guide
... available on turbo squid, the world's leading provider of digital 3d models for visualization, films, television, and games.
turbosquid
$1
Road Guide 2
... available on turbo squid, the world's leading provider of digital 3d models for visualization, films, television, and games.
3d_ocean
$9

Guide Books 3
...sformed separately and each have unique texture map on front and back cover. to make your work easier this model comes in thre...
Axis
3ddd
$1

Мария Axis
...
3ddd
кухня , классическая , axis
модель кухни.
3d_export
$22

Axis robot 6-axis robotic arm
...ing parts drawings, standard parts purchased parts list, can be produced directly according to the drawings, welcome to download!
3ddd
free

Versatile Axis
...ddd
nexus , плитка
http://bvtileandstone.com/ceramic-porcelain/versatile-axis/
3d_export
$19

robot 2 axis
...robot 2 axis
3dexport
robot 2 axis
turbosquid
$40

Axis R5F
... available on turbo squid, the world's leading provider of digital 3d models for visualization, films, television, and games.
turbosquid
$40

Axis S5F
... available on turbo squid, the world's leading provider of digital 3d models for visualization, films, television, and games.
turbosquid
$30

Axis Athlon
... available on turbo squid, the world's leading provider of digital 3d models for visualization, films, television, and games.
turbosquid
$10

Linear Axis
... available on turbo squid, the world's leading provider of digital 3d models for visualization, films, television, and games.
3d_export
$15

drawing axis
...drawing axis
3dexport
simple rendering of the scene file
3ddd
$1

versatile axis ARC
...versatile axis arc
3ddd
versatile , плитка
versatile axis arc red dot design award
Z
3d_export
$5

nissan z
...nissan z
3dexport
nissan z
3ddd
$1

Vase Z
...vase z
3ddd
vase z
3ddd
$1

полотенцесушить Z
...полотенцесушить z
3ddd
полотенцесушитель
полотенцесушить z
design_connected
free

Z-Chair
...z-chair
designconnected
free 3d model of z-chair designed by karman, aleksei.
design_connected
$11

Z Lamp
...z lamp
designconnected
phillips z lamp computer generated 3d model. designed by kalff, louis.
3d_export
$5

Dragon balls z
...dragon balls z
3dexport
dragon ball z
turbosquid
$20

Fighter Z
...
turbosquid
royalty free 3d model fighter z for download as on turbosquid: 3d models for games, architecture, videos. (1292563)
turbosquid
$9

Pen Z
...pen z
turbosquid
free 3d model pen z for download as obj on turbosquid: 3d models for games, architecture, videos. (1686775)
turbosquid
free

z chair
...z chair
turbosquid
free 3d model z chair for download as max on turbosquid: 3d models for games, architecture, videos. (1410230)
turbosquid
$5

Letter Z
...urbosquid
royalty free 3d model letter z for download as max on turbosquid: 3d models for games, architecture, videos. (1408540)