Thingiverse

(Yet another) Rear electronics case for Ender 3 Pro by TkrBox
by Thingiverse
Last crawled date: 3 years ago
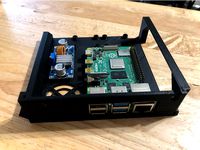
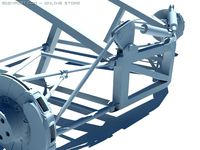
Here's my (yet another) rear electronics case for Ender 3 pro.
It moves the mainboard to the hollow on the backside under the heating bed, freeing the front space. Also, if you're an Octoprint user, you can use the 'left case' to accommodate the Raspberry Pi board and DC converter.
This is a remix from Teaching Tech's "Ender 3 all in one, universal rear electronics case," which can be found here: https://www.thingiverse.com/thing:3688967
I want to properly attribute Teaching Tech as the origin of this remix, however, the web editor is not functioning well at this time. Hence, I've added the lines above. I recommend all viewers to visit, study and familiarize with the above original project before using my remix.
This edition is designed for stock mainboard & Raspberry Pi 4b. Will suit other boards with same physical dimensions, such as Bigtreetech's.
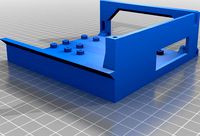
My design has:
Enclosed box structure with thicker walls and lids for sturdiness
Enlarged cable outlets for easier installation
Rail guides on sides and back, which are detachable to minimize the need for supports
Lids with mating slots on the back to ensure a better fit
Fan mounts and air inlets on both cases.
Printing :
8 copies of the rail guides are needed. Multiply them in your slicer. Also, rotate 90 deg so that round side faces down.
RPi ports cover is provided as an option. Print and use it when needed.
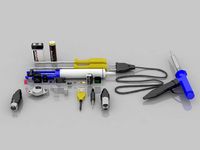
Fasteners etc:
Variety of M3 and M2.5 fasteners are used. When possible, I used threaded inserts to mate with the bolts.
Complete list of parts is in the attached PDF file.
Acknowledgement :
This project, like many other DIY projects, requires basic skills in electronic work. Please take all reasonable measures regarding electric safety. Power supply must be turned off and unplugged. Get familiarize with the electronic components and connector mechanisms before setting on to work.
Please take it slow and enjoy the process and the learning down the road. Happy tinkering!
Please visit my YouTube channel:https://www.youtube.com/channel/UCCfZqDkK8B-hgNsQs2-u3Zg
It moves the mainboard to the hollow on the backside under the heating bed, freeing the front space. Also, if you're an Octoprint user, you can use the 'left case' to accommodate the Raspberry Pi board and DC converter.
This is a remix from Teaching Tech's "Ender 3 all in one, universal rear electronics case," which can be found here: https://www.thingiverse.com/thing:3688967
I want to properly attribute Teaching Tech as the origin of this remix, however, the web editor is not functioning well at this time. Hence, I've added the lines above. I recommend all viewers to visit, study and familiarize with the above original project before using my remix.
This edition is designed for stock mainboard & Raspberry Pi 4b. Will suit other boards with same physical dimensions, such as Bigtreetech's.
My design has:
Enclosed box structure with thicker walls and lids for sturdiness
Enlarged cable outlets for easier installation
Rail guides on sides and back, which are detachable to minimize the need for supports
Lids with mating slots on the back to ensure a better fit
Fan mounts and air inlets on both cases.
Printing :
8 copies of the rail guides are needed. Multiply them in your slicer. Also, rotate 90 deg so that round side faces down.
RPi ports cover is provided as an option. Print and use it when needed.
Fasteners etc:
Variety of M3 and M2.5 fasteners are used. When possible, I used threaded inserts to mate with the bolts.
Complete list of parts is in the attached PDF file.
Acknowledgement :
This project, like many other DIY projects, requires basic skills in electronic work. Please take all reasonable measures regarding electric safety. Power supply must be turned off and unplugged. Get familiarize with the electronic components and connector mechanisms before setting on to work.
Please take it slow and enjoy the process and the learning down the road. Happy tinkering!
Please visit my YouTube channel:https://www.youtube.com/channel/UCCfZqDkK8B-hgNsQs2-u3Zg
Similar models
thingiverse
free

Raspberry pi 3 case with Ender 3 mount by Kevlarr
... mount by kevlarr
thingiverse
remixed the lid for diodepress's snap fit raspberry pi 3 case to include a ender 3 rail mount
thingiverse
free

Ender 3 Pro Original Mainboard & Raspberry Pi 4 Case
... updated the part for the original mainboard to fit all types of mini usb cables. my friend noticed some thicker plugs didnt fit.
thingiverse
free

Ender 3 Raspberry Pi on Rails by soonerjim
...y pi on rails by soonerjim
thingiverse
ender 3 raspberry pi mounting case, no hardware top mount.
this is my first remix/design.
thingiverse
free

Rear mounted case for Ender 3 Pro with 3DFused Linear Rail Y-axis by itstangl
...e easily printed on almost any 3d printer.
for the connection between the two bottom parts i used m3x20 bots and for the lid m3x4
thingiverse
free

Ender 3 All-in-one electronics case - Raspberry Pi 3A+ ReMix
...ix
thingiverse
remix of teachingtech's ender 3 all-in-one electronics mount (left side) to accommodate the raspberry pi 3a+.
thingiverse
free

Ender 3 Rear Venting Mainboard Fan Guard by gknapp
...se you use that space (e.g. to house a raspberry pi).
recommend using tree supports and enabling ironing in your slicer software.
thingiverse
free
Ender 3 all in one rear case - XL 4015 Buck for Pi 4 by rynfox13
...ut the case, i strongly encourage you to check out teaching tech's video on youtube and the original download (linked above).
thingiverse
free

Raspberry PI 4 Case for Ender 3 v2 Rail Mount by BurnoutIverse
...y pictures i've used as top: top_mesh_sm_fan30_screws from the original.
printed flat with supports only touching buildplate.
thingiverse
free
Taller rear electronics case Ender 3Pro by MakeItSlow
...ting to sag a little bit. the gap in the pi also allow for a csi cable for my pi camera to route toward the front of the printer.
thingiverse
free

80mm fan shroud lid for TeachingTech Pi/Ender 3 electronics box
... 10 allen socket screws to fix the fan to the lid, the screws need to be inserted from the inside, with the bolts on the outside.

Ender
3ddd
$1

Enders / Elegance
...enders / elegance
3ddd
обогреватель
уличный газовый обогреватель enders elegance
высота: 2200 мм
3d_export
free

ender 3 frame cavity covers
... of the creality ender 3 - makes it look a bit more attractive it just slides into the open channels of the aluminium framework
turbosquid
$1

pen support for ender 3
...y free 3d model pen support for ender 3 for download as blend on turbosquid: 3d models for games, architecture, videos. (1611282)
3d_ocean
$9

Ender Dragon Minecraft
...ojang obj poly videogames
ender dragon minecraft created with cinema 4d r15 formats included: max 2013 – fbx 2012 – c4d r15 – obj
3d_export
free

Creality ender enclosure webcam mount
...e creality enclosure. sure is better than a tripod. change it up if it helps. i printed pla with 50% infill on my dd ender 3 pro.
3d_export
free

ender 3 enclosure corners
...er corners and 4 upper corners, using 25mmx25mm angled aluminium pieces that gets covered on inside of the frame with plexiglass
3d_export
free

ender 3 3d print bed clips
...ed + normal aluminium bed frame of the creality ender 3 = 6mm (b) these clips are designed for glass plate + aluminium bed = 4mm
3d_export
$5

GRUMPY CAT
...grumpy cat 3dexport grumpy cat to print in ender ...
3d_export
$5

Logs fire
...with one multi material for corona and vray r ender. albedo, normal, uvmap, roughness format jpg 4096x4096 models:...
3d_export
$42

excavator
...is the original size. 0.12 mm printing surface creality ender5 ...
Rear
3d_export
$48
engine case rear
...re efficient as it eliminates the need for the propeller shaft while the differential merges with the transmission to save space.
turbosquid
$39
rear rim
... available on turbo squid, the world's leading provider of digital 3d models for visualization, films, television, and games.
3d_export
$5
Rear Suspension 3D Model
... suspension 3d model
3dexport
rear suspension spring sport car disc brake chasis
rear suspension 3d model bayazoff 30675 3dexport
turbosquid
$20

Rear sport wheel
...del rear sport wheel for download as ige, obj, stl, and sldas on turbosquid: 3d models for games, architecture, videos. (1227527)
turbosquid
$99
Rear tyre set
... available on turbo squid, the world's leading provider of digital 3d models for visualization, films, television, and games.
turbosquid
$49
Wet Rear tyre
... available on turbo squid, the world's leading provider of digital 3d models for visualization, films, television, and games.
turbosquid
$49
Hard rear tyre
... available on turbo squid, the world's leading provider of digital 3d models for visualization, films, television, and games.
turbosquid
$49
Medium Rear tyre
... available on turbo squid, the world's leading provider of digital 3d models for visualization, films, television, and games.
turbosquid
$49

Supersoft Rear tyre
... available on turbo squid, the world's leading provider of digital 3d models for visualization, films, television, and games.
turbosquid
$39
tractor rim rear
... available on turbo squid, the world's leading provider of digital 3d models for visualization, films, television, and games.
Electronics
turbosquid
$1

electron
...urbosquid
royalty free 3d model electron for download as max on turbosquid: 3d models for games, architecture, videos. (1157488)
turbosquid
$50

electronic
...
royalty free 3d model electronic for download as max and obj on turbosquid: 3d models for games, architecture, videos. (1289427)
turbosquid
$40

Electron
... available on turbo squid, the world's leading provider of digital 3d models for visualization, films, television, and games.
3d_ocean
$8
Electronic game
...electronic game
3docean
electronic games nu pogody wait a minute well
electronic game “well, wait a minute”, “nu pogody”
3ddd
$1
Brilux Electronic
...brilux electronic
3ddd
подвес. brilux electronic. польша. материалы настроены.
3d_export
free

electronic shop
...lectronic shop with high quality interior and exterior. it has tvs smartphone play station printer and many more electronic item.
3ddd
$1

Термостаты OJ Electronics
...ермостаты oj electronics
3ddd
oj electronics , термостат
термостаты фирмы oj electronics
3d_export
$8

electron 714
...electron 714
3dexport
game ready model for export to unreal engine soviet tv electron 714 pbr 4k
3ddd
$1

Термостат OJ Electronics
... oj electronics
3ddd
oj electronics , термостат
термостат occ2-1991 фирмы oj electronics
turbosquid
$60
Electronics Stuff
...
royalty free 3d model electronics stuff for download as max on turbosquid: 3d models for games, architecture, videos. (1624680)
Another
turbosquid
$15
ANOTHER BATHROOM
...quid
royalty free 3d model another bathroom for download as on turbosquid: 3d models for games, architecture, videos. (1171460)
turbosquid
$24

Another World
... available on turbo squid, the world's leading provider of digital 3d models for visualization, films, television, and games.
turbosquid
$39
Another Red Curb
...ee 3d model another red curb for download as ma, obj, and fbx on turbosquid: 3d models for games, architecture, videos. (1182913)
turbosquid
$9
Another Deberenn Sofa
...model another deberenn sofa for download as max, obj, and fbx on turbosquid: 3d models for games, architecture, videos. (1497850)
turbosquid
$2
Another picnic table
... model another picnic table for download as max, obj, and fbx on turbosquid: 3d models for games, architecture, videos. (1426381)
turbosquid
$15

door to another world
...oor to another world for download as 3ds, obj, fbx, and blend on turbosquid: 3d models for games, architecture, videos. (1334842)
3d_export
free

another hacksaw
...another hacksaw
3dexport
. . . 3d model of a hacksaw. 3d model files: - 3ds max 2017 (scanline) - obj (low poly) . . .
turbosquid
$12
Another Country Side Table
... another country side table for download as max, obj, and fbx on turbosquid: 3d models for games, architecture, videos. (1496053)
turbosquid
$29
Furniture - "Another country" modern sofa
...another country" modern sofa for download as obj and c4d on turbosquid: 3d models for games, architecture, videos. (1186189)
3d_ocean
$29

Another Tron Light Cycle with the Rider and Trail
...ther tron light cycle with the rider and the light trail. high quality 3d model,all the materials and lights are included. the...
Pro
turbosquid
$29

Pro
...ree 3d model mac pro for download as obj, c4d, fbx, and blend on turbosquid: 3d models for games, architecture, videos. (1505782)
turbosquid
$15

Apple Mac Pro and Pro Display
...ee 3d model apple mac pro and pro display for download as max on turbosquid: 3d models for games, architecture, videos. (1417078)
3d_export
$5

iphone 13 pro max and pro
...3 pro max and 13 pro the model is made in four colors (graphite, gold, silver, and blue), all of which are attached in the files.
3d_export
free

sapphire pro
...sapphire pro
3dexport
sapphire pro 3d printer head mask
3d_export
$4

macbook pro
...macbook pro
3dexport
macbook pro 13" inch 2020 years model
3ddd
free

GentleLase Pro
... syneron , candela
gentlelase pro аппарат для лазерной эпиляции
turbosquid
$25

PRO frame
...rbosquid
royalty free 3d model pro frame for download as max on turbosquid: 3d models for games, architecture, videos. (1148329)
turbosquid
$5

Alien pro
...osquid
royalty free 3d model alien pro for download as blend on turbosquid: 3d models for games, architecture, videos. (1678446)
turbosquid
$5

iphone11 pro
...uid
royalty free 3d model iphone11 pro for download as blend on turbosquid: 3d models for games, architecture, videos. (1562707)
3ddd
$1

Mac Pro (appel)
...mac pro (appel)
3ddd
компьютер , apple
mac pro
Case
3d_export
$1

case
...case
3dexport
case
archibase_planet
free

Case
...case
archibase planet
showcase show-case glass case
glass-case + cakes - 3d model for interior 3d visualization.
archibase_planet
free

Case
...case
archibase planet
showcase show-case glass case
glass-case for chips - 3d model for interior 3d visualization.
archibase_planet
free

Case
...case
archibase planet
case shelving drawer
case - 3d model for interior 3d visualization.
archibase_planet
free

Case
...case
archibase planet
case rack locker
case - 3d model for interior 3d visualization.
archibase_planet
free

Case
...case
archibase planet
case drawer kitchen furniture
case - 3d model for interior 3d visualization.
archibase_planet
free

Case
...case
archibase planet
case cupboard shelving
glass case - 3d model for interior 3d visualization.
archibase_planet
free

Case
...case
archibase planet
case handbag suitcase
case - 3d model (*.gsm+*.3ds) for interior 3d visualization.
archibase_planet
free

Case
...case
archibase planet
case suitcase
case 5 - 3d model (*.gsm+*.3ds) for interior 3d visualization.
archibase_planet
free

Case
...case
archibase planet
locker case dresser
case - 3d model (*.gsm+*.3ds) for interior 3d visualization.
3
turbosquid
$10

Mountain Bike 3 -3 of 3
...model mountain bike 3 (#3 of 3) for download as fbx and blend on turbosquid: 3d models for games, architecture, videos. (1438752)
turbosquid
$6

Rock 3-3
...urbosquid
royalty free 3d model rock 3-3 for download as obj on turbosquid: 3d models for games, architecture, videos. (1628065)
turbosquid
$29

Books 150 pieces 3-3-3
...books 150 pieces 3-3-3 for download as max, obj, fbx, and stl on turbosquid: 3d models for games, architecture, videos. (1384033)
turbosquid
$3

Genesis 3 Clothing 3
... available on turbo squid, the world's leading provider of digital 3d models for visualization, films, television, and games.
3d_export
$5

hinge 3
...hinge 3
3dexport
hinge 3
3ddd
$1

Розетка 3
...розетка 3
3ddd
розетка
розетка 3
turbosquid
$50

is-3
... available on turbo squid, the world's leading provider of digital 3d models for visualization, films, television, and games.
turbosquid
$10

Mountain Bike 3 -2 of 3
...model mountain bike 3 (#2 of 3) for download as fbx and blend on turbosquid: 3d models for games, architecture, videos. (1438750)
turbosquid
$10

Mountain Bike 1 -3 of 3
...model mountain bike 1 (#3 of 3) for download as fbx and blend on turbosquid: 3d models for games, architecture, videos. (1438743)
3d_export
$5

3 CATS
...3 cats
3dexport
3 cats pen holder