Thingiverse

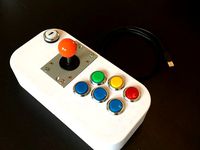
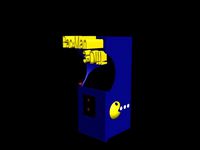
Yet Another Mini Arcade. Adjustable for 6 or 8 button config. by Canino
by Thingiverse
Last crawled date: 3 years, 1 month ago
!!!!!!!!ATTENTION: READ THIS BEFORE PRINTING.
Choosing the correct size/type pushbuttons can be a problem if you dont know what to look for. Even if you dont plan to print this model and you go for a different build, please read the following:
I used buttons which have a mounting hole of 28mm wide. The top part that rests on the panel is at ~33mm. These buttons are screwed onto the panel.
There are also pushbuttons which click/slide in. These are mostly called "30mm pushbuttons".
"Sanwa" for example is a brand/type name, and has 30mm and 24mm standard size buttons. These buttons have a mounting hole of 30 and 24mm. Their top parts are respectively ~33mm and ~27mm. There are sets online which have 6x30mm and 2x24mm buttons.
Now as most of us are building on the cheap, here is an important detail!
Some chinese knockoffs and their retailers mix up the dimensions of these Sanwa clone buttons. Some Sanwa 30mm clones have a mounting hole of 28mm!. But original ones have 30mm
SOOOOOOOOOO.....
I have added a couple of optional model changes for the buttonpanel.stl and bottom.stl. Right now they both have 28mm holes. If you have 28mm buttons then use it as is.
I added 2 extra buttonpanels with 30mm mounting holes and a version with 8 buttons on top (30mm). (also the original 6x28mm version)
I have also added 2 extra versions of the bottom.stl with mounting holes for 24mm and 30mm. (and the original 28mm version)
I'll add a couple of links for the joystick and buttons. Measure your buttons first OR when ordering one from my links measure it up before you print one of the panels.
=================
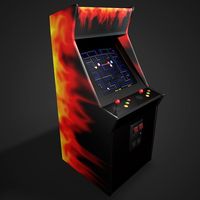
Its always fun to design and print your own stuff. I really like the japanese/modern style arcade cabinets, so i tried to resemble one with this build.
You will need a big printing volume/bed. The button panel is slightly larger than 25x25 cm. I used my CR10 (standard), which has a building volume of 30x30x40cm.
Print on glass (mirror) for smooth finish. I use strong cheap hairspray to make prints stick perfect.
For more details and in action see also my video (please like and sub, if you will :))https://youtu.be/XbANuQp5gMQ
Assembly is very easy. I only used screws for the joystick. Everything else is held together with friction, hotglue and zipties.
Inside there is an MXQ tv box which i flashed with ScottElec (fork of LibreElec). But for gaming rpi 3 is probably better.
Shorten the usb cables and stuff as much as possible to save room (i did this after my video)
The button holes on the buttonpanel are 28mm. The links i added below contain possible different sized buttons, check above!!!
I used a cheap 7inch 1024x600 monitor.
The speakers are 2inch 3w speakers and i used a cheap amplifier for them.
Use rubber adhesive pads for the feet.
Everything is powered through the usb ports of the tv box.
================================
PARTS LIST
Amplifierhttps://www.gearbest.com/other-accessories/pp_226458.html?wid=1433363&lkid=14770337
2x Speakerhttps://www.gearbest.com/development-boards/pp_154868.html?wid=1433363&lkid=14770354
MXQ box i used. It already has bluetooth and wifi build inhttps://www.gearbest.com/tv-box/pp_728844.html?wid=1433363&lkid=14770379
If you are using a Raspberry, make sure the power adapter has enough amps 2.5 or 3 amp preferably.
Better pushbuttons, joystick and usb encoder (i'll add more)https://www.gearbest.com/raspberry-pi/pp_607192.html?wid=1433363&lkid=14770410https://www.banggood.com/Zero-Delay-Arcade-Game-Controller-USB-Joystick-Kit-for-MAME-Raspberry-Pi-p-1132080.html?p=GS29073405097201512Chttps://www.banggood.com/Game-DIY-Arcade-Set-Kits-Replacement-Parts-USB-Encoder-to-PC-Joystick-and-Buttons-p-1039974.html?p=GS29073405097201512Chttps://www.banggood.com/Joystick-Push-Button-Game-Controller-DIY-Kit-for-Arcade-Fighting-Video-Game-PC-p-1268267.html?p=GS29073405097201512C
7inch display i used (i didnt use the button panel, not necessary (only for initial adjusting brightness colours)https://www.banggood.com/nl/Raspberry-Pi-7-inch-HDMI-HD-LCD-Screen-1024-600-Display-Module-Kit-p-1028330.html?p=GS29073405097201512C
Get a big 3d printer (cr10) herehttps://www.gearbest.com/3d-printers-3d-printer-kits/pp_627176.html?wid=1433363&lkid=14760617
-Short flexible hdmi cable would be nice to attach the display.
-I shortened the usb cable for the zero delay pushbutton controller.
-To attach the speakers to amp i used some scrap wiring and cut an old aux cable and usb cable.
================================
To do list:
-Knob for volume control
-IO bracket or something for holes
-Add 2 extra button panel options for 30mm pushbuttons. one for 6 button config and one for 8 button.
Get a big 3d printer (cr10) herehttps://www.gearbest.com/3d-printers-3d-printer-kits/pp_627176.html?wid=1433363&lkid=14760617
Info on Scottelec projecthttps://www.gearbest.com/3d-printers-3d-printer-kits/pp_627176.html?wid=1433363&lkid=14760617
Choosing the correct size/type pushbuttons can be a problem if you dont know what to look for. Even if you dont plan to print this model and you go for a different build, please read the following:
I used buttons which have a mounting hole of 28mm wide. The top part that rests on the panel is at ~33mm. These buttons are screwed onto the panel.
There are also pushbuttons which click/slide in. These are mostly called "30mm pushbuttons".
"Sanwa" for example is a brand/type name, and has 30mm and 24mm standard size buttons. These buttons have a mounting hole of 30 and 24mm. Their top parts are respectively ~33mm and ~27mm. There are sets online which have 6x30mm and 2x24mm buttons.
Now as most of us are building on the cheap, here is an important detail!
Some chinese knockoffs and their retailers mix up the dimensions of these Sanwa clone buttons. Some Sanwa 30mm clones have a mounting hole of 28mm!. But original ones have 30mm
SOOOOOOOOOO.....
I have added a couple of optional model changes for the buttonpanel.stl and bottom.stl. Right now they both have 28mm holes. If you have 28mm buttons then use it as is.
I added 2 extra buttonpanels with 30mm mounting holes and a version with 8 buttons on top (30mm). (also the original 6x28mm version)
I have also added 2 extra versions of the bottom.stl with mounting holes for 24mm and 30mm. (and the original 28mm version)
I'll add a couple of links for the joystick and buttons. Measure your buttons first OR when ordering one from my links measure it up before you print one of the panels.
=================
Its always fun to design and print your own stuff. I really like the japanese/modern style arcade cabinets, so i tried to resemble one with this build.
You will need a big printing volume/bed. The button panel is slightly larger than 25x25 cm. I used my CR10 (standard), which has a building volume of 30x30x40cm.
Print on glass (mirror) for smooth finish. I use strong cheap hairspray to make prints stick perfect.
For more details and in action see also my video (please like and sub, if you will :))https://youtu.be/XbANuQp5gMQ
Assembly is very easy. I only used screws for the joystick. Everything else is held together with friction, hotglue and zipties.
Inside there is an MXQ tv box which i flashed with ScottElec (fork of LibreElec). But for gaming rpi 3 is probably better.
Shorten the usb cables and stuff as much as possible to save room (i did this after my video)
The button holes on the buttonpanel are 28mm. The links i added below contain possible different sized buttons, check above!!!
I used a cheap 7inch 1024x600 monitor.
The speakers are 2inch 3w speakers and i used a cheap amplifier for them.
Use rubber adhesive pads for the feet.
Everything is powered through the usb ports of the tv box.
================================
PARTS LIST
Amplifierhttps://www.gearbest.com/other-accessories/pp_226458.html?wid=1433363&lkid=14770337
2x Speakerhttps://www.gearbest.com/development-boards/pp_154868.html?wid=1433363&lkid=14770354
MXQ box i used. It already has bluetooth and wifi build inhttps://www.gearbest.com/tv-box/pp_728844.html?wid=1433363&lkid=14770379
If you are using a Raspberry, make sure the power adapter has enough amps 2.5 or 3 amp preferably.
Better pushbuttons, joystick and usb encoder (i'll add more)https://www.gearbest.com/raspberry-pi/pp_607192.html?wid=1433363&lkid=14770410https://www.banggood.com/Zero-Delay-Arcade-Game-Controller-USB-Joystick-Kit-for-MAME-Raspberry-Pi-p-1132080.html?p=GS29073405097201512Chttps://www.banggood.com/Game-DIY-Arcade-Set-Kits-Replacement-Parts-USB-Encoder-to-PC-Joystick-and-Buttons-p-1039974.html?p=GS29073405097201512Chttps://www.banggood.com/Joystick-Push-Button-Game-Controller-DIY-Kit-for-Arcade-Fighting-Video-Game-PC-p-1268267.html?p=GS29073405097201512C
7inch display i used (i didnt use the button panel, not necessary (only for initial adjusting brightness colours)https://www.banggood.com/nl/Raspberry-Pi-7-inch-HDMI-HD-LCD-Screen-1024-600-Display-Module-Kit-p-1028330.html?p=GS29073405097201512C
Get a big 3d printer (cr10) herehttps://www.gearbest.com/3d-printers-3d-printer-kits/pp_627176.html?wid=1433363&lkid=14760617
-Short flexible hdmi cable would be nice to attach the display.
-I shortened the usb cable for the zero delay pushbutton controller.
-To attach the speakers to amp i used some scrap wiring and cut an old aux cable and usb cable.
================================
To do list:
-Knob for volume control
-IO bracket or something for holes
-Add 2 extra button panel options for 30mm pushbuttons. one for 6 button config and one for 8 button.
Get a big 3d printer (cr10) herehttps://www.gearbest.com/3d-printers-3d-printer-kits/pp_627176.html?wid=1433363&lkid=14760617
Info on Scottelec projecthttps://www.gearbest.com/3d-printers-3d-printer-kits/pp_627176.html?wid=1433363&lkid=14760617
Similar models
thingiverse
free

Google Assistant Controlled LED Matrix! by Nematic
..._237508.html?wid=1433363
6) step up module- https://m.gearbest.com/other-accessories/pp_227265.html?wid=1433363&lkid=15159586
thingiverse
free
Solar/Baterry DC-DC Power Supply by ericd_86
...tevo tornado: https://amzn.to/2lf5bu8
cameras used
canon rebel sl2: https://amzn.to/2jkdhy4
gopro hero 5: https://amzn.to/2jt919o
thingiverse
free

Retropie Console by printale
...ed-super-nintendo-controller-for-pcmac-p-923100.html
software from:https://retropie.org.uk/
next weeks i will post some pictures.
thingiverse
free

Oukitel U15S Phone Cases (Wireless charging) by Kounes
...com/power-banks/pp_589758.html?wid=1433363
and this powerbankhttps://www.gearbest.com/chargers-cables/pp_1274486.html?wid=1433363
thingiverse
free

Ergonomic Arcade Joystick 24/30mm by keganholtzhausen
... joystick
4x sanwa obsf-24
2x sanwa obsf-30
10x 6mm m3 button head screws
4x 4mm plastic screws
4x self-adhesive rubber feet
wire
thingiverse
free

Self watering baby groot planter (customizable) by UniversalMaker
...st.com/3d-printers-3d-printer-kits/pp_708167.html?wid=1433363&lkid=14677136
video:https://www.youtube.com/watch?v=qb-iyqfr2g4
thingiverse
free
Arcade Joystick + Embedded PI by keganholtzhausen
...
7x 28mm arcade buttons + switches
1x joystick like a zippy
1x xin-mo controller + wiring harness
a raspberry pi running retropie
thingiverse
free

Xiaomi Toothbrush travel box by elRedeo
...redeo
thingiverse
this is a box for the xiaomi toothbrush https://www.gearbest.com/toothbrushes/pp_009125596712.html?wid=1433363
grabcad
free

Sanwa joystick
...sanwa joystick
grabcad
sanwa japanese style joystick for arcade control panel layout
3dwarehouse
free

Sanwa OBSF-30
...urements in sanwa catalog. red ring represents maximum panel thickness. #arcade #arcade_part #button #japanese #pushbutton #sanwa
Canino
thingiverse
free

Férula Para Canino By Martin Gomez by abauerenator
...férula para canino by martin gomez by abauerenator
thingiverse
modelo experimental de férula para perros.
thingiverse
free
"Modular" tinywhoov by Canino
...n at the end of this video https://youtu.be/xpryag0--ny
see my first design https://youtu.be/jqfsrlrtezk
subscribe to my channel!
thingiverse
free

HOTAS Throttle (modular) by Canino
... rods easier by using the grip base to get the correct amount of smoothness. you'll of course need to glue the rods in place.
thingiverse
free

Micro RC Turret Double barrel (prototype) by Canino
....
i drilled the holes on the sides with an 1.8mm drill and used glue and pieces of filament to align and hold the model together.
thingiverse
free

Tiny Trak Volkswagen by Canino
...wheelie bar made for this model by flyboymac89 https://www.thingiverse.com/thing:3506571https://www.thingiverse.com/thing:3506571
thingiverse
free

Tiny Bumper (Tiny WHoov with a skirt) by Canino
...softmount)
see my original tinywhoov skirted design (how to make the skirt) https://youtu.be/jqfsrlrtezk
subscribe to my channel!
thingiverse
free

Staind XL Turret remix
...to mount the looming terror rubber band shooter by canino to it...not sure how well the 9g servos will...
thingiverse
free
Chetra PM-140 Personnel Carrier Tiny Trak by scotthraban
...the chassis/wheelbase come from the tiny trak volkswagon by canino linked in the remix section. the wheels come from...
thingiverse
free

Tiny Trak Volkswagon W/ Integrated Antennas+Cam by Downlow3D
...thingiverse remix files of the vw bus body from canino to hold a crossfire mini-mortal t antenna, an emax...
Config
3d_export
free

explicit content carpet
...product!<br>you can change the texture to <br> in node config<br>- 3,000 particles<br>- 200 descendants<br>|| <br> ||<br>- .blend (all in...
3dfindit
free

Config
...config
3dfind.it
catalog: wilo
thingiverse
free
coupling scad config by wanick
...coupling scad config by wanick
thingiverse
scad file config sizes
thingiverse
free
Klipper Configs for Creality Printers by artheoday
...klipper configs for creality printers by artheoday
thingiverse
klipper config... i will upload more in the future
thingiverse
free

FLSun kossel marlin config by RobertHarrison
...flsun kossel marlin config by robertharrison
thingiverse
configuration.h
thingiverse
free
FormD T1 Config theory by wispymatt
...validate your own dimensions.
credit to formdworks.com for the actual case design and thanks to w360mod for permission to share.
thingiverse
free

TRONXY X5S-400 MKS SBase Config by BG32940
...tronxy x5s-400 mks sbase config by bg32940
thingiverse
my current config for my tronxy x5s-400 mks sbase
thingiverse
free

Martian II parts for my config by t0mpi
...martian ii parts for my config by t0mpi
thingiverse
todo
thingiverse
free

DuetWIFI Config and Case For 300 X 300 by lanman1969
...my config for the duet wifi, and a simple case i made
the following files are included
config.g
homeall.g
homex.g
homey.g
homez.g
thingiverse
free

Artillery Genius Klipper config by Mudz
...btt skr 1.4 with tmc2209
tft screen don't work with klipper
**the led is not enabled but you can add the code to the firmware
Arcade
3ddd
$1
Simas / Arcade
...dd
simas , simas arcade , тумба
simas arcade 46
3d_export
$5

Arcade
...arcade
3dexport
3ddd
free
Turri / Arcade
...turri / arcade
3ddd
turri , журнальный
turri / arcade
turbosquid
$35

arcade
... available on turbo squid, the world's leading provider of digital 3d models for visualization, films, television, and games.
turbosquid
$15
Arcade
... available on turbo squid, the world's leading provider of digital 3d models for visualization, films, television, and games.
turbosquid
free
Arcade
... available on turbo squid, the world's leading provider of digital 3d models for visualization, films, television, and games.
3d_ocean
$16
Arcade Game
...tomate button coin computer console fun game gamer gaming joystick machine play side art video game
detailed arcade game machine.
3d_export
$5

Arcade 3D Model
...arcade 3d model
3dexport
architecture arcade elements decor
arcade 3d model evgenadm 86783 3dexport
3d_export
$10

Arcade 3D Model
...arcade 3d model
3dexport
arcade arch porch portico well round
arcade 3d model loscarpello 54648 3dexport
3d_export
$9
Arcade 3D Model
...arcade 3d model
3dexport
arcade architecture old building classic arch
arcade 3d model lotfy 150 3dexport
Button
archibase_planet
free
Buttons
...buttons
archibase planet
lift elevator call buttons
elevator call buttons - 3d model for interior 3d visualization.
3ddd
$1
Button
... button , john reeves
набор мебели button от дизайнера john reeves
3d_export
$5
Button
...button
3dexport
smd button<br>verts 2.180<br>faces 3.848
turbosquid
$4

Button
...
turbosquid
royalty free 3d model button for download as fbx on turbosquid: 3d models for games, architecture, videos. (1297941)
turbosquid
$1

Button
...
turbosquid
royalty free 3d model button for download as fbx on turbosquid: 3d models for games, architecture, videos. (1392935)
turbosquid
$9
buttons
...id
royalty free 3d model buttons for download as max and fbx on turbosquid: 3d models for games, architecture, videos. (1404875)
turbosquid
$6

button
...uid
royalty free 3d model button for download as 3dm and max on turbosquid: 3d models for games, architecture, videos. (1669204)
turbosquid
$5
Button
...uid
royalty free 3d model button for download as max and fbx on turbosquid: 3d models for games, architecture, videos. (1710868)
turbosquid
$3

Button
...quid
royalty free 3d model button for download as ma and obj on turbosquid: 3d models for games, architecture, videos. (1510524)
turbosquid
$3
Button
...quid
royalty free 3d model button for download as ma and obj on turbosquid: 3d models for games, architecture, videos. (1509961)
Mini
turbosquid
$10

Mini Mini Luceplan
...
royalty free 3d model mini mini luceplan for download as max on turbosquid: 3d models for games, architecture, videos. (1227359)
3d_ocean
$39

Mini Cooper
...mini cooper
3docean
cabrioler cooper mini
mini cooper cabrioler
3d_export
$30

Mini lathe
...mini lathe
3dexport
mini lathe
3d_export
$5

mini mouse
...mini mouse
3dexport
mini mouse
3d_export
$5

mini house
...mini house
3dexport
mini house
3d_export
free

Mini Mecha
...mini mecha
3dexport
concept of mini mecha
3d_ocean
$20

Mini Gun
...mini gun
3docean
gatling gun gun machine gun mini gun weapon
model of a mini gatling gun.
3ddd
free

Herve mini
... кофейный , herve
http://www.mobiliavenanti.it/ru/products/hervè-mini
3d_export
$5

mini wall
...mini wall
3dexport
mini wall for living room
3d_export
$5

mini bank
...mini bank
3dexport
mini bank 3d model
Another
turbosquid
$15
ANOTHER BATHROOM
...quid
royalty free 3d model another bathroom for download as on turbosquid: 3d models for games, architecture, videos. (1171460)
turbosquid
$24

Another World
... available on turbo squid, the world's leading provider of digital 3d models for visualization, films, television, and games.
turbosquid
$39
Another Red Curb
...ee 3d model another red curb for download as ma, obj, and fbx on turbosquid: 3d models for games, architecture, videos. (1182913)
turbosquid
$9
Another Deberenn Sofa
...model another deberenn sofa for download as max, obj, and fbx on turbosquid: 3d models for games, architecture, videos. (1497850)
turbosquid
$2
Another picnic table
... model another picnic table for download as max, obj, and fbx on turbosquid: 3d models for games, architecture, videos. (1426381)
turbosquid
$15

door to another world
...oor to another world for download as 3ds, obj, fbx, and blend on turbosquid: 3d models for games, architecture, videos. (1334842)
3d_export
free

another hacksaw
...another hacksaw
3dexport
. . . 3d model of a hacksaw. 3d model files: - 3ds max 2017 (scanline) - obj (low poly) . . .
turbosquid
$12
Another Country Side Table
... another country side table for download as max, obj, and fbx on turbosquid: 3d models for games, architecture, videos. (1496053)
turbosquid
$29
Furniture - "Another country" modern sofa
...another country" modern sofa for download as obj and c4d on turbosquid: 3d models for games, architecture, videos. (1186189)
3d_ocean
$29

Another Tron Light Cycle with the Rider and Trail
...ther tron light cycle with the rider and the light trail. high quality 3d model,all the materials and lights are included. the...
Adjustable
3d_ocean
$7
Adjustable Wrench
...adjustable wrench
3docean
adjustable wrench highly detailed wrench
highly detailed adjustable wrench.
3ddd
$1
Adjustable Stool
...adjustable stool
3ddd
табурет
wooden adjustable stool.
3d_ocean
$20

Adjustable Gym Bench
...st adjustable bench black equipement gym gymnastic indoor silver sport workout
3d model of black and silver adjustable gym bench.
3d_ocean
$20
Adjustable Gym Bench
...st adjustable bench black equipement gym gymnastic indoor silver sport workout
3d model of black and silver adjustable gym bench.
3d_ocean
$16

Adjustable Weight Bench
...arbell bench black equipement gym gymnastic indoor sport weight workout
3d model of black adjustable weight bench with a barbell.
turbosquid
$5

Adjustable wrench
...
royalty free 3d model adjustable wrench for download as fbx on turbosquid: 3d models for games, architecture, videos. (1313414)
3d_export
$5

adjustable tension lock
...adjustable tension lock
3dexport
adjustable tension lock
turbosquid
$1

Adjustable Wrench
...free 3d model adjustable wrench for download as obj and blend on turbosquid: 3d models for games, architecture, videos. (1446736)
turbosquid
$1

Adjustable Wrench
...y free 3d model adjustable wrench for download as c4d and fbx on turbosquid: 3d models for games, architecture, videos. (1379022)
3d_export
$5

Adjustable key
...adjustable key
3dexport
6
3d_export
$18

tulip 6
...tulip 6
3dexport
tulip 6
3d_export
$5
hinge 6
...hinge 6
3dexport
hinge 6
3ddd
$1
MASIERO / FLASHWOOD STL 6 + 6
...6
3ddd
masiero
торшер flashwood stl 6 + 6 фабрики masiero
http://www.masierogroup.com/c87_697/it/flashwood%20stl%206%20+%206.ashx
turbosquid
$110

Atmos Cannon 2000 6*6
...yalty free 3d model atmos cannon 2000 6*6 for download as skp on turbosquid: 3d models for games, architecture, videos. (1528591)
turbosquid
$1
ae 6 6 electric locomotive
... free 3d model ae 6 6 electric locomotive for download as obj on turbosquid: 3d models for games, architecture, videos. (1707537)
turbosquid
$39
A-6
... available on turbo squid, the world's leading provider of digital 3d models for visualization, films, television, and games.
3ddd
$1
6 ковров
...6 ковров
3ddd
ковры , ковер
6 ковров
turbosquid
$12

Calligraphic Digit 6 Number 6
...hic digit 6 number 6 for download as max, obj, fbx, and blend on turbosquid: 3d models for games, architecture, videos. (1389336)
turbosquid
$19
Case For Phone 6 Girl 6
... available on turbo squid, the world's leading provider of digital 3d models for visualization, films, television, and games.
turbosquid
$35

Iphone 6 & 6 Plus All
... available on turbo squid, the world's leading provider of digital 3d models for visualization, films, television, and games.
8
turbosquid
$6

Rock 8-8
...urbosquid
royalty free 3d model rock 8-8 for download as obj on turbosquid: 3d models for games, architecture, videos. (1659393)
3ddd
$1
Italamp 387/8+8
...italamp 387/8+8
3ddd
italamp
люстра italamp 387/8+8
размеры 92x71h
3ddd
$1
8 марта
...8 марта
3ddd
8 марта
кресло 8 марта
design_connected
$16
No 8
...nected
photo-realistic 3d models of the sibast no 8 armchair from sibast for 3d architectural and interior design presentations.
3d_export
$5
hinge 8
...hinge 8
3dexport
hinge 8
3d_export
$5

iphone 8
...iphone 8
3dexport
iphone 8
turbosquid
$69

iPhone 8 and iPhone 8 Plus
... free 3d model iphone 8 and iphone 8 plus for download as max on turbosquid: 3d models for games, architecture, videos. (1202442)
turbosquid
$12

Calligraphic Digit 8 Number 8
...hic digit 8 number 8 for download as max, obj, fbx, and blend on turbosquid: 3d models for games, architecture, videos. (1389341)
3ddd
free
PLANTS 8
...plants 8
3ddd
цветок , горшок
plant 8,,, hope u all like it
3ddd
$1
8 Марта / Amadey
...8 марта / amadey
3ddd
8 марта
8 marta amadey