Thingiverse
Y guide - MGN12H linear rails (RedBot) by NickRimmer
by Thingiverse
Last crawled date: 3 years ago
Hello everyone! I didn't post anything so long.... >_< Ok, let's fix it!
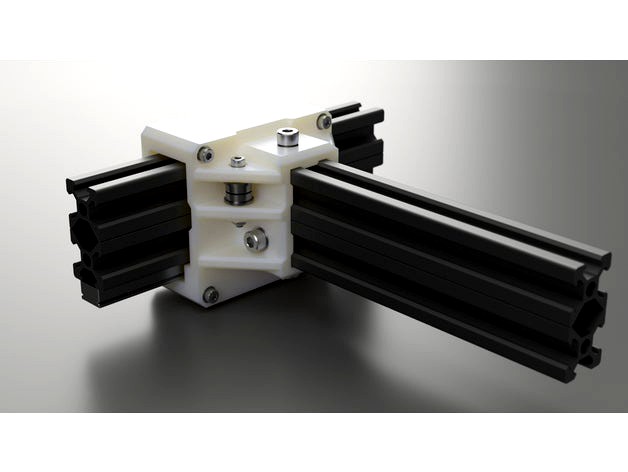
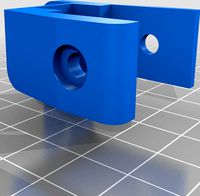
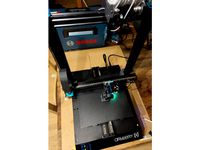
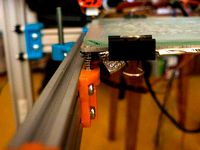
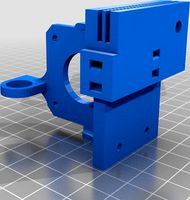
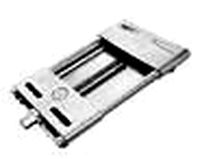
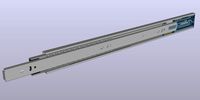
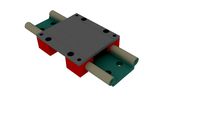
This is my new carriage for Y-axis. Now i'm using MGN12 rails and MGN12H carriages, instead wheels. Also I placed them to bottom of profile - this solution much better for me. It's looks pretty well now ~_~
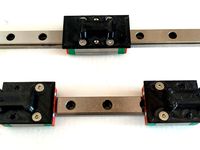
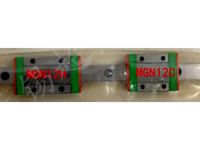
Where I bought rails:
2 x MGN12 Rails (390mm length,holes by 7.5mm on both sides)
2 x MGN12H Carriages (With "H" in end, also I recommend you to take +1 pcs, it will very helpfull, if you lost some balls from carriages)
Before installations, I grease carriages by Castrol LMX
To assembly of one carriage you will need:
4 pcs - M3x35 screws (or M3x40), for assembly main parts
2 pcs - M3x25 screws, for bearings
4 pcs - M3x10 srews, for mount MGN12H carriage
2 pcs - M3 selflock nuts for bearings (if you haven't them, you can use usual nuts)
4 pcs - M3 usual nuts
10 pcs - M3 washers
4 pcs - M5x10 screws, for aluminium profile
4 pcs - M5 square nuts
4 pcs - M5 washers
To mount each of rail I used 4pcs of M3x10 screws with T-nuts.
This is my new carriage for Y-axis. Now i'm using MGN12 rails and MGN12H carriages, instead wheels. Also I placed them to bottom of profile - this solution much better for me. It's looks pretty well now ~_~
Where I bought rails:
2 x MGN12 Rails (390mm length,holes by 7.5mm on both sides)
2 x MGN12H Carriages (With "H" in end, also I recommend you to take +1 pcs, it will very helpfull, if you lost some balls from carriages)
Before installations, I grease carriages by Castrol LMX
To assembly of one carriage you will need:
4 pcs - M3x35 screws (or M3x40), for assembly main parts
2 pcs - M3x25 screws, for bearings
4 pcs - M3x10 srews, for mount MGN12H carriage
2 pcs - M3 selflock nuts for bearings (if you haven't them, you can use usual nuts)
4 pcs - M3 usual nuts
10 pcs - M3 washers
4 pcs - M5x10 screws, for aluminium profile
4 pcs - M5 square nuts
4 pcs - M5 washers
To mount each of rail I used 4pcs of M3x10 screws with T-nuts.
Similar models
thingiverse
free
MGN12 Tevo Tarantula Y-Axis Mount by Z123456789
...://www.thingiverse.com/thing:1704123
additional information:
.iges is also available for download if you want to modify the part.
thingiverse
free

Ender-3 pro Y axis dual MGN12H LM guide, No drilling, keep Z height
...10 bolt
8 x m3 washer
4 x m5x15 flat head bolt
4 x m5 nut(nyloc)
4 x m5 washer
alignment is very important
keep belt horizontally
thingiverse
free

MGN12 SeeMeCNC Barbell Carriage for Delta Printer (D300VS and others)
...ails when mounting them.
also check out my hemera mount that also uses seemecnc barbellshttps://www.thingiverse.com/thing:4027625
thingiverse
free

Full mount and dual fan bracket for E3D v6 by ArcherEG
...cs m4x20 screw
4 pcs m4x30 screw
2 pcs m3 nut
4 pcs m4 nut
4 pcs m3 washer
4 pcs m4 washer
1 pcs foam 10x10x25
2 pcs fan 30x30x10
thingiverse
free
Carriage Block MGN12H Prusa Mk3 Bear by Zen3Dhu
...
thingiverse
mgn12h carriage block for full bear mk3 y-axis lineal rails mgn12
mgn12c carriage block: bear 2.1 linear rail addon
thingiverse
free
MGN12C Carriage Mounts for Y and Z Axis by marcbea
... pattern
here are the y and z axis mounts that will work with mgn12c carriages should you have gotten these instead of the mgn12h
thingiverse
free
MGN12 Endcap for 2020 Aluminum Profile System by TehseenulHasan
...rse
this is the endcap for mgn12 linear rail bearing (mgn12h). it is designed to mount on 2020 aluminum profile using m4 screws.
thingiverse
free

Y Rail Holder MGN12 350mm by Zen3Dhu
...remix from: bear 2.1 linear rail addon for 350mm mgn12 linear guide
full bear mk3 y-axis lineal rails mgn12
mgn12h carriage block
thingiverse
free

Tarantula Y carriage for MGN12H by ikong
...tarantula y carriage for mgn12h by ikong
thingiverse
tevo tarantula y carriage for mgn12h (of mgn12 rail).
thingiverse
free
Artillery Sidewinder X1 Y axis mgn12 linear rails by kse
...2x mgn12 rails with 450mm length and mgn12h carriage, 12 t-slot nuts with m3 thread for 2020 profiles, and 12 m3x8 din912 screws.
Redbot
thingiverse
free

Body for RedBot by studioMiranda
...body for redbot by studiomiranda
thingiverse
body for robot two wheels
thingiverse
free

Redbot Sumo Shields by dykebert
...and back shields are angled at 10 deg. both shields print without support and clip onto redbot for easy installation and removal.
thingiverse
free

RedBot E3Dv6_holder_part1/2 3.6mm and 4mm by kisel
...to hold e3d v5 / e3d v6 clones. they can be 3.6 or 4mm
part of a redbot printer - https://www.thingiverse.com/thing:1930233/files
thingiverse
free
Birdbathhouse by redbot
...h, and drain hole.
requirements:
some twine to hang
a stick/skewer/rod of 4mm in diameter or less for an interior roosting perch.
thingiverse
free

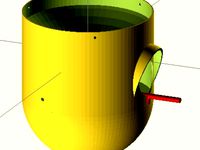
Smart Funnel by redbot
...op_radius = 30;
middle_radius = 12;
bottom_radius = 8;
thickness = 3;
breather_radius = 2.5;
top_height = 60;
bottom_height = 45;
thingiverse
free

Skullcrawler by redbot
... organic.
here a video of it all put together: https://drive.google.com/file/d/17peo2lhqc6yrx5xcza-hds3hyqqyhcpu/view?usp=sharing
thingiverse
free

Bearing Bike 02A by redbot
... good calibration test object as it has some bridging, tight spacing, etc, and it takes less than 1 1/2 hours to print at 40mm/s.
thingiverse
free
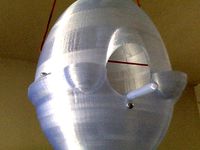
Egghouse by redbot
...thin, the birdbaths may leak, but some glue or filler would take care of it.
printed: 3mm layers, 20% infill, no support, no raft
thingiverse
free

George Floyd - I Can't Breathe - Vector Art by redbot
...rt by redbot
thingiverse
i didn't like seeing all the profiteering off of george floyd's image so here's a free one.
thingiverse
free

2020 remix for Y guide - MGN12H linear rails (RedBot) by Sunsai
...w.thingiverse.com/thing:2170087) with 2020 on x-axis to re-d-bot y carriage on rails (https://www.thingiverse.com/thing:2834162).
Nickrimmer
thingiverse
free

Overwatch Logo by NickRimmer
...overwatch logo by nickrimmer
thingiverse
just logo (=
d.va's bunny i used from there (by spoolishness).
thingiverse
free

Overwatch tokens by NickRimmer
...overwatch tokens by nickrimmer
thingiverse
i took some recognizable icons of heroes, made vector image, and create tokens.
thingiverse
free

Platform of cooler for Anet A6 by NickRimmer
...platform of cooler for anet a6 by nickrimmer
thingiverse
just one detail which i broke on assembly step
thingiverse
free

Spool holder by NickRimmer
... spool holder (=
spool holes 30-22mm, bearing 24mm.
in sources you can easily customize spool hole or bearing size as you need (;
thingiverse
free

Wheel spacers (alternative) by NickRimmer
...erse
this spacers better when you using 5x10x4 bearings.
this is part for d-bot, but can be used in others corexy constructions.
thingiverse
free
Adjustable bed holders by NickRimmer
...giverse
just new better bed holders for you (;
this is part for d-bot, but can be used in others corexy and v-slot constructons.
thingiverse
free
Printer feets by NickRimmer
...ng where you can this imagine. you may use it with your microwave, refrigerator, or with old tv of your grandpa.
that so cool ~_~
thingiverse
free

Fan duct for Anet A6 by NickRimmer
...t for anet a6 by nickrimmer
thingiverse
almost default fan duct. i'm just made this thing little better and open for edit (=
thingiverse
free

Holders for hot bed (Anet A6 printer) by NickRimmer
...holders for hot bed (anet a6 printer) by nickrimmer
thingiverse
just holders for hot bed, for high speeds (=
thingiverse
free

Orange PI PC dimensions by NickRimmer
...immer
thingiverse
this model helped me when i modeled case.
*.step file in sources or you can check this: http://a360.co/2gxbqrj
Mgn12H
thingiverse
free

Mount 775 motor mgn12h by crazysova
...mount 775 motor mgn12h by crazysova
thingiverse
mount 775 motor mgn12h
thingiverse
free

Servo mount for MGN12H rail by Kieranod
...servo mount for mgn12h rail by kieranod
thingiverse
servo mount for mgn12h rail
thingiverse
free

MGN12H Titan Mount Vfire by 3DPrintingEverything
...mgn12h titan mount vfire by 3dprintingeverything
thingiverse
mgn12h mount for a titan e3d extuder
thingiverse
free

Kossel Mini carriage for MGN12H by gnahz
...kossel mini carriage for mgn12h by gnahz
thingiverse
kossel mini carriage for mgn12h with end stop
thingiverse
free
Tarantula Y carriage for MGN12H by ikong
...tarantula y carriage for mgn12h by ikong
thingiverse
tevo tarantula y carriage for mgn12h (of mgn12 rail).
thingiverse
free

MGN12H clamping V-slot by SviatoslavWolf
...mgn12h clamping v-slot by sviatoslavwolf
thingiverse
создал крепление для напрявляющих mgn12h под профиль v-slot
thingiverse
free
MGN12H aero p3steel v18 campy by maskeperro
...eperro
thingiverse
mgn12h aero p3steel v18 campy , pieza modificada para usar con mgn12h ....la original de campy es para mgn12c
thingiverse
free

MGN12H to 2020 and belt holder for x Axis by Kieranod
...epper.
mgn12h without belts.stl has no belt i used it on the side of the nema17 stepper.https://www.thingiverse.com/thing:2959042
thingiverse
free

MGN12C and MGN12H adapter plate by 3r4th
...h
thingiverse
i created a adapter plate for the y axis from mgn12c and mgn12h to a hole pattern of the sc8uu.
best regards 3r4th
thingiverse
free

MGN12H linear rail 20x20 adapter by Goretec
... linear rail 20x20 adapter by goretec
thingiverse
mgn12h linear rail adapter for mounting 20x20 extrusion to the linear guide.
Linear
3ddd
$1
Linear Diffusers
...linear diffusers
3ddd
диффузор
set of linear diffusers for ceiling.
design_connected
$27

Linear Sofa
...linear sofa
designconnected
scp linear sofa computer generated 3d model.
design_connected
$18

Atlantis linear
...atlantis linear
designconnected
terzani atlantis linear pendant lights computer generated 3d model. designed by barlas baylar.
3d_export
$5
light linear unit
...light linear unit
3dexport
light linear unit
turbosquid
$5

Linear Actuator
...
royalty free 3d model linear actuator for download as blend on turbosquid: 3d models for games, architecture, videos. (1589061)
turbosquid
$29
Linear panel
...oyalty free 3d model linear panel for download as max and obj on turbosquid: 3d models for games, architecture, videos. (1391254)
turbosquid
$12
Linear Chandelier
...y free 3d model linear chandelier for download as max and obj on turbosquid: 3d models for games, architecture, videos. (1574289)
turbosquid
$10
Grohe Lineare
... available on turbo squid, the world's leading provider of digital 3d models for visualization, films, television, and games.
turbosquid
$10

Linear Axis
... available on turbo squid, the world's leading provider of digital 3d models for visualization, films, television, and games.
3d_export
$5

Linear Unit 3D Model
...linear unit 3d model
3dexport
linear unit force torque velocity
linear unit 3d model fau 71218 3dexport
Guide
turbosquid
$15
Guide drawer
...squid
royalty free 3d model guide drawer for download as dwg on turbosquid: 3d models for games, architecture, videos. (1261387)
turbosquid
$1
Road Guide
... available on turbo squid, the world's leading provider of digital 3d models for visualization, films, television, and games.
archive3d
free
Guide-board 3D Model
...ion sign guide sign
guide-board n170112 - 3d model (*.gsm+*.3ds) for exterior 3d visualization.
turbosquid
$2

soap cutter guide
...
royalty free 3d model soap cutter guide for download as stl on turbosquid: 3d models for games, architecture, videos. (1694030)
turbosquid
$15
Blind Guiding tiles
...free 3d model blind guiding tiles for download as 3dm and dae on turbosquid: 3d models for games, architecture, videos. (1156598)
turbosquid
$69

Japanese Tour Guide
...d model japanese tour guide for download as max, fbx, and obj on turbosquid: 3d models for games, architecture, videos. (1614288)
turbosquid
$10
CNC Linear Guide
... available on turbo squid, the world's leading provider of digital 3d models for visualization, films, television, and games.
turbosquid
$1

Tank Model Guide
... available on turbo squid, the world's leading provider of digital 3d models for visualization, films, television, and games.
turbosquid
$1
Road Guide 2
... available on turbo squid, the world's leading provider of digital 3d models for visualization, films, television, and games.
3d_ocean
$9

Guide Books 3
...sformed separately and each have unique texture map on front and back cover. to make your work easier this model comes in thre...
Rails
3d_ocean
$5

rails
...rails
3docean
old rails rails sleepers
old rails
archibase_planet
free
Rail
...chibase planet
rail railing handrail guard-rail
rail forged fence n310814 - 3d model (*.gsm+*.3ds) for exterior 3d visualization.
archibase_planet
free

Rail
...rail
archibase planet
handrail railing guard-rail
rail n220914 - 3d model (*.gsm+*.3ds) for interior 3d visualization.
archibase_planet
free

Rail
...rail
archibase planet
railing hand-rail banisters
rail n130309 - 3d model (*.gsm+*.3ds) for interior 3d visualization.
archibase_planet
free
Rail
...rail
archibase planet
railing hand-rail banisters
rail n270510 - 3d model (*.gsm+*.3ds) for interior 3d visualization.
archibase_planet
free
Railing
...
archibase planet
railing handrail fence guard-rail
railing n140314 - 3d model (*.gsm+*.3ds+*.max) for exterior 3d visualization.
archibase_planet
free

Railing
...railing
archibase planet
railing
railing- 3d model (*.gsm+*.3ds) for interior 3d visualization.
archibase_planet
free
Railing
...railing
archibase planet
railing enclosure barrier
light railing - 3d model for interior 3d visualization.
archibase_planet
free
Rail
...rail
archibase planet
metal railing
rail n280608 - 3d model (*.gsm+*.3ds) for interior 3d visualization.
archibase_planet
free
Railing
...railing
archibase planet
railing kitchen ware
railing 1 - 3d model (*.gsm+*.3ds) for interior 3d visualization.
Y
turbosquid
$1

Tetera y Galletas y Caf
... available on turbo squid, the world's leading provider of digital 3d models for visualization, films, television, and games.
3ddd
$1

Смеситель Y-CON
...смеситель y-con
3ddd
смеситель , y-con
смеситель y-con
3ddd
$1

Y-Chair
...y-chair
3ddd
tom dixon
y-chair designed by tom dixon,
3ds max + obj, corona
3ddd
$1

Y Chair compilation
....net/products/us/y-chair-sled-base
y chair swivel basehttp://www.tomdixon.net/products/us/y-chair-swivel-base
turbosquid
$190

Y-8
...y-8
turbosquid
royalty free 3d model y-8 for download as max on turbosquid: 3d models for games, architecture, videos. (1658891)
turbosquid
$7

Bench Y
...turbosquid
royalty free 3d model bench y for download as obj on turbosquid: 3d models for games, architecture, videos. (1488746)
turbosquid
$15

bonePile Y
...oyalty free 3d model bonepile y for download as blend and obj on turbosquid: 3d models for games, architecture, videos. (1546374)
turbosquid
$7

Y for Yarn
...d
royalty free 3d model y for yarn model for download as max on turbosquid: 3d models for games, architecture, videos. (1699732)
turbosquid
$2

FONT Y
...quid
royalty free 3d model font y for download as ma and obj on turbosquid: 3d models for games, architecture, videos. (1549457)
3ddd
$1

WOOD-y
...wood-y
3ddd
wooden guy