Thingiverse
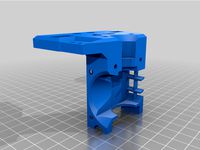
X-Carriage Bearing Block upgrade for Original Prusa i3 MK2 by Steve-J
by Thingiverse
Last crawled date: 3 years ago
Edit 2-21-17: Full Size X-Block file fixed, if anyone had any slicing errors it should be fine now.
Edit 12-10-16: This part is not compatible with the Multi-Color upgrade, if you have this part installed it must be removed when upgrading to the Multi-Color extruders.
READ BEFORE INSTALLING
This bearing block is designed specifically for the Original Prusa i3 MK2, it is not designed for and has not been tested with any other machine.
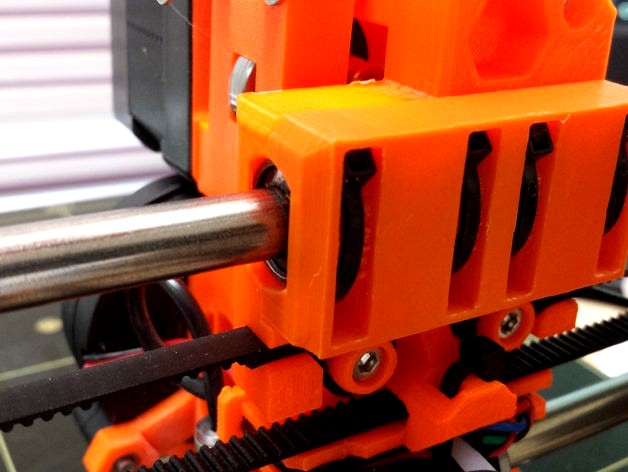
I made this X-Carriage Bearing Block upgrade because I did not want to rely purely on zip ties for the mechanical connection between the X-Carriage, with extruder assembly and precision-adjustable nozzle, and the X-axis bearings. Since we can achieve such precision with z-height adjustments, I feel that if there were a solid mechanical connection in place to take most of the strain off of the flexible zip ties, we would have a much greater likelihood of maintaining z-height adjustments more precisely. It seems like sometimes just loading and unloading filament throws off the z-height, which is understandable with only flexible, nylon zip ties between two really important parts, but maybe we can make it better!!
Now I am not an expert, and I have zero proof that installing these will have any effect, either positive or negative, that said, I do believe it will work. The more people who try it the sooner we'll find out!
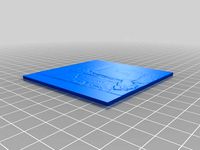
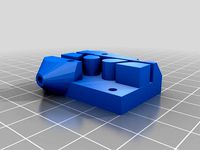
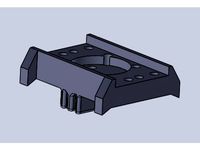
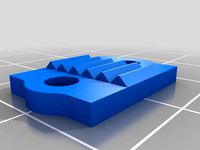
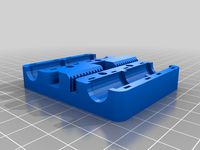
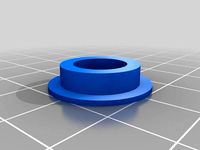
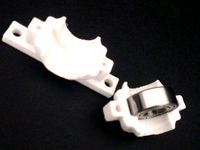
There are two versions of the Bearing Block, the FULL SIZE version and the MINI version. The MINI version covers about 67% of the upper X-Carriage bearings and is as easy to install as clip your zips and put it on with new ones.
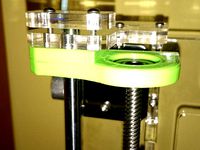
The FULL SIZE version REQUIRES the replacement of the original z-axis tops with the modified z-axis top file, available here to download, which will allow the proper clearance at every possible point of travel. Specifically near the very top of z travel at 190, if the carriage is all the way to the left, you will crash into the original z-axis top and not be able to achieve full height. So download, print and install the modified z-axis top_remix stl also if you are going to print and install the FULL SIZE version.
The FULL SIZE version covers 100% of the upper X-Carriage bearings and is just as easy to install.
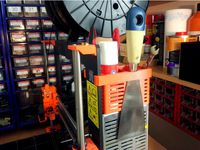
Clip all four of your zips (make sure to support the extruder assembly when you clip the last zip so it doesn’t fall forward)
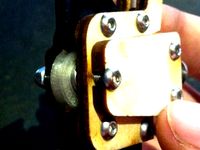
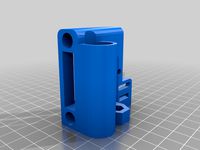
Install the bearing block (the cut corner is the marker for the top left)
Install four new zip ties!
Make sure to slide the zip tie heads all the way up or all the way down after you clip the ends off so they tuck in for proper frame clearance. You can insert from either the bottom or the top and slide them either way to tuck them in.
For those of you with IGUS or Drylin bearings, this block may help with the issue of deformation from zip ties as the pressure would be more evenly distributed, however I have not tested it with this type of bearing as I don't currently have any to test with. You may need to modify the part to fit properly, try it out and let us know!
So download and print one of these X-Carriage Bearing Blocks and try it for yourself and see what you think, and let us know your results!
WARNING: you may cause damage to your machine if you do not READ and follow the instructions carefully, I am not responsible for any of the following:
Broken machines
Broken eggs
Broken dreams
and anything else you may think of.
BTW. . . .
The entire animal kingdom is preparing to rise up against you. . . .
Unless you download, print and install this part.
:D
DESCRIPTION OF PICS
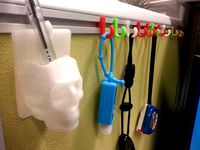
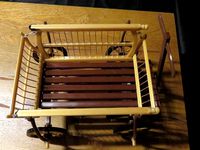
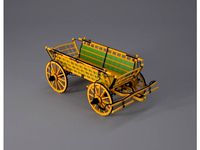
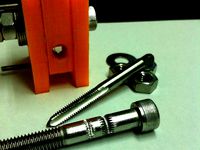
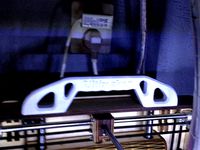
Note: In the pictures you can see both versions and their clearance from an above-view of the left z-axis top very close up, the MINI clears the original z-axis top part and in the picture of the FULL SIZE one I have already installed the modified z-axis top. The last picture shows the clearance for top-of-the-frame spool holders, there are three pictured, the one in the middle is the original one that shipped with the unit, the far left is one that I modified with a little longer lip and the block clears that one too. . Just fyi
Edit 12-10-16: This part is not compatible with the Multi-Color upgrade, if you have this part installed it must be removed when upgrading to the Multi-Color extruders.
READ BEFORE INSTALLING
This bearing block is designed specifically for the Original Prusa i3 MK2, it is not designed for and has not been tested with any other machine.
I made this X-Carriage Bearing Block upgrade because I did not want to rely purely on zip ties for the mechanical connection between the X-Carriage, with extruder assembly and precision-adjustable nozzle, and the X-axis bearings. Since we can achieve such precision with z-height adjustments, I feel that if there were a solid mechanical connection in place to take most of the strain off of the flexible zip ties, we would have a much greater likelihood of maintaining z-height adjustments more precisely. It seems like sometimes just loading and unloading filament throws off the z-height, which is understandable with only flexible, nylon zip ties between two really important parts, but maybe we can make it better!!
Now I am not an expert, and I have zero proof that installing these will have any effect, either positive or negative, that said, I do believe it will work. The more people who try it the sooner we'll find out!
There are two versions of the Bearing Block, the FULL SIZE version and the MINI version. The MINI version covers about 67% of the upper X-Carriage bearings and is as easy to install as clip your zips and put it on with new ones.
The FULL SIZE version REQUIRES the replacement of the original z-axis tops with the modified z-axis top file, available here to download, which will allow the proper clearance at every possible point of travel. Specifically near the very top of z travel at 190, if the carriage is all the way to the left, you will crash into the original z-axis top and not be able to achieve full height. So download, print and install the modified z-axis top_remix stl also if you are going to print and install the FULL SIZE version.
The FULL SIZE version covers 100% of the upper X-Carriage bearings and is just as easy to install.
Clip all four of your zips (make sure to support the extruder assembly when you clip the last zip so it doesn’t fall forward)
Install the bearing block (the cut corner is the marker for the top left)
Install four new zip ties!
Make sure to slide the zip tie heads all the way up or all the way down after you clip the ends off so they tuck in for proper frame clearance. You can insert from either the bottom or the top and slide them either way to tuck them in.
For those of you with IGUS or Drylin bearings, this block may help with the issue of deformation from zip ties as the pressure would be more evenly distributed, however I have not tested it with this type of bearing as I don't currently have any to test with. You may need to modify the part to fit properly, try it out and let us know!
So download and print one of these X-Carriage Bearing Blocks and try it for yourself and see what you think, and let us know your results!
WARNING: you may cause damage to your machine if you do not READ and follow the instructions carefully, I am not responsible for any of the following:
Broken machines
Broken eggs
Broken dreams
and anything else you may think of.
BTW. . . .
The entire animal kingdom is preparing to rise up against you. . . .
Unless you download, print and install this part.
:D
DESCRIPTION OF PICS
Note: In the pictures you can see both versions and their clearance from an above-view of the left z-axis top very close up, the MINI clears the original z-axis top part and in the picture of the FULL SIZE one I have already installed the modified z-axis top. The last picture shows the clearance for top-of-the-frame spool holders, there are three pictured, the one in the middle is the original one that shipped with the unit, the far left is one that I modified with a little longer lip and the block clears that one too. . Just fyi
Similar models
thingiverse
free

Huxley X-Carriage with Zip-Ties by FMMT666
... parts didn't work for me.
here's a modified version of the x-carriage that uses two zip-ties to fix the linear bearings.
thingiverse
free
Block bearing axis Z Sunhokey by Enermax2012
...thingiverse
block bearing axis z for sunhokey upgrade part
print sx and dx block bearing
if you prefer you can glue the bearing.
thingiverse
free

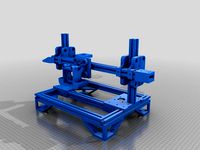
Upgrade CNC Laser / Z-Axis
...itable for the z axis. there are m4 screws to better support the z axis while the normal part has m3 screws to support the laser.
thingiverse
free

X-endstop after X and Z-axis MGN12H upgrade by siegfriedestrada
...using the single extruder stock carriage. so i decided to design one using sketchup. installed and working fine on my unit. :)
thingiverse
free

Prusa no zip ties needed LM8UU bearing X Carriage by CdnReprap
... the tie wrap version included in the release
picture shows the original on the left and the revised part on the right.
enjoy
dan
thingiverse
free

Anet A8 Y-Carriage upgrade by skalnet
...are 219x219mm so should fit every printer with a similar design like anet a6 etc. i removed the option...
thingiverse
free

FT-5 Z axis adjustable end stop mount modified for proper clearance FT5 by The_Wizard
...es you to drill a hole in the bed platform. get the adjustment screw parts from the original posting.
its a nice, rigid design.
thingiverse
free

Wanhao i3 Double Bearing Clip by dumbcomputers
... but it would work with the stock roller bearings as well if you wanted to drop the weight of one aluminum bearing block.
cheers.
thingiverse
free

Prusa Bear Full Upgrade Z-Axis Tops for Reverse Bowden by 207Printing
...re using a m10 thread connector.
if you have any ideas how to make this part better please comment and let me know your thoughts!
thingiverse
free

reprap guru Prusa i3 Z axis Upgrades by d4rkmatter
...i did have to clean up the bearing shaft holes with an 8mm drill bit (turned by hand) to get the shaft to insert cleanly.
enjoy!
Steve
thingiverse
free

steve by Supercase
...steve by supercase
thingiverse
steve
thingiverse
free

steve by Skyla
...steve by skyla
thingiverse
it is a minecraft steve
thingiverse
free

Steve by loponsler97
...steve by loponsler97
thingiverse
minecraft steve
thingiverse
free

Minecraft Steve
...minecraft steve
thingiverse
minecraft steve but trash
thingiverse
free
Steve by lualrosa
...steve by lualrosa
thingiverse
aqui tenim a steve de minecraft
thingiverse
free

Steve and Tina by Spheric00l
...steve and tina by spheric00l
thingiverse
steve and tina
thingiverse
free
Minecraft Steve by TazerTaste
...minecraft steve by tazertaste
thingiverse
minecraft steve is here!!!
thingiverse
free

Steve by schmidjon
...steve by schmidjon
thingiverse
.
thingiverse
free

Steve with cube by Simon246
...steve with cube by simon246
thingiverse
easy steve with cube in hand
thingiverse
free
steve scharff by GenericStudentss
...steve scharff by genericstudentss
thingiverse
my father steve scharff!!!!!!!!!!!!!!!!!!
Mk2
thingiverse
free

Prusa i3 MK2/MK2S LCD Cover by DJT3D
...prusa i3 mk2/mk2s lcd cover by djt3d
thingiverse
prusa i3 mk2/mk2s lcd cover
thingiverse
free

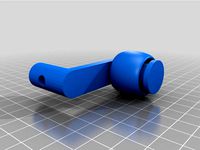
Prusa i3 Mk2/Mk2s/Mk3 knob by Nick_White
...3 knob by nick_white
thingiverse
this is another knob for the prusa i3 mk2/mk2s/mk3. it has a grip and is much easier to turn.
thingiverse
free

covfefe mk2 by albertom
...covfefe mk2 by albertom
thingiverse
covfefe keychain mk2
thingiverse
free

Transit MK2 Spiegelkappe
...transit mk2 spiegelkappe
thingiverse
transit mk2 camper spiegelkappe
thingiverse
free

MK2 Drive Bashguards
...mk2 drive bashguards
thingiverse
bashguards for the mk2 avio at gear drive!
thingiverse
free

Spool Holder for Original Prusa i3 MK2 / MK2S by dktosoch
...ginal prusa i3 mk2 / mk2s by dktosoch
thingiverse
spool holder for quick and easy swapping spool on a original prusa i3 mk2/s.
thingiverse
free

Trollenium Falcon Mk2 by _unregistered
...trollenium falcon mk2 by _unregistered
thingiverse
mk2 of the trollenium falcon.
thingiverse
free

mk2 legs by Tomik1118
...by tomik1118
thingiverse
to mitigate the vibrations of prusa mk2 printers and other clones.
really functional! rubber material.
thingiverse
free

pursa i3 mk2 by Dvoraka01
...pursa i3 mk2 by dvoraka01
thingiverse
pursa i3 mk2 part
thingiverse
free
Prusa MK2S - tool holder
...prusa mk2s - tool holder
thingiverse
tool holder for mk2s printer.
J
thingiverse
free

Earing J and J by jclymer01
...earing j and j by jclymer01
thingiverse
this earring is for anyone who has j's in their relationship. j loves j. :)
thingiverse
free

Planter with J+J by darthdarth4
...planter with j+j by darthdarth4
thingiverse
simple planter
thingiverse
free

J and O by
...j and o by
thingiverse
it is a j and a o
thingiverse
free

J by jamesjam233
...j by jamesjam233
thingiverse
a j for you to print.
thingiverse
free

Alpha Black J&J barrel spacer
...ves a little gap between the barrel and shroud making it rattle. i made this to fill the space between the barrel and the shroud.
thingiverse
free

Letra J by Xbertus
...letra j by xbertus
thingiverse
letra j
thingiverse
free

J thing by jacqkee
...j thing by jacqkee
thingiverse
j thing
thingiverse
free

J Keychain by joeyimprota
...j keychain by joeyimprota
thingiverse
j keychain
thingiverse
free
chess j by landzbej
...chess j by landzbej
thingiverse
chess j
thingiverse
free
J-Hook by Super169
...j-hook by super169
thingiverse
j-hook
Carriage
thingiverse
free
Carriage
...carriage
thingiverse
good luck
thingiverse
free

Carriage wheel
...carriage wheel
thingiverse
100mm diameter carriage wheel
thingiverse
free
Carriage by Dape
...carriage by dape
thingiverse
old fashion carriage model, more files here:https://bit.ly/3ntskqq
thingiverse
free

Inkjet Carriage by joshuajacoby99
...inkjet carriage by joshuajacoby99
thingiverse
inkjet carriage
thingiverse
free

printer carriage by qiao
...printer carriage by qiao
thingiverse
printer carriage
thingiverse
free
MGN12C Carriage by renierduminy
...mgn12c carriage by renierduminy
thingiverse
remix for a mgn12c carriage
thingiverse
free
Carriage cookie cutter
...carriage cookie cutter
thingiverse
carriage cookie cutter
thingiverse
free
Carriage that goes on the carriage 2020 by Hilmo
...goes on the carriage 2020 by hilmo
thingiverse
i am not original creator! please praise original creator! sorry for all caps! ;)
thingiverse
free
Carriage by Mr_Vigil
...carriage by mr_vigil
thingiverse
carriage mount, 7mm cross bars, gt 2 belt, 3m bolts, magnet mount as well
thingiverse
free
Y Carriage belt holder for Upgraded Carriage by Garyriet
...e belt holder for upgraded carriage by garyriet
thingiverse
added a 8mm extension to work with new carriage from reprap champion
Upgrade
thingiverse
free
upgrade graber
...upgrade graber
thingiverse
upgrade graber
thingiverse
free
Ultimaker Feeder Upgrade, Upgrade :) by yzorg
...deformation.
i made this grooved ring for the new feeder upgrade from ultimaker.
replaces the delrin ring.
test at your own risk.
thingiverse
free

Crosshairs upgrade
...crosshairs upgrade
thingiverse
upgraded wheels, hubcaps and axle joints for a certain transforming robot toy. print 4 of each.
thingiverse
free

Slingfire upgrades by RayvenLover
...slingfire upgrades by rayvenlover
thingiverse
slingfire upgrade.
thingiverse
free

Drawer Upgrade. by AcTiv
...drawer upgrade. by activ
thingiverse
drawer upgrade.
thingiverse
free

RF1000 Upgrade by LHardy
...rf1000 upgrade by lhardy
thingiverse
rf1000 upgrade
thingiverse
free

Tronxy X3 upgrades
...tronxy x3 upgrades
thingiverse
3 axis upgrades
thingiverse
free

Upgrade Anet ET4
...upgrade anet et4
thingiverse
39/5000
upgrade parts for anet printer
thingiverse
free
reel upgrade by gjay21
...reel upgrade by gjay21
thingiverse
upgrade for the fishing rod http://www.thingiverse.com/thing:896767
thingiverse
free

ender 3 upgrade by dog19721972
...ender 3 upgrade by dog19721972
thingiverse
upgrade
Block
thingiverse
free

Concrete Block / Cinder Block
...concrete block / cinder block
thingiverse
scale model of a concrete block or cinder block, drawn in mastercam.
thingiverse
free

Blocks
...blocks
thingiverse
small blocks to play around with kids
thingiverse
free

Block by block 3D game by lac826
...block by block 3d game by lac826
thingiverse
block by block 3d game
thingiverse
free

Block
...block
thingiverse
?
thingiverse
free

block by jriley
...block by jriley
thingiverse
block
thingiverse
free

Block by NedXM
...block by nedxm
thingiverse
a block
thingiverse
free

block by jriley
...block by jriley
thingiverse
block
thingiverse
free

Blocks by DavidOcasio16
...blocks by davidocasio16
thingiverse
blocks
thingiverse
free

Blocks by nevitdilmen
...blocks by nevitdilmen
thingiverse
blocks
thingiverse
free
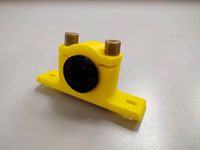
plummer block
...plummer block
thingiverse
plummer block
I3
thingiverse
free

Carriage for Graber i3/Prusa i3 by orange2120
...carriage for graber i3/prusa i3 by orange2120
thingiverse
a carriage for graber i3/prusa i3 with laser mount
thingiverse
free
I3 by singwanlew
...i3 by singwanlew
thingiverse
just prototyping my i3.
thingiverse
free

i3 MOSFET Holder / i3 MOSFET Halter by JMDesigns
...i3 mosfet holder / i3 mosfet halter by jmdesigns
thingiverse
i3 mosfet holder / i3 mosfet halter
thingiverse
free

i3-corner by guohc
...i3-corner by guohc
thingiverse
for prusa i3
thingiverse
free

i3 xCarriage by Robi1602
...i3 xcarriage by robi1602
thingiverse
i3 carriage
thingiverse
free

Wanhao i3 & i3 Plus XT60 board mods by jpasternack
...wanhao i3 & i3 plus xt60 board mods by jpasternack
thingiverse
wanhao i3 & i3 plus xt60 board mods
thingiverse
free
Prusa i3 by plangdon
...prusa i3 by plangdon
thingiverse
files for prusa i3
thingiverse
free
Atualização Graber i3
...atualização graber i3
thingiverse
melhorias graber i3 mdf
thingiverse
free

i3 Mega new
...i3 mega new
thingiverse
new idea i3 mega anycubic
thingiverse
free
prusa i3 ??? ???? by jellyalex978
...prusa i3 ??? ???? by jellyalex978
thingiverse
prusa i3 ??? ????
m8 60mm
m6 ???
Prusa
thingiverse
free

Prusa without Prusa (rc2) by madless
...prusa without prusa (rc2) by madless
thingiverse
just the main part of prusa rc2 faceshield, without writing.
enjoy :)
thingiverse
free

Prusa by acejbc
...prusa by acejbc
thingiverse
prusa knob info
m3 8mm screw
thingiverse
free

Prusa house
...prusa house
thingiverse
how prusa house could look like...
thingiverse
free

Prusa Mk2 "Fake Prusa" LCD cover by anraf1001
...r by anraf1001
thingiverse
version of prusa's lcd cover with "fake prusa" instead of "original prusa"
thingiverse
free

Prusa stabilizator by gutiueugen
...prusa stabilizator by gutiueugen
thingiverse
prusa stabilizator
thingiverse
free

Keychain Prusa by rbarbalho
...keychain prusa by rbarbalho
thingiverse
keychain with text prusa.
thingiverse
free

remake of Prusa Mini
...remake of prusa mini
thingiverse
remake of prusa mini
thingiverse
free
Prusa i3 by plangdon
...prusa i3 by plangdon
thingiverse
files for prusa i3
thingiverse
free
Mini Prusa (Prusa Mate) by neil3dprints
...cify which colors are required and if color changes are needed as well as heights to apply the color changes.
happy printing. :-)
thingiverse
free
prusa i3 ??? ???? by jellyalex978
...prusa i3 ??? ???? by jellyalex978
thingiverse
prusa i3 ??? ????
m8 60mm
m6 ???
Bearing
thingiverse
free

bearing
...bearing
thingiverse
just a bearing i made for fun
thingiverse
free

Bear
...bear
thingiverse
bear i made in tinkercad to see if i could
thingiverse
free

Brown Bear, Brown Bear by morganglass
...brown bear, brown bear by morganglass
thingiverse
brown bear, brown bear
thingiverse
free

care bears sunshine bear by johnboyjr
...care bears sunshine bear by johnboyjr
thingiverse
care bear sunshine bear
thingiverse
free

Bearing by mskokondo
...bearing by mskokondo
thingiverse
working bearing with bearing balls.
thingiverse
free

Bear mom and bear babyV2 by AlexStormND
...com/en/3d-model/art/bear-mom-and-bear-babyv3
bear mom and bear babyv4https://cults3d.com/en/3d-model/art/bear-mom-and-bear-babyv4
thingiverse
free

Bear mom and bear baby by AlexStormND
...om and bear baby by alexstormnd
thingiverse
bear mom and bear baby, you can see my other sculptures at https://t.me/alexstormnd
thingiverse
free

bearing by isaacdrais
...bearing by isaacdrais
thingiverse
bearing
thingiverse
free

Bearings by The_LAB
...bearings by the_lab
thingiverse
bearings
thingiverse
free
Bearing by milad64
...bearing by milad64
thingiverse
bearing
Original
thingiverse
free
original crank holder / original Kurbelhalter by BazillusMaximus
... holder / original kurbelhalter by bazillusmaximus
thingiverse
originally designed crank holder.
kurbelhalter original designt.
thingiverse
free
The ultimaker original handle with original logo by Gizmo999
...the ultimaker original handle with original logo by gizmo999
thingiverse
this is the handle with original logo
thingiverse
free
origin's ring
...origin's ring
thingiverse
my first modelisation attempt
origin's ring
thingiverse
free

Original Cryptex by Imura_Industries
...original cryptex by imura_industries
thingiverse
original cryptex
thingiverse
free

Potiaufsatz-original by HROB
...potiaufsatz-original by hrob
thingiverse
der original potiknopf
thingiverse
free

Original 3DBenchy by SRT808
...original 3dbenchy by srt808
thingiverse
the original 3d benchy without any crazy mods.
thingiverse
free

Origin 300i by 1234cm1
...origin 300i by 1234cm1
thingiverse
the origin 300i from star citizen. redone by hand, not exact.
thingiverse
free

Spacer for original bearing
...spacer for original bearing
thingiverse
print two of this to use the original bearing. inner hole fits m4 bolt.
thingiverse
free

Original Prusa Boombox
...both are suitable for original prusa i3 mk3 printers.
see more information about this and other projects at www.prusaprinters.org
thingiverse
free
tiger original by minnesotanice2108
...tiger original by minnesotanice2108
thingiverse
ian