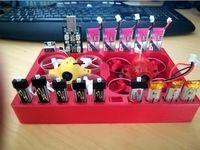
Thingiverse
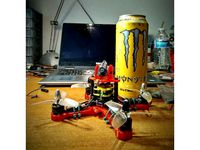
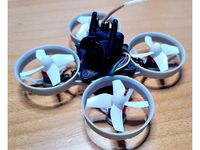
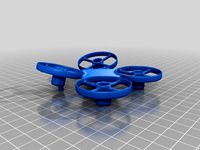
X-120 - 2 Inch "Monster Whoop" Micro Brushless Racing Drone Quadcopter by Karamvir_Bhagat
by Thingiverse
Last crawled date: 3 years ago
Update - 13.09.2018 - 19 x 19 Camera Mounts Added Clearance & Adapters
Note:
This mount is internally cleared for 20 x 20 mm to ensure a clean fit for the camera. The mount can easily be bend to accommodate for any looseness and or you can use thin washer to resolve any issues if you encounter any.
Picking the right file:
There are several files here, they are as follows:
RunCam 19 x 19 Mount - Has a M2 hole on each side to mount 19 x 19 cameras or the provided adapters.
RunCam 19 x 19 Mount - Has M2 slots on each side to mount 19 x 19 cameras or the provided adapters.
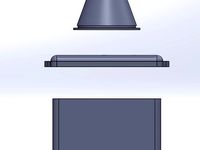
Drop Head RunCam 19 x 19 Mount - Is labelled as such and is smaller than the other mounts. It is such that you should be able to now mount off the roof.
Universal Camera Adapter - By looping a rubber band around the front of the lens, twisting, pulling behind and over your camera and back onto the lens will secure your FPV camera. This is suitable for Tiny Whoop style cameras and offers adjustable tilt. The lens is cleared for 13.8 mm lenses.
Universal Camera Adapter TPU - This is the same as the above file with a smaller lens opening. If printed in TPU you can push fit in your camera. The mount should stretch and grip it. If you have difficultly carefully and safely cut a small slit to expand the hole.
Print Advice:
Place the piece on the bed so that when looking directly down it appears as a C or a U. You should have the print lines running along the long edge of the piece where the camera bolts in.
For the adapter print vertically with the lock points point up off the bed.
Files have been updated and included. Separate files can be found at: https://www.thingiverse.com/thing:3098162
real_darKing kindly made and shared an attractive mount to use on my frames. You can check it out at: https://www.thingiverse.com/thing:3094068
Update: 11.09.2018
New RunCam 19 x 19 - Some users kindly reported that they were having issues with fitment of their RunCam cameras. This new mount has added clearance and should now clearance adequately. It mounts to the frame in the slot with M3 hardware.
For the most strength, print so that the mount:
Appears like a C or U flat on the bed.
Has the layer lines running up the vertical edges with camera mount holes.
real_darKing kindly made and shared an attractive mount to use on my frames. You can check it out at: https://www.thingiverse.com/thing:3094068
You can join the Facebook group at:https://www.facebook.com/groups/254825821981391/
Update: 10.09.2018
If you would like to use a Magnum Mini Stack (as in the Emax Babyhawk R) you will need to use the M2 to M3 adapters. You can mount via the arm holes or by rotating the stack to have one corner facing forward like a Tiny Whoop.
Adapters: https://www.thingiverse.com/thing:3093369
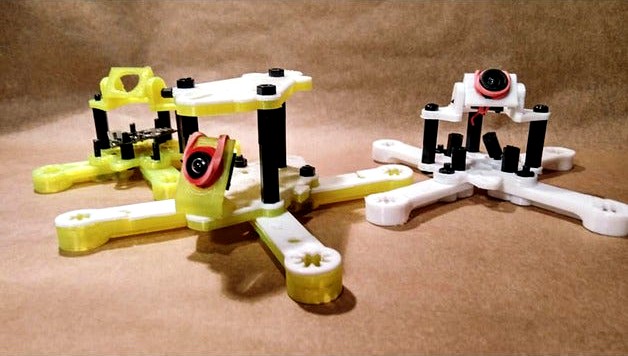
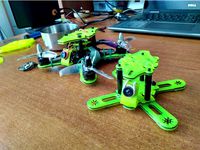
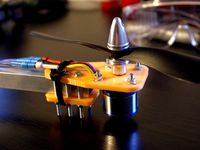
X-120 - Design Points & Spec In Full:
True X 120.1 mm frame with perfect balance.
Fully modular: Arms are easily detachable with the removal of two bolts.
Multi-config: Standard, Pusher, Puller & Split Front/Rear.
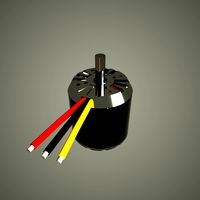
Motors: 11xx in M2.
Propellers: Anything up to 2.5 inch will fit with clearance.
Stacks/4 in 1 ESC: 16mm x 16mm in M2 & 20mm x 20mm in M3.
Active Geometry Concept:
I’m a guitarist and if you play an instrument you know that the proportions of the instrument are key to the sound. Simplest example being a pitchfork, that resonates at a specific frequency due to its shape and density. I considered that if you design the frame proportionally you should be able to cancel out unwanted vibration in the same way a noise cancelling headphone works. Additionally, it should allow stresses to be routed in such a way that components are not damaged and to also importantly add inherent strength. For fun, if you your splicer software put an excessive number of walls you can actually see the lines of how the stresses and vibrations should be routed. This is particularly noticeable in general if you print in a translucent material and gives a very cool effect.
This is just something I noted from my observations in my designs and I wanted to work with and test for proof of concept.
I call this Active Geometry.
X-120 – Build Guide:
To be able to build the X-120 successfully you need to understand one key thing, that this drone has no strict form. The parts are made so that different combinations produce different style frames with different characteristics from the same parts. To build your X-120 you must first familiarise yourself with the parts and the ways in which you can combine them.
Once you are familiar with the parts and the general build concept you can get going.
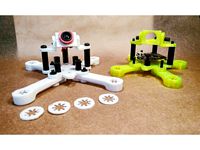
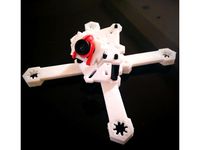
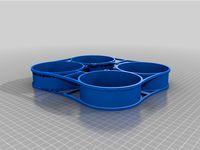
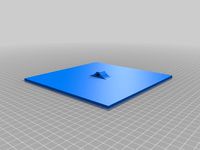
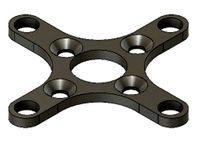
Bottom Plate – This is the main plate that you will use to bolt the quad together. The arms will lock to this piece and so will your components. The slot in the bottom plate is to accommodate the camera mounts, the idea being that you can slide the mount back and forth to suit your camera view and camera size. This plate also doubles as the top plate.
Lite Top Plate: This was created to offer a slightly lighter top to the quad and to give it a nice appearance. If you want to top mount your battery then it would be advised to use a second bottom plate for the top plate.
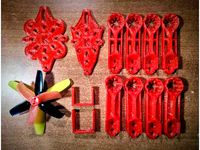
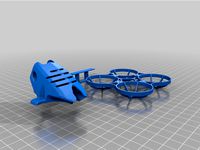
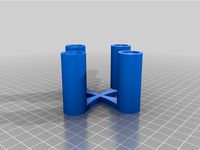
Arms: The arms of this quadcopter come in two types, plate (flat piece) and tri-beam reinforced.
a) Tri-Beam Arm: This is one file and is the standard arm for this quadcopter.
b) The plate arms come in three thickness designations, 1.1 mm, 1.7 mm and 2.8 mm. Originally my first quad, the X-132, had plate style arms in 2.8 mm. I started finding that regardless of the material these plates were prone to cracking due to their inflexibility. Experimenting I found that in basically all materials if you print several, separate layers and stack them (with or without glue) that they are structurally stronger since they can flex and this absorb some shock impact.
I then started to take this a step further by using a mix of plastics and stacking them in open and closed face “sandwiches”. I have had great success with PLA/TPU/PLA (1.1 mm respective) and I postulate that the same with PETG instead of PLA will be even more resilient. The benefit of this is that the PLA flexes enough to be functional and durable and if a it gets broken the TPU stops the motors from being torn off.
Apart from adding strength, this also meant that I could make some truly cool looking combinations of colours to make my quad really stand out.
The 2.8 mm plates will be sufficient for solid plate pieces and then you can combine different layer thickness in different numbers to get the characteristics that you want. You can also like me, experiment with different plastics to blend characteristics.
On a practical basis, using these thin “plates” you can make a quad that resembles one made from flat carbon fibre pieces, but more importantly it means that you can print very thin TPU plates for example and soft mount various parts of the quad for example if you have a very sensitive F4+ flight controller.
With regard to arm mounting you will need to use two bolts, one of which will go into your stack. You will need longer nylon bolts for this in M2/M3. If you do not have these you can probably rotate your stack and use shorter bolts. With regard to flight controllers and vibration interference there is a two-fold dampening by way of the plastic itself and also the geometry which will be explained below. I use an F3 class board with ZERO issues, you should not have any issues with an F4+, if you do you can soft mount the arms to your heart’s content with a bit of foam tape or a piece of TPU.
Multi-config - This frame allows you to build in:
a) Standard config.
b) Pusher config.
c) Split config.
To do this you will need to likely use two bottom plates to mount arms on the roof of the quad.
Camera Mounts: All my drones share common parts, this means that the camera mounts can be interchanged between all of them, the same goes for stack plates and shims. There are 3 main types of camera mount:
a) Universal camera mount: This comes in 10.8 mm and 12 mm lens sizes and mounts with an M3 bolt. To secure you camera, pass a rubber band through the hole with one half in front and one half sticking out behind. Pop the camera through the hole, twist the band once and loop over the lens. Then pull the other half over the camera and again over the lens to secure. You can do this sideways or vertically. Look at the pictures if this is unclear.
These mounts come in a short and a tall version and are in 5-degree increments.
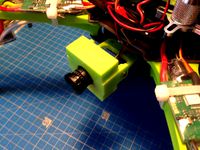
b) Adjustable camera mount: This is from the X-82 and allows you to do as above but to use the (19 x 19) Run Cam Micro style camera mount to mount your whoop style camera but with the ability to change angle. Mount holes are in M2.
c) Run Cam Micro (19 x 19) Mount: This mount takes 19 x 19 Run Cam style cameras and comes in a tall and short version. Hardware is in M2 and the frame mount hole is in M3.
Stack plates: The stack plates are so that components that do not have mount holes can be mounted to them with the use of foam tape or a very thin rubber band. This helps to secure and protect components and to also neaten up your build for wiring and aesthetic purposes.
I use the Run Cam TX200 and I have specially designed a plate so you can screw this with M2 bolts using the recesses in the sides.
Soft Mounts & Shims: Depending on the material that you use to print these, these can be either shims or soft mounts (or both). There are different thicknesses for you to choose from so that you can get the best fit for your motors.
Motor Mounting: People argue that holes are better than slots. I disagree completely. My frames are to be universal and future proof (as far as possible) so this takes that into account. Even within 11xx motors there are different screw sizes and also different mount diameters and styles. Additionally people often strip their mount holes for the motors and this can be a serious problem if you have a limited set of holes.
Secondly holes are weak points and if you crack one hole, the arm is wasted. Having a slot means that in the unlikely event you do crack a slot (normally you will snap an arm first) you can at least rotate your motor and bolt it back in. Secondly people don’t realise that all motors don’t have wires coming out from the same side, which can be a serious problem if you have not got correct holes mounts as it leaves the weak point of the wire exposed.
YOU MUST USE AT LEAST 3 BOLTS FOR YOUR MOTORS! USING 2 BOLTS WILL CAUSE A MID AIR MOTOR DETACHMENT IF YOU ARE NOT CAREFUL!
I generally think that for the sake of a 0.5g bolt per arm you should risk your quad, Lock-tite or no Lock-tite. I have had this happen in “bolt hole” arms using 2 bolts and despite good advice many continue to do this. You will have to use three bolts whether you like it or not. You can thank me when you don’t see a motor fly off in front of your camera.
Be free: I made these frames specially so that they could be totally customised and could accept additional parts easily. This is why I have left holes in the top plate for accessory mounting or for you to run your antennas through. If you want to put in an LED light bar, or a buzzer, or a GPS, you know that you can use any of the standard mount holes provided and just quickly and easily sketch something up for yourself. Similarly, if you want to have holes instead of slots or just want to make the design specific to you, I have thought of you in advance. The shapes are relatively easy to modify and customise to your needs.
Fun: My aim was to make a frame that would let people have fun with their builds and let them build to their imagination.
Flying advice:
Plastic frames are not carbon frames, its easy to forget that when you are flying.
When you first get it into the air, treat it gently like a whoop until you get used to it. Secondly, not many frames are designed to balance perfectly or are actually “true X” and if you are not used to this it might feel a little strange at first.
I would generally advice to bottom mount a battery for the longevity of the frame and arms and to generally at first treat it like a whoop. Of course, once you are proficient with the frame mount as you wish.
Plastic frame quads will protect your components very well, particularly from current and voltage spikes that normally kill components during crashes. Secondarily the frame breaking absorbs a great deal energy which would otherwise damage your components. The frames are designed to fully enclose the key components of the drone so you should hopefully enjoy parts that last for a long time.
If you want to build an absolute monster I would suggest using 3s-4s and 11xx motors. However I would also advise that if you do anything above 2s, be a careful, seriously, this will seriously haul ass and then some.
ALWAYS CHECK FLYING REGULATIONS AND RESTRICTIONS LOCAL TO YOU BEFORE ATTEMPTING TO FLY YOUR CRAFT.
Originality of Design
Of key importance to me is that my designs are original works. I always make my designs from scratch and try and make them as distinct as possible. I want to my my frames the best that they can be.
Legal Disclaimer:
In no event shall I the designer be liable for any direct, indirect, punitive, incidental, special consequential damages, to property or life, whatsoever arising out of or connected with the use or misuse of any of my designs.
In using my work you acknowledge that any and all liability is with you the user.
You use this design at your own risk and are responsible for any consequences as such.
With Love - Karamvir Bhagat
Note:
This mount is internally cleared for 20 x 20 mm to ensure a clean fit for the camera. The mount can easily be bend to accommodate for any looseness and or you can use thin washer to resolve any issues if you encounter any.
Picking the right file:
There are several files here, they are as follows:
RunCam 19 x 19 Mount - Has a M2 hole on each side to mount 19 x 19 cameras or the provided adapters.
RunCam 19 x 19 Mount - Has M2 slots on each side to mount 19 x 19 cameras or the provided adapters.
Drop Head RunCam 19 x 19 Mount - Is labelled as such and is smaller than the other mounts. It is such that you should be able to now mount off the roof.
Universal Camera Adapter - By looping a rubber band around the front of the lens, twisting, pulling behind and over your camera and back onto the lens will secure your FPV camera. This is suitable for Tiny Whoop style cameras and offers adjustable tilt. The lens is cleared for 13.8 mm lenses.
Universal Camera Adapter TPU - This is the same as the above file with a smaller lens opening. If printed in TPU you can push fit in your camera. The mount should stretch and grip it. If you have difficultly carefully and safely cut a small slit to expand the hole.
Print Advice:
Place the piece on the bed so that when looking directly down it appears as a C or a U. You should have the print lines running along the long edge of the piece where the camera bolts in.
For the adapter print vertically with the lock points point up off the bed.
Files have been updated and included. Separate files can be found at: https://www.thingiverse.com/thing:3098162
real_darKing kindly made and shared an attractive mount to use on my frames. You can check it out at: https://www.thingiverse.com/thing:3094068
Update: 11.09.2018
New RunCam 19 x 19 - Some users kindly reported that they were having issues with fitment of their RunCam cameras. This new mount has added clearance and should now clearance adequately. It mounts to the frame in the slot with M3 hardware.
For the most strength, print so that the mount:
Appears like a C or U flat on the bed.
Has the layer lines running up the vertical edges with camera mount holes.
real_darKing kindly made and shared an attractive mount to use on my frames. You can check it out at: https://www.thingiverse.com/thing:3094068
You can join the Facebook group at:https://www.facebook.com/groups/254825821981391/
Update: 10.09.2018
If you would like to use a Magnum Mini Stack (as in the Emax Babyhawk R) you will need to use the M2 to M3 adapters. You can mount via the arm holes or by rotating the stack to have one corner facing forward like a Tiny Whoop.
Adapters: https://www.thingiverse.com/thing:3093369
X-120 - Design Points & Spec In Full:
True X 120.1 mm frame with perfect balance.
Fully modular: Arms are easily detachable with the removal of two bolts.
Multi-config: Standard, Pusher, Puller & Split Front/Rear.
Motors: 11xx in M2.
Propellers: Anything up to 2.5 inch will fit with clearance.
Stacks/4 in 1 ESC: 16mm x 16mm in M2 & 20mm x 20mm in M3.
Active Geometry Concept:
I’m a guitarist and if you play an instrument you know that the proportions of the instrument are key to the sound. Simplest example being a pitchfork, that resonates at a specific frequency due to its shape and density. I considered that if you design the frame proportionally you should be able to cancel out unwanted vibration in the same way a noise cancelling headphone works. Additionally, it should allow stresses to be routed in such a way that components are not damaged and to also importantly add inherent strength. For fun, if you your splicer software put an excessive number of walls you can actually see the lines of how the stresses and vibrations should be routed. This is particularly noticeable in general if you print in a translucent material and gives a very cool effect.
This is just something I noted from my observations in my designs and I wanted to work with and test for proof of concept.
I call this Active Geometry.
X-120 – Build Guide:
To be able to build the X-120 successfully you need to understand one key thing, that this drone has no strict form. The parts are made so that different combinations produce different style frames with different characteristics from the same parts. To build your X-120 you must first familiarise yourself with the parts and the ways in which you can combine them.
Once you are familiar with the parts and the general build concept you can get going.
Bottom Plate – This is the main plate that you will use to bolt the quad together. The arms will lock to this piece and so will your components. The slot in the bottom plate is to accommodate the camera mounts, the idea being that you can slide the mount back and forth to suit your camera view and camera size. This plate also doubles as the top plate.
Lite Top Plate: This was created to offer a slightly lighter top to the quad and to give it a nice appearance. If you want to top mount your battery then it would be advised to use a second bottom plate for the top plate.
Arms: The arms of this quadcopter come in two types, plate (flat piece) and tri-beam reinforced.
a) Tri-Beam Arm: This is one file and is the standard arm for this quadcopter.
b) The plate arms come in three thickness designations, 1.1 mm, 1.7 mm and 2.8 mm. Originally my first quad, the X-132, had plate style arms in 2.8 mm. I started finding that regardless of the material these plates were prone to cracking due to their inflexibility. Experimenting I found that in basically all materials if you print several, separate layers and stack them (with or without glue) that they are structurally stronger since they can flex and this absorb some shock impact.
I then started to take this a step further by using a mix of plastics and stacking them in open and closed face “sandwiches”. I have had great success with PLA/TPU/PLA (1.1 mm respective) and I postulate that the same with PETG instead of PLA will be even more resilient. The benefit of this is that the PLA flexes enough to be functional and durable and if a it gets broken the TPU stops the motors from being torn off.
Apart from adding strength, this also meant that I could make some truly cool looking combinations of colours to make my quad really stand out.
The 2.8 mm plates will be sufficient for solid plate pieces and then you can combine different layer thickness in different numbers to get the characteristics that you want. You can also like me, experiment with different plastics to blend characteristics.
On a practical basis, using these thin “plates” you can make a quad that resembles one made from flat carbon fibre pieces, but more importantly it means that you can print very thin TPU plates for example and soft mount various parts of the quad for example if you have a very sensitive F4+ flight controller.
With regard to arm mounting you will need to use two bolts, one of which will go into your stack. You will need longer nylon bolts for this in M2/M3. If you do not have these you can probably rotate your stack and use shorter bolts. With regard to flight controllers and vibration interference there is a two-fold dampening by way of the plastic itself and also the geometry which will be explained below. I use an F3 class board with ZERO issues, you should not have any issues with an F4+, if you do you can soft mount the arms to your heart’s content with a bit of foam tape or a piece of TPU.
Multi-config - This frame allows you to build in:
a) Standard config.
b) Pusher config.
c) Split config.
To do this you will need to likely use two bottom plates to mount arms on the roof of the quad.
Camera Mounts: All my drones share common parts, this means that the camera mounts can be interchanged between all of them, the same goes for stack plates and shims. There are 3 main types of camera mount:
a) Universal camera mount: This comes in 10.8 mm and 12 mm lens sizes and mounts with an M3 bolt. To secure you camera, pass a rubber band through the hole with one half in front and one half sticking out behind. Pop the camera through the hole, twist the band once and loop over the lens. Then pull the other half over the camera and again over the lens to secure. You can do this sideways or vertically. Look at the pictures if this is unclear.
These mounts come in a short and a tall version and are in 5-degree increments.
b) Adjustable camera mount: This is from the X-82 and allows you to do as above but to use the (19 x 19) Run Cam Micro style camera mount to mount your whoop style camera but with the ability to change angle. Mount holes are in M2.
c) Run Cam Micro (19 x 19) Mount: This mount takes 19 x 19 Run Cam style cameras and comes in a tall and short version. Hardware is in M2 and the frame mount hole is in M3.
Stack plates: The stack plates are so that components that do not have mount holes can be mounted to them with the use of foam tape or a very thin rubber band. This helps to secure and protect components and to also neaten up your build for wiring and aesthetic purposes.
I use the Run Cam TX200 and I have specially designed a plate so you can screw this with M2 bolts using the recesses in the sides.
Soft Mounts & Shims: Depending on the material that you use to print these, these can be either shims or soft mounts (or both). There are different thicknesses for you to choose from so that you can get the best fit for your motors.
Motor Mounting: People argue that holes are better than slots. I disagree completely. My frames are to be universal and future proof (as far as possible) so this takes that into account. Even within 11xx motors there are different screw sizes and also different mount diameters and styles. Additionally people often strip their mount holes for the motors and this can be a serious problem if you have a limited set of holes.
Secondly holes are weak points and if you crack one hole, the arm is wasted. Having a slot means that in the unlikely event you do crack a slot (normally you will snap an arm first) you can at least rotate your motor and bolt it back in. Secondly people don’t realise that all motors don’t have wires coming out from the same side, which can be a serious problem if you have not got correct holes mounts as it leaves the weak point of the wire exposed.
YOU MUST USE AT LEAST 3 BOLTS FOR YOUR MOTORS! USING 2 BOLTS WILL CAUSE A MID AIR MOTOR DETACHMENT IF YOU ARE NOT CAREFUL!
I generally think that for the sake of a 0.5g bolt per arm you should risk your quad, Lock-tite or no Lock-tite. I have had this happen in “bolt hole” arms using 2 bolts and despite good advice many continue to do this. You will have to use three bolts whether you like it or not. You can thank me when you don’t see a motor fly off in front of your camera.
Be free: I made these frames specially so that they could be totally customised and could accept additional parts easily. This is why I have left holes in the top plate for accessory mounting or for you to run your antennas through. If you want to put in an LED light bar, or a buzzer, or a GPS, you know that you can use any of the standard mount holes provided and just quickly and easily sketch something up for yourself. Similarly, if you want to have holes instead of slots or just want to make the design specific to you, I have thought of you in advance. The shapes are relatively easy to modify and customise to your needs.
Fun: My aim was to make a frame that would let people have fun with their builds and let them build to their imagination.
Flying advice:
Plastic frames are not carbon frames, its easy to forget that when you are flying.
When you first get it into the air, treat it gently like a whoop until you get used to it. Secondly, not many frames are designed to balance perfectly or are actually “true X” and if you are not used to this it might feel a little strange at first.
I would generally advice to bottom mount a battery for the longevity of the frame and arms and to generally at first treat it like a whoop. Of course, once you are proficient with the frame mount as you wish.
Plastic frame quads will protect your components very well, particularly from current and voltage spikes that normally kill components during crashes. Secondarily the frame breaking absorbs a great deal energy which would otherwise damage your components. The frames are designed to fully enclose the key components of the drone so you should hopefully enjoy parts that last for a long time.
If you want to build an absolute monster I would suggest using 3s-4s and 11xx motors. However I would also advise that if you do anything above 2s, be a careful, seriously, this will seriously haul ass and then some.
ALWAYS CHECK FLYING REGULATIONS AND RESTRICTIONS LOCAL TO YOU BEFORE ATTEMPTING TO FLY YOUR CRAFT.
Originality of Design
Of key importance to me is that my designs are original works. I always make my designs from scratch and try and make them as distinct as possible. I want to my my frames the best that they can be.
Legal Disclaimer:
In no event shall I the designer be liable for any direct, indirect, punitive, incidental, special consequential damages, to property or life, whatsoever arising out of or connected with the use or misuse of any of my designs.
In using my work you acknowledge that any and all liability is with you the user.
You use this design at your own risk and are responsible for any consequences as such.
With Love - Karamvir Bhagat
Similar models
thingiverse
free
X-82 "Monster Whoop" - 1.9 - 2.5 Inch Micro Brushless FPV Racing Drone Quadcopter by Karamvir_Bhagat
...y and all liability is with you the user.
you use this design at your own risk and are responsible for any consequences as such.
thingiverse
free

"Monster Whoop" 19 x 19 & RunCam Camera Mount by Karamvir_Bhagat
...e long edge of the piece where the camera bolts in.
for the adapter print vertically with the lock points point up off the bed.
thingiverse
free

X-153 - "Sauce 1" - XL Monster Whoop - 3" Micro Brushless Quadcopter Drone by Karamvir_Bhagat
...or by rotating the stack to have one corner facing forward like a tiny whoop.
adapters: https://www.thingiverse.com/thing:3093369
thingiverse
free
X-129R "Monster Whoop" - Micro Brushless 3D Printed FPV Quadcopter Drone Frame Kit by Karamvir_Bhagat
...ny and all liability is with you the user.
you use this design at your own risk and are responsible for any consequences as such.
thingiverse
free
X-107 - 2" Micro Brushless Drone Beta Testing by Karamvir_Bhagat
...ers note:
thank you very much your interest and for your participation should you wish to engage in the project!
karamvir bhagat
thingiverse
free
X-814 Singularity Master Monster Whoop by Karamvir_Bhagat
... builds.
fully enclosed stack.
height adjustable 19 x 19 camera compatible with 1 mm clearance added.
beast mode built in.
thingiverse
free
XC-120 Patriot - Micro Brushless 2.5 inch "Monster Whoop" 3D Printable Quadcopter Drone by Karamvir_Bhagat
...just quickly and easily sketch something up for yourself. similary, if you want to have holes instead of slots...
thingiverse
free

Joza TX130 quadcopter frame
...are to be threaded m2.
i have had the plates cut out of 3mm carbon fiber plates. 1,5mm for the top plate. stand offs are printed.
thingiverse
free
M2 & M2.5 to M3 Adapters & Soft Mounts (20 x 20 mm Flight Controllers) by Karamvir_Bhagat
... rotate and mount the stack like a tiny whoop with a corner facing forward to in the regular manner by mounting through the arms.
thingiverse
free
FPV Camera Case & Mount for SK450 by emdzej
...;ll probably have to take out your lens before mounting the camera as the hole for the lens is almost the size of the lens mount.
Karamvir
thingiverse
free
Runcam Micro Sparrow Holder for X-153 and other similar Frames by real_darKing
...the x-153 abd x-132, a 3d printable frame by karamvir bhagat https://www.thingiverse.com/thing:3079727https://www.thingiverse.com/thing:2956351 thank you! about the thing: i wanted...
thingiverse
free
X-107 - 2" Micro Brushless Drone Beta Testing by Karamvir_Bhagat
...ers note:
thank you very much your interest and for your participation should you wish to engage in the project!
karamvir bhagat
thingiverse
free
XC-120 Patriot - Micro Brushless 2.5 inch "Monster Whoop" 3D Printable Quadcopter Drone by Karamvir_Bhagat
... you the user.
you use this design at your own risk and are responsible for any consequences as such.
with love - karamvir bhagat
Bhagat
3d_sky
$8

Roman shades of velvet
...fill your room and provide its originality and splendor bhagat ...
thingiverse
free
Runcam Micro Sparrow Holder for X-153 and other similar Frames by real_darKing
...x-153 abd x-132, a 3d printable frame by karamvir bhagat https://www.thingiverse.com/thing:3079727https://www.thingiverse.com/thing:2956351 thank you! about the thing: i wanted to...
thingiverse
free
X-107 - 2" Micro Brushless Drone Beta Testing by Karamvir_Bhagat
...ers note:
thank you very much your interest and for your participation should you wish to engage in the project!
karamvir bhagat
thingiverse
free
XC-120 Patriot - Micro Brushless 2.5 inch "Monster Whoop" 3D Printable Quadcopter Drone by Karamvir_Bhagat
... you the user.
you use this design at your own risk and are responsible for any consequences as such.
with love - karamvir bhagat
cg_trader
$20
Bhagat Singh | 3D
...3d print, bhagat singh figurine. bhagat singh bust. bhagat singh stl bhagat singh bhagatsingh revolutionary indian art sculptures
grabcad
free

Logo SD Bhagat
...logo sd bhagat
grabcad
that is my logo, for my vehicle.
grabcad
free

SCREW JACK By Dipraj Bhagat
...
to remove tyre it needs to lift vehicle upwards this jack helps to lift the vehicle upwards and makes tyre removal process easy
3dwarehouse
free
bhautik bhagat fc
...bhautik bhagat fc
3dwarehouse
3dwarehouse
free

bhautik bhagat 2
...bhautik bhagat 2
3dwarehouse
Whoop
thingiverse
free
whoop by MichaelJFPV
...whoop by michaeljfpv
thingiverse
whoop
thingiverse
free
Tiny Whoop holder for 2 whoops by d2000
...tiny whoop holder for 2 whoops by d2000
thingiverse
tiny whoop holder for 2 whoop mini drones and battery
thingiverse
free
Whoop frame by Brassekongo
...whoop frame by brassekongo
thingiverse
a tiny whoop frame
thingiverse
free

Whoop frame by Brassekongo
...whoop frame by brassekongo
thingiverse
my first whoop frame.
thingiverse
free
WHOOPS 4
...
whoops is another
big cinewhoop as addon for hyperlite tooth fairy race frame 4"
first flight https://youtu.be/xm9afwiiass
thingiverse
free
Tiny Whoop 65mm by binaryfpv
...tiny whoop 65mm by binaryfpv
thingiverse
tiny whoop 65mm
thingiverse
free
V-Tail Whoop by Mystereon
...v-tail whoop by mystereon
thingiverse
v-tail whoop .. wip
thingiverse
free
Tiny Whoop Case by 3DRCStore
...tiny whoop case by 3drcstore
thingiverse
tiny whoop case for transport.
thingiverse
free
Tiny Whoop Calibration Base
...tiny whoop calibration base
thingiverse
a base usefull to calibrate your tiny whoop
thingiverse
free
Tiny Whoop Gate by Imozeb
...tiny whoop gate by imozeb
thingiverse
custom tiny whoop gate. requires hot glue for assembly.
Brushless
turbosquid
$4
Brushless motor
...r download as 3ds, dxf, obj, xsi, wrl, fbx, dwg, dae, and skp on turbosquid: 3d models for games, architecture, videos. (1366202)
3d_export
$10
wheel and motor for mars rover
...last project: a mars rover concept. complete wheel and brushless electrical motor designed to attach to an atv or...
3d_export
$100
the volt futuristic ev hypercar
...future ! some design aspects : this is in-wheel (brushless hub) motors vehicle, for each motor the core part...
3d_export
$20
si cantik cargo plane for humanity medicine kit
...used for the tailboom. the electronic components used are brushless motor os 1000kv which can produce thrust 3kgas a...
free3d
free
N6375 Brushless Motor
...n6375 brushless motor
free3d
n6375 brushless motor
thingiverse
free

Tyro 79 brushless key
...tyro 79 brushless key
thingiverse
tyro 79 brushless key
thingiverse
free
Propeller antirotation brushless lock
...propeller antirotation brushless lock
thingiverse
propeller antirotation brushless lock
thingiverse
free
Brushless motor holder by NukeCraft
...brushless motor holder by nukecraft
thingiverse
brushless motor holder for bl3650
thingiverse
free
Brushless motor mount by robotbuilders
...brushless motor mount by robotbuilders
thingiverse
replacement mount for brushless motor.
thingiverse
free
Brushless motor mount by TarsVH
...brushless motor mount by tarsvh
thingiverse
a mount for a 2830 size brushless motor
Quadcopter
3d_export
$5
quadcopter
...quadcopter
3dexport
futuristic quadcopter design.<br>original design davidflo 77
turbosquid
$19
quadcopter
...lty free 3d model quadcopter for download as max, ma, and obj on turbosquid: 3d models for games, architecture, videos. (1591426)
turbosquid
$25
QuadCopter
... available on turbo squid, the world's leading provider of digital 3d models for visualization, films, television, and games.
3d_export
$5
Quadcopter 3D Model
...quadcopter 3d model
3dexport
quadcopter studio shaders
quadcopter 3d model vortex333 93968 3dexport
3d_export
$5

Quadcopter 3D Model
...quadcopter 3d model
3dexport
quadcopter aircraft helicopter
quadcopter 3d model greatghost 94019 3dexport
3d_export
$18
passenger quadcopter
... a multicopter is an aircraft built according to a helicopter scheme, with three or more rotors. previews rendered with redshift.
turbosquid
$159
Quadcopter Animated.
... available on turbo squid, the world's leading provider of digital 3d models for visualization, films, television, and games.
turbosquid
$19
Drone Quadcopter
... available on turbo squid, the world's leading provider of digital 3d models for visualization, films, television, and games.
turbosquid
$12
Drone Quadcopter
... available on turbo squid, the world's leading provider of digital 3d models for visualization, films, television, and games.
3d_export
$29

Quadcopter
...
questions about the continuation of the collection or the model can be asked here:<br>https://www.artstation.com/evgen_beg
Drone
3d_export
$12
Drones
...drones
3dexport
drones
3d_export
$5
drone
...drone
3dexport
drone
3d_export
$6

drone
...drone
3dexport
high poly model of dji phantom 4 (drone)
3d_export
$5

drone
...drone
3dexport
drone military flight, sizes are in mm, modeled in fision 360
3d_export
free
drone
...drone
3dexport
drone de uso tactico, creado en blender version 2.79
3d_export
$35
DRONE
...drone
3dexport
turkey drone alpagu kamikaze foldable wing 3ds max 2019,2020,2021,2022 vray 5.00 rendered
3d_ocean
$29

Drone
...drone camera drone electronics justtomas military parrot plane robot sci-fi spy toy vehicle
drone by justtomas .c4d r16 .obj .3ds
turbosquid
$6

Drone
...rone
turbosquid
royalty free 3d model drone for download as on turbosquid: 3d models for games, architecture, videos. (1347051)
turbosquid
free

Drone
...drone
turbosquid
free 3d model drone for download as blend on turbosquid: 3d models for games, architecture, videos. (1688993)
turbosquid
$69
Drone
...e
turbosquid
royalty free 3d model drone for download as max on turbosquid: 3d models for games, architecture, videos. (1232508)
Monster
3d_export
$5
monster
...monster
3dexport
very realistic monster
3d_export
free

monster
...monster
3dexport
bloody monster! (looks terrifying)
3d_ocean
$12

Monster
... this code “envatoguest2016” . visit our store high details 3d character model for small monster , useful for animations, movi...
3d_ocean
$15
Monster
...monster
3docean
android game ios java main model monster playdesign
polycount :1118 texture :1024×1024png
3d_ocean
$8
Monster Man
...monster man
3docean
giant monster
monster man software: 3ds max, mental ray.
turbosquid
$60

MONSTER
...turbosquid
royalty free 3d model monster for download as max on turbosquid: 3d models for games, architecture, videos. (1220728)
turbosquid
$60
Monster
...turbosquid
royalty free 3d model monster for download as fbx on turbosquid: 3d models for games, architecture, videos. (1320840)
turbosquid
$19

Monster
...turbosquid
royalty free 3d model monster for download as max on turbosquid: 3d models for games, architecture, videos. (1248452)
turbosquid
$15
Monster
...turbosquid
royalty free 3d model monster for download as ztl on turbosquid: 3d models for games, architecture, videos. (1417804)
turbosquid
$15

Monster
...turbosquid
royalty free 3d model monster for download as max on turbosquid: 3d models for games, architecture, videos. (1293042)
Micro
3ddd
$1
Micro
...micro
3ddd
автобус
turbosquid
$80

MICRO
...ty free 3d model micro for download as max, c4d, obj, and fbx on turbosquid: 3d models for games, architecture, videos. (1700743)
3ddd
$1

JBL Micro Wireless
... micro , колонка , плеер
jbl micro wireless
turbosquid
$10
Suppressor Micro
...quid
royalty free 3d model suppressor micro for download as on turbosquid: 3d models for games, architecture, videos. (1380433)
turbosquid
$20
Micro Meter
...osquid
royalty free 3d model micro meter for download as fbx on turbosquid: 3d models for games, architecture, videos. (1350448)
turbosquid
$7

NIghtstand Micro
...d
royalty free 3d model nightstand micro for download as max on turbosquid: 3d models for games, architecture, videos. (1248117)
3ddd
$1
Micro wind turbine
...micro wind turbine
3ddd
турбина
micro wind turbine for your green building projects
turbosquid
$29
Micro Speakers
... available on turbo squid, the world's leading provider of digital 3d models for visualization, films, television, and games.
turbosquid
$29

Micro Servo.max
... available on turbo squid, the world's leading provider of digital 3d models for visualization, films, television, and games.
turbosquid
$20

Micro cells
... available on turbo squid, the world's leading provider of digital 3d models for visualization, films, television, and games.
120
3ddd
$1

Life 120-120-50
... журнальный , круглый
автор модели: aeroslon
design_connected
$13
XZ3 120
...xz3 120
designconnected
magis xz3 120 computer generated 3d model. designed by van onck, andries & hiroko.
3ddd
$1
diamond so 120
...diamond so 120
3ddd
diamond , morosini
люстра diamond so 120
turbosquid
$10

Table 120
...lty free 3d model table 120 for download as max, obj, and fbx on turbosquid: 3d models for games, architecture, videos. (1503795)
turbosquid
$6

Lamp 120
...alty free 3d model lamp 120 for download as max, obj, and fbx on turbosquid: 3d models for games, architecture, videos. (1500749)
turbosquid
$15

Curtain 120
...e 3d model curtain 120 for download as max, max, fbx, and obj on turbosquid: 3d models for games, architecture, videos. (1618083)
3ddd
$1
Bench 120
...bench 120
3ddd
скамья
bench for two.
turbosquid
$20

Landscape 120
... available on turbo squid, the world's leading provider of digital 3d models for visualization, films, television, and games.
turbosquid
$9

Office 120
... available on turbo squid, the world's leading provider of digital 3d models for visualization, films, television, and games.
3ddd
free

kerasan Bentley 120
... цветок , полотенце
комплект kerasan bentley 120
Racing
3ddd
$1
race
...race
3ddd
мотоцикл
race
turbosquid
$15
Racing
...d
royalty free 3d model racing for download as obj and blend on turbosquid: 3d models for games, architecture, videos. (1474846)
3d_export
$5

racing car
...racing car
3dexport
racing car
3d_export
$5
racing helmet
...racing helmet
3dexport
helmet 3d model for motocross or racing cars
3d_export
$5

racing car
...racing car
3dexport
low poly classical racing car model
3d_ocean
$29
racing car
...cing car rim seat speed sport sport car tyre
detailed 3d model of racing car. all materials are included. model is ready for use.
3d_ocean
$29

racing car
... rim seat speed spoiler sport sport car tire
detailed 3d model of racing car. all materials are included. model is ready for use.
3d_ocean
$15

Race Car
...race car
3docean
a very detailed and realistic 3d model of a race car, which was created with polygons.
3ddd
$1
Turbo Racing
... машинка
игрушечная гоночная дорога "turbo racing". почувствуй себя настоящим гонщиком.
3d_export
$100

start race motocross
...start race motocross
3dexport
start race motocross
Inch
3ddd
$1
Inch chair
...inch chair
3ddd
inch , vitra
vitra inch chair wood vray
3d_export
$7
shoes size from 5 inch size to 11 inch
...shoes size from 5 inch size to 11 inch
3dexport
shoes design women model sizing from 5 inch to 11 inch
turbosquid
free
BAZOOKA 236 INCH
...d
royalty free 3d model bazooka 236 inch for download as fbx on turbosquid: 3d models for games, architecture, videos. (1646746)
3ddd
$1

36 Inch Terrific Trio
...36 inch terrific trio
3ddd
круглый , скатерть
нойной столик - 36 inch terrific trio
turbosquid
$10
30 inch table
... available on turbo squid, the world's leading provider of digital 3d models for visualization, films, television, and games.
turbosquid
$2

Display 22 inch
... available on turbo squid, the world's leading provider of digital 3d models for visualization, films, television, and games.
3ddd
free
currey 30 inches 6767
...currey 30 inches 6767
3ddd
currey&company
светильник настольный currey and company 6767 greta 30 inch table lamp
3d_export
$6

samsung 85 inch uhd tv
...samsung 85 inch uhd tv
3dexport
samsung 85 inch uhd tv with stand and normal both
turbosquid
$49

Hyde Sofa 88-inch
...
royalty free 3d model hyde sofa 88-inch for download as max on turbosquid: 3d models for games, architecture, videos. (1622670)
turbosquid
$44
Corwyn Sofa 85-inch
...royalty free 3d model corwyn sofa 85-inch for download as max on turbosquid: 3d models for games, architecture, videos. (1622689)
2
design_connected
$11

No 2
...no 2
designconnected
sibast no 2 computer generated 3d model. designed by sibast, helge.
turbosquid
$6

Cliff Rock 2-2
...uid
royalty free 3d model cliff rock 2-2 for download as obj on turbosquid: 3d models for games, architecture, videos. (1619161)
turbosquid
$29

Book variation 2 2
...3d model book variation 2 2 for download as max, obj, and fbx on turbosquid: 3d models for games, architecture, videos. (1366868)
turbosquid
$22

Classic baluster (2) (2)
...assic baluster (2) (2) for download as max, obj, fbx, and stl on turbosquid: 3d models for games, architecture, videos. (1483789)
turbosquid
$99

Smilodon 2 Pose 2
... available on turbo squid, the world's leading provider of digital 3d models for visualization, films, television, and games.
turbosquid
$20

Barrel Barricade 2-2
... available on turbo squid, the world's leading provider of digital 3d models for visualization, films, television, and games.
turbosquid
$6

Wall Trophy (2) (2)
... available on turbo squid, the world's leading provider of digital 3d models for visualization, films, television, and games.
turbosquid
free

Tire label 2 of 2
... available on turbo squid, the world's leading provider of digital 3d models for visualization, films, television, and games.
3ddd
$1

Кровать, 2 тумбочки, 2 светильника
...кровать, 2 тумбочки, 2 светильника
3ddd
кровать, 2 тумбочки, 2 светильника
нормальное качество
формат 3ds max
без текстур
3ddd
free

Кровать, 2 тумбочки, 2 светильника
...кровать, 2 тумбочки, 2 светильника
3ddd
кровать, 2 тумбочки, 2 светильника
нормальное качество
формат 3ds max
без текстур