Thingiverse
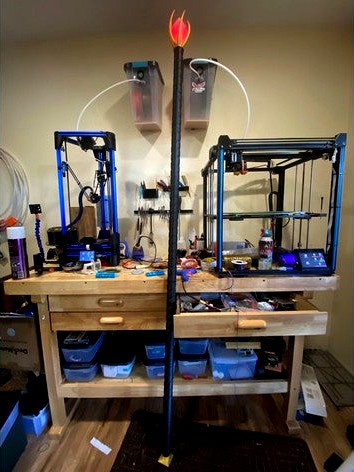
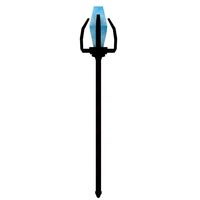
Wizard's staff by mattkins99
by Thingiverse
Last crawled date: 3 years, 3 months ago
I've never done cosplay, but was bored over Thanksgiving and started this as a way to play with NodeMCUs running WLED. I also plan to adapt this for yard torches this summer. Also my wife really liked it but didn't want a saff, so I made another with only the top shaft as a short wand.
Parts:
Random
Wire (6ft for the staff, but more for various bits)
Hot glue
Super glue
E6000 glue
conformal coating
Main Staff:
1x CrystalLEDJig
1x StaffCrystal
1x Crown
1x StaffTop
9x shaft
~71" 1" schedule 40 PVC (dirt cheap from HomeDepot)
10x Individually Addressable LEDs (https://www.amazon.com/ALITOVE-100pcs-WS2812B-Addressable-Arduino/dp/B01D1FFVOA)
1x NodeMCU (standard 8266 fits 1", but ESP32 DevKitv1 does not. Other ESP32 boards are smaller. 8266 is plenty for this project though and dirt cheap) (https://www.amazon.com/KeeYees-Internet-Development-Wireless-Compatible/dp/B07S5Z3VYZ)
1x 18650 battery (salvage or buy from Amazon)
1x lithium battery charger/discharger 5v (https://www.amazon.com/MakerFocus-Discharge-Integrated-Charging-Protection/dp/B07PZT3ZW2)
Pommel USB charger
1x USBPommel
1x USB port (I ripped one off ... um.. some electronic doo-dad)
[Optional] magnetic tip USB cables (glue into USB port. Glue tip into USB port to make things easier) (https://www.amazon.com/TOPK-Magnetic-Charging-Compatible-iProducts/dp/B087LZTD9C)
Pommel standard/Wireless charging coil
1x Pommel_coil
1x Pommel_coilCap
1x wireless inductive charging set (https://www.amazon.com/Adafruit-Inductive-Charging-Set-ADA1407/dp/B00SLYAIG8)
Wireless Charging Base
1x WirelessChargerCenterCup
1x WirelessChargerCenterRing
1x WirelessChargerBase
1x 5.5mm barrel jack
1x 12v power brick with standard 5.5 jack. (1.5A should be plenty though I'm using 5A simply because it's what I had laying around) (https://www.amazon.com/Pigtail-Female-Connectors-Security-Adapter/dp/B07C7VSRBG)
Printing Tips
Crown
Print the Crown with high infill and with strong filament. it's fragile so... I'm planning to re-print mine in PLA+ or PETG. Wife already broke the first one I made for her wand version of this. I reprinted with 70% infill and so far it's holding up.
Crystal
I printed with 3 walls and 0% infill which gives good diffusion of the light. I'm not sure it would look good with infill... but then I didn't try it so.... maybe I'm wrong?
Assembly
LED jig/Crystal
LEDs are wired in three parallel strands. 2 are 3 LEDs long and one is 4 which is the LED at the top. E6000 holds really well and is clear so I used at lot here.
Glob some E6000 onto the top LED and shove it into the crystal with a stick or really anything just to push it all the way in. Leave it that way for a few minutes until the E6000 holds it. I also gluded the wires at the bottom of the crystal and added a JST connector for ease of assembly/disassembly and because I had them... but that's totally optional.
Use Hot Glue to hold the crystal into the crown. It is easy to break the crown and while E6000 can be removed, hot glue holds well enough and is just easier to remove for disassembly if you need to.
USB Pommel
Look up the pin out on a micro USB connector. Basically the outer most pins one side is 5v and the other is ground.
Feed the wire into the hold in the base first. I inserted a magnetic USB charger end thing into the USB port at this point, but it's optional. I then globbed E6000 (because this area will hit the ground a lot and E6000 is more durable than hot glue) and pushed it all the way into the pommel letting it dry.
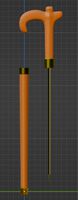
Shaft
Top shaft first with some glue (I used superglue, but you could use epoxy or whatever. I was test fitting a lot, so I didn't want something as strong as epoxy (and I didn't have any on hand) but if I was to make this again, I would probably go with a thin epoxy.
Add shaft sections one at a time, adding glue, aligning and letting dry. I tried alignment pins but they were more trouble than they were worth.
Parts:
Random
Wire (6ft for the staff, but more for various bits)
Hot glue
Super glue
E6000 glue
conformal coating
Main Staff:
1x CrystalLEDJig
1x StaffCrystal
1x Crown
1x StaffTop
9x shaft
~71" 1" schedule 40 PVC (dirt cheap from HomeDepot)
10x Individually Addressable LEDs (https://www.amazon.com/ALITOVE-100pcs-WS2812B-Addressable-Arduino/dp/B01D1FFVOA)
1x NodeMCU (standard 8266 fits 1", but ESP32 DevKitv1 does not. Other ESP32 boards are smaller. 8266 is plenty for this project though and dirt cheap) (https://www.amazon.com/KeeYees-Internet-Development-Wireless-Compatible/dp/B07S5Z3VYZ)
1x 18650 battery (salvage or buy from Amazon)
1x lithium battery charger/discharger 5v (https://www.amazon.com/MakerFocus-Discharge-Integrated-Charging-Protection/dp/B07PZT3ZW2)
Pommel USB charger
1x USBPommel
1x USB port (I ripped one off ... um.. some electronic doo-dad)
[Optional] magnetic tip USB cables (glue into USB port. Glue tip into USB port to make things easier) (https://www.amazon.com/TOPK-Magnetic-Charging-Compatible-iProducts/dp/B087LZTD9C)
Pommel standard/Wireless charging coil
1x Pommel_coil
1x Pommel_coilCap
1x wireless inductive charging set (https://www.amazon.com/Adafruit-Inductive-Charging-Set-ADA1407/dp/B00SLYAIG8)
Wireless Charging Base
1x WirelessChargerCenterCup
1x WirelessChargerCenterRing
1x WirelessChargerBase
1x 5.5mm barrel jack
1x 12v power brick with standard 5.5 jack. (1.5A should be plenty though I'm using 5A simply because it's what I had laying around) (https://www.amazon.com/Pigtail-Female-Connectors-Security-Adapter/dp/B07C7VSRBG)
Printing Tips
Crown
Print the Crown with high infill and with strong filament. it's fragile so... I'm planning to re-print mine in PLA+ or PETG. Wife already broke the first one I made for her wand version of this. I reprinted with 70% infill and so far it's holding up.
Crystal
I printed with 3 walls and 0% infill which gives good diffusion of the light. I'm not sure it would look good with infill... but then I didn't try it so.... maybe I'm wrong?
Assembly
LED jig/Crystal
LEDs are wired in three parallel strands. 2 are 3 LEDs long and one is 4 which is the LED at the top. E6000 holds really well and is clear so I used at lot here.
Glob some E6000 onto the top LED and shove it into the crystal with a stick or really anything just to push it all the way in. Leave it that way for a few minutes until the E6000 holds it. I also gluded the wires at the bottom of the crystal and added a JST connector for ease of assembly/disassembly and because I had them... but that's totally optional.
Use Hot Glue to hold the crystal into the crown. It is easy to break the crown and while E6000 can be removed, hot glue holds well enough and is just easier to remove for disassembly if you need to.
USB Pommel
Look up the pin out on a micro USB connector. Basically the outer most pins one side is 5v and the other is ground.
Feed the wire into the hold in the base first. I inserted a magnetic USB charger end thing into the USB port at this point, but it's optional. I then globbed E6000 (because this area will hit the ground a lot and E6000 is more durable than hot glue) and pushed it all the way into the pommel letting it dry.
Shaft
Top shaft first with some glue (I used superglue, but you could use epoxy or whatever. I was test fitting a lot, so I didn't want something as strong as epoxy (and I didn't have any on hand) but if I was to make this again, I would probably go with a thin epoxy.
Add shaft sections one at a time, adding glue, aligning and letting dry. I tried alignment pins but they were more trouble than they were worth.
Similar models
thingiverse
free

iPhone 11 With Symmetry Case Wireless Cradle by gnikeimaj
...to the usb-c port on my truck; the phone would slide off the charger while driving so i designed this cradle to hold it in place.
thingiverse
free

Charging Station - Wireless Phone / Garmin Watch by pandro
...n your own stand the opening on the top is 11mm x 8mm. i recommend about 4.5mm 'insert' to make sure it doesn't move.
thingiverse
free

Nexus 5 QI Charger Stand by phatride4ever
...s are great. the charger is nice a snug will it is easy to put in/take put a nexus 5. i printed with .3 mm height. infill of 20%.
thingiverse
free

Wireless Charging Stand by LiGhTMaGiCk
...easily place my galaxy s7 edge to charge. after a few adjustments this should be a decent stand and i'm pretty happy with it.
thingiverse
free

FreeTrack / TrackIR Infrared LED Clip by MelihKa
... resistor
1x on/off switch
1x cr2032 battery holder
1x cr2032 battery
~30cm wire.
epoxy resin or hot glue to fix the components.
thingiverse
free

Kandypens Crystal Magnetic Charging Base by greendragon42
...e in place.
this design was inspired by this charging base for valve index controllers:
https://www.thingiverse.com/thing:3744655
thingiverse
free

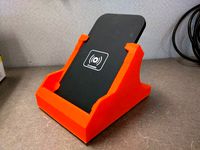
Phone stand with bultin wireless charging by hieroslokhos
...ts (x4).
print settings
infill: 50%
supports: only touching the heatbed.
changelog
03/04/2020 v2: initial version on thingiverse.
thingiverse
free
Nexus 6 Charging Cradle - Qi Charger by EskimoRuler
...irect=true&ref_=oh_aui_detailpage_o00_s00), and also breakout the led on the charger so that it is on the front of the stand.
thingiverse
free

Sony Z3 Compact - Harry Potter Deathly Hallows by Deiago
...e usb charging port with this print.
(the pictures are with a previous version that didn't have the usb charging port cutout)
thingiverse
free

USB Plug for Pixel 5 by necropasia
...reless charging, i rarely need access to the port. outside dimensions are matched to the spigen case that i'm currently using
Mattkins99
thingiverse
free
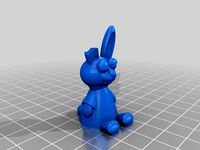
Chocolate Bunny by mattkins99
...chocolate bunny by mattkins99
thingiverse
wanted a bunny with a bite taken out of the ear :-)
thingiverse
free
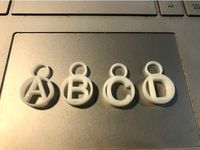
Knitting Charms by mattkins99
...rms by mattkins99
thingiverse
knitting charms. not really sure what they are or are for... wife asked me to make them so i did.
thingiverse
free
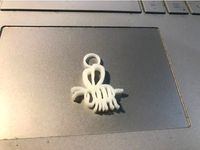
Bee Knitting Charm by mattkins99
...charm by mattkins99
thingiverse
bee knitting charm. wife asked for it, i made... not sure how she uses it or what it's for.
thingiverse
free

CrazyPony 450mah 2S 80/160C lipo battery case by mattkins99
...crazypony 450mah 2s 80/160c lipo battery case by mattkins99
thingiverse
just wanted a simple case for my babyhawk batteries
thingiverse
free

Tiny Butterfly Cookie Cutter by mattkins99
...rs that do and share their source files so i could make this :-) according to my wife it's actually used for cutting fondant
thingiverse
free

35Ah battery handle for Duracell Ultra DURDC12-35J by mattkins99
...durdc12-35j. i use these a lot for boats and needed a replacement. it might work for other batteries if you have the same style
thingiverse
free

Glue Gun Holder 45 degree by mattkins99
...degree angle so i can mount it on my stair banister where my work table is.
a screw hole could be added, but i just use vhb tape.
thingiverse
free

Furibee X215 Pro inset antenna mount by mattkins99
...we'll see how it holds up.
replacement antenna mount that's inset so there's a little more room for the antenna wire.
thingiverse
free
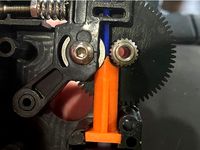
HE3D Titan clone extruder lower filament guide by mattkins99
...
enable lift head under cooling in cura for the tip otherwise it gets blobby. also i had to clear the tube with a 2mm drill bit.
thingiverse
free

Garbage Can painters triangle by mattkins99
...thought these were called bench cookies, but oh well.
after printing, the tip was sharper than i wanted, so i hit it with a file.
Wizard
3d_export
$5

wizard
...wizard
3dexport
wizard
3d_export
$5

hyena wizard
...hyena wizard
3dexport
hyena wizard
3d_export
free

Wizard House
...wizard house
3dexport
this is wizard house.
turbosquid
$20

wizard
...d
turbosquid
royalty free 3d model wizard for download as ma on turbosquid: 3d models for games, architecture, videos. (1559180)
turbosquid
$14

wizard
...
turbosquid
royalty free 3d model wizard for download as fbx on turbosquid: 3d models for games, architecture, videos. (1374180)
turbosquid
$60

Wizard
...el wizard for download as ma, upk, unitypackage, obj, and fbx on turbosquid: 3d models for games, architecture, videos. (1628960)
turbosquid
$1

Wizard
... available on turbo squid, the world's leading provider of digital 3d models for visualization, films, television, and games.
turbosquid
$1

Wizard
... available on turbo squid, the world's leading provider of digital 3d models for visualization, films, television, and games.
turbosquid
free

Wizard
... available on turbo squid, the world's leading provider of digital 3d models for visualization, films, television, and games.
3ddd
free

Simpo | Wizard
... гостевой , кожаный
диван wizard, сделанный по каталогу сербской фабрики simpo
Staff
turbosquid
$5

God Staff Jax Staff
...d model god staff jax staff for download as max, obj, and fbx on turbosquid: 3d models for games, architecture, videos. (1290684)
turbosquid
$49

Staff
...f
turbosquid
royalty free 3d model staff for download as max on turbosquid: 3d models for games, architecture, videos. (1541991)
turbosquid
$2

Staff
...quid
royalty free 3d model staff for download as fbx and obj on turbosquid: 3d models for games, architecture, videos. (1682366)
3d_export
$5
Staff
...staff
3dexport
turbosquid
$50

Staff
...model staff for download as obj, fbx, blend, and unitypackage on turbosquid: 3d models for games, architecture, videos. (1428381)
turbosquid
$15

staff
... available on turbo squid, the world's leading provider of digital 3d models for visualization, films, television, and games.
turbosquid
$3

Staff
... available on turbo squid, the world's leading provider of digital 3d models for visualization, films, television, and games.
turbosquid
$1
Staff
... available on turbo squid, the world's leading provider of digital 3d models for visualization, films, television, and games.
turbosquid
free

staff
... available on turbo squid, the world's leading provider of digital 3d models for visualization, films, television, and games.
turbosquid
free

Staff
... available on turbo squid, the world's leading provider of digital 3d models for visualization, films, television, and games.