Thingiverse
Window Screen by kvn5x4
by Thingiverse
Last crawled date: 4 years, 1 month ago
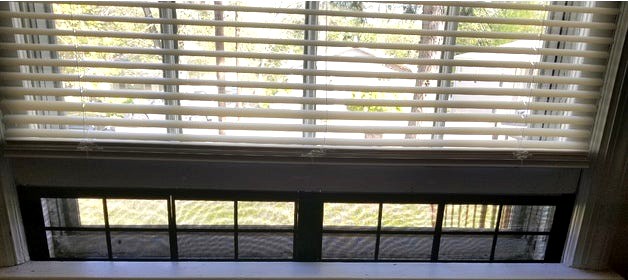
My current residence does not have any window screens or anything available to allow cool air to blow through the house. Being a tenant, I cannot modify anything without approval - which would also be costly. I developed this window screen to that I can have it sit in the window sill, while still allowing the window open. This has prevented bugs and critters getting in, while enjoying the evening breeze.
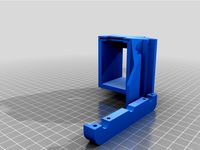
This design is based on six components. The interconnecting keys (2 length sizes), end pieces (left & right), mesh window, and middle piece.
The end and middle pieces are 1/16" taller than the window pieces, so that they can take the weight of the physical window. I placed weather stripping across the top of the mesh windows to accommodate for this gap and ensure no bugs could still enter. The mesh is printed in place by pausing the print on the middle layer of the frame. It is important that the preceding top and bottoms layers where the netting is placed should be a solid infill/layer. Otherwise, when you peel the print off the bed, it may de-laminate.
Physical design:
The internal dimensions of my physical window was 39.75", the design of these components are based on this information. However, I designed the whole assembly to be 39.625" to allow for expansion/ease of insertion. You will need to scale your components accordingly.
Mesh screens: 6" tall and 9" long. The channel for the key is 1.5" long
End pieces: 6.0625" tall and 1" wide. The channel for the key is 0.75" long
Middle piece: 6.0625" tall and 1.625" wide.
Keys: 0.24" x 0.24"
The code I used for pausing at the desired layer, add this custom g-code at your desired layer:
G92 E0.0
G1 E-3 F3600
G1 X0.000 Y200.000 E0; parking position
M17; turn on steppers
M104 S0; set extruder temp to 0
M140 S0; set bed temp to 0
M1 PAUSED; stop and print message
G28 X Y; home X and Y
M190 S75 ; set & wait for bed temp
M109 S255 ; set & wait for extruder temp
G1 E3 F3600
G92 E0.0
Assembly:
Use the 2.5" key to connect the mesh window to end/middle pieces.
Use the 3" key to connect mesh window to mesh window.
Place super glue in joints, insert key, then push and hold connecting pieces together.
Place weather stripping across the top of the the mesh window.
Materials:
Screen mesh: https://www.lowes.com/pd/Saint-Gobain-ADFORS-Small-Insect-3-ft-x-7-ft-Black-Fiberglass-Screen-Mesh/999908963
Weatherstripping: https://www.amazon.com/Stripping-Windows-Self-adhisive-Soundproof-Insulation/dp/B07DDD6N3R/ref=sr_1_9?dchild=1&keywords=weather+stripping&qid=1586120358&sr=8-9
Similar models
thingiverse
free

A10M A20M Purge extension (Aibecy hotend) by deakbannok
...91 ; switch from absolute positioning to relative positioning
g1 z-0.4 f800 ;
g90 ; return to absolute
g1 e6.5 f3600.0 ;
g92 e0 ;
thingiverse
free

Anet A8 auto off by JUHHisi
... the top
g1 x198 f3600 ; move 198mm to the right
g1 x-10 f3600 ; move 8mm to the left
m84 ;steppers off
g90 ;absolute positioning
thingiverse
free
A20M A10M BigMac MKII 5015 Blower
...
g1 e70 f3000
g92 e0
g1 e30 f200
g92 e0
g4 s3
g0 f10000
; end extruder 2
g92 e0
g1 e-5 f6000
g1 x-10.5 f8000
g1 e-70 f3000
g92 e0
thingiverse
free
SVO2 Purge Bucket and GCODE by RedSquirrelHobbies
... positioning on
g1 z-1 f1000 ; lower nozzle by 1mm
g90 ; absolute positioning on
m400 ; wait for finish
thingiverse
free

Anet ET4 upgrades + cura profile + cable chain + light bar + tool box by Samwbarber
...1000.0 e30 ; draw the second line
g92 e0 ; reset extruder
end:
m104 s0
m140 s0
g92 e0
g1 e-10 f2000
g28 x0 y0
g0 x0 y200 f500
m84
thingiverse
free

Multi-Coloured Owl Key Tag by danricho
...f }}{% endif %}
{% endif %}
hope this was interesting/helpful.
i'm australian, so "colour" is the correct spelling!
thingiverse
free

Dual Extruder Y adapter by wookie_666
...an have the ptfe tube run all the way to the plastic chamfered section of the splitter.
update:
i have made the splitter shorter.
thingiverse
free
Double-sided Inset Fillet Gauge by acenine
... used the "pause at height" postscript feature to pause at layer 2 and 5 to make the middle 3 layers a different color.
thingiverse
free

Simplify3D Snapmaker 2.0 A350 Profile by CarvedArt
...rformed a backlash calibration and use the numbers from your test. simply add the gcode to the beginning of your starting script.
thingiverse
free

Double Sided Key | Çift Taraflı Anahtar by Katalikitci
... part is designed for "kale" branded keys. check your key model if it fits. dimensions are given in the pictures above.
Kvn5X4
thingiverse
free

Bottom Bins for Harbor Freight 40 Bin Organizer by kvn5x4
...er dividers for more storage/organization. i've include the step and solidworks files for your accessibility. hope you enjoy!
thingiverse
free

Petsafe Automatic Feeder (Non-Wifi) Agitator by kvn5x4
...bit to make sure it would withstand the constant torque forces. this design uses all existing hardware, simply print and replace.
thingiverse
free

Bin Dividers for Harbor Freight 40 Bin Organizer (Remix) by kvn5x4
...e" bin option. additionally, folks can use this as as baseline for other custom dividers/walls that they may want to create.
thingiverse
free

Dewalt DW26453 to Rigid NXT Shop Vac Adapter by kvn5x4
... in that section of the print. it should be printed with the toothed side down, no supports required, and relatively quick print.
Screen
archibase_planet
free
Screen
...screen radiator screen radiator enclosure lattice
screen radiator n120315 - 3d model (*.gsm+*.3ds) for interior 3d visualization.
archibase_planet
free

Screen
...screen
archibase planet
screen group display
movie screen - 3d model for interior 3d visualization.
3ddd
$1
Screen
...screen
3ddd
screen
modern dressing wall partition
3d_ocean
$15

HP Screen
...test hp screen. it is has different object, so you can use it as a wall mounted screen or a stand on table. hope you all like it.
3d_export
$10
Accessories screen LCD screen 3D Model
...d screen 3d model
3dexport
accessories screen lcd 3d model interior
accessories screen lcd screen 3d model sunupcg 17831 3dexport
turbosquid
$25
SCREEN
... available on turbo squid, the world's leading provider of digital 3d models for visualization, films, television, and games.
turbosquid
$2
Screen
... available on turbo squid, the world's leading provider of digital 3d models for visualization, films, television, and games.
3d_export
$10
Screen metal screen microwave 3D Model
...ave 3d model
3dexport
screen metal microwave oven 3d model interior
screen metal screen microwave 3d model sunupcg 17847 3dexport
3d_ocean
$5
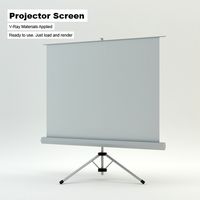
Projector Screen
...hat have presentations. the projector screen consists of an alluminum structure that holds the canvas up. this model can be us...
archive3d
free
Screen 3D Model
...rchive3d
screen folding screen
screen n020811 - 3d model (*.3ds) for interior 3d visualization.
Window
3d_ocean
$3

Window
...window
3docean
window
a lowpoly window .
3d_ocean
$2
Window
...window
3docean
window
a lowpoly window.
3d_ocean
$2
Window
...window
3docean
window
a lowpoly window.
3d_ocean
$2
Window
...window
3docean
window
a lowpoly window .
3d_ocean
$5
Window
...window
3docean
window
a high quality window.
3d_ocean
$4
Window
...window
3docean
window
a high quality window.
3d_ocean
$4
Window
...window
3docean
window
a high quality window.
3d_ocean
$4
Window
...window
3docean
window
a high quality window.
3d_ocean
$3

Window
...window
3docean
window
a high quality window.
3d_ocean
$3
Window
...window
3docean
window
a high quality window .