Thingiverse

White Board Magnetic Marble Track by bamoore01
by Thingiverse
Last crawled date: 4 years, 1 month ago
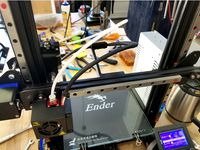
The grand kids are getting bored during these CV-19 restrictions so we decided to do something fun. This is a work in progress and will be changing as time goes on as I add things or modify things. right now, I a pretty happy with the V4 that I have out here. I doubt that that will change much or even at all. If I do modify, it will probably be cosmetic changes where any new version will work well with the old versions.
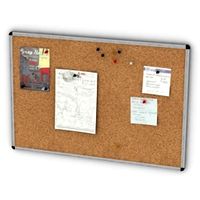
What I've made are tracks that magneticly stick to white boards (that can be used with magnets), refrigerators (flat), or any other magnetic panel for marbes to run down. There are different lengths and shapes of track. You or the kids can rearange all you want. It is all made for a 14mm marble which seem to be a common size, and availlable on amazon (Amazon link below). The magnets that I am using are 15mm x 2mm fridge magnets (Amazon link below). I think the idea is pretty simple and straight forward so I won't spend any time on explanations of how to use it. Instead I'll just use a build notes section below to try to explain the how and why I did things the way I did and my results in different printing methods.
Build notes:
Materials. (The links work today. I can't make any claims that they will work tomorrow and if I will be able to update them or verify replacement parts)
Marbles: 14mm dia., https://www.amazon.com/gp/product/B07WP8JZSK/ref=ppx_yo_dt_b_asin_title_o03_s00?ie=UTF8&psc=1
Magnets: 15mm x 2 mm, https://www.amazon.com/gp/product/B07G48647D/ref=ppx_yo_dt_b_asin_title_o05_s00?ie=UTF8&psc=1
Design.
Joining holes in the end. There are 3 holes in the end of each piece to aid in joining multiple pieces together. I just use a short length of the PLA filament for that. Depending on your printer and settings you may have to ream them out with a drill bit.
Number of magnets required to make for good sticking power. I think I have extra holes in each section. For instance, the 100 mm straight piece has holes for three sets of magnets. I actually only use two holes with one magnet in each hole and it seems to work well but..... it has not been thoroughly kid tested at this point. In those three holes you can use up to 6 magnets total (maybe even 9) to increase the sticking power.
The spiral piece(s), front and back will have to be glued together.
Printing.
I tried printing on end and with the backs of the tracks to the plate. Printing with the backs to the plate worked the best for me and I optimized the design for that. Printing on end makes for a little bumpier track and the supports you need for the magnet holes can be a little messy.
Supports. Supports are not needed for most parts. Printing these pieces on their backs as they are oriented works well for the track pieces. The buckets do require supports when printing on their back.
I use PLA at 210 degrees for the print head and 60 degrees for the bed.
Post Print:
To put the magnets in, I just made a little ring of CA in the bottom of the magnet holes around the edges, dropped the magnet in, put it up against a piece of metal to pull the magnets tight let it sit till the CA cured. Seems to work well. If you decide to use a second magnet, it will hold quite well against the first one without any additional glue. Glue if you want.
One problem I ran into was the PLA slides easily against a white board. This can be helped a lot by putting a layer of electrical tape on the back of each piece. I found that Scotch 33+ worked well. Some electrical tape is fairly thick. The thicker the tape, the farther the magnets will be from the board resulting in a weaker grab. The 33+ is 7 mils. If you want more grab, a second magnet can be dropped into each hole. That helps a little.
Similar models
thingiverse
free

Magnetic Marble Track by brbn
...lue.
i'll add more sections of track as i make them.
changelog:
02-mar-2021: widened magnet pockets to receive larger magnets
thingiverse
free

Celestial magnets
...all together
print on front with the holes up
after printing stick 8x3mm magnets into the holes on the back
please post any makes
thingiverse
free

Steam engine for wooden track by kixel
...u: you can use a magnet with the hole inside and screw it, or you can stick it with glue. both options were tested and work well.
thingiverse
free

Scotch tape dispenser with magnetic base and spindle. by reactron
...e much easier.
get the magnets here :https://www.amazon.com/gp/product/b073rxt5rn/ref=oh_aui_detailpage_o03_s00?ie=utf8&psc=1
thingiverse
free

Amazon Fire TV Holder by Mjacobs518
... the 3m kind. i printed it out with pla it seemed to work better than abs less warping , i used supports to print the over hangs.
thingiverse
free

Outlet finder
...nter of the outlet it self.
i use a 68 mm hole-saw in the center of each well and made a nice little frame to cover the edges up.
thingiverse
free

Coach sail magnets by kvaso
...r boats and marks.
after print you can use it on table or if you stick magnetic tape on it you can easy use it on magnetic board.
thingiverse
free

The Cyclone: triple lift, triple track marble machine by mroek
...han steel balls due to a little more friction against the tracks.
total amount of plastic to print this will be around 300 grams.
thingiverse
free

Amazon Echo Auto stick-on mount by PyramidHead76
...car, you'll need to print in abs, pet-g or similar ...
thingiverse
free

Apple pencil magnetic clip by petolone
...ard pla and i was surprised how well it works. i will probably print it again from petg to get better flexibility and durability.
Bamoore01
thingiverse
free

Digitrax UT Throttle Table Mounts by bamoore01
...e little clips that are just for holding the extra cable up off the floor. they are meant to hold the coiled cable from the ut4.
thingiverse
free

Aquila Sailplane by bamoore01
...o real profile change so i did not change the version number.
05.06.21: added the fuse with no cavity or launch hook.
..........
thingiverse
free

Hobie Hawk Sailplane by bamoore01
...n at 110 (bread proof on out oven) but that cause a lot of problems like sagging fuse and stab.
.................................
thingiverse
free

Filament Guide for Creality Ender 3 by bamoore01
...ip it down over the z axis screw. it keeps the filament off of the greasy screw without putting additional bend on the filament.
thingiverse
free
Linear Rail X Axis Mod for Ender 3 by bamoore01
...ving problems printing it.
12.28.18 - replaced belt adapter v2 with v3. v3 is a little stronger and the stl is a little cleaner.
thingiverse
free

Linear Rail Z Axis Mod for Ender 3 by bamoore01
...ly. they are close but also can be a little off in the y direction so you might have to shim them out or file them down (maybe).
thingiverse
free

X-Axis Stepper cover w/ integrated Micro-Switch Mount for Linear Mod
...#lazy. x-axis stepper cover https://www.thingiverse.com/thing:3271077 x-linear mod is from @bamoore01 ...
Marble
3d_export
free

marbles
...marbles
3dexport
animated marbles
3ddd
$1

Marble
...marble
3ddd
мрамор
marbles of turkey
3d_export
free
marbles
...marbles
3dexport
3d_export
$5

Marble vase
...marble vase
3dexport
marble vase
turbosquid
$2
marble
...d
royalty free 3d model marble for download as blend and fbx on turbosquid: 3d models for games, architecture, videos. (1645970)
turbosquid
$2

Marble
...quid
royalty free 3d model marble for download as ma and max on turbosquid: 3d models for games, architecture, videos. (1240771)
3d_export
$5
marble skirting
...marble skirting
3dexport
marble skirting for indoor design.
3ddd
$1
Marble Table
...marble table
3ddd
журнальный , круглый
marble table
turbosquid
$10

Marbles
... available on turbo squid, the world's leading provider of digital 3d models for visualization, films, television, and games.
3ddd
$1

Marble lamp
...marble lamp
3ddd
marble lamp in style of 30's
Track
design_connected
$11

Tracks
...tracks
designconnected
bonaldo tracks computer generated 3d model. designed by gilles, alain.
3d_export
$30

TRACK
...track
3dexport
turbosquid
$20

tracks
... available on turbo squid, the world's leading provider of digital 3d models for visualization, films, television, and games.
turbosquid
$5

Tracks
... available on turbo squid, the world's leading provider of digital 3d models for visualization, films, television, and games.
turbosquid
$5

Track
... available on turbo squid, the world's leading provider of digital 3d models for visualization, films, television, and games.
turbosquid
$2

Track
... available on turbo squid, the world's leading provider of digital 3d models for visualization, films, television, and games.
3d_export
$65

track
...track
3dexport
simple rendering of the scene file
3d_export
$65

track
...track
3dexport
simple rendering of the scene file
3d_export
$65

track
...track
3dexport
simple rendering of the scene file
3ddd
free

Стол Bonaldo Tracks
...onaldo , tracks , обеденный
стол bonaldo tracks
Magnetic
3d_ocean
$2

Magnet
...magnet 3docean 3d 3ds max electric magnet magnetic magnetism max model polygon realistic tesla magnet created in...
turbosquid
$6
Magnet
...
turbosquid
royalty free 3d model magnet for download as obj on turbosquid: 3d models for games, architecture, videos. (1548733)
turbosquid
$6

magnet
...uid
royalty free 3d model magnet for download as 3dm and max on turbosquid: 3d models for games, architecture, videos. (1670606)
turbosquid
$1

Magnet
...y free 3d model magnet for download as 3ds, max, obj, and fbx on turbosquid: 3d models for games, architecture, videos. (1215037)
turbosquid
$7

Magnet
...agnet for download as blend, unitypackage, fbx, gltf, and obj on turbosquid: 3d models for games, architecture, videos. (1576588)
3d_export
$5

magnetic knife holder
...magnetic knife holder
3dexport
ordinary magnetic knife holder
archive3d
free

Fridge magnet 3D Model
...3d model archive3d refrigerator magnet fridge magnet magnet toy magnetic s n280712 - 3d model (*.3ds) for interior 3d...
turbosquid
$35

Magnetic butterflies
...alty free 3d model magnetic butterflies for download as blend on turbosquid: 3d models for games, architecture, videos. (1315792)
turbosquid
$2
Magnetic Board
...quid
royalty free 3d model magnetic board for download as ma on turbosquid: 3d models for games, architecture, videos. (1264141)
turbosquid
$977
Magnetic Lego
...oyalty free 3d model magnetic lego for download as ma and obj on turbosquid: 3d models for games, architecture, videos. (1142761)
Board
archibase_planet
free
Board
...e planet
board information board bulletin board
board information n310813 - 3d model (*.gsm+*.3ds) for interior 3d visualization.
archibase_planet
free
Board
...board
archibase planet
board cutting board kitchen ware
board n051011 - 3d model (*.gsm+*.3ds) for interior 3d visualization.
archibase_planet
free

Board
...board
archibase planet
board blackboard school board
board school n290114 - 3d model (*.gsm+*.3ds) for interior 3d visualization.
archibase_planet
free
Board
...board
archibase planet
slate board
board - 3d model (*.gsm+*.3ds) for interior 3d visualization.
archibase_planet
free
Board
...board
archibase planet
blackboard board school furniture
board - 3d model for interior 3d visualization.
archibase_planet
free
Board
...board
archibase planet
board shelf stand
board - 3d model (*.gsm+*.3ds) for interior 3d visualization.
archibase_planet
free
Board
...board
archibase planet
kitchen ware board
board - 3d model (*.gsm+*.3ds) for interior 3d visualization.
archibase_planet
free
Board
...board
archibase planet
kitchen ware board
board n150410 - 3d model (*.gsm+*.3ds) for interior 3d visualization.
archibase_planet
free
Board
...board
archibase planet
board office supplies stationery
board - 3d model (*.gsm+*.3ds) for interior 3d visualization.
archibase_planet
free

Board
...board
archibase planet
board gym
board evminov n240613 - 3d model (*.gsm+*.3ds) for interior 3d visualization.
White
3ddd
free

White
...white
3ddd
white glaze
3d_ocean
$5
Sofa white modern white
...bedding cloth couch davenport daybed divan leather lounge ottoman pillows settee sofa squab white
simple sofa white modern white.
turbosquid
$7

Sofa white modern white
... available on turbo squid, the world's leading provider of digital 3d models for visualization, films, television, and games.
3d_ocean
$2

White Pearl
...white pearl
3docean
pearl white pearl
white pearl
3ddd
$1
Hickory White
...hickory white
3ddd
hickory white
производитель: hickory white
3ddd
$1
Стул White
...стул white
3ddd
white
лёгкий стул white с изящной формой
3ddd
$1
Hickory White
...hickory white
3ddd
hickory white
кровать фабрики hickory white со всеми текстурами.
3ddd
$1
White chair
...white chair
3ddd
white , chair
modern white chair from plastick
modeling by d.zahariev
3d_export
$5

White Cupboard
...white cupboard
3dexport
white cupboard
3d_export
$5
white chair
...white chair
3dexport
white chair best