Thingiverse
Weed2all HYPERCUBE EVOLUTION REWORK by weed2all
by Thingiverse
Last crawled date: 4 years, 7 months ago
hi!
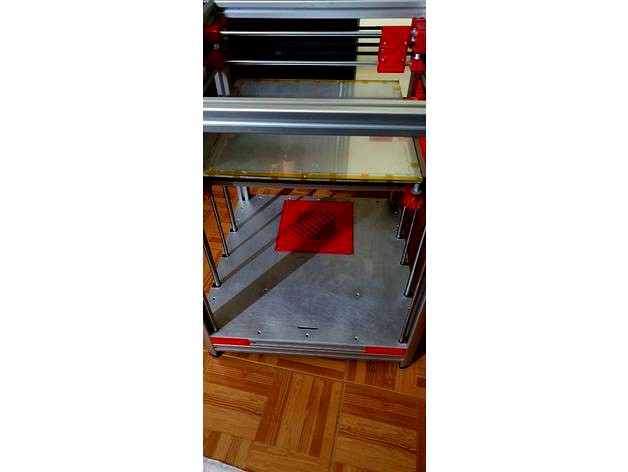
this is my version of hypercube with ideas take from original hypercube by Tech2c and by hypercube evolution made by Scott
work in progress!!!
I have some material here from another project and didn't want to buy other material so I made design to accommodate to my needs
build volume 300x300x300
the same as Scott I use 30x30 aluminium profile from Minitec that I buy here in my country as is more cheap than to buy from eBay
on Y axis i use 10mm chromed rod with 2 lm10uu each rod, on Z axis I use a 12mm chromed rod with 2 lm12uu on each rod
on X axis I use 8mm rod with 2 lm8uu for each rod
the only thing that I do not like in both designs is the xy stepper motors position so I made some changes to use the motor in the bottom side of the printer and that way I gain some extra room for xy axis because my aluminium profile that I have laying around was cut shorter than Scott used in his build and I want a total printing volume 300x300...
work in progress
YOU WILL NEED TO PRINT:
z_axis_bottom_plate_rework.STL x 2(one is mirror of the other)
z_axis_top_plate_rework.STL x 2
XY motor mount.STL x 2(one is mirror of the other)
xy_rod_sistem_for_bottom.STL x 2(one is mirror of the other)
Z_axis_lm12luu_mount.STL x 4
XY_lm10uu_mounting.STL x 2
Z_axis leadscrew nut.STL x 2
z_axis_top_plate_rework.STL x 2
idler_front.STL x 2(one is mirror of the other)
big_knob.STL x 4
heat_bed_mount_rework.STL x 2
Belts tighten.STL x 2 (100% infil...)
All other parts that is not set here you will have to print only one part each
3030 ALUMINIUM PROFILES FOR THE FRAME
-4 x 580mm round profiles(feet) you can use normal profile as the rest of the build
-10 x 400mm profiles for X and Y
-2 x 100mm profile(for Z axis back side bottom)
-2 x 80mm profile(for Z axis front side bottom)
-1 x 240mm profile (front bottom fo the printer where the "xy rod sistem for bottom motors.STL" will mount )
---this build uses hidden corners for mounting the 3030 aluminium frame together!---
FOR BED also used 3030
-2 x 346mm
-2 x 260mm
RODS AND LINEAR BEARINGS
Z axis 4 x 12mm hardened steel rods with 390mm + 4 LM12LUU(long version)
Y axis 2 x 10mm hardened steel rods with 400mm + 2 LM10LUU(long version)
X axis 2 x 8mm hardened steel rods with 385mm + 2 LM8LUU(long version)
also need 2 more rods 8mm in diameter with 495mm(you can use normal steel rods as it will be only for driving the xy because of the motors are in the bottom)
IF YOU WISH TO INCREASE THE PRINTER SIZE (for example to be 400x400x400mm you need to add 100mm more to the current dimension of the frame and to the linear rods)
BELTS ,PULLEY AND IDLERS:
6m of gt2 with 2mm pitch belts
1x 1040mm closed loop belt(it is 520mm perimeter)used for dual z
2 x 200mm closed loop belts(it is 100mm perimeter)
4 x 20tooth idler pulley with 5mm inside
2 x 20toothless idler pulley with 5mm inside(for z axis idler)
2 x 20tooth idler pulley with 3mm inside
2 x 20toothless idler pulley with 3mm inside
6 x 20tooth pulley with 8mm inside diameter
2 x 20tooth pulley with 8mm inside diameter
2 x 16toothless idler pulley(these will be used in conjunction with Y_10mm_front left and right part in order to make the belts run at 90°)
BEARINGS:
4 x 608zz berings (22x8x7)
12 x 688z berings (16x8x5)
m3 and m5 screws with different size
m3 and m5 nuts
update 14/02/2019
added 1.stl and 2.stl
this is the correct way to print the items for good results and strenght
Added some photos to see how it mounts the x carriage(don't take in count the y spliter for e3d, that is something that I'm working on, the normal e3d will mount exactly the same way)
At the back of e3d mount.stl will be attached the carriage cable cover.stl with 2 ×m3 20mm screws and all the cables from hotend will pass thru it and the enter into the flexible 16mm diameter conduit(this is easy to find in hardware store or in store that deal with electricity) that will go up to the db15 connector at the back of the printer...
In this configuration I have shave down about 150g from x carriage witch is alot...
For Y axis you need to use the Y axis optic endstop trigger.stl and mount it on the LM10LUU bearing on the left side, the part is made to have a 25mm m3 screw and nut to tight to the bearing and have a small 2mm hole where it need to enter a m2.5 screw without head...here you can offset it how you wish...the m2.5 screw needs to be 6mm sticking out when you mount the plastic part at the tip of lm10luu bearing in order to trigger the endstop...(insert the screw all the way into the plastic part then you cut his head off...you can put a long screw and play with the offset of the part that will go onto the lm10luu bearing)
11/03/2019
small update over e3d mount part...was reported that cant fit the bltouch and e3d, now all fits perfectly
added 4 offsets parts for bltouch...3mm,4mm,5mm,6mm
(one of this parts fits underneath the bltouch and the e3d mount in order to get your bltouch sensor at desired high in relation of the nozzle)
if you like my work and want to keep me making more great stuff you can buy me a coffe
15/18/2020 new update
I always work to improve and add new feature on my printer, this time i'll add precision piezo orion v2 mount because i had some problems with my bltouch and decided that is time to change my probe to something new and also add direct drive instead of bowden...as a owner of 3 delta printers that have Duet board and Duet smart effector on them i was very impressed with the easy probe that smart effector offers, and i wanted to add that funcionality to my corexy printer, so the Precision Piezo Orion V2 add the same future as smart effector witch is probing with the nozzle without the needs for probe offset
also i edited the z axis bearings mounts and z axis leadscrew mounts