Thingiverse
Wanhao Di3/Maker Select LED stage lighting by Dracos
by Thingiverse
Last crawled date: 3 years ago
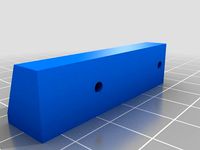
The steel frame edges on these printers make an excellent mounting location for LED strips.
These mounts are low profile, positioning the strip in front of the frame.
They are designed for 10mm, 30/meter, non-addressable, IP65 waterproof, 12v, 5050 style strips. These strips have a silicone overlay that forms an arched top surface. They are also cuttable into 3 LED (50mm) segments.
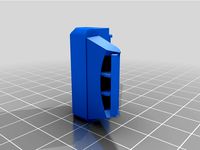
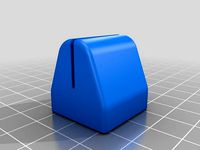
The long parts are designed to fit a single segment. led_rail.stl is a middle part and is onmidirectional. The led_end_rail_?.stl parts are directional, and have a closed end to conceal the end of the strip.
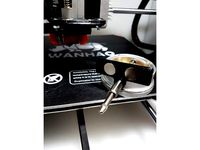
The led_z_spacer_?.stl parts lift the side strips up to put the lowest LED just above the bed surface. They also have a gap that allows the wire to be inserted and a channel that wraps the wire around the frame for concealment. The tab on top fits into the slot on the long parts to conceal the wired end of the strip.
The parts have a strong grip on the frame so they won't fall off. The LED strip fits snug in the channel (leave the backing paper on). If your print has any pimples in the channel, they'll need to be shaved off.
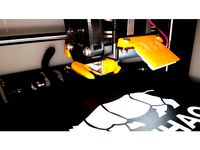
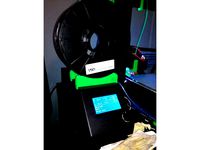
As shown I have 4 LED segments on each side and 5 across the top for a total of 39 LEDs.
Use the latest revision of each file.
This completes stage 1 of this Thing.
TODO:
Modify the relevant parts from AzzA's Z Braces to add positionable light bars at the front and rear of the bed frame
Add a variant of led_rail.stl that can hold a filament filter in some way
Design a control box to allow each strip to be turned on individially, likely with a dimmer circuit
Modify the Diiicooler to place LEDs around its perimeter
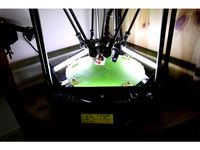
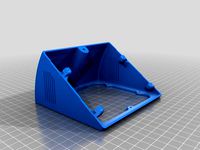
EDIT 16 May 2016: Added a rendering of the work in progress concept for the "foot lights" apparatus. Will probably reuse most of the same parts for the back lights, still need to figure out how to position around the bed cable bundle.
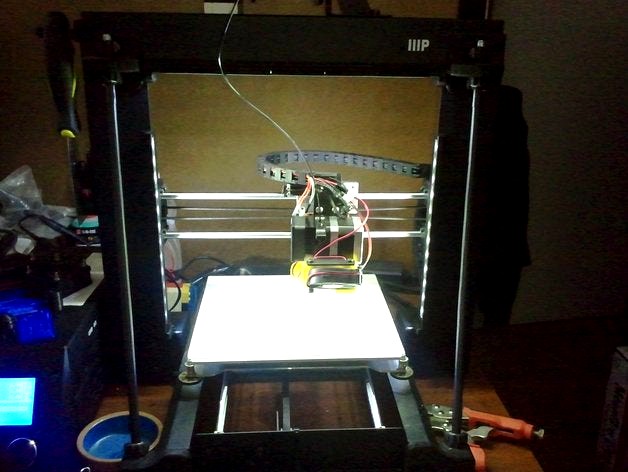
EDIT 25 May 2016: Added first revision with files marked as rev001, and pictures showing a completed stage 1 install. The X and Z spacers go with strip segments oriented along that axis, so the Z spacers are for the sides, and X spacers for the top. There are now two versions of the Z spacers, low and high; these are meant to coincide with the mounting position of the Z endstop.
These mounts are low profile, positioning the strip in front of the frame.
They are designed for 10mm, 30/meter, non-addressable, IP65 waterproof, 12v, 5050 style strips. These strips have a silicone overlay that forms an arched top surface. They are also cuttable into 3 LED (50mm) segments.
The long parts are designed to fit a single segment. led_rail.stl is a middle part and is onmidirectional. The led_end_rail_?.stl parts are directional, and have a closed end to conceal the end of the strip.
The led_z_spacer_?.stl parts lift the side strips up to put the lowest LED just above the bed surface. They also have a gap that allows the wire to be inserted and a channel that wraps the wire around the frame for concealment. The tab on top fits into the slot on the long parts to conceal the wired end of the strip.
The parts have a strong grip on the frame so they won't fall off. The LED strip fits snug in the channel (leave the backing paper on). If your print has any pimples in the channel, they'll need to be shaved off.
As shown I have 4 LED segments on each side and 5 across the top for a total of 39 LEDs.
Use the latest revision of each file.
This completes stage 1 of this Thing.
TODO:
Modify the relevant parts from AzzA's Z Braces to add positionable light bars at the front and rear of the bed frame
Add a variant of led_rail.stl that can hold a filament filter in some way
Design a control box to allow each strip to be turned on individially, likely with a dimmer circuit
Modify the Diiicooler to place LEDs around its perimeter
EDIT 16 May 2016: Added a rendering of the work in progress concept for the "foot lights" apparatus. Will probably reuse most of the same parts for the back lights, still need to figure out how to position around the bed cable bundle.
EDIT 25 May 2016: Added first revision with files marked as rev001, and pictures showing a completed stage 1 install. The X and Z spacers go with strip segments oriented along that axis, so the Z spacers are for the sides, and X spacers for the top. There are now two versions of the Z spacers, low and high; these are meant to coincide with the mounting position of the Z endstop.
Similar models
thingiverse
free

MK2 / MK2 MMU LED Light mount by Suraky
...he mmu extruders. i printed mine with the top side down on the print bed, 0.3mm layers, no supports, sliced in prusa control.
thingiverse
free

LED Strip Light fixture by Beaton
...e housing has been made slightly deeper than the one shown in the picture to allow the center led to sit fully under the plastic.
thingiverse
free
Geeetech Rostock G2 / G2S LED lighting ring by qbranchrg
..." connected around the ring, and then connected directly to a spare set of 12v outputs on the 3d printer's power supply.
thingiverse
free

LED Strip Mounts for ZMR250 Quad Copter by slammers
...en the frames.
the side ones are smaller to allow space underneath. i use the spacer file to raise them just below the top frame.
thingiverse
free
Command Strip LED Strip Hanger by kpdudek2
... and well supported.
i included the solidworks file in case the .125" channel doesn't fit the light strip you are using.
thingiverse
free

LED light strip holder for Z Brace by uwe999
...he original cover.
it would be best to use 2 light strips on a brace but the cover is a bit too long to use 2 next to each other.
thingiverse
free

Anet A8 Top Mount LED Strip Light by Only1Mattrix
...t it fit on my bed. i have not attempted to print this without support (all over) -- there may be a way but i couldn't do it.
thingiverse
free
CR-10 2020 Top Mount LED by techyg
...pply, and i also ran a cheap automotive 12v switch in between it and the led strip.
https://www.amazon.com/gp/product/b078bhwd1y/
thingiverse
free

Robo R2 LED Lighting Mount by red112
...led's were wired and it was a 12v source.
these parts were printed in petg to help prevent warping for the heated print bed.
thingiverse
free

Amoeba LED Lamp-V1 by ChrisTheViolaNerd
...ints, and negative battery terminal will be wired to the (com) switch point. no wires will be connected to the (nc) switch point.
Di3
thingiverse
free
Wanhao Di3 v2 Light / Wanhao Di3 v2 Beleuchtung by JMDesigns
...wanhao di3 v2 light / wanhao di3 v2 beleuchtung by jmdesigns
thingiverse
wanhao di3 v2 light / wanhao di3 v2 beleuchtung
thingiverse
free
Wanhao Di3 MagFix System by JMDesigns
...wanhao di3 magfix system by jmdesigns
thingiverse
wanhao di3 magfix system
thingiverse
free
Wanhao Di3 Silicone Softgrip by JMDesigns
...wanhao di3 silicone softgrip by jmdesigns
thingiverse
wanhao di3 silicone softgrip
thingiverse
free
Di3 rotary dial by 3Dplanner
...hingiverse
original model of jo3ri http://www.thingiverse.com/thing:33286 , adjusted for the di3.
layer 0.2
shell 2
fill 50%
pla
thingiverse
free
Di3 LCD Angler ( With Air Vents ) by diamonddrake
...3 lcd angler ( with air vents ) by diamonddrake
thingiverse
this is a remix of rtideas di3 lcd angler, i simply added air vents.
thingiverse
free
Di3 Hex Wrench Holder by BliNDF123
...de a hex wrench holder for the ones that come with the di3, stuck it to the side frame of my printer with some double sided tape.
thingiverse
free
E3D v6 mount for Wanhao Di3 by slimc
...w design http://www.thingiverse.com/thing:1657971
set of components that allow the e3d v6 hotend to be mounted on the wanhao di3.
thingiverse
free

Wanhao Di3 V2.1 Knob Grip by Hyperlinks
...
thingiverse
this is a remix for the di3 v2.1. it did not fit properly on my printer (too tall), so i scaled it down minus 7 mm.
thingiverse
free
Wanhao Di3+ filament cleaner by Alpin3D
...wanhao di3+ filament cleaner by alpin3d
thingiverse
v1.1
filament cleaner / sponge
v1.2
better filament control
thingiverse
free
Di3 Nozzle LED Mount by sprfly
...e cooler. uses a 3 led section of self adhesive strip leds. i tapped into the always on hotend fan to provide the 12v to my leds.
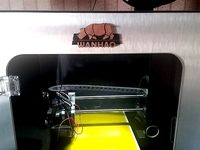
Dracos
turbosquid
$150

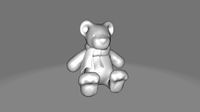
Draco
... available on turbo squid, the world's leading provider of digital 3d models for visualization, films, television, and games.
3ddd
$1

Draco
...draco
3ddd
дракон , дракон profi
игрушка, мягкая, дракон
3d_export
$10

Toy Draco 3D Model
...toy draco 3d model
3dexport
toy draco
toy draco 3d model nlena1208 64516 3dexport
turbosquid
$5

Little Draco
...odel little draco for download as c4d, obj, dae, fbx, and stl on turbosquid: 3d models for games, architecture, videos. (1708340)
3d_export
$10

dracaena draco dragon tree
...dracaena draco dragon tree
3dexport
dracaena draco | dragon tree
turbosquid
$39

Chinese Draco Pendant
...model chinese draco pendant for download as max, obj, and fbx on turbosquid: 3d models for games, architecture, videos. (1226306)
turbosquid
$20

BC Rich Draco Guitar
... available on turbo squid, the world's leading provider of digital 3d models for visualization, films, television, and games.
turbosquid
$69

Electric guitar B C Rich DRACO
... available on turbo squid, the world's leading provider of digital 3d models for visualization, films, television, and games.
3d_export
$5

Dracaena Draco trees
...00 cm<br>formats<br>3ds max - vray / corona<br>cinema4d<br>blender<br>obj<br>fbx<br>stl
3d_export
$5

Red Dragon 3D Model
...red dragon 3d model
3dexport
red dragon monster skyrim draco dragons
red dragon 3d model liquidsunproductions 63440 3dexport
Wanhao
thingiverse
free
Wanhao Logo Plate / Wanhao Logo Schild by JMDesigns
...wanhao logo plate / wanhao logo schild by jmdesigns
thingiverse
wanhao logo plate / wanhao logo schild
thingiverse
free
Wanhao logo by nebtio
...wanhao logo by nebtio
thingiverse
wanhao logo
thingiverse
free
Wanhao keychain by Rein3003
...wanhao keychain by rein3003
thingiverse
a keychain with the logo of wanhao
thingiverse
free
Wanhao Di3 v2 Light / Wanhao Di3 v2 Beleuchtung by JMDesigns
...wanhao di3 v2 light / wanhao di3 v2 beleuchtung by jmdesigns
thingiverse
wanhao di3 v2 light / wanhao di3 v2 beleuchtung
thingiverse
free
TUSH For Wanhao by wtmi1992
...tush for wanhao by wtmi1992
thingiverse
the ultimate spool holder, modified for the top of the wanhao control box. fits snug.
thingiverse
free
fanduct wanhao d12 by theopoilmek
...fanduct wanhao d12 by theopoilmek
thingiverse
fanduct pour wanhao d12
thingiverse
free
Wanhao i3 Marlin by johan21
...wanhao i3 marlin by johan21
thingiverse
marlin for wanhao i3 rampsboard 1.4.
thingiverse
free
Wanhao Duplicator i3 by imagineering4
...wanhao duplicator i3 by imagineering4
thingiverse
these are the stl files for the improvements to the wanhao duplicator i3, v2
thingiverse
free

Wanhao D6 filament guard
...wanhao d6 filament guard
thingiverse
this is a filament guard for wanhao d6 machine to avoid the filament unrolling
thingiverse
free
Wanhao Duplicator i3 Model by Hilde3D
...wanhao duplicator i3 model by hilde3d
thingiverse
wanhao duplicator i3 model
Stage
archibase_planet
free
Stage
...stage
archibase planet
stage staging boards scene
stage n290814 - 3d model (*.gsm+*.3ds+*.max) for exterior 3d visualization.
archibase_planet
free

Stage
...stage
archibase planet
stage dais rostrum
aqua - stage - 3d model for interior 3d visualization.
3d_export
$100

Stage
...stage
3dexport
collapsible mapping stage decor dimensions
3d_export
$100

Stage
...stage
3dexport
double curtain stage decor sequence order
turbosquid
$49

stage
...e
turbosquid
royalty free 3d model stage for download as obj on turbosquid: 3d models for games, architecture, videos. (1305813)
turbosquid
$29

stage
...ty free 3d model stage for download as 3ds, obj, c4d, and fbx on turbosquid: 3d models for games, architecture, videos. (1400329)
turbosquid
$29
stage
...ty free 3d model stage for download as c4d, obj, fbx, and 3ds on turbosquid: 3d models for games, architecture, videos. (1659284)
turbosquid
$15

Stage
...ty free 3d model stage for download as obj, fbx, skp, and stl on turbosquid: 3d models for games, architecture, videos. (1474331)
3d_export
$20

Pack Stage
...pack stage
3dexport
stage with furniture and complete scenography
turbosquid
$88

Stage
... available on turbo squid, the world's leading provider of digital 3d models for visualization, films, television, and games.
Select
3ddd
$1

TUBADZIN SELECT
...max 2014, 2011.
fbx 2014, 2013, 2011,
obj
_____________________________________http://www.tubadzin.pl/en/collection/324
3ddd
$1
Плитка Selection
... supergres , плитка
плитка selection - supergres ceramiche
turbosquid
$15
Christmas Selection
...royalty free 3d model christmas selection for download as fbx on turbosquid: 3d models for games, architecture, videos. (1696333)
turbosquid
$39

Vases selection
... available on turbo squid, the world's leading provider of digital 3d models for visualization, films, television, and games.
turbosquid
free

SELECTIVE RACKING SYSTEM
...yalty free 3d model selective racking system for download as on turbosquid: 3d models for games, architecture, videos. (1282512)
turbosquid
$10
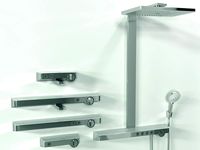
Hansgrohe ShowerTablet Select
...ee 3d model hansgrohe showertablet select for download as max on turbosquid: 3d models for games, architecture, videos. (1336955)
turbosquid
$29
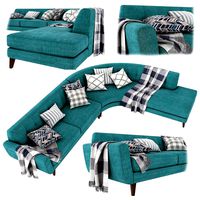
Chill selectional sofa
...odel chill selectional sofa for download as max, obj, and fbx on turbosquid: 3d models for games, architecture, videos. (1465691)
3ddd
free

Lunaria - Nova, ASA Selection
... asa selection , dried flowers
ветка лунарии в вазе nova, asa selection
3ddd
$1
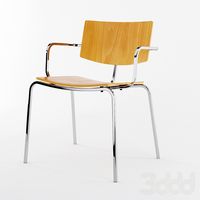
inno SELECT SLIM chair
...inno select slim chair
3ddd
inno
high detailed inno select slim chair
turbosquid
$29

Select Chaise Lounge
... available on turbo squid, the world's leading provider of digital 3d models for visualization, films, television, and games.
Led
3d_export
$5

led
...led
3dexport
the led is cut with all the parts.
3ddd
$1

Monacor / PARL56DMX / LED-320RGBW / LED-345RGBW / LED-300RGB
... прожектор
http://www.monacor.dk/
parl56dmx
led-320rgbw
led-345rgbw
led-300rgb
turbosquid
$10

LED
...led
turbosquid
free 3d model led for download as blend on turbosquid: 3d models for games, architecture, videos. (1691856)
3d_export
$5

led lamp
...led lamp
3dexport
led lamp, brightness animation
3ddd
free

leds-c4
...leds-c4
3ddd
leds-c4
современный торшер
3ddd
free

leds-c4
...leds-c4
3ddd
leds-c4
настольный лампа
turbosquid
$19

LED
... available on turbo squid, the world's leading provider of digital 3d models for visualization, films, television, and games.
turbosquid
$12

Led
... available on turbo squid, the world's leading provider of digital 3d models for visualization, films, television, and games.
turbosquid
free

LED
... available on turbo squid, the world's leading provider of digital 3d models for visualization, films, television, and games.
turbosquid
free

LED
... available on turbo squid, the world's leading provider of digital 3d models for visualization, films, television, and games.
Lighting
archibase_planet
free

Light
...light archibase planet lamp lighting light light - s2 - 3d model for interior...
archibase_planet
free

Light
...light archibase planet light luminaire lighting light l0465 - 3d model (*.gsm+*.3ds) for interior 3d...
3d_export
$5

lighting
...lighting
3dexport
lighting
3d_export
$5

lighting
...lighting
3dexport
lighting in livingroom
turbosquid
$3

Lighting Tree with Lights
...d model lighting tree with lights for download as max and 3ds on turbosquid: 3d models for games, architecture, videos. (1585507)
archibase_planet
free

Light
...light archibase planet luster lighting solution light - s - 3d model for interior...
archibase_planet
free

Light
...light archibase planet luster lamp lighting light 1 - 3d model for interior 3d...
archibase_planet
free

Lights
...lights
archibase planet
surgical lights surgical lamp
surgical lights (floor) - 3d model for interior 3d visualization.
archibase_planet
free

Light
...light archibase planet lighting luminaire candlelight light l0463 - 3d model (*.gsm+*.3ds) for...
3d_export
$18

street light-lighting-light-xia bing
...
3dexport
street light-lighting-light-xia bing<br>max 2015 v-ray 3 max 2015<br>textures<br>all files in zip...
Maker
3d_ocean
$17
Coffee Maker
...coffee maker
3docean
breakfast coffee drip electric maker morning
detailed coffee maker and a plug.
3ddd
$1

coffee maker
...coffee maker
3ddd
кофемашина
coffee maker
3d_export
$10

chapati maker
...chapati maker
3dexport
it is a indian traditional chapati maker
archibase_planet
free
Coffee maker
...aker
archibase planet
percolator coffee-machine coffee maker
coffee maker - 3d model (*.gsm+*.3ds) for interior 3d visualization.
archibase_planet
free
Coffee maker
...aker
archibase planet
percolator coffee-machine coffee maker
coffee maker - 3d model (*.gsm+*.3ds) for interior 3d visualization.
archibase_planet
free

Coffee maker
...aker
archibase planet
percolator coffee-machine coffee maker
coffee maker - 3d model (*.gsm+*.3ds) for interior 3d visualization.
archibase_planet
free

Сoffee maker
...er
archibase planet
coffee maker percolator coffee-machine
сoffee maker n020112 - 3d model (*.3ds) for interior 3d visualization.
archibase_planet
free

Coffee maker
...aker
archibase planet
coffee maker percolator coffee-machine
coffee maker - 3d model (*.gsm+*.3ds) for interior 3d visualization.
3ddd
$1

Juice Maker
...juice maker
3ddd
соковыжималка
fully detailed kenwood juice maker
archibase_planet
free

Coffee maker
...hibase planet
coffee maker percolator coffee-machine
coffee maker n140611 - 3d model (*.gsm+*.3ds) for interior 3d visualization.