Thingiverse
Walmart Mainstays Parsons Enclosure Ender 3 by XYZebruh
by Thingiverse
Last crawled date: 2 years, 10 months ago
First off this is a collection of files from respectable creators on Thingiverse all in one convenient place to help build a cheap Walmart Mainstays Parsons end table enclosure:
ORIGINAL FILE SOURCES:
Bottom Risers source:https://www.thingiverse.com/thing:2527450
mainstays riser by ILLGotti is licensed under the Creative Commons - Attribution license.http://creativecommons.org/licenses/by/3.0/
Top Risers source:https://www.thingiverse.com/thing:2798973
Mainstays Top wall and door supports by theomne is licensed under the Creative Commons - Attribution license.http://creativecommons.org/licenses/by/3.0/
Hinges, Handles, Powersupply holder/bracket source:
IKEA Lack Enclosure Creality Ender 3 Compilation by Woody1978 on Thingiverse: https://www.thingiverse.com/thing:3083358
Motherboard Case source:https://www.thingiverse.com/thing:3522495 Ender 3 enclosure for stock & SKR Mini E3 boards by Usuariu
Screen Case (remixed with mounting holes) source:
BTT TFT35-E3 V3.0 - Free Standing Case by pointybeard on Thingiverse: https://www.thingiverse.com/thing:4514252
Filament guide: Something I made awhile back on Fusion360 :)
INTRODUCTION:
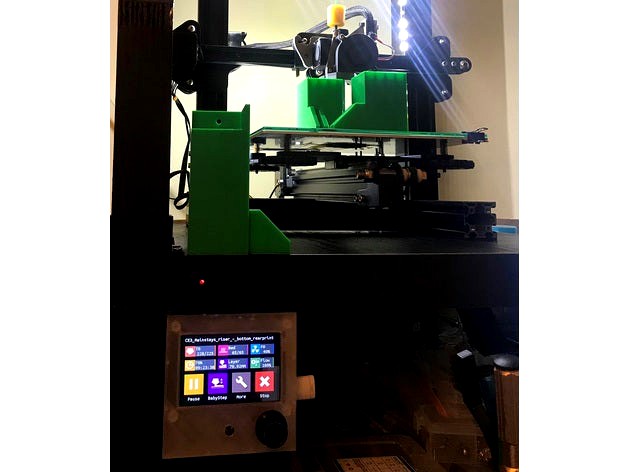
This is to facilitate ease of access and simplicity to others that do not have access to the IKEA store or want to pay more for shipping two IKEA Lack tables to make an enclosure. These files will help you assemble a working enclosure using two Walmart end tables branded Mainstays Parsons. Many of us have at least a Walmart nearby in the United States even in remote areas across the states. The tables are fairly inexpensive and can usually be purchased for $14.98 or sometimes on sale for $9.98 each.
PRINTING:
Bottom/Top Risers:
To speed up the process print all the risers in .32 layer height, 50mm/sec speed, at 10% infill (plenty strong) no supports needed, add a brim if your printer has layer adhesion issues or for added security.
Hinges & Handle parts:
Hinges and the handles for the enclosure can be printed in .2 layer height, 50mm/sec speed, at 30% infill. The only confusing part of the files is there will be two options to print either a pan head style hole hinge or countersunk hinge though it would make since that a left and right hinge of either the pan head or countersunk hinge go together however in CURA before printing I noticed this is not true. It seems like a left pan head hinge interlocks with a left countersunk hinge and vise versa for the right. Experiment here before printing x8 needed hinges.
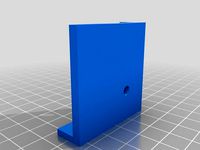
Screen Case:
The original Ender 3 screen will fit in the lower left front under the table flush with just enough ribbon cable coming from the back left of the motherboard which is where I recommend you mount the motherboard. Mounting the motherboard back there will save you a headache in extending the factory wiring harness. I used rubber grommets for the hole in the back left of printer to run all the wires through down underneath. Essentially you can reuse your original motherboard case as well just remember to leave at least 1/2" gap above the case lid for the fan to pull in air other wise flush mounting the case to the bottom side of the table will render the cooling fan useless and burn up your board!!! You can use the two diagonal holes to mount the case to the back left leg, fairly simple idea and it worked on my Walmart enclosure build.
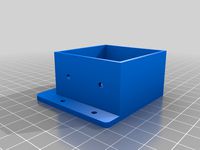
(optional) Motherboard case
The motherboard case which is optional if you decide to not reuse your original Ender 3 case mounted underneath should be printed at .2 layer height, 40mm/sec speed, at 100% infill, with supports, (print tiny walls option selected). I have yet to print this case and after looking at the file it looks like you would simply mount the case upside down with motherboard cooling fan at the bottom with the lid. You can either use the slots to attach a few screws through into the bottom side of the base table or simply use the red double sided foam tape that is super sticky and strong (will usually say 15lb rating).
UPDATE 26May2021: Added a remix case with mounting tabs!
Filament hole guide:
.2 layer height, 40-50mm/sec speed, 100% infill, use a brim. Drill a half inch hole through the top of your enclosure in a location that fits your needs to where your printer would take filament from, mine is center as I am direct feed now. I recommend a few inches from the left edge in line of your extruder if using the factory Bowden setup. The guide tube should stick out about a half inch past the bottom side of the top table when all the way through. Glue it down if you want, though I did not have to as mine fits fairly tight no issues.
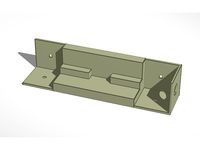
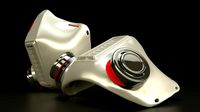
Power supply holder and bracket:
.2 layer height, 50mm/sec speed, 100% infill. You want this part strong as it is the most important electronic component of your setup and you do not want it to fail and cause a short or worse a fire!!!
ADDITIONAL MATERIALS/PARTS:
Walls:
The walls can be made either from 1/8" plexiglass, 1/8" MDF, 1/8" plywood, or even Dollar Tree Foam board is inexpensive and cheap and it fits perfectly in the slots for the walls, keeps the price down substantially, and it is foam so it will be a perfect insulator at moderate temperatures inside. I plan to use the foam board for 3 of walls and use plexiglass for the doors.
Hardware:
3/4" long wood screws should do just fine as the table tops and legs are hollow and does not require much depth of the screw to bite into the material. You will also need a magnetic cabinet latch block to mount at the top and bottom in the middle where the two doors will meet.
THIS IS A WORK IN PROGRESS AND SHOULD WORK, ALMOST 100% CERTAIN AS I AM 90% COMPLETE IN BUILDING MINE
ORIGINAL FILE SOURCES:
Bottom Risers source:https://www.thingiverse.com/thing:2527450
mainstays riser by ILLGotti is licensed under the Creative Commons - Attribution license.http://creativecommons.org/licenses/by/3.0/
Top Risers source:https://www.thingiverse.com/thing:2798973
Mainstays Top wall and door supports by theomne is licensed under the Creative Commons - Attribution license.http://creativecommons.org/licenses/by/3.0/
Hinges, Handles, Powersupply holder/bracket source:
IKEA Lack Enclosure Creality Ender 3 Compilation by Woody1978 on Thingiverse: https://www.thingiverse.com/thing:3083358
Motherboard Case source:https://www.thingiverse.com/thing:3522495 Ender 3 enclosure for stock & SKR Mini E3 boards by Usuariu
Screen Case (remixed with mounting holes) source:
BTT TFT35-E3 V3.0 - Free Standing Case by pointybeard on Thingiverse: https://www.thingiverse.com/thing:4514252
Filament guide: Something I made awhile back on Fusion360 :)
INTRODUCTION:
This is to facilitate ease of access and simplicity to others that do not have access to the IKEA store or want to pay more for shipping two IKEA Lack tables to make an enclosure. These files will help you assemble a working enclosure using two Walmart end tables branded Mainstays Parsons. Many of us have at least a Walmart nearby in the United States even in remote areas across the states. The tables are fairly inexpensive and can usually be purchased for $14.98 or sometimes on sale for $9.98 each.
PRINTING:
Bottom/Top Risers:
To speed up the process print all the risers in .32 layer height, 50mm/sec speed, at 10% infill (plenty strong) no supports needed, add a brim if your printer has layer adhesion issues or for added security.
Hinges & Handle parts:
Hinges and the handles for the enclosure can be printed in .2 layer height, 50mm/sec speed, at 30% infill. The only confusing part of the files is there will be two options to print either a pan head style hole hinge or countersunk hinge though it would make since that a left and right hinge of either the pan head or countersunk hinge go together however in CURA before printing I noticed this is not true. It seems like a left pan head hinge interlocks with a left countersunk hinge and vise versa for the right. Experiment here before printing x8 needed hinges.
Screen Case:
The original Ender 3 screen will fit in the lower left front under the table flush with just enough ribbon cable coming from the back left of the motherboard which is where I recommend you mount the motherboard. Mounting the motherboard back there will save you a headache in extending the factory wiring harness. I used rubber grommets for the hole in the back left of printer to run all the wires through down underneath. Essentially you can reuse your original motherboard case as well just remember to leave at least 1/2" gap above the case lid for the fan to pull in air other wise flush mounting the case to the bottom side of the table will render the cooling fan useless and burn up your board!!! You can use the two diagonal holes to mount the case to the back left leg, fairly simple idea and it worked on my Walmart enclosure build.
(optional) Motherboard case
The motherboard case which is optional if you decide to not reuse your original Ender 3 case mounted underneath should be printed at .2 layer height, 40mm/sec speed, at 100% infill, with supports, (print tiny walls option selected). I have yet to print this case and after looking at the file it looks like you would simply mount the case upside down with motherboard cooling fan at the bottom with the lid. You can either use the slots to attach a few screws through into the bottom side of the base table or simply use the red double sided foam tape that is super sticky and strong (will usually say 15lb rating).
UPDATE 26May2021: Added a remix case with mounting tabs!
Filament hole guide:
.2 layer height, 40-50mm/sec speed, 100% infill, use a brim. Drill a half inch hole through the top of your enclosure in a location that fits your needs to where your printer would take filament from, mine is center as I am direct feed now. I recommend a few inches from the left edge in line of your extruder if using the factory Bowden setup. The guide tube should stick out about a half inch past the bottom side of the top table when all the way through. Glue it down if you want, though I did not have to as mine fits fairly tight no issues.
Power supply holder and bracket:
.2 layer height, 50mm/sec speed, 100% infill. You want this part strong as it is the most important electronic component of your setup and you do not want it to fail and cause a short or worse a fire!!!
ADDITIONAL MATERIALS/PARTS:
Walls:
The walls can be made either from 1/8" plexiglass, 1/8" MDF, 1/8" plywood, or even Dollar Tree Foam board is inexpensive and cheap and it fits perfectly in the slots for the walls, keeps the price down substantially, and it is foam so it will be a perfect insulator at moderate temperatures inside. I plan to use the foam board for 3 of walls and use plexiglass for the doors.
Hardware:
3/4" long wood screws should do just fine as the table tops and legs are hollow and does not require much depth of the screw to bite into the material. You will also need a magnetic cabinet latch block to mount at the top and bottom in the middle where the two doors will meet.
THIS IS A WORK IN PROGRESS AND SHOULD WORK, ALMOST 100% CERTAIN AS I AM 90% COMPLETE IN BUILDING MINE
Similar models
thingiverse
free

Parsons Enclosure Risers by ramiivan1
...rner facing in, and four in the middle facing out. although 8 of them won't fit if you have bed adhesion or skirting checked.
thingiverse
free

ender 3 enclosure supports for mainstays parson end tables by DIRTeDev44
...adding plexiglass walls. i printed with tree supports on buildplate only with support brim enabled for the top of the closed end.
thingiverse
free
Riser & Brace for Ameriwood Parsons Table (Lack Style Enclosure) by jbrown2693
...found on amazon. it may fit other tables of similar style since the original was designed for the mainstays...
thingiverse
free
Mainstays Parsons Table Joint by jeepin95
... connect two tables together so that they don't fall apart. i've printed 2 so far but haven't yet mounted everything.
thingiverse
free

Walmart Parsons table enclosure by PantheraOnza
...g stands i designed to make an enclosure out of the walmart parsons tables, if you go that route instead of the ikea lack tables.
thingiverse
free

Mainstays Parsons Table Lack Enclosure by Silar
...join 2 or more walmart mainstays parson tables together similar to the ikea lack table enclosures everyone is using....
thingiverse
free

Legs for Mainstays Pearson Tables (Walmart) (Anet A8) by marcmdm2005
... one of these tables. always see them so you can attach two tables but not a mount for the bottom table.
printed and works great.
thingiverse
free

RPi Prusa Printed Solid Enclosure Case by ddivins
...e
m3x16 (or 12/whatever) with nuts to connect case to enclosure
print settings:
.2 layer height
20% infill
no supports
i used pla
thingiverse
free

Lambda Minimal Case by Click2print3D
...d this case for gravitech lambda board.
layer height: 0.2mm
speed: 50mm/s
infill: hexagon 30%
side layers: 3
top/bottom layers: 3
thingiverse
free
Ender 3 Enclosure Walmart Parsons Lack Table
...rews.
if you do not wish to use packing tape to hold the legs together then feel free to print my sleeve connector in my designs.
Xyzebruh
thingiverse
free

Pie Cut 3in OD stencil by XYZebruh
...not calibrated correctly please upscale the model in cura in increments of .5% to allow for proper fitment over your tube. enjoy!
thingiverse
free

Fly Egg 130 Improved Version by XYZebruh
...e printing in abs/pla it should be strong cheap alternative frame. email me feedback at zebruhfpv@gmail.com. thanks and enjoy! :)
Mainstays
turbosquid
$15

Mainstay Suite
... available on turbo squid, the world's leading provider of digital 3d models for visualization, films, television, and games.
turbosquid
$39

Mainstay Floor Lamp
...royalty free 3d model mainstay floor lamp for download as max on turbosquid: 3d models for games, architecture, videos. (1269814)
3d_export
$25

lowpoly a-50 mainstay aircraft
...>lighting is not included.<br>the render of previews is setup in default render.<br>no 3rd party plugin is needed.
3d_ocean
$45

Plane Airborne Early Warning and Control
...mium template/artwork product for photoshop, illustrator, indesign, after effect, maya and etc… categories: mockups, 3d model,...
3d_export
$60

aeritalia f-104s starfighter
...nd destined to be the last in service worldwide. the f-104s (upgraded to asa/m standard) was retired from service in october 2004
3d_export
$15
consolidated b-24 liberator
....s. service, although the pb4y-2 privateer maritime patrol derivative carried on in service with the u.s. navy in the korean war.
thingiverse
free

mainstays riser by ILLGotti
...9;t use the ikea ones because the tabs for the enclosure won't line up... my version brings the glass out as far as possible.
thingiverse
free

Mainstays Top wall and door supports by theomne
...stays pearson enclosure from wal-mart in the vein of the ikea-lack enclosures. matches illgotti's mainstays riser perfectly.
thingiverse
free

Toliet Seat Nut Tool (Mainstay) by Hitchabout
...toliet seat nut tool (mainstay) by hitchabout
thingiverse
i just needed a tool for the cross nut.
thingiverse
free

Mainstays Side Table Brace by jolsen
...is bracket allows 2 side tables to be stacked on top of each other to create a small tower that is great for holding 3d printers!
Parsons
turbosquid
$12

Anne Parsons Chair
... available on turbo squid, the world's leading provider of digital 3d models for visualization, films, television, and games.
3d_export
$20
Wooden Parsons Table 23 3D Model
...3dexport
table parsons rectangular modern contemporary realistic furniture
wooden parsons table 23 3d model cgaxis 29744 3dexport
turbosquid
$34
Parsons Concrete Brass Console
...ete brass console for download as max, max, max, fbx, and obj on turbosquid: 3d models for games, architecture, videos. (1676896)
turbosquid
$34

Parsons Concrete Dark Coffee Table
...dark coffee table for download as max, max, max, fbx, and obj on turbosquid: 3d models for games, architecture, videos. (1663817)
turbosquid
$34

Parsons Concrete Brass Coffee Table
...rass coffee table for download as max, max, max, fbx, and obj on turbosquid: 3d models for games, architecture, videos. (1663806)
turbosquid
$34

Parsons Black Marble Brass Console
...ble brass console for download as max, max, fbx, obj, and max on turbosquid: 3d models for games, architecture, videos. (1677133)
turbosquid
$34

Parsons Concrete Stainless Steel Console
...ess steel console for download as max, max, max, fbx, and obj on turbosquid: 3d models for games, architecture, videos. (1676951)
turbosquid
$34
Parsons Concrete Dark Steel Console
...ark steel console for download as max, max, max, fbx, and obj on turbosquid: 3d models for games, architecture, videos. (1676874)
3d_ocean
$8

CGAxis Wooden Parsons Table 23
... 3ds max 2008 or higher and many others. *.max scanline *.max mentalray *.max vray *.c4d cinema4d *.c4d cinema 11,5 vray *.fbx...
turbosquid
$16

RECLAIMED RUSSIAN OAK PARSONS SIDE TABLE
...oak parsons side table for download as 3ds, max, obj, and fbx on turbosquid: 3d models for games, architecture, videos. (1208423)
Walmart
cg_studio
$99

Walmart Truck3d model
...gstudio
.3ds .c4d .fbx .lwo .max .obj - walmart truck 3d model, royalty free license available, instant download after purchase.
turbosquid
$62

Walmart (3D scan)
... available on turbo squid, the world's leading provider of digital 3d models for visualization, films, television, and games.
3d_export
$9

WalMart 3d Logo 3D Model
...et shops retail chain stores warehouse trade sale retailer 3d model maya obj fbx
walmart 3d logo 3d model rmodeler 43866 3dexport
turbosquid
$129

Walmart Delivery Step Van
...walmart delivery step van for download as fbx, blend, and dae on turbosquid: 3d models for games, architecture, videos. (1411026)
3d_export
$99

Walmart Truck 2015 3D Model
...uturistic prototype 2017 semi transport future 2018 2019 2020 sci-fi heavy scifi
walmart truck 2015 3d model squir 85673 3dexport
3ddd
$1

DISPLAY CABINET 2
...display cabinet 2 3ddd walmart , стеллаж display cabinet 2,...
3d_export
$5

Computer Desk
...desk diy"<br>"simple computer desk with printer shelf"<br>"simple computer desk walmartquot;<br>"simple computer desk amazon"<br>"simple computer desk ideas"<br>"keyword"<br>"simple computer desk ikea"<br>"simple...
3d_export
$5
respiration-mask octane render high poly
...3d file<br>surgical mask cvs<br>surgical masks amazon<br>surgical mask target<br>surgical masks walmartlt;br>surgical mask walgreens<br>surgical mask for sale<br>surgical mask vs n95<br>surgical mask...
3d_export
$5

surgical mask - n95 medical face mask
...3d file<br>surgical mask cvs<br>surgical masks amazon<br>surgical mask target<br>surgical masks walmartlt;br>surgical mask walgreens<br>surgical mask for sale<br>surgical mask vs n95<br>surgical mask...
sketchfab
$42
Walmart
...d in maya and zbrush
size: x:283cm x y:82.5cm x z:21cm
centered on x,y,z axis - walmart - buy royalty free 3d model by pop417
Enclosure
3d_export
free

electrical enclosure
...l enclosure where electrical devices like (relays, contactors, busbars ) are kept in order to protect from hazardous environment.
turbosquid
$100

GPU Enclosure
...yalty free 3d model gpu enclosure for download as obj and stl on turbosquid: 3d models for games, architecture, videos. (1381061)
3d_export
$5

Electrical Enclosure
...ed. also has tower lights attaced on the top.<br>file format that are available:<br>.step<br>.obj<br>.stl
archive3d
free

Enclosure 3D Model
...closure 3d model
archive3d
shower enclosure-acquarius- 3d model for interior 3d visualization.
archive3d
free

Enclosure 3D Model
...enclosure 3d model
archive3d
shower enclosure-omega- 3d model for interior 3d visualization.
archive3d
free

Enclosure 3D Model
...enclosure 3d model
archive3d
shower enclosure-vega - 3d model for interior 3d visualization.
archive3d
free

Enclosure 3D Model
...enclosure 3d model
archive3d
shower enclosure-zenith - 3d model for interior 3d visualization.
turbosquid
$20

shower enclosure
... available on turbo squid, the world's leading provider of digital 3d models for visualization, films, television, and games.
turbosquid
$14

Dumpster Enclosure
... available on turbo squid, the world's leading provider of digital 3d models for visualization, films, television, and games.
turbosquid
$25

3d printer enclosure
... model 3d printer enclosure for download as ipt, skp, and fbx on turbosquid: 3d models for games, architecture, videos. (1634310)
Ender
3ddd
$1

Enders / Elegance
...enders / elegance
3ddd
обогреватель
уличный газовый обогреватель enders elegance
высота: 2200 мм
3d_export
free

ender 3 frame cavity covers
... of the creality ender 3 - makes it look a bit more attractive it just slides into the open channels of the aluminium framework
turbosquid
$1

pen support for ender 3
...y free 3d model pen support for ender 3 for download as blend on turbosquid: 3d models for games, architecture, videos. (1611282)
3d_ocean
$9

Ender Dragon Minecraft
...ojang obj poly videogames
ender dragon minecraft created with cinema 4d r15 formats included: max 2013 – fbx 2012 – c4d r15 – obj
3d_export
free

Creality ender enclosure webcam mount
...e creality enclosure. sure is better than a tripod. change it up if it helps. i printed pla with 50% infill on my dd ender 3 pro.
3d_export
free

ender 3 enclosure corners
...er corners and 4 upper corners, using 25mmx25mm angled aluminium pieces that gets covered on inside of the frame with plexiglass
3d_export
free

ender 3 3d print bed clips
...ed + normal aluminium bed frame of the creality ender 3 = 6mm (b) these clips are designed for glass plate + aluminium bed = 4mm
3d_export
$5

GRUMPY CAT
...grumpy cat 3dexport grumpy cat to print in ender ...
3d_export
$5

Logs fire
...with one multi material for corona and vray r ender. albedo, normal, uvmap, roughness format jpg 4096x4096 models:...
3d_export
$42

excavator
...is the original size. 0.12 mm printing surface creality ender5 ...
3
turbosquid
$10

Mountain Bike 3 -3 of 3
...model mountain bike 3 (#3 of 3) for download as fbx and blend on turbosquid: 3d models for games, architecture, videos. (1438752)
turbosquid
$6

Rock 3-3
...urbosquid
royalty free 3d model rock 3-3 for download as obj on turbosquid: 3d models for games, architecture, videos. (1628065)
turbosquid
$29

Books 150 pieces 3-3-3
...books 150 pieces 3-3-3 for download as max, obj, fbx, and stl on turbosquid: 3d models for games, architecture, videos. (1384033)
turbosquid
$3

Genesis 3 Clothing 3
... available on turbo squid, the world's leading provider of digital 3d models for visualization, films, television, and games.
3d_export
$5

hinge 3
...hinge 3
3dexport
hinge 3
3ddd
$1

Розетка 3
...розетка 3
3ddd
розетка
розетка 3
turbosquid
$50

is-3
... available on turbo squid, the world's leading provider of digital 3d models for visualization, films, television, and games.
turbosquid
$10

Mountain Bike 3 -2 of 3
...model mountain bike 3 (#2 of 3) for download as fbx and blend on turbosquid: 3d models for games, architecture, videos. (1438750)
turbosquid
$10

Mountain Bike 1 -3 of 3
...model mountain bike 1 (#3 of 3) for download as fbx and blend on turbosquid: 3d models for games, architecture, videos. (1438743)
3d_export
$5

3 CATS
...3 cats
3dexport
3 cats pen holder