Thingiverse
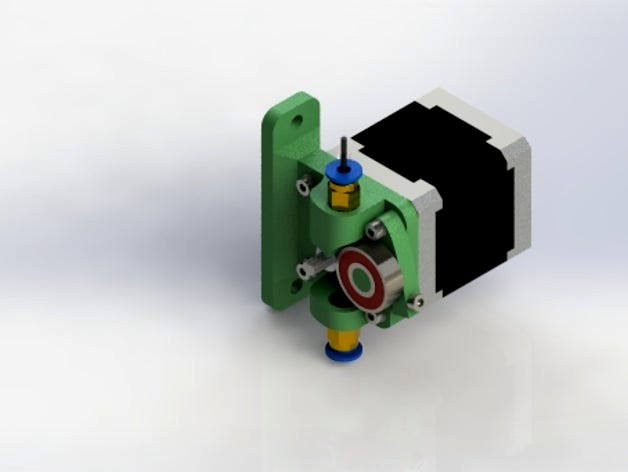
V/T-slot bowden extruder by austingeorge
by Thingiverse
Last crawled date: 3 years ago
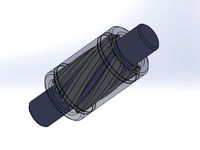
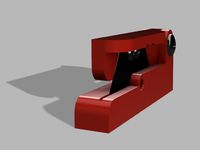
This extruder was designed by myself specifically for my C-Bot clone build.
It uses some commonly available components, and tools that i happened to have lying around.
I've managed to get 8mm3/S volumetric extrusion through my e3Dv6 hotend with this extruder; so it is capable of some grunt
The extruder is intended to be mounted directly to T-Slot or V-slot 20mm extrusion with 2x M5 bolts and washers. I've put a recommended size for the M5 bolt in the required list, incase you are mounting this to aluminium extrusion like i have.
The extruder at the moment, only fits 1.75mm filament. I don't currently intend to expand this to any other sizes.
I recommend not to use filament with a bad diameter tolerance. I typically use good quality filament with stated +-0.03mm tolerance and haven't had a jam or slip.
There is no need for a print or suspension mechanism for the idler arm in this design. The springiness is exerted on the idler arm itself. Another good reason to print in PETG or similar strong filament.
Parts
Required:
5x M3x16mm bolts (preferentially hex head)
5x M3 washers
1x M3 brass heat-set insert
2x M5x12mm or M5x10mm bolts and washers (M5x10mm might be a bit short) (to attach mount to extrusion)
1x skateboard bearing (608 - no flange!)
1x MK8 9mm external diameter, 7mm drive diameter gear
1x NEMA17 motor with rotor length of minimum
1x BPT bowden connector (drill out the hex hole to >=4mm if you would like the bowden tube to extend up to the drive gear - This isn't essential though)
Optional:
1x BPT bowden connector for reel-side bowden tube if you're intending to print air-sensitive filaments
Assembly tools:
Soldering iron with temp control
M3 bolt fastening tool (allen key, screwdriver)
9mm spanner or adjustable wrench
Print settings:
I printed at 0.3mm layer height in PETG. I have not tried this design in PLA, or ABS.
Care should be taken pirnting and using this in PLA as it's possible that PLA is too brittle and weak. I have no experience of ABS strength, so can't comment.
Instructions:
Print all 3 parts. ensuring that relevant supports are included wherever required.
Remove supports
Clean up any bolt holes, and bowden connector holes
Test fit the three parts together with bolts. The idler arm should swing on the top left M3 bolt and the extrusion mount should slot nicely into the motor mount and allow the two M3 bolt holes to be fitted to hold them together.
(optional) Drill out bowden tube hole in outlet of extruder. Minimum 4mm drill bit
Carefully, thread the bowden connectors onto the outlet (and inlet if required, using optional bowden connector) motor mount plate. Make sure they thread in straight. They do correct thmselves slightly as they thread in, but be weary that threads are hard to remove once created.
Test fit one of the M3 bolts through the idler arm to the motor mount plate. The hole in the motor mount plate can be threaded with a tap instead of a heat set insert, but i can't imagine it'll hold very well under tension.
Using your soldering iron set to [hotend extrusion temp - 30degC], push the heat-set insert into the hole in the motor mount plate.
Check the heat set insert is lined up with the idler arm bolt by repeating step.608
Push the idler bearing onto the bearing arm
Attach the motor to the back-side of the motor mount.
Mate the extrusion mount and motor mount and bolt together using the motor as the fastening nut. The bolt holes are snug. This is intentional, just keep threading the bolts in
Bolt the final lower right bolt of the motor mount to the motor.
Thread in some filament, insert bowden tube, attach to your printer, and tension the idler arm to suit.
Similar models
thingiverse
free

Bowden Extruder with captured connector by bradjshannon
...nt path removed for now. not needed except for flexible filaments, anyways
public fusion 360 project link: http://a360.co/2devcfk
thingiverse
free
Bowden Extruder for 2020 Profile - 1.75 MK7 608zz by Enrike_X5
...around 15mm lenth)
1x nema17 stepper
1x ptfe tube
you may need a tap kit (m5 and m8) to correct the threads, and a 2mm drill bit.
thingiverse
free

Alpha Direct Drive Extruder by engineglue
...upply list; this is a minimal design. you can use m4 bolts and nuts to mount it. it mounts to a standard aluminum mounting plate.
thingiverse
free

Printrbot 1401 - Bowden Conversion Extruder Motor to Bowden connector by astemoi
...otor to bowden connector by astemoi
thingiverse
attach to the aluminium extuder motor mount to and thread bowden tube connector.
thingiverse
free

Compact bowden extruder mount plate by BubaLettow
...
thingiverse
here is a mount to stiffen the bowden extruder for a through hole mounting scenario. set up for a m3 bolts and nuts
thingiverse
free

Bowden Mount for Greg's Wade's Extruder by Tearabite
...nd just trap a couple of nuts threaded onto the bowden tube in between the mount and the extruder itself. it works fantastically.
thingiverse
free
Ball Joint Filament Guide for 2040 Extrusion by Slava_Z
... m5x10mm, m5x10mm or m5x6mm bolt, and 4mm wide ptfe tube.
use 4mm drill bit if ptfe tube doesn't wand to go through the hole.
thingiverse
free
Yet Bondtech Bowden Extruder - Geared with Belt
... be printed in the orientation they are in when loading the files.
designed to be printed with 0.2mm layer or a division here of.
thingiverse
free

Openbuilds v-slot X axis for Lulzbot TAZ 6 printers by piercet
...head m5 bolts and nuts 30mm (standard bolts will not fit, need the flat ones. ). longer if you plan to add the cable chain pieces
thingiverse
free

Nema23 Bowden Extruder Cold End (1.75mm) by 4ndreas
...rod.
for the motor mount i used din 933 hex screws, the head fits in the extruder mount and can attracted from the motor side.
Austingeorge
thingiverse
free

M5 20x20 extrusion cable tie mount by austingeorge
... m5 nut.
two cable tie mount points are on either side of the mount, assuming wires would run perpendicular to cable tie opening.
thingiverse
free

Wanhao duplicator i3 extruder assembly reference by austingeorge
....
please point out any changes i can make.
and feel free to improve upon these models by adding further detailing where required.
thingiverse
free

Wanhao i3 Z endstop - No extra bolts needed by austingeorge
...o.
don't throw away the two bolts that originally mounted the switch as they're used to mount the bracket to the frame.
thingiverse
free

Wanhao Di3 30mm to 40mm fan adapter by austingeorge
...#39;s not neccessary
pictures show how to use the nuts and tapped threads.
let me know if there's any improvements i can make
thingiverse
free

Gear generator for Solidworks (Straight / Helix / Herringbone) by austingeorge
...ting of gears
added gear profile for gear ratio mate
adjusted how the herringbone is generated as it broke on some configurations
thingiverse
free
4mm PTFE LM8UU replacement by austingeorge
...y less than ideal bridging on the inside of the bearing casing
slide onto an 8mm linear rod and run up and down to check movement
thingiverse
free
20mm Extrusion cable chain - Small bend radius - Minimal twist by austingeorge
...m internal face
internal cavity measures 12mm width, 7mm height.
end connectors fit bolts commonly used with 20x20 extrusion (m5)
thingiverse
free

Wanhao duplicator i3 <=V1 - Glass bed XY corner clamp by austingeorge
...d over time.
i also recommend you print this in abs, due to thermal properties and to avoid warping when your bed gets to temp.
thingiverse
free

Duplicator i3 Adjustable Z Endstop - no extra hardware by biohazrd
...hardware by biohazrd thingiverse this is a remix of austingeorge#39;s adjustable endstop. the original puts the endstop too high...
Bowden
turbosquid
$199
Vintage Ben Bowden Spacelander bike
... available on turbo squid, the world's leading provider of digital 3d models for visualization, films, television, and games.
3ddd
$1

Manooi Artica
...and pendants in various sizes and forms. suspension: galvanized bowden - dia. 1,5 mm. bulb: max 60 w -...
thingiverse
free
Remix Compact Bowden extruder - m6 bowden couplers and bowden tube pass-through
...ouplers and bowden tube pass-through
thingiverse
remix compact bowden extruder - m6 bowden couplers and bowden tube pass-through
thingiverse
free

Bowden Extruder
...bowden extruder
thingiverse
i have created bowden extruder for flsun delta 3d printer.
thingiverse
free

bowden 3mm by spee_D
...bowden 3mm by spee_d
thingiverse
for bowden 3mm
thingiverse
free
Bowden Tube Cutter
...bowden tube cutter
thingiverse
bowden tube cutter
thingiverse
free
Customizable Bowden Clip
...customizable bowden clip
thingiverse
customizable bowden clip
thingiverse
free
Bowden Oiler by fcheshire
...bowden oiler by fcheshire
thingiverse
inline bowden oiler
thingiverse
free

Bowden adapter by helkaroui
...bowden adapter by helkaroui
thingiverse
this is a fixed bowden adapter
thingiverse
free

Adventure3 Bowden Clip
...adventure3 bowden clip
thingiverse
adventure3 bowden clip
Extruder
3ddd
$1

Extruded Chair
...extruded chair
3ddd
extruded , tom dixon
inspired by tom dixon extruded chair
turbosquid
$15

Extruded Table
... extruded table for download as blend, dae, fbx, obj, and stl on turbosquid: 3d models for games, architecture, videos. (1634137)
turbosquid
$2

3D Printer Extruder
...d
royalty free 3d model 3d printer extruder for download as on turbosquid: 3d models for games, architecture, videos. (1537359)
turbosquid
$1

Zombie extruded text
...oyalty free 3d model zombie extruded text for download as obj on turbosquid: 3d models for games, architecture, videos. (1322198)
turbosquid
$4

Extruder conical screw
...el extruder conical screw for download as sldpr, ige, and stl on turbosquid: 3d models for games, architecture, videos. (1524433)
turbosquid
$50

3d PRINTER - Extruder
... available on turbo squid, the world's leading provider of digital 3d models for visualization, films, television, and games.
turbosquid
$15

Extruded Table 2
...xtruded table 2 for download as blend, dae, fbx, obj, and stl on turbosquid: 3d models for games, architecture, videos. (1621846)
turbosquid
$10

Maya Extrude Tool
... available on turbo squid, the world's leading provider of digital 3d models for visualization, films, television, and games.
3d_export
$5

world earth extrude map
...world earth extrude map
3dexport
3ddd
$1

Simply Elegant Extruded Tree Coffee Table Design
...ble by link studios. the silhouette of a tree is visible at one angle, extruded from the surface to create the support structure.
Slot
3d_export
$5
slot handle
...slot handle
3dexport
slot handle
archibase_planet
free
Slot machine
...ase planet
slot machine slot-machine playing machine
slot machine n260311 - 3d model (*.gsm+*.3ds) for interior 3d visualization.
archibase_planet
free

Slot machine
... machine slot-machine one-armed bandit
slot machine novomatic gaminator n240911 - 3d model (*.3ds) for interior 3d visualization.
3d_export
$5

narrow slot handle
...narrow slot handle
3dexport
narrow slot handle
turbosquid
$15

Slot Machine
...oyalty free 3d model slot machine for download as max and fbx on turbosquid: 3d models for games, architecture, videos. (1710861)
turbosquid
$25

Slot Machine
... free 3d model slot machine for download as max, obj, and fbx on turbosquid: 3d models for games, architecture, videos. (1649555)
turbosquid
$25

Coin Slots
... available on turbo squid, the world's leading provider of digital 3d models for visualization, films, television, and games.
turbosquid
$11

Slotted spoon
... available on turbo squid, the world's leading provider of digital 3d models for visualization, films, television, and games.
turbosquid
$5

Slot Sofa
... available on turbo squid, the world's leading provider of digital 3d models for visualization, films, television, and games.
turbosquid
$3
slotted spoon
... available on turbo squid, the world's leading provider of digital 3d models for visualization, films, television, and games.
V
design_connected
$16
V Chair
...v chair
designconnected
v chair computer generated 3d model.
design_connected
$11
V Hanglamp
...v hanglamp
designconnected
arturo alvarez v hanglamp computer generated 3d model. designed by alvarez, arturo .
turbosquid
$25

Borbet V
...v
turbosquid
royalty free 3d model borbet v for download as on turbosquid: 3d models for games, architecture, videos. (1381618)
turbosquid
free
Saturn V
...rn v
turbosquid
free 3d model saturn v for download as blend on turbosquid: 3d models for games, architecture, videos. (1651098)
turbosquid
$40

V motor
...turbosquid
royalty free 3d model v motor for download as max on turbosquid: 3d models for games, architecture, videos. (1379483)
turbosquid
$7

V for Van
...rbosquid
royalty free 3d model v for van for download as max on turbosquid: 3d models for games, architecture, videos. (1695889)
turbosquid
$5
Letter v
...urbosquid
royalty free 3d model letter v for download as max on turbosquid: 3d models for games, architecture, videos. (1408535)
turbosquid
$5

Letter v
...urbosquid
royalty free 3d model letter v for download as max on turbosquid: 3d models for games, architecture, videos. (1408534)
turbosquid
$15

BonePile V
...oyalty free 3d model bonepile v for download as blend and obj on turbosquid: 3d models for games, architecture, videos. (1546310)
turbosquid
$2

FONT V
...quid
royalty free 3d model font v for download as ma and obj on turbosquid: 3d models for games, architecture, videos. (1549450)
T
design_connected
$11

T & T
...t & t
designconnected
dark t & t computer generated 3d model. designed by de ryck, christophe.
3d_export
$5

t-800
...t-800
3dexport
t-800
3ddd
$1
Table T
...table t
3ddd
журнальный
table t
3ddd
free
T-Rex
...t-rex
3ddd
t-rex
rrrrrr
3d_export
$5
t-virus
...t-virus
3dexport
it's t-virus
3d_export
$5

T-26T
...t-26t
3dexport
artillery tractor on the t-26 chassis ussr
3ddd
$1
T 45
...t 45
3ddd
t-45
кабинет руководителя t 45
12 предметов
подробнее:http://www.prezident-mebel.ru/index.php?productid=1541
3ddd
free

SAFE T
...safe t
3ddd
огнетушитель
креативные огнетушители от компании safe t
3d_export
free
t-rex
...t-rex
3dexport
t-rex have normal map and base color textures
3d_export
$75

T-55
...nally, but these improvements made the tank more efficient and lethal. the t-55 was officially adopted by the soviet army in 1958