Thingiverse

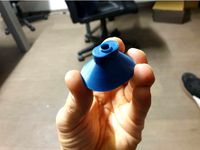
Vaporizer - Homemade by Still_Breathing
by Thingiverse
Last crawled date: 3 years, 1 month ago
Vaporizer (for weed vaping)
These 3D print parts are based on my original wood version (shown in a photo).
Data points:
Optimal Temperature Range of heatblock for Vaping is 355 to 375 (F).
Depending on your soldering iron, time to Temp’s will vary ~ 8 min’s.
After several min’s of vaping, the Temp will rise to above 375F, UnPlug it (or use a controller such as your favorite Arduino design).
[FYI - I’m done vaping before it gets too hot so I don’t use a controller]
When assembled, all plastic is far enough away from the heatblock and won’t cause softening/melting (PLA or ABS or bottle).
The Parts:
Plastic Bottle - Boss ring is sized for a 4 inch Western Family water bottle but you can use most any bottle that meets the geometry (and / or scale the Boss’s X and Y dim’s as needed). 4 inch dia bottle keeps sides away from heatblock. Make cutout as shown in photo.
Bottle Cap - No 3d printers when I made the original so I used plastic from Ace Hardware (parts shown in photo). Sure, design/make your own…
The Boss - Tapered and radius’d to enable slipping the bottle on with ease via tilting it from the back and slipping the bottle’s cutout over the taper/radius’s. The bottle will tend to curl inwards due to the cutout so, the taper/radius is facing the soldering iron mount).
The Mount - Has an ‘Anti-rotation’ bump to limit the soldering iron from rotating. Press the Front cap into place - you can file/grind the nub if needed. Add a shim if needed… This will depend on the soldering iron. It will pull out from front entry so be sure it’s snug.
Mount Caps - Sized to fit without slop; be sure to file and sand the Mount and guts of the Caps so they install and remove without too much difficulty. Plastic shrink, Extrude Flowrate/etc will affect this so, experiment until you’re satisfied.
Install Rear Cap with the thicker wall facing the Front Cap (solder iron is tapered thus, so is the hole for it in rear cap).
Soldering Iron - Weller SP23L 25 watts. The concept is generic so, create your own parts for your/different solder iron… And, screw the heatblock onto the iron to ensure consistant heat transfer.
Heatblock - Original uses brass. New versions made for others use Alum 6061 (approx: 5/8” x 1.25” x 1.0”). No need for a recessed pocket like original brass one. Just drill the holes as shown in drawing. Better contact between Heatblock and Solder Iron means more responsive and uniform heating - better to under-size the hole and file it out as needed to make it snug.
[FYI - Resin builds up in bottle and hose - after 2 feet of hose length, most of the resin is cleared out of the hose… If concerned about breathing the resin, see the JAMA report cited below.
Good Vaping info here:
Health Info: From JAMA, the Journal of Amer. Med Assoc.http://jamanetwork.com/journals/jama/fullarticle/1104848
Good Vape technical info (Temps, THC, CBD…) California NORMLhttp://www.maps.org/research-archive/mmj/Gieringer-vaporizer.pdf
Similar models
thingiverse
free

Bottle Cap Hose Barb 2.0 by Lordofrealms
... the plastic layers because it was so thin. this was true even after some vapor polishing. this one is thicker and does not leak.
thingiverse
free
Funnel for Airistech Herbva 5G vaporizer by fricisne
...he grinder into the vape.
note: don't use while the device is hot! the plastic can melt'n'stuff and damage your vape.
thingiverse
free

Funnel for Airistech Herbva 5G vaporizer by fricisne
...he grinder into the vape.
note: don't use while the device is hot! the plastic can melt'n'stuff and damage your vape.
thingiverse
free

Bottle Cage Displacer by JAltham
...cutouts designed into the model (use a soldering iron to gently push an m5 nut into the recess and it will hold incredibly tight)
thingiverse
free

JBC Soldering station cleaning section cap by sns13
...r jbc soldering station iron cleaning section so it won't dry too quickly. printed with elastan plastic, which is quite soft.
thingiverse
free

Customizable cap for soldering Iron by AndreaSignoretto
...le thing to design ever... but was great fun!! :-)
you can customize it in dimension to use as a cap for anything!
thank you!
thingiverse
free

Bottle Cap for Plant Watering by privejan
...e bottle cap. before glueing printed part on, carve a hole into your regular bottle cap. any strong glue for plastic can be used.
grabcad
free

Cap for soldering iron PX-280
...cap for soldering iron px-280
grabcad
cap for soldering iron px-280
thingiverse
free

Photon Resin Funnel
... fit a paper filter and the taper is relieved to add clearance where the filter screen is located, promoting improved resin flow.
cg_trader
$2

Vape Juice Dropper Bottle
...vape juice dropper bottle
cg trader
a basic, plastic vape juice dropper bottle.
Homemade
turbosquid
$14
Homemade Cup
... free 3d model homemade cup for download as max, fbx, and obj on turbosquid: 3d models for games, architecture, videos. (1530055)
turbosquid
$12

Homemade Bread
...ree 3d model homemade bread for download as max, obj, and fbx on turbosquid: 3d models for games, architecture, videos. (1593685)
turbosquid
$10
Homemade Based Gun
... available on turbo squid, the world's leading provider of digital 3d models for visualization, films, television, and games.
turbosquid
$4

Homemade Gaming Table
... available on turbo squid, the world's leading provider of digital 3d models for visualization, films, television, and games.
turbosquid
$59

Electric Homemade Morgenstern
... morgenstern for download as max, max, max, max, fbx, and obj on turbosquid: 3d models for games, architecture, videos. (1708709)
turbosquid
$15

Homemade Chocolates(8 types)
...e 3d model homemade chocolates(8 types) for download as blend on turbosquid: 3d models for games, architecture, videos. (1214642)
turbosquid
$5
Homemade Axe (High Poly)
...ty free 3d model homemade axe (high poly) for download as obj on turbosquid: 3d models for games, architecture, videos. (1209323)
3d_export
$10

homemade knife
...nife
3dexport
all textures in the png extension (2k, pbr). number of polygons 6980. file formats: fbx, obj, stl, max, mb, blend.
turbosquid
$15
Homemade metal sauna stove
...made metal sauna stove for download as max, obj, fbx, and dwg on turbosquid: 3d models for games, architecture, videos. (1577773)
turbosquid
$9
Homemade guide screw module
...e guide screw module for download as 3ds, ige, obj, and sldas on turbosquid: 3d models for games, architecture, videos. (1224566)
Vaporizer
3ddd
$1

VAPOR
...vapor
3ddd
karim rashid
современный торшер из коллекции
vapor
design karim rashid
turbosquid
$15
Vaporizer
... available on turbo squid, the world's leading provider of digital 3d models for visualization, films, television, and games.
3d_export
$20
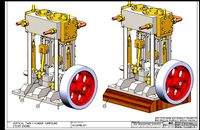
MAQUINA DE VAPOR
...maquina de vapor
3dexport
vertical twin cylinder compound<br>steam engine, project modeled in solidworks
3ddd
$1

Сноуборд Burton Vapor
... сноуборд
модель не сверх точная, но для средних планов вполне сгодится.
в комплекте текстура, сделанно в 2009 максе, vray маты.
3d_export
$25

Chrysler 300 SRT8 Satin Vapor rim 3D Model
... part of avto car chrysler 300 srt8 satin vapor rim
chrysler 300 srt8 satin vapor rim 3d model creativeideastudio 97157 3dexport
turbosquid
$39

Chrysler 300 SRT8 Satin Vapor wheel
... available on turbo squid, the world's leading provider of digital 3d models for visualization, films, television, and games.
turbosquid
$29

Chrysler 300 SRT8 Satin Vapor rim
... available on turbo squid, the world's leading provider of digital 3d models for visualization, films, television, and games.
3d_ocean
$20

Chrysler 300 SRT8 Satin Vapor wheel
.... model with physically accurate materials. model is separated on parts and correctly named. so it is easy to use and modified...
3d_ocean
$18

Chrysler 300 SRT8 Satin Vapor rim
...model has got physically accurate materials. it is separated on parts and they are correctly named. so it is easy to use and m...
3d_export
$5

Cloud X-1 Vaporizer concept 3D Model
...smokeless vape
cloud x-1 vaporizer concept 3d model download .c4d .max .obj .fbx .ma .lwo .3ds .3dm .stl colten3d 104598 3dexport
Breathing
turbosquid
$5

Breathe Strip
... available on turbo squid, the world's leading provider of digital 3d models for visualization, films, television, and games.
turbosquid
free

Alien Breathing Mask
...squid
free 3d model alien breathing mask for download as obj on turbosquid: 3d models for games, architecture, videos. (1279130)
turbosquid
$52
Human Mechanism of Breathing
... available on turbo squid, the world's leading provider of digital 3d models for visualization, films, television, and games.
3ddd
$1

Baby's Breath Flower
...baby's breath flower
3ddd
цветы , ваза
baby's breath flower
3d_export
$15

A self-contained breathing apparatus SCBA
...us scba
3dexport
a self-contained breathing apparatus (scba) with mask.<br>this is a fictional model not used in real life
3d_ocean
$25

Baby's Breath Flower 01
...baby's breath flower 01
3docean
decoration flower interior vase
baby’s breath flower models
turbosquid
$11

Breathing Valve To The Oil Reservoir 5
... available on turbo squid, the world's leading provider of digital 3d models for visualization, films, television, and games.
turbosquid
$11

Breathing Valve To The Oil Reservoir 4
... available on turbo squid, the world's leading provider of digital 3d models for visualization, films, television, and games.
turbosquid
$11

Breathing Valve To The Oil Reservoir 2
... available on turbo squid, the world's leading provider of digital 3d models for visualization, films, television, and games.
turbosquid
$11
Breathing Valve To The Oil Reservoir 1
... available on turbo squid, the world's leading provider of digital 3d models for visualization, films, television, and games.
Still
design_connected
$4

Still
...still
designconnected
minotti still tables computer generated 3d model. designed by rodolfo dordoni.
turbosquid
$49

Still
... available on turbo squid, the world's leading provider of digital 3d models for visualization, films, television, and games.
3ddd
$1
Кровать STILLES
...кровать stilles
3ddd
bidermajer , stilles
прошу добавить в профи
3ddd
$1
prive still
...prive still
3ddd
cassina
prive still arm chair (840x840)pix
3ddd
$1

Molteni Still
...molteni still
3ddd
molteni&c
sofa molteni still. ширина 250см,глубина95см,высота86см.
3ddd
$1
STILLES dining table
...les dining table
3ddd
обеденный , stilles
stilles dining table, dimension: 190x105x75 cm
3ddd
$1

MOLTENI STILL
...olteni still
3ddd
molteni&c
sofa molteni still. ширина 250см,глубина95см,высота86см. обивка кожанная.цвет-белый и черный.
3d_export
free

still-life
...still-life
3dexport
turbosquid
$159

Still life
... available on turbo squid, the world's leading provider of digital 3d models for visualization, films, television, and games.
turbosquid
$100

still-life
... available on turbo squid, the world's leading provider of digital 3d models for visualization, films, television, and games.