Thingiverse
USB Shell
by Thingiverse
Last crawled date: 6 years, 1 month ago
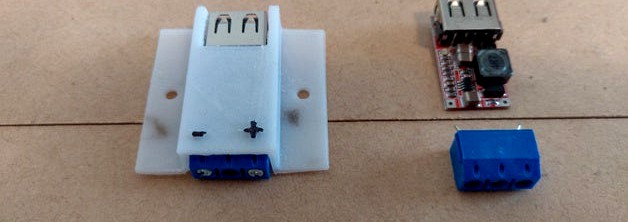
This is just a small shell to house a 6/12VDC-5VDC USB "buck" convertor.
I've recently upgraded to the Arlo Pro 3 camera system. Unfortunately the optimal locations to mount the cameras makes them easily stolen. The answer of course is to mount the cameras behind plates which I've done but trying to recharge the internal batteries then involves dismounting them from the plates, a painful & long winded task.
The cameras can be recharged by connecting a cable with a USB end to a USB wall charger (included in the kit). However, apart from the fact that none of the camera positions are near a power point, I sorta object to them sitting there sucking my electricity.
So, I've come up with this idea to power each of the cameras. The cameras USB lead connects to the USB on the buck convertor which in turn is connected to 2x 6VDC lantern batteries wired in series (USB in your car works in this same manner).
I'm not sure how many Amp Hours there are in 2x lantern batteries but its gotta be heaps. Certainly way more than the piddly little battery inside the cameras. Also lantern batteries are cheap (around $2 NZD) so it doesn't really matter if I need to replace them ocassionally.
The shell is designed to screw onto the outside of the wooden battery boxes that I've built. For this reason, the wire entry points for the screw terminals are on the underside.
Also it should be noted that I've used 3 pole screw terminals but the centre terminal is unused. I chose 3 poles so that the terminal housing was the correct width. My original idea was that I would remove the fittings of the centre terminal but ultimately I was unable to do this. So instead, I simply broke off the solder leg so that it wouldn't get in the way. Someone more pedantic than me might consider filling it with epoxy.
Lastly, I've marked the polarity on the outside of the shell because (distressingly) there is no indication on the board itself.
Here's the source that I used for the buck convertor:https://www.aliexpress.com/item/32815170131.html?spm=2114.13010708.0.0.4dfa4c4dLWI4NX
Addendum
I forgot to mention a number of things:
although I've designed this for use with my Arlo Pro 3 cameras, this concept could also be used for any other application where a device requires USB power and its desirable not to connect it via the mains. i.e. its an independent, standalone device.
I've used 2x 6VDC lantern batteries because I had a number of them left over from a previous (failed) experiment. The buck convertor will handle 6VDC - 24VDC input. So basically, you can use as little as a single 6VDC lantern battery for an input voltage.