Thingiverse
Updated: WPL Beetle Bouncer C24/C14 Mod Trail Buggy by WrenchToDrive
by Thingiverse
Last crawled date: 4 years, 1 month ago
Hi guys,
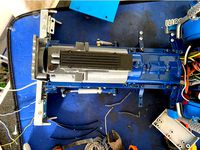
Update: I got my C24 back in action with the help of a pinion gear puller. I swapped the pinion gear off the 2spd gearbox motor onto the stock motor and then installed the stock motor in my 2spd gearbox. There are holes that fit the smaller stock motor in the gearbox from the factory, so it's easy. Long story short, the front body mounting posts are a weak spot. If you mount the cage to the stock frame rails you likely won't have the same problem. One of mine broke after 4 hard hits right on the body. I used hot glue to fix the broken post and ran a bead of hot glue down the front and back side of both to strengthen them up a bit. The new version has reinforcements built in but I would suggest also adding a bit of hot glue or some other sort of glue to beef up that point of failure.
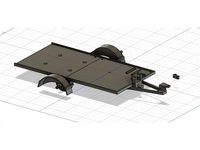
Updates are: Stronger body mount posts on the servo tray and a battery tray that installs between the chassis rails at the back end of the car (if you use plastic rails, not stock). The servo mount screw holes are smaller now so they can actually be used (sorry about that, I use 2 sided tape to install the servo and I didn't check those holes until yesterday).
BTW, the stock motor installed in the 2spd gearbox makes the car quite a bit faster, so if speed is your thing, that might be the mod for you because the gears are much beefier than the ones in the stock transmission.
If Thingiverse is as slow for you as it is for me, consider looking for your 3D parts at Cults 3D: https://cults3d.com/en/users/WrenchToDrive/creations
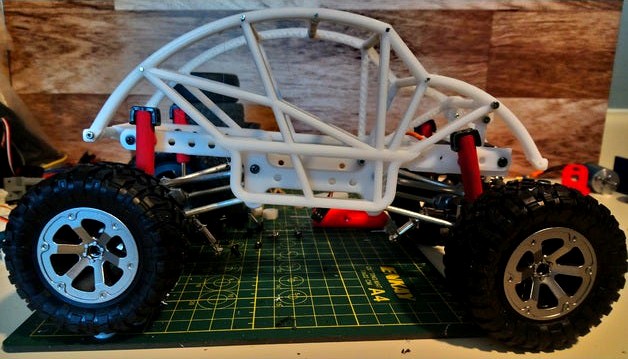
This is a rock bouncer(ish) mod for the WPL C14/C24. There won't be a run video any time soon because my two speed motor is cooked and my my stock transmission has a busted gear (see my bumper crash test video). The parts are on a slow boat from China which is destined to be even slower thanks to the widespread overreaction to a certain virus. Can you still buy toilet paper where you live? #ThingICantPrint
There's a much swankier 1/10 scale version of this project coming (for use with SCX10 axles) but it's a lot more work so hang in there.
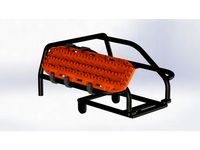
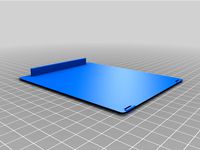
Anyway, the frame sides (cage) can be bolted to the stock frame rails but the ends of the rails will stick out some. If you go that route you'll want to use the "chassis spacer" between the cage and the frame rails. The plastic printable rails are bendy but the whole unit is pretty stiff so I think it will work fine. The servo tray is shortened and there are multiple shock positions available if you use the plastic rails. You'll need some M2x10mm scews to put it together. I used brad nails and glue for most of the cage braces and it's pretty solid, but I would suggest screws for the chassis attachments for sure. The rear hinge is a little goofy but it works. That's on my list of "what was I thinking", but it won't be addressed until another day.
7 x Cross_Bar_59
2 x Latch
1 x latch bar
1 x rear hinge
1 x L_Side
1 x Mirror of L_Side
1 x Front_Latch_Bar
If using plastic frame rails
2 x Chassis_Rail
If using stock frame rails
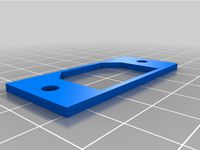
4 x Chassis_Spacer
As always, use at your own risk.
Wrench to drive or drive to wrench?
PS if you notice anyone spamming your friendly neighborhood designer's comment section, please feel free to spam them right back in a hurtful but civil way. Don't get yourself in trouble but let them know how badly their parents failed the world.
Update: I got my C24 back in action with the help of a pinion gear puller. I swapped the pinion gear off the 2spd gearbox motor onto the stock motor and then installed the stock motor in my 2spd gearbox. There are holes that fit the smaller stock motor in the gearbox from the factory, so it's easy. Long story short, the front body mounting posts are a weak spot. If you mount the cage to the stock frame rails you likely won't have the same problem. One of mine broke after 4 hard hits right on the body. I used hot glue to fix the broken post and ran a bead of hot glue down the front and back side of both to strengthen them up a bit. The new version has reinforcements built in but I would suggest also adding a bit of hot glue or some other sort of glue to beef up that point of failure.
Updates are: Stronger body mount posts on the servo tray and a battery tray that installs between the chassis rails at the back end of the car (if you use plastic rails, not stock). The servo mount screw holes are smaller now so they can actually be used (sorry about that, I use 2 sided tape to install the servo and I didn't check those holes until yesterday).
BTW, the stock motor installed in the 2spd gearbox makes the car quite a bit faster, so if speed is your thing, that might be the mod for you because the gears are much beefier than the ones in the stock transmission.
If Thingiverse is as slow for you as it is for me, consider looking for your 3D parts at Cults 3D: https://cults3d.com/en/users/WrenchToDrive/creations
This is a rock bouncer(ish) mod for the WPL C14/C24. There won't be a run video any time soon because my two speed motor is cooked and my my stock transmission has a busted gear (see my bumper crash test video). The parts are on a slow boat from China which is destined to be even slower thanks to the widespread overreaction to a certain virus. Can you still buy toilet paper where you live? #ThingICantPrint
There's a much swankier 1/10 scale version of this project coming (for use with SCX10 axles) but it's a lot more work so hang in there.
Anyway, the frame sides (cage) can be bolted to the stock frame rails but the ends of the rails will stick out some. If you go that route you'll want to use the "chassis spacer" between the cage and the frame rails. The plastic printable rails are bendy but the whole unit is pretty stiff so I think it will work fine. The servo tray is shortened and there are multiple shock positions available if you use the plastic rails. You'll need some M2x10mm scews to put it together. I used brad nails and glue for most of the cage braces and it's pretty solid, but I would suggest screws for the chassis attachments for sure. The rear hinge is a little goofy but it works. That's on my list of "what was I thinking", but it won't be addressed until another day.
7 x Cross_Bar_59
2 x Latch
1 x latch bar
1 x rear hinge
1 x L_Side
1 x Mirror of L_Side
1 x Front_Latch_Bar
If using plastic frame rails
2 x Chassis_Rail
If using stock frame rails
4 x Chassis_Spacer
As always, use at your own risk.
Wrench to drive or drive to wrench?
PS if you notice anyone spamming your friendly neighborhood designer's comment section, please feel free to spam them right back in a hurtful but civil way. Don't get yourself in trouble but let them know how badly their parents failed the world.
Similar models
thingiverse
free
wpl-c24/14 front wheel wells and servo/equipment tray by samparlatore
...ge in your video description.
with enough encouragement i may end up making a hood for this part and maybe even rear wheel wells.
thingiverse
free
1/14 Engine by rcdesigna
...;t included, i just used these as a reference. also i didn't use the blocks as mine was nice and tight sitting over the motor
thingiverse
free
WPL C24 Honcho Cage Traction Board Mount by TS-Designs
....thingiverse.com/thing:1749800/comments (the page says it's 1/10 but it's closer to 1/14 and looks scale for wpl trucks).
thingiverse
free

WPL C24 conversion chassis and parts for D90
...he rest of the parts not included here can be found on spone's excellent model here:https://www.thingiverse.com/thing:2395001
thingiverse
free
WPL-c24 Bed Retainer Loop by samparlatore
...ic so the bottom of the battery pan can be glued to.
these have an ample 2cm sq. glue surface so they wont come off anytime soon.
thingiverse
free

WPL B-1 Servo Mount - ES08MA / MG90 Servo by Pilotgeek
...rints fine at 0.3 layer height 20% infill.
using the stock servo mounting gear, the alignment of the linkages should be correct.
thingiverse
free

Land Rover Defender with WPL upgrade
...check my building video:
and a test run:
https://www.youtube.com/watch?v=jcqoxldxk-ohttps://www.youtube.com/watch?v=miatj1py-gs
thingiverse
free

Tracks for WPL-c24 or WPL-c14 KM by samparlatore
...arts or if you use my printed gear.
please link my youtube / thingiverse page in your description if you run this part in videos.
thingiverse
free

WPL C24 lowrider tires by skr00zloose
...but the offset is wrong on those wheels for my project, so i'm using these for now: https://www.thingiverse.com/thing:3985480
thingiverse
free

WPL C24 Servo Bracket Adapter for 9g Servos by JoTheBob
... servo a little farther forward.
scale the model to 1000% to make it the correct size, autodesk inventor is just weird like that.
Wrenchtodrive
thingiverse
free

Kyosho Fazer MK2 Front Bumper by WrenchToDrive
...it works well in tpu but my first version was pla and has held up well.
use at your own risk.
wrench to drive or drive to wrench?
thingiverse
free

Arrma Senton Roof Slider by WrenchToDrive
...;m not so sure about. your mileage may vary.
attach with 2-sided tape.
use at your own risk.
wrench to drive or drive to wrench?
thingiverse
free

Redcat Gen 8 SCX10 Metal Axle Panhard Mount by WrenchToDrive
... hold it in place.
summary and run video: https://youtu.be/zj-lojcs2sw
use at your own risk.
wrench to drive or drive to wrench?
thingiverse
free

SCX10 Jeep Bumper by WrenchToDrive
... trx-4 rails are the same as scx10 except that the channels are deeper.
use at your own risk.
wrench to drive or drive to wrench?
thingiverse
free

SCX10 Clone Crawler Stealth(ish) Rear Bumper by WrenchToDrive
... the mount kit for improvements. i expect the bumpers will not change.
use at your own risk.
wrench to drive or drive to wrench?
thingiverse
free

Kyosho Fazer MK2 Rear Suspension by WrenchToDrive
... a charger daytona/plymouth super bird front end and wing...
as always, use at your own risk.
drive to wrench or wrench to drive?
thingiverse
free

Generic roof slider (For RC car) by WrenchToDrive
... bit and they are more durable than i expected. your mileage may vary.
use at your own risk.
wrench to drive or drive to wrench?
thingiverse
free

SCX10 Tube Style Bumper by WrenchToDrive
...o, you'll just need to mount the bumper to it with screws and nuts.
use at your own risk.
wrench to drive or drive to wrench?
thingiverse
free

SCX10 (Clone) Tube Front Bumper LED Ready by WrenchToDrive
...k the mount kit for improvements. i expect the bumpers will not change.
use at your own risk.
wrench to drive or drive to wrench?
thingiverse
free

Jeep Front and Rear Inner Fenders by WrenchToDrive
...mment and let me know. i don't consider a little trimming heinous.
use at your own risk.
wrench to drive or drive to wrench?
Bouncer
turbosquid
$4

Joe The Bouncer
... available on turbo squid, the world's leading provider of digital 3d models for visualization, films, television, and games.
turbosquid
$15

Lady Bird Bouncer
... available on turbo squid, the world's leading provider of digital 3d models for visualization, films, television, and games.
turbosquid
$9

Bottom Bouncer and Worm
... available on turbo squid, the world's leading provider of digital 3d models for visualization, films, television, and games.
3d_export
$19

Man Bouncer 3d model 3D Model
...man bouncer gamemodel
man bouncer 3d model 3d model download .c4d .max .obj .fbx .ma .lwo .3ds .3dm .stl vladyder 113510 3dexport
3d_export
$15

Space Hopper 3D Model
...70s seventies toy retro spacehopper moonhopper skippyball kangaroo ball bouncer hippity hop skippy moon space hopper 3d model download...
3d_export
$40

Full-size frame model of showtime bouncer buggy of tim cameron
...5f84b1d&index=14<br>https://www.pirate4x4.com/news/featured-vehicles/its-showtime-tim-camerons-new-flavor-of-the-month/
thingiverse
free

Rotorama Bouncer
...rotorama bouncer
thingiverse
3d models for rotorama bouncer drone frame.
3d_sky
$8

Bouncer Strandkorb Nordseeform
...bouncer strandkorb nordseeform
3dsky
beach
bouncer strandkorb nordseeform
unity_asset_store
$25

Bouncer Bot
...ur workflow with the bouncer bot asset from the architect. find this & other characters options on the unity asset store.
thingiverse
free

Bouncer for YONGNUO YN560 by velomobil
...bouncer for yongnuo yn560 by velomobil
thingiverse
bouncer for yongnuo yn560
C24
design_connected
$20

Canaletto Composition C24
...composition c24
designconnected
ligne roset canaletto composition c24 computer generated 3d model. designed by lipparini, mauro.
3ddd
$1
CATTELAN ITALIA swing
...cattelan italia swing 3ddd cattelan italia , стеллаж http://www.cattelanitalia.com/en/product/c2480045ebc-1117-46b0-9a4e-1c4f57935c97/swing ...
3ddd
free

Cattelan Italia / Wally
...модульная книжная полка/стеллаж wally, cattelan italia. размеры модуля, см: 215x105x26http://www.cattelanitalia.com/en/product/c24957096ea-f8a5-4dce-a0d1-63f12f9e3afa/wally ...
3ddd
free

Cattelan Italia Drop
...и отсеки для бутылок в матовом белом или черном цвете.http://www.cattelanitalia.com/ru/product/c245e71615a-c666-4a19-9da3-8f98098cd658/drop ...
thingiverse
free

WPL C24 trunk lid
...wpl c24 trunk lid
thingiverse
i got a wpl c24 with missing lid so i reverse-engineered it.
thingiverse
free
WPL C24 Rollbar by Theoduf_
...wpl c24 rollbar by theoduf_
thingiverse
...
thingiverse
free
WPL C24 rear light lens by znaler
...wpl c24 rear light lens by znaler
thingiverse
wpl c24 rear light lens with separated lights
thingiverse
free

WPL Roof rack for C24 by daolcer
...wpl roof rack for c24 by daolcer
thingiverse
thingiverse
free
WPL C24 bed cover by floz
...over / bed cover for the c24 bed.
intended to be printed as oriented, be sure your bed is level and clean for a good first layer.
thingiverse
free

WPL C24 Tail Lights
...paint my kit clear ones so i made these up in red pla. not a perfect replica but close and fit well. you might want a dab of glue
Wpl
thingiverse
free

WPL Winch by BartoPL
...wpl winch by bartopl
thingiverse
wpl winch
thingiverse
free

TIRE AND WHEELS FOR WPL
...tire and wheels for wpl
thingiverse
new tires for wpl
thingiverse
free
BRUDER FOR WPL
...bruder for wpl
thingiverse
i've resized the wheel and put a hex adapter to fit with wpl and jjrc trucks
thingiverse
free
WPL Wheel
...pl wheel
thingiverse
wpl wheel for c14 and c24, original offset and very solid and tight.
not the most beautiful but functional.
thingiverse
free

WPL rim by Tim0733
...wpl rim by tim0733
thingiverse
rim for wpl rc with factory tires.
thingiverse
free

WPL wheel rim by Juppi
...wpl wheel rim by juppi
thingiverse
wpl wheel rim make from petg
fit perfectly on wpl axle
thingiverse
free
WPL Wheels by eder1969
...wpl wheels by eder1969
thingiverse
impressão 3d das rodas dianteiras e traseiras para caminhões wpl.
thingiverse
free

Unterstellbock 1/16 wpl
...unterstellbock 1/16 wpl
thingiverse
unterstellbock for wpl cars.
thingiverse
free
REMORQUE PLATEAU WPL by Roockeur
...emorque plateau wpl by roockeur
thingiverse
remorque plateau basculante pour 4x4 wpl
assez grand pour mettre un 4x4 wpl c24 1/16
thingiverse
free

KrAZ for WPL Cahssis V1
...kraz for wpl cahssis v1
thingiverse
kraz 255 cab for the wpl / jjrc chassis
C14
3dfindit
free

C14
...c14
3dfind.it
catalog: yamaha motor co., ltd
sketchfab
$6

C14 Finish
...c14 finish
sketchfab
casual game character - c14 finish - buy royalty free 3d model by kieartist
thingiverse
free

c14-mount by ehj
...or (plus switch) . the c14 power connector chassis part has a standard layout but is available with or without mounting brackets.
thingiverse
free

C14 Connector Housing
... ac connector c14. it has nice tight fit and holes for crews too. you can customize to change extra spacing around the connector.
thingiverse
free

WPL C14 OEM Frame Rail
...wpl c14 oem frame rail
thingiverse
this is an accurate 3d printable model of the wpl c14 frame rail. enjoy.
thingiverse
free

C14 coupler housing by hgglmmr
...using itself can be fixed with two screws.
one version with one outlet on the front, the other one with two outlets on the sides.
thingiverse
free

C14 Mini Power Socket Mount by mildw4ve
...c14 mini power socket mount by mildw4ve
thingiverse
universal use c14 socket / switch mount.
thingiverse
free
IEC C14 Plug - Cutting Template
...tting template
thingiverse
here is a cutting pattern for the iec c14 connectors. draw the contours and cut! watch your fingers;)
thingiverse
free

WPL C14|24 differential gasket by znaler
...wpl c14|24 differential gasket by znaler
thingiverse
wpl c14|24 differential gasket to to increase the gap between gears
thingiverse
free

Sides Bottom Bracket for C14 appliance inlet by ceesios
...sides bottom bracket for c14 appliance inlet by ceesios
thingiverse
modified sides_bottom_bracket to house a c14 power plug
Beetle
3d_ocean
$9

dung beetle
...dung beetle
3docean
beetle cinema4d dung beetle insect
dung beetle model no texture c4d obj poly 46562 point 46759
archibase_planet
free

Stag beetle
...stag beetle
archibase planet
stag beetle beetle bug insect
stag beetle - 3d model (*.gsm+*.3ds) for exterior 3d visualization.
3d_export
$25

pendant beetle
...pendant beetle
3dexport
pendant beetle
turbosquid
$30

Beetle
...
turbosquid
royalty free 3d model beetle for download as c4d on turbosquid: 3d models for games, architecture, videos. (1226214)
3d_ocean
$45

VW BEETLE
...vw beetle
3docean
historic car vw beetle
3d max model of vw beetle, including textures.
turbosquid
$24

Burying beetles / Hammer the beetle / insects
...ying beetles / hammer the beetle / insects for download as ma on turbosquid: 3d models for games, architecture, videos. (1319718)
3d_ocean
$5

Beetle Bug
...beetle bug
3docean
beetle bug insect
a simple model of a beetle bug. - preview images rendered with mental ray -
3d_export
$50

beetle
...beetle
3dexport
turbosquid
$599

Beetles
... available on turbo squid, the world's leading provider of digital 3d models for visualization, films, television, and games.
turbosquid
$39

Beetle
... available on turbo squid, the world's leading provider of digital 3d models for visualization, films, television, and games.
Buggy
3d_ocean
$45

High Quality Buggy Buggy
...high quality buggy buggy
3docean
buggy car race rally sport car vehicle
car model, like buggy buggy style
turbosquid
$20

Buggy
...y
turbosquid
royalty free 3d model buggy for download as max on turbosquid: 3d models for games, architecture, videos. (1372762)
3d_export
$5

buggy chassi
...buggy chassi
3dexport
chassis of a simple ride buggy.
3ddd
$1

Buggy
...buggy
3ddd
коляска
без модификаторов
turbosquid
$89

buggy
... available on turbo squid, the world's leading provider of digital 3d models for visualization, films, television, and games.
turbosquid
$50

Buggy
... available on turbo squid, the world's leading provider of digital 3d models for visualization, films, television, and games.
turbosquid
$10

Buggy
... available on turbo squid, the world's leading provider of digital 3d models for visualization, films, television, and games.
turbosquid
$2

Buggy
... available on turbo squid, the world's leading provider of digital 3d models for visualization, films, television, and games.
turbosquid
free

buggy
... available on turbo squid, the world's leading provider of digital 3d models for visualization, films, television, and games.
3d_ocean
$49

Buggy Concept
... poly massive outdoor robust vehicle
just a model of are own buggy concept vehicle. maybe you can make a beautiful renders of it!
Trail
3d_export
$10

trailing ivy
...trailing ivy
3dexport
trailing ivy
3d_export
$10
trailing ivy 2
...trailing ivy 2
3dexport
trailing ivy 2
3d_export
$10

trailing ivy 3
...trailing ivy 3
3dexport
set trailing ivy 3.
turbosquid
$10

trail 1
... available on turbo squid, the world's leading provider of digital 3d models for visualization, films, television, and games.
3d_export
$16

Nissan x-trail t32
...nissan x-trail t32
3dexport
nissan x-trail t32 for 3d printing
3d_export
$15
Marble trail 3D Model
...rt
marble trail bridge мрамор
marble trail 3d model download .c4d .max .obj .fbx .ma .lwo .3ds .3dm .stl trueline 109495 3dexport
3d_export
$65

tree-lined trail
...tree-lined trail
3dexport
simple rendering of the scene file
3d_export
$40

Nissan X-trail 3D Model
...nissan x-trail 3d model
3dexport
car x-trail nissan suv cars auto instaauto 2011
nissan x-trail 3d model llirik 101209 3dexport
3d_ocean
$3

Beach Sand with Bird Trails
... a beach for game development and 3d modelling art. 1 color and 1 bump file in png format, made from 100% original photo content.
3d_ocean
$89

Nissan X-Trail 2011
...y, in real units of measurement, qualitatively and maximally close to the original. model formats: - *.max (3ds max 2008 scanl...
Mod
design_connected
$13

MOD. 4233 - MOD. 4234 Table Lamp
...mod. 4233 - mod. 4234 table lamp
designconnected
arcahorn mod. 4233 - mod. 4234 table lamp computer generated 3d model.
design_connected
$11

MOD.1095
...mod.1095
designconnected
mod.1095 computer generated 3d model. designed by sarfatti, gino.
3ddd
$1

fireplaces mod Spec
...fireplaces mod spec
3ddd
камин
fireplaces mod spec 180x90x125h
3ddd
free

Flos Mod. 2129
... mod
фабрика: flos
модель: mod. 2129
описание: подвесной светильник, металл, белый, черный.
сайт: www.flos.com
turbosquid
$34

Mod Lamp.c4d
... available on turbo squid, the world's leading provider of digital 3d models for visualization, films, television, and games.
turbosquid
$32

MOD A 001
... available on turbo squid, the world's leading provider of digital 3d models for visualization, films, television, and games.
turbosquid
$29

Maars Mod
... available on turbo squid, the world's leading provider of digital 3d models for visualization, films, television, and games.
turbosquid
$15

Mod 70..
... available on turbo squid, the world's leading provider of digital 3d models for visualization, films, television, and games.
turbosquid
$10

MOD Sofa
... available on turbo squid, the world's leading provider of digital 3d models for visualization, films, television, and games.
turbosquid
$1

Mod-Lite
... available on turbo squid, the world's leading provider of digital 3d models for visualization, films, television, and games.
Updated
turbosquid
$5

orthographic room (updated)
...ee 3d model orthographic room (updated) for download as blend on turbosquid: 3d models for games, architecture, videos. (1375451)
turbosquid
$95

Romantic Bedroom - Updated
... available on turbo squid, the world's leading provider of digital 3d models for visualization, films, television, and games.
turbosquid
$39

Sofa. Updated release
... available on turbo squid, the world's leading provider of digital 3d models for visualization, films, television, and games.
turbosquid
$15

Procedurally updating cartoon crystal
...l procedurally updating cartoon crystal for download as blend on turbosquid: 3d models for games, architecture, videos. (1525853)
3d_export
$5

10 Surfboard s UPDATE
...10 surfboard s update
3dexport
3d_export
$10

chair updated rocking
...chair updated rocking
3dexport
armchair renewed plywood 18 mm. for cnc machines. layout in the stp archive.
turbosquid
free

Marble Table Updated
...el marble table for download as 3ds, obj, fbx, blend, and dae on turbosquid: 3d models for games, architecture, videos. (1201300)
turbosquid
$35

Mauser 1930the model is updated with the kits
... available on turbo squid, the world's leading provider of digital 3d models for visualization, films, television, and games.
turbosquid
$145

Contemporary Bedroom Collection Vol 1 - Updated
... available on turbo squid, the world's leading provider of digital 3d models for visualization, films, television, and games.
turbosquid
$16

B&B Mart Armchair MPRN (Updated)
...art armchair mprn (updated) for download as max, obj, and fbx on turbosquid: 3d models for games, architecture, videos. (1284355)