Thingiverse
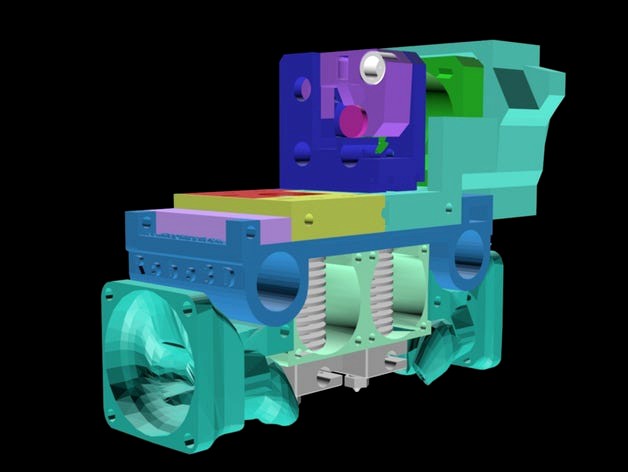
UPDATED: techno_hippieGuy's Robo 3D Dual E3Dv6 Extruder Carriage (Work in Progress!!!!) by technoHippieGuy
by Thingiverse
Last crawled date: 3 years ago
This is still a work in progress
UPDATE_same: Uploaded the fixed version of the bowden extruder. I'll be using 2 of these until I get the redesign finished.
UPDATE_010615.12:48am: So my first test run was a failure. Due to the issues I'm having with my extruder, I am unable to print out a part strong enough. I cannot say whether it will work for you or not.
I've uploaded a file that contains 2 bowden mounting plates, so that this can easily be a dual bowden assembly. I've also uploaded version 2 of the x carriage. I realized the cylindrical posts I was using are unnecessary, so they have been removed. Anchor points for the belt have been made smaller and stronger, and high stress areas have been strengthened.
I will be redesigning the hybrid assembly which will require fewer parts, will provide stronger parts, and perform better overall.
I will be working on this over the next few days. I will update soon.
UPDATE_010415.12:46am: I've fixed the measurements and now the gear sits perfectly positioned over the hole for the hotend, including the PTFE tubing. I've fixed this on the direct drive motor mount (mount_a_direct) for the Tatsu v2 drive gears and planetary geared nemas. All previous versions are outdated, and while I do see them being updated to match, I have no time frame to provide.
I will be transfering the changes over to the bowden drive mount later today and have those uploaded by tonight. A full BoM and instructions will soon follow, and eventually I will make an instructional video. May be a bit overboard, but could use the experience for my portfolio.
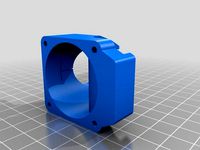
Also uploaded a converter for a 50mmx15mm blower fan. This is from this thing:
http://www.thingiverse.com/thing:432000
Adapter converts to 4x standard aquarium airline tubing, 2 per head. No tube guides for the moment, that's final priority after fixing bowden drive mount. I will be using this instead of the 40mm fans to reduce bulk.
TLDR: All files for the tatsu and mk8 drives are functional except tatsu bowden drive mount. Update later tonight. Adapter for blower fan uploaded as well should you chose to go that route. Print away (except bowden drive mount)!
UPDATE010315.7:05am: So my 2 Tatsu v2 drive gears arrived and have a slightly larger diameter at the center of the hobb, so I have to adjust the model to move the motor over 1-2mm or so. ***This only applies if you are using the Tatsu v2 drive gears. If you bore out MK8 gears, the "GEAREDSTEPPER" files will work for you.***
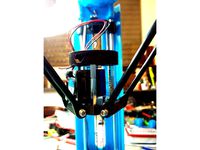
These gears are beautiful. Shiny chrome finish, very sharp teeth and great overall design. Including a picture of the gears attached to the motor. Really looking forward to seeing these in action.
I'm uploading the current temporary rework I did. Going to print out one of these to check for placement and will then finalize the design.
Again, thank you to everyone downloading and testing though these iterations. Your support is much appreciated. Some good news is that this mount is fully compatible with e3d's new Volcano, as long as you are using 2 of them. I look forward to testing these out sometime in the near future and will update.
And another idea for future update: I may have come up with a new design which will require fewer printed parts as well as better hotend height adjustment, and even an increase to maximum z height. I won't be uploading any files for this until I have a working version, and it will probably be it's own thing. Will update with those finalized motor mounts soon.
UPDATE_122914.12:47am: The 6mm bore drive gear Tatsu V2 is back in stock!!!
http://deezmaker.com/store/#!/Tatsu-v2-Drive-Gear-Hobbed-Filament-Drive-Gear/p/24043350/category=0
Spoke with the owner who has resupplied. This is the only drive gear that will work without further processing.
UPDATE_122814.6:58am: Redesigned mount_b_direct to include a support system for the geared stepper motor. A block is extruded between the blocks where the belt gets tied down and expanded into a platform, which then surrounds a portion of the motor and extends back along the side to the main part of the mount and rejoins there. There are 2 tabs compatible with these gpu heatsinks:
http://www.amazon.com/gp/product/B00KBPT2RQ/ref=oh_aui_detailpage_o04_s00?ie=UTF8&psc=1
I haven't added holes yet because a) I want to test fit the part to make sure everythings right, and b) I'm too lazy right now.
Sorry to any of you that may be printing out parts and needing to reprint them the next day. I'm trying to get this done ASAP, and rather than provide major iterations, I felt it better to provide the design files at each step of the process for any who wanted to contribute to the project. Though, since this has been up for a while now and has yet to receive a single comment, I suppose it doesn't matter in that regard.
Enjoy the update!
Edit: Another possible update in the future may include interchangeable mounts so that this "thing" will be an all in one dual direct, dual bowden, dual direct/bowden hybrid extruder package.
I also had to recently replace the bluray drive in my ps3 slim and found a very small motor connected to a screw, much like how our z axis works. Once I get some more arduino and raspberry pi experience, I'd like to integrate this system with a couple of switches to allow for auto-leveling of the hotends. I have no idea if marlin supports this, but perhaps the with the new RPi B+ controlling a printer, I dont see why the capability isn't there, it just needs to be coded. This would obviously involve recoding an entire firmware to run the machine and it would no longer really be a robo at that point, but you know, dreamers will dream.
UPDATE_122714.11:27am: Some new parts, all designed for the use of 5:1 Geared Stepper Motors (http://www.omc-stepperonline.com/gear-ratio-51-planetary-gearbox-with-nema-17-stepper-motor-17hs130404spg5-p-140.html).
This upgrade provides much more torque over the standard nema17 configuration, which is much preferable, almost a necessity for the bowden half and if you plan on using flexible filament.
The drawback is these motors have a 6mm shaft, which all of the MK8 drive gears on the market worth using have a 5mm bore (save for this guy: http://deezmaker.com/store/#!/~/product/category=0&id=24043350 . The issue here is they have been out of stock from the only vendor that sells them for a while, at least since I've discovered them) You will need either a lathe or drill press (I'm using a Dremel Station 220) and a 6mm borer (I'm using a Industrial Carbide Tipped 6mm Boring Bit with 10mm shank, M5 inner threading coupled with a M5 to 1/4" coupler coupled to a 1/4" to 1/8" coupler attached to my dremel using a 1/8" screw with the head cut off and some stabilizer pieces I designed, though have yet to print and test, to keep the thing in place). Keep in mind these MK8's are stainless steel, so you have to cut very slow, and it will take a long time, and you are going to have to use lubricant such as White Lithium Grease to keep temps down.
I've also included a centering block that will allow you to more easily clamp in place with a vice your MK8. There isn't a through hole, but I figure you'll just tap it out on your first gear.
There are also a number of upgrades and modifications to both the direct and bowden extruder designs. These are only on the geared motor versions, and I am unsure at this time if I will be transferring the changes over to the standard versions.
Geared motor files are labeled GEAREDSTEPPER_ before the file name.
In regards to the fan ducts, I simply cannot get a print without holes, even though my software shows it as hole free. I will adjust these at some point, but as I've run into a gear issue with my current Wade's, I am unable to print with consistent flow until I have a prototype version of the design in place. For the time being, I used a thicker ABS slurry (even though I printed with PLA) and coated over any areas of the print where there are holes. It's not pretty, but a functional and efficient fix for now.
I'm getting close to a final version, so a full list of materials and links to sources (if I still have them) will be provided.
Current thoughts on future improvements:
I like how I have the springs settled into the carriage, but I've found the tube-like posts meant to keep the mounting blocks in place are fragile and usually don't fit quite right. I'm considering widening the holes in the mounting blocks so that the posts are only there for the springs, and putting 4 additional screw holes in each mounting block. These will be set as posts using a nut, and the screws going through the springs will be free fitting. I've found it can be difficult to get the nut tightened in some of the tighter spaces, and it would be much easier if my screw weren't locked in place as a post like in the current design.
I'm not convinced the interlocking mechanism I'm using for the mounts is necessary (between direct and bowden). I think I may remove entirely, and just allow for a screw to be placed the both sides in the center between blocks (lengthwise) with washers on the outside. Maybe be unnecessary all together, I don't know. Will test soon.
I also want to integrate some kind of support structure for the stepper motor, since that weight will be hanging kind of far out there by 4 screws on a printed part with a lot of lateral forces being thrown on it. Considering a clip design that will get screwed into the main mount somehow. Conceptual atm.
I need to look into the physics at work here, but considering some sort of counter weight to balance out the carriage. Unsure if necessary since the bulk of the weight will be roughly centered over where the belt attaches to the carriage. Testing will be done.
Have fun with the new version!
Fan ducts still not working, busy for part of the day, will have available tonight sometime.
122014.1:11: Realized the nozzle fan ducts aren't printing right. I have to try to fix the model. If that doesn't work, remodeling from scratch. Hope to have it updated in a few hours, by morning at the latest.
UPDATE: Updated all part files to latest versions. Few fitting modifications made, some resizing. Increase in durability for some pieces.
UPDATE: Added nozzle fan ducts.
This version should work completely as is, but things don't seem to quite fit right and I recognize there can be improvements made on pretty much every piece. I needed to finish this quickly as I needed it for a job with a deadline. Once this job is over, I'll be working on improving this further and making sure the fit is correct and tight all around. Feel free to test this version out and make any suggestions. Any and all would be well appreciated.
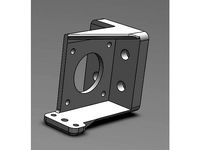
UPDATE: Added heatsink fan bracket and updated direct drive mounts.
UPDATE: Working Version!!!
I've fixed a all parts. Springs fit better into slots for mount_a_direct, which also fits better onto the x-carriage. The springs I'm using put far more pressure than needed on the parts, so I think I have to cut them down. Once I can find the specs, and figure out where to cut, I'll update. Still working on a parts list. mounting plates have been modified to lock together a bit better and allow for easier adjustment. It's a little bit more limiting than before, but there should be more than enough wiggle room to get the hotends leveled. I haven't added it yet, but I'm going to drill in a 3mmx6mm screw hole at the two corners of the longer thin arms. Will add those to the model next update.
I've included .obj files for each object should you wish to modify yourself.
Original Post:
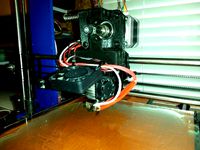
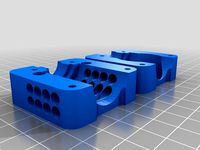
This is my design for a dual extruder carriage that supports 2 e3d v6 hotends, one bowden driven, one direct driven. Files uploaded are complete and functional, but the entire assembly is still missing heatsink fan brackets and hotend fan ducts. I hope to get these completed in the next few days. The main files are here if anyone would like to test. I've found that mount_b_direct and mount_b_bowden has trouble slicing in Cura, but I've had success slicing with CraftWare. Please experiment and post in comments if you may know what's going on.
Extruder is same from here:
http://www.thingiverse.com/thing:550788
Assembly instructions and list of required parts will be supplied once designing is complete.
UPDATE_same: Uploaded the fixed version of the bowden extruder. I'll be using 2 of these until I get the redesign finished.
UPDATE_010615.12:48am: So my first test run was a failure. Due to the issues I'm having with my extruder, I am unable to print out a part strong enough. I cannot say whether it will work for you or not.
I've uploaded a file that contains 2 bowden mounting plates, so that this can easily be a dual bowden assembly. I've also uploaded version 2 of the x carriage. I realized the cylindrical posts I was using are unnecessary, so they have been removed. Anchor points for the belt have been made smaller and stronger, and high stress areas have been strengthened.
I will be redesigning the hybrid assembly which will require fewer parts, will provide stronger parts, and perform better overall.
I will be working on this over the next few days. I will update soon.
UPDATE_010415.12:46am: I've fixed the measurements and now the gear sits perfectly positioned over the hole for the hotend, including the PTFE tubing. I've fixed this on the direct drive motor mount (mount_a_direct) for the Tatsu v2 drive gears and planetary geared nemas. All previous versions are outdated, and while I do see them being updated to match, I have no time frame to provide.
I will be transfering the changes over to the bowden drive mount later today and have those uploaded by tonight. A full BoM and instructions will soon follow, and eventually I will make an instructional video. May be a bit overboard, but could use the experience for my portfolio.
Also uploaded a converter for a 50mmx15mm blower fan. This is from this thing:
http://www.thingiverse.com/thing:432000
Adapter converts to 4x standard aquarium airline tubing, 2 per head. No tube guides for the moment, that's final priority after fixing bowden drive mount. I will be using this instead of the 40mm fans to reduce bulk.
TLDR: All files for the tatsu and mk8 drives are functional except tatsu bowden drive mount. Update later tonight. Adapter for blower fan uploaded as well should you chose to go that route. Print away (except bowden drive mount)!
UPDATE010315.7:05am: So my 2 Tatsu v2 drive gears arrived and have a slightly larger diameter at the center of the hobb, so I have to adjust the model to move the motor over 1-2mm or so. ***This only applies if you are using the Tatsu v2 drive gears. If you bore out MK8 gears, the "GEAREDSTEPPER" files will work for you.***
These gears are beautiful. Shiny chrome finish, very sharp teeth and great overall design. Including a picture of the gears attached to the motor. Really looking forward to seeing these in action.
I'm uploading the current temporary rework I did. Going to print out one of these to check for placement and will then finalize the design.
Again, thank you to everyone downloading and testing though these iterations. Your support is much appreciated. Some good news is that this mount is fully compatible with e3d's new Volcano, as long as you are using 2 of them. I look forward to testing these out sometime in the near future and will update.
And another idea for future update: I may have come up with a new design which will require fewer printed parts as well as better hotend height adjustment, and even an increase to maximum z height. I won't be uploading any files for this until I have a working version, and it will probably be it's own thing. Will update with those finalized motor mounts soon.
UPDATE_122914.12:47am: The 6mm bore drive gear Tatsu V2 is back in stock!!!
http://deezmaker.com/store/#!/Tatsu-v2-Drive-Gear-Hobbed-Filament-Drive-Gear/p/24043350/category=0
Spoke with the owner who has resupplied. This is the only drive gear that will work without further processing.
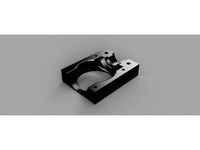
UPDATE_122814.6:58am: Redesigned mount_b_direct to include a support system for the geared stepper motor. A block is extruded between the blocks where the belt gets tied down and expanded into a platform, which then surrounds a portion of the motor and extends back along the side to the main part of the mount and rejoins there. There are 2 tabs compatible with these gpu heatsinks:
http://www.amazon.com/gp/product/B00KBPT2RQ/ref=oh_aui_detailpage_o04_s00?ie=UTF8&psc=1
I haven't added holes yet because a) I want to test fit the part to make sure everythings right, and b) I'm too lazy right now.
Sorry to any of you that may be printing out parts and needing to reprint them the next day. I'm trying to get this done ASAP, and rather than provide major iterations, I felt it better to provide the design files at each step of the process for any who wanted to contribute to the project. Though, since this has been up for a while now and has yet to receive a single comment, I suppose it doesn't matter in that regard.
Enjoy the update!
Edit: Another possible update in the future may include interchangeable mounts so that this "thing" will be an all in one dual direct, dual bowden, dual direct/bowden hybrid extruder package.
I also had to recently replace the bluray drive in my ps3 slim and found a very small motor connected to a screw, much like how our z axis works. Once I get some more arduino and raspberry pi experience, I'd like to integrate this system with a couple of switches to allow for auto-leveling of the hotends. I have no idea if marlin supports this, but perhaps the with the new RPi B+ controlling a printer, I dont see why the capability isn't there, it just needs to be coded. This would obviously involve recoding an entire firmware to run the machine and it would no longer really be a robo at that point, but you know, dreamers will dream.
UPDATE_122714.11:27am: Some new parts, all designed for the use of 5:1 Geared Stepper Motors (http://www.omc-stepperonline.com/gear-ratio-51-planetary-gearbox-with-nema-17-stepper-motor-17hs130404spg5-p-140.html).
This upgrade provides much more torque over the standard nema17 configuration, which is much preferable, almost a necessity for the bowden half and if you plan on using flexible filament.
The drawback is these motors have a 6mm shaft, which all of the MK8 drive gears on the market worth using have a 5mm bore (save for this guy: http://deezmaker.com/store/#!/~/product/category=0&id=24043350 . The issue here is they have been out of stock from the only vendor that sells them for a while, at least since I've discovered them) You will need either a lathe or drill press (I'm using a Dremel Station 220) and a 6mm borer (I'm using a Industrial Carbide Tipped 6mm Boring Bit with 10mm shank, M5 inner threading coupled with a M5 to 1/4" coupler coupled to a 1/4" to 1/8" coupler attached to my dremel using a 1/8" screw with the head cut off and some stabilizer pieces I designed, though have yet to print and test, to keep the thing in place). Keep in mind these MK8's are stainless steel, so you have to cut very slow, and it will take a long time, and you are going to have to use lubricant such as White Lithium Grease to keep temps down.
I've also included a centering block that will allow you to more easily clamp in place with a vice your MK8. There isn't a through hole, but I figure you'll just tap it out on your first gear.
There are also a number of upgrades and modifications to both the direct and bowden extruder designs. These are only on the geared motor versions, and I am unsure at this time if I will be transferring the changes over to the standard versions.
Geared motor files are labeled GEAREDSTEPPER_ before the file name.
In regards to the fan ducts, I simply cannot get a print without holes, even though my software shows it as hole free. I will adjust these at some point, but as I've run into a gear issue with my current Wade's, I am unable to print with consistent flow until I have a prototype version of the design in place. For the time being, I used a thicker ABS slurry (even though I printed with PLA) and coated over any areas of the print where there are holes. It's not pretty, but a functional and efficient fix for now.
I'm getting close to a final version, so a full list of materials and links to sources (if I still have them) will be provided.
Current thoughts on future improvements:
I like how I have the springs settled into the carriage, but I've found the tube-like posts meant to keep the mounting blocks in place are fragile and usually don't fit quite right. I'm considering widening the holes in the mounting blocks so that the posts are only there for the springs, and putting 4 additional screw holes in each mounting block. These will be set as posts using a nut, and the screws going through the springs will be free fitting. I've found it can be difficult to get the nut tightened in some of the tighter spaces, and it would be much easier if my screw weren't locked in place as a post like in the current design.
I'm not convinced the interlocking mechanism I'm using for the mounts is necessary (between direct and bowden). I think I may remove entirely, and just allow for a screw to be placed the both sides in the center between blocks (lengthwise) with washers on the outside. Maybe be unnecessary all together, I don't know. Will test soon.
I also want to integrate some kind of support structure for the stepper motor, since that weight will be hanging kind of far out there by 4 screws on a printed part with a lot of lateral forces being thrown on it. Considering a clip design that will get screwed into the main mount somehow. Conceptual atm.
I need to look into the physics at work here, but considering some sort of counter weight to balance out the carriage. Unsure if necessary since the bulk of the weight will be roughly centered over where the belt attaches to the carriage. Testing will be done.
Have fun with the new version!
Fan ducts still not working, busy for part of the day, will have available tonight sometime.
122014.1:11: Realized the nozzle fan ducts aren't printing right. I have to try to fix the model. If that doesn't work, remodeling from scratch. Hope to have it updated in a few hours, by morning at the latest.
UPDATE: Updated all part files to latest versions. Few fitting modifications made, some resizing. Increase in durability for some pieces.
UPDATE: Added nozzle fan ducts.
This version should work completely as is, but things don't seem to quite fit right and I recognize there can be improvements made on pretty much every piece. I needed to finish this quickly as I needed it for a job with a deadline. Once this job is over, I'll be working on improving this further and making sure the fit is correct and tight all around. Feel free to test this version out and make any suggestions. Any and all would be well appreciated.
UPDATE: Added heatsink fan bracket and updated direct drive mounts.
UPDATE: Working Version!!!
I've fixed a all parts. Springs fit better into slots for mount_a_direct, which also fits better onto the x-carriage. The springs I'm using put far more pressure than needed on the parts, so I think I have to cut them down. Once I can find the specs, and figure out where to cut, I'll update. Still working on a parts list. mounting plates have been modified to lock together a bit better and allow for easier adjustment. It's a little bit more limiting than before, but there should be more than enough wiggle room to get the hotends leveled. I haven't added it yet, but I'm going to drill in a 3mmx6mm screw hole at the two corners of the longer thin arms. Will add those to the model next update.
I've included .obj files for each object should you wish to modify yourself.
Original Post:
This is my design for a dual extruder carriage that supports 2 e3d v6 hotends, one bowden driven, one direct driven. Files uploaded are complete and functional, but the entire assembly is still missing heatsink fan brackets and hotend fan ducts. I hope to get these completed in the next few days. The main files are here if anyone would like to test. I've found that mount_b_direct and mount_b_bowden has trouble slicing in Cura, but I've had success slicing with CraftWare. Please experiment and post in comments if you may know what's going on.
Extruder is same from here:
http://www.thingiverse.com/thing:550788
Assembly instructions and list of required parts will be supplied once designing is complete.
Similar models
thingiverse
free

EASYTHREED X1(SONDORY PICO - X carriage for V6 and motor mount for bowden extruder by GloSense
...mount to maintenance.
coolling fan duct is not included - i printed one of uploaded cooing fan duct in thingiverse for v6 hotend.
thingiverse
free

CR10s Pro direct drive conversion using stock extruder. by SilverPaul
...y attached to the carriage.)
i've yet to download an stl that didn't need tweaking so expect to have to do a little work!
thingiverse
free

Robo3D Chimera Bowden Carriage by RobMakesStuff
...ne. i haven't used this for dual extrusion yet, but i just keep 2 nozzle sizes mounted. its been working great for 6+ months.
thingiverse
free

anet a6 direct drive version from Dovanzeijl (non tested yet) by panch47
...ruder motor. i haven't tested it yet.
the part "direct drive 1" is removable to use it with a bowden extruder type.
thingiverse
free
Prusa I3 Direct Drive Extruder 3mm by alphapilot
...aliexpress.com/item/mk7-bore-8mm-extruder-drive-gear-for-3mm-hobbed-gear-for-makerbot-reprap-mendel-high-quality/32462285369.html
thingiverse
free

Compact Bowden Extruder (Geared Motor Version) for 1.75 filament by Martin_S
...y with dual pushfit and no brackets. i'm currently using this one with an air extruder setup and it's been working great.
thingiverse
free

Gearstruder J7 - Dual Drive Extruder by walter
...t.
there is also a nema14 version and info about several other dual drive bowden extruders i've just uploaded on thrinter.com
thingiverse
free

Prusa I3 Rework Bowden Extruder and Carriage with Inductive Sensor by chinzw
...ing of the distance to the hotend.
update 6: added a new version of the carriage clamp that adds a 40mm fan shroud for the e3d v6
thingiverse
free

Gearstruder J4 - Dual Drive Extruder by walter
...t.
there is also a nema17 version and info about several other dual drive bowden extruders i've just uploaded on thrinter.com
thingiverse
free

cOssel Bowden Extruder - Geared Stepper - v2 by cdaringe
... moment, but if there is demand, i can upload a 3mm version. of course, you can simply drill the guide holes out to accommodate.
Technohippieguy
thingiverse
free

DJI Phantom Battery Box - 6 Pack + Lid by technoHippieGuy
...39;ll add here.
printed with cura
settings in the image (for robo3d printer).
enjoy
*** added a lid, still working on the handle
thingiverse
free

DJI Phantom Landing Gear Length Extensions by technoHippieGuy
...rom toppling over.
feel free to modify. i was tired when i made it and just didn't feel it necessary to get a perfect fit.
thingiverse
free
Remix - GoPro Gimbal Parts - Camera Arm by technoHippieGuy
...s, please comment and let me know. otherwise, i'll post a fix when i figure it out in case anyone else runs into same issue.
thingiverse
free

*Modified* FAT SHARK Video Transmitter Mount for DJI PHANTOM - FPV / UAV by technoHippieGuy
... i'm thinking if i'd like to upgrade it, i may put a groove and tongue system in to make gluing it properly a bit easier.
thingiverse
free

techno_hippieGuy's Robo3D Smooth Rod Upgrade for 495mm Rods (REMIX) by technoHippieGuy
...t side of the bed would slide loose a bit and the bed would be able to jiggle. a second belt should prevent this from happening.
thingiverse
free

Robo3D Z-Axis Auto-Level Nut Adapter - 11mm Wrench to 13mm Wrench by technoHippieGuy
... once my ventilation gets installed. if anyone knows the best material to use for longevity, please let me know in the comments.
Techno
3ddd
$1

techno calculator
...techno calculator
3ddd
калькулятор
techno calculator
dimentions : 15x12 cm
turbosquid
$15
Techno Table
...oyalty free 3d model techno table for download as c4d and 3ds on turbosquid: 3d models for games, architecture, videos. (1613010)
3d_export
$7

techno bar stool
...techno bar stool
3dexport
techno bar stool, made of black plastic with chrome-plated legs. 17,000 polygons
3d_export
$5
techno steampunk fan concept
...techno steampunk fan concept
3dexport
techno steampunk fan concept
turbosquid
$29
Elektrostandard Techno 1014
...elektrostandard techno 1014 for download as max, obj, and fbx on turbosquid: 3d models for games, architecture, videos. (1239341)
turbosquid
$1

Techno color cube
... 3d model techno color cube for download as max, obj, and fbx on turbosquid: 3d models for games, architecture, videos. (1352263)
3ddd
$1
Dorum / Techno
...ы по чертежам производителя.
в архиве текстуры плёнок применяемые в этой серии.
сайт производителяhttp://dorum.com.ua/
turbosquid
free

Techno Sofa & Chair
... available on turbo squid, the world's leading provider of digital 3d models for visualization, films, television, and games.
turbosquid
$3

floor lamps idea and techno
...ty free 3d model floor lamps idea and techno for download as on turbosquid: 3d models for games, architecture, videos. (1625726)
turbosquid
$29

Elektrostandard TECHNO 1694 LED
...trostandard techno 1694 led for download as max, obj, and fbx on turbosquid: 3d models for games, architecture, videos. (1240301)
E3Dv6
thingiverse
free
Dualfan for e3dv6 by CaJI9I
...dualfan for e3dv6 by caji9i
thingiverse
this fan for dual extruder e3dv6. spacing between nozzle 24 mm
thingiverse
free
e3dv6 mount remix by mokash770
...e3dv6 mount remix by mokash770
thingiverse
e3dv6 mount with bigger holes repired
thingiverse
free
E3Dv6 Bowden Clamp by x20011
...e3dv6 bowden clamp by x20011
thingiverse
this is a e3dv6 hotend clamp with an additional 40x40mm fan mount.
thingiverse
free
E3DV6 by makermitch69
...e3dv6 by makermitch69
thingiverse
this includes a custom cover for the anet a8 with a place for 4 leds
thingiverse
free
e3dv6 gran caudal 40mm by jj25000
...e3dv6 gran caudal 40mm by jj25000
thingiverse
e3dv6 ventilador 40x40
thingiverse
free
support e3dv6 + titan + bltouch by nikos1234
...support e3dv6 + titan + bltouch by nikos1234
thingiverse
support e3dv6 + titan + bltouch
thingiverse
free
E3dV6 fan 4040 by andreascarpelli
...040 by andreascarpelli
thingiverse
this is a design to have a single fan on a e3dv6 that fit a 4cm fan for extruder and hot end
thingiverse
free

e3dv6 fan duct by Snorkis
...r this e3dv6 mount https://www.thingiverse.com/thing:2790694?fbclid=iwar19pbsfb39c7m0kvpxb-f_wh3i_uoxl43d5ghoedarbmfezc-vwr01nnia
thingiverse
free

E3Dv6 mount for Renkforce RF500 by Timon_Suhk
...e3dv6 mount for renkforce rf500 by timon_suhk
thingiverse
two piece mount for e3dv6 on renkforce rf500.
thingiverse
free
E3Dv6 for 101 Hero by electrokill
...electrokill
thingiverse
wip
heres a mount for an e3dv6 for a 101 hero
other customizations follow so here is only the first part
Robo
3d_export
$5

robo
...robo
3dexport
just robo for your game or video
turbosquid
$15

robo
...obo
turbosquid
royalty free 3d model robo for download as max on turbosquid: 3d models for games, architecture, videos. (550622)
3d_ocean
$5
robo head
...docean
head machines robo robo head robot vray
robo head model max 2010 and obj model 1024×1024 texture vray 2.40 render material
turbosquid
$2000

robo
... available on turbo squid, the world's leading provider of digital 3d models for visualization, films, television, and games.
turbosquid
$50

robo
... available on turbo squid, the world's leading provider of digital 3d models for visualization, films, television, and games.
turbosquid
$50

robo
... available on turbo squid, the world's leading provider of digital 3d models for visualization, films, television, and games.
turbosquid
$11

ROBO
... available on turbo squid, the world's leading provider of digital 3d models for visualization, films, television, and games.
3d_export
$10

Robo 3D Model
...robo 3d model
3dexport
he is robo
robo 3d model dpkisvv 32093 3dexport
turbosquid
$20
ROBO-BRAIN
...rbosquid
royalty free 3d model robo-brain for download as max on turbosquid: 3d models for games, architecture, videos. (550625)
turbosquid
$10

Robo-boy
...urbosquid
royalty free 3d model robo-boy for download as max on turbosquid: 3d models for games, architecture, videos. (1245875)
Carriage
archibase_planet
free

Carriage
...arriage
archibase planet
perambulator baby carriage pram
carriage n250908 - 3d model (*.gsm+*.3ds) for interior 3d visualization.
3d_export
free

carriage
...carriage
3dexport
old fashion carriage model, more files here:
turbosquid
$140

Carriage
...urbosquid
royalty free 3d model carriage for download as max on turbosquid: 3d models for games, architecture, videos. (1482052)
turbosquid
$25

Carriage
...urbosquid
royalty free 3d model carriage for download as max on turbosquid: 3d models for games, architecture, videos. (1285944)
3d_export
free

carriage
...carriage
3dexport
game cart
3d_ocean
$15

Barrel Carriage
...ieval oak old transport wheels wine wood
this model contains a barrel and a carriage. it is a medieval type of wood oak carriage.
turbosquid
$40

Carriage
...ty free 3d model carriage for download as obj, fbx, and blend on turbosquid: 3d models for games, architecture, videos. (1290094)
turbosquid
free

Carriage
...yalty free 3d model carriage for download as ma, obj, and fbx on turbosquid: 3d models for games, architecture, videos. (1239157)
3d_export
$5

Medieval carriage
...medieval carriage
3dexport
medieval carriage in fairy style
turbosquid
$58

Carriage
...d model carriage with scene for download as max, obj, and fbx on turbosquid: 3d models for games, architecture, videos. (1276262)
Progress
3ddd
free
Baga / Progress
...baga / progress
3ddd
baga
progress baga
3ddd
$1

Futura / Progress
...futura / progress
3ddd
futura
фабрика futura модель progress
3ddd
$1

светильник Progress Lighting
...9):
d -50,8 см.
светильник progress lighting (art.p4642-09):
d -62 см.
светильник progress lighting (art.p4643-09):
d -68,6 см.
turbosquid
$5

spaceship progress
...
royalty free 3d model spaceship progress for download as max on turbosquid: 3d models for games, architecture, videos. (1589494)
turbosquid
$5

Progressive Knife
... available on turbo squid, the world's leading provider of digital 3d models for visualization, films, television, and games.
turbosquid
$39

Progressive Arts building
... available on turbo squid, the world's leading provider of digital 3d models for visualization, films, television, and games.
3ddd
$1

Baga Progress - 3291
...baga progress - 3291
3ddd
baga
baga art.3291
3ddd
$1
Progress Lighting P5184-104 1
...progress lighting p5184-104 1
3ddd
progress lighting
kitchen lighting
bar lighting
3ddd
free

Baga Progress 3434
...a garganti
art. 3434
4 lights floor lamp
finish: leaden and nickel
lampshades: black leather
cm l. 135 - h. 207
d: 50
4x40w e14
turbosquid
$50

Progressive Sheet Metal Mold
...ree 3d model progressive sheet metal mold for download as ige on turbosquid: 3d models for games, architecture, videos. (1439355)
Dual
turbosquid
free

Dual Pistols
...ls
turbosquid
free 3d model dual pistols for download as fbx on turbosquid: 3d models for games, architecture, videos. (1320360)
turbosquid
$2

Dual Axe
...urbosquid
royalty free 3d model dual axe for download as fbx on turbosquid: 3d models for games, architecture, videos. (1332372)
turbosquid
$10

Dual Lesaths
... available on turbo squid, the world's leading provider of digital 3d models for visualization, films, television, and games.
3ddd
$1

плитка Dual Bianco (Испания)
...й плитки venis dual (испания). технические качества: устойчивость к стирания, отличная геометрия, отсутствие проблем при укладке.
turbosquid
$35

Dual Mesh Fonts
...ree 3d model dual mesh fonts for download as ma, obj, and fbx on turbosquid: 3d models for games, architecture, videos. (1352989)
turbosquid
$29

Dual Flask with Bungs
...del dual flask with bungs for download as obj, fbx, and blend on turbosquid: 3d models for games, architecture, videos. (1210512)
turbosquid
$19

Dual Socket Plug
...3d model dual socket plug for download as obj, fbx, and blend on turbosquid: 3d models for games, architecture, videos. (1303912)
turbosquid
$13

Dual Adjustable Pulley
... available on turbo squid, the world's leading provider of digital 3d models for visualization, films, television, and games.
turbosquid
$10

Amoi N809 Dual
... available on turbo squid, the world's leading provider of digital 3d models for visualization, films, television, and games.
turbosquid
$5

Dual Turret Tank
... available on turbo squid, the world's leading provider of digital 3d models for visualization, films, television, and games.
Extruder
3ddd
$1

Extruded Chair
...extruded chair
3ddd
extruded , tom dixon
inspired by tom dixon extruded chair
turbosquid
$15

Extruded Table
... extruded table for download as blend, dae, fbx, obj, and stl on turbosquid: 3d models for games, architecture, videos. (1634137)
turbosquid
$2

3D Printer Extruder
...d
royalty free 3d model 3d printer extruder for download as on turbosquid: 3d models for games, architecture, videos. (1537359)
turbosquid
$1

Zombie extruded text
...oyalty free 3d model zombie extruded text for download as obj on turbosquid: 3d models for games, architecture, videos. (1322198)
turbosquid
$4

Extruder conical screw
...el extruder conical screw for download as sldpr, ige, and stl on turbosquid: 3d models for games, architecture, videos. (1524433)
turbosquid
$50

3d PRINTER - Extruder
... available on turbo squid, the world's leading provider of digital 3d models for visualization, films, television, and games.
turbosquid
$15

Extruded Table 2
...xtruded table 2 for download as blend, dae, fbx, obj, and stl on turbosquid: 3d models for games, architecture, videos. (1621846)
turbosquid
$10

Maya Extrude Tool
... available on turbo squid, the world's leading provider of digital 3d models for visualization, films, television, and games.
3d_export
$5

world earth extrude map
...world earth extrude map
3dexport
3ddd
$1

Simply Elegant Extruded Tree Coffee Table Design
...ble by link studios. the silhouette of a tree is visible at one angle, extruded from the surface to create the support structure.
Updated
turbosquid
$5

orthographic room (updated)
...ee 3d model orthographic room (updated) for download as blend on turbosquid: 3d models for games, architecture, videos. (1375451)
turbosquid
$95

Romantic Bedroom - Updated
... available on turbo squid, the world's leading provider of digital 3d models for visualization, films, television, and games.
turbosquid
$39

Sofa. Updated release
... available on turbo squid, the world's leading provider of digital 3d models for visualization, films, television, and games.
turbosquid
$15

Procedurally updating cartoon crystal
...l procedurally updating cartoon crystal for download as blend on turbosquid: 3d models for games, architecture, videos. (1525853)
3d_export
$5

10 Surfboard s UPDATE
...10 surfboard s update
3dexport
3d_export
$10
chair updated rocking
...chair updated rocking
3dexport
armchair renewed plywood 18 mm. for cnc machines. layout in the stp archive.
turbosquid
free

Marble Table Updated
...el marble table for download as 3ds, obj, fbx, blend, and dae on turbosquid: 3d models for games, architecture, videos. (1201300)
turbosquid
$35
Mauser 1930the model is updated with the kits
... available on turbo squid, the world's leading provider of digital 3d models for visualization, films, television, and games.
turbosquid
$145

Contemporary Bedroom Collection Vol 1 - Updated
... available on turbo squid, the world's leading provider of digital 3d models for visualization, films, television, and games.
turbosquid
$16

B&B Mart Armchair MPRN (Updated)
...art armchair mprn (updated) for download as max, obj, and fbx on turbosquid: 3d models for games, architecture, videos. (1284355)
Work
3d_export
$5
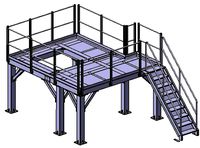
WORKING PLATFORM
...working platform
3dexport
working platform 4000x3000x1500mm
design_connected
$16

Working set
...working set
designconnected
smallaccents working set computer generated 3d model.
3ddd
free
Pinao / Stelar Works
...pinao / stelar works
3ddd
stelar works , stellar works
стулья pinao от stelar works
design_connected
$13

Work Lamp
...work lamp
designconnected
design house stockholm work lamp computer generated 3d model. designed by form us with love.
turbosquid
$6

Road Works
...turbosquid
royalty free 3d model road works for download as on turbosquid: 3d models for games, architecture, videos. (1151328)
3ddd
free

Stellar Works Lumar
...llar works , lumar , барный
stellar works lumar
turbosquid
$20
Work boots
...bosquid
royalty free 3d model work boots for download as stl on turbosquid: 3d models for games, architecture, videos. (1313566)
turbosquid
$8
Desk Work
...osquid
royalty free 3d model desk work for download as blend on turbosquid: 3d models for games, architecture, videos. (1381338)
turbosquid
$5

Work Desk
...osquid
royalty free 3d model work desk for download as blend on turbosquid: 3d models for games, architecture, videos. (1435344)
turbosquid
$1

Plant for work
...uid
royalty free 3d model plant for work for download as obj on turbosquid: 3d models for games, architecture, videos. (1557514)