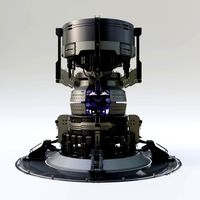
Thingiverse
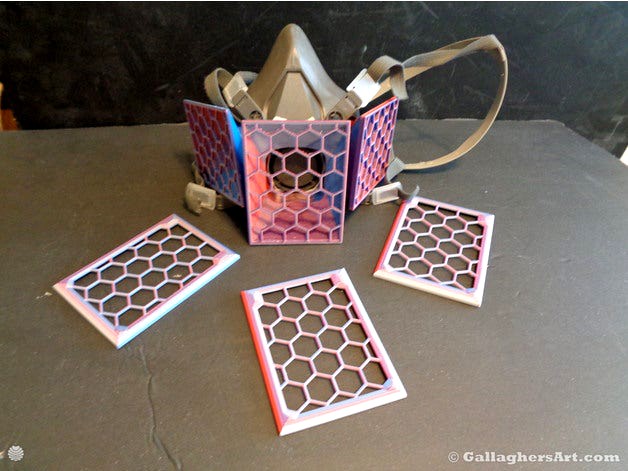
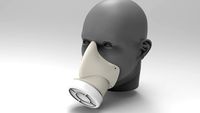
Updated 3M Generic reusable IN and OUT filters optimized for printing by gallaghersart
by Thingiverse
Last crawled date: 3 years, 1 month ago
All models are meant for fast printing. May still optimize more later.
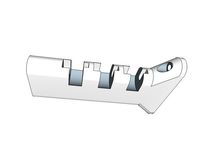
All use same filter size and filter cover that just snaps into place.
Just cut filters to same size as the mounts. Place filter in place and press cover into place. Filter should be same size as the mount and no bigger. Cover should keep filter in place.
I’m using a 3M Virus level home filter that I cut apart to make my own filters. Any valid filter can be used. Choose a cover that matches your compressed filter thickness. (2x versions, thin or a few layers of filters - not fabric)
All models are support free. Print in place. The air outtake should have some brims or such to keep part adhered to print bed.
60% flow Bridge yes, please look at pictures to see best bridge 1st layer.
I use a 0.4mm nozzle but with a line / perimeter of 0.5mm. this makes for a better print and better speed.
0.2mm layer height. The base of the mount could be from the layer height of 1mm to 2.2mm be 0.1mm per layer height for the locking clamp to the 3M mask. (0.2mm for all layers of cover).
I would remove bridge layer after print. If you take a pointed file along the ends of the bridge layers to break them from the model. Then you can use your fingers to gradually press bridge layer from the hexagon grid.
With a file clean up any part of the printed models so that they attach to 3M mask cleanly. Also clean up the areas that the cover attaches to, or the inside of the cover.
Note on use:
Filters I use appear to also block most if not all humidity. After few hours drinks are necessary as mouth dries out. Mind the direction of the filters before you cut and make them. The version I have has he soft side as the air intake side. So the air in mounts would have soft fuzzy side out, and the air intake mount would have soft fuzzy side faced in.
Air out take will pool up with water after a few hours. When removing mask keep it tilted up as like you wear it. Just do not spin around. Over sink pry air -outtake cover off from the top first then pull bottom away keeping filter faced downward (filter is contaminant > trash). Any luck only the filter and inside will be wet. Cover should be OK… Dry everything really good and disinfect spay all affected areas.
If any moisture is in the air Intake, then your valves are broken and need fixed.
Clean and disinfect before using again and replace filters with new ones. When removing used filters use extreme safety as even if you’re not sick the filters may be contaminated and could infect you if touched incorrectly and not washing hands and so on… I wear gloves while taking off and cleaning.
The main Air outtake mount should for the most part stay on the 3M mask as the way it is mount is not meant for on and off action. Having a few extras of these already printed would be wise. I carry an extra cover with filter, air intake and outtake, and along with an air intake plug.
I found some cheap Supposed to be UVC USB LED strips, Not UVC but UV.+?. lined a box with reflective foil and placed these USB UV LED strips along the inside of box. Then the ends of the LED strips I placed within mask areas. The longer the better. Not a light to have on while looking at.
Similar models
thingiverse
free

3M gas mask replacing filter cotton Remit
...3m gas mask replacing filter cotton remit
thingiverse
improved air intake
thingiverse
free

3M Command Strip Face Mask Hanger - Accordian Style by tamsanh
...lution is to print the 3m mount sideways, to increase the shearing strength.
otherwise, it works great, and my roommate loves it!
grabcad
free

3m respirator filter/cartidge adapter
...i would recommend that you add some extra padding around the attached filter to improve the air seal.
use this at your own risk.
thingiverse
free

Playtex Diaper Genie Carbon Filter Holder (Print in Place) by RT3DWorkshop
...3m command picture hanging strips (medium) found here.
(#ad) https://is.gd/jollvv
carbon filters here:
(ad#) https://is.gd/t1a7dv
thingiverse
free

3M 6200 Respirator Filter by Surgical Mask
...ts the surgical mask filter to be splashed. i also provide a belt ring and close base so only one filter to be used if necessary.
thingiverse
free

Open source face mask with filter and one way valve
...a prototype is fully assembled this should only serve as an inspiration for possible ideas on how to further improve the project!
thingiverse
free
3M Canister Filter Replacement - Respirator COVID by johnrburleson
... for 3m respirators. i have a 7000 series half mask so any other masks that use this attachment should fit fine. see photos below
thingiverse
free

3M respirator mask 6035 filter corona virus cover by hudja
...cult to make a nice acrylic finish in that case.
i will add a convex logo soon, in case you would like to print it in two colors.
thingiverse
free

3D Printed Face Mask Dual Filter using TPU by k19k19
... pla cover into filter cavity when printing the tpu mask. it will serve as a very good bridge support. result will be super nice.
thingiverse
free

Mask N95 3M Filter by 3DANR
...nd it.
so i designed the holder and the cover, and adapted it to a mask.
i leave the holder file to be able to adapt to any mask.
Gallaghersart
thingiverse
free
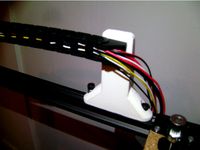
20xx Cable Chain riser by gallaghersart
...ame nuts.
i made this to allow for more room on my modified z9m3 corexy larger belts and custom rear belt alignment.
enjoy!
`mike
thingiverse
free
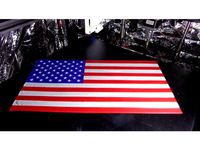
US Flag by gallaghersart
...ded also
they are designed to be printer with .4mm nozzle with a .3mm first layer height, remaining layers are .2mm layer height.
thingiverse
free
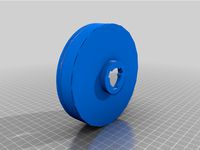
20xx Filament spool handles by gallaghersart
...ent spins easily, wish i did sooner. i’m also using clips to hold different size spools on support.
3x wheels
3x m5 15mm
1x clip
thingiverse
free
Duet 7i Handheld housing and mount by gallaghersart
...s for the handheld.
parts
• m3 tap/ bottom tap
• 8x m3 heat insets (holes are 5mm)
• 6x m3 bolt
• 2x m3 bolt
enjoy!
`mike
thingiverse
free

Duet 7i Screen Handheld housing and mount by gallaghersart
...s for the handheld.
parts
• m3 tap/ bottom tap
• 8x m3 heat insets (holes are 5mm)
• 6x m3 bolt
• 2x m3 bolt
enjoy!
`mike
thingiverse
free
Dual circuit 4 gang box cover with meters by gallaghersart
...r if smoke alarm is set off.
parts
• 2x gfi
• 2x meters
• 1x 4x gang box metal with metal brackets on “bottom”
enjoy!
`mike
thingiverse
free
Z9M3 2nd Filament Hotend Fan by gallaghersart
... my part fan over to the other side and set it up as a second filament cooler fan.
i left room for auto level module
enjoy!
`mike
thingiverse
free

Refrigerator wall spacers to keep food from freezing by gallaghersart
...s later they are still holding. and freezing food has ended, and a more stable constant temperature can be achieved.
enjoy!
`mike
thingiverse
free
Marlin CoreXY skew test 200mm x 200mm remix by gallaghersart
...re precise areas to measure.
no type markings to speed up prints, just one coroner is different. this should be “a”.
enjoy!
`mike
thingiverse
free

Flag of U.S. State of Ohio by gallaghersart
...he wall count no less than 2 (.8mm) so that the 1.2mm borders on 2nd layer end up being only parameters and no fill.
enjoy!
`mike
Reusable
turbosquid
$7
Virus Slim Reusable Head Mask Respirator - 3D Print
...r - 3d print for download as ma, dae, fbx, gltf, obj, and stl on turbosquid: 3d models for games, architecture, videos. (1535191)
3d_ocean
$12

3D classic lightbulb
...classic lightbulb 3docean bulb clean filiment glass light lightbulb reusable stunning usefull a 3d classic lightbulb, complete with sparks...
3d_export
$8

rpg-32 barkas
...rpg-32 barkas 3dexport rpg-32 barkas is a reusable russian multicaliber hand-held anti-tank grenade launcher.<br>caliber 72 and 105...
3d_export
$12

Kidney Basin 3D Model
...basin dish surgery surgical dental medical tray emesis waste reusable nursing dentist doctor vomit vomiting bowl hospital equipment tool...
3d_export
$15
Freight Container 3D Model
...container 3d model 3dexport shipping container freight intermodal transport reusable transportation cargo shipment ship rail storage steel box crate...
3d_export
$10
Glass Jar 3D Model
...glass jar 3d model 3dexport glass jar reusable jam cylindrical cylinder bottle kitchen container food water packing...
3d_ocean
$15
Prototype Mobile Game Set - Creature : Zombie_2
...games high quality indoor lowpoly mmorpg mobile painted prototype reusable rpg set stylized texture world of warcraft zombie here...
3d_ocean
$15

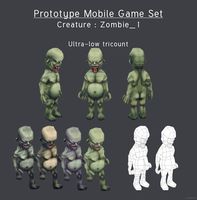
Prototype Mobile Game Set - Creature : Zombie_1
...games high quality indoor lowpoly mmorpg mobile painted prototype reusable rpg set stylized texture world of warcraft here is...
3d_ocean
$15

Prototype Mobile Game Set - Creature : Skeleton
...games high quality indoor lowpoly mmorpg mobile painted prototype reusable rpg set skeleton stylized texture world of warcraft here...
3d_ocean
$10
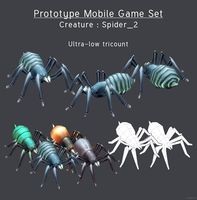
Prototype Mobile Game Set - Creature : Spider_2
...games high quality indoor lowpoly mmorpg mobile painted prototype reusable rpg set spider stylized texture world of warcraft here...
3M
turbosquid
$33

Altai as 3m
...royalty free 3d model altai as 3m for download as max and obj on turbosquid: 3d models for games, architecture, videos. (1632306)
turbosquid
$29

Kiosk Expo Square Display Stand 3m x 3m
...quare display stand 3m x 3m for download as obj, c4d, and fbx on turbosquid: 3d models for games, architecture, videos. (1323587)
turbosquid
$39

Kiosk Expo Corner Display Fair Stand Project 3m x 3m
...splay stand project 3m x 3m for download as obj, c4d, and fbx on turbosquid: 3d models for games, architecture, videos. (1322406)
turbosquid
$59

Motorcycle Voshod 3M
... available on turbo squid, the world's leading provider of digital 3d models for visualization, films, television, and games.
turbosquid
$79

Creative Booth Design Template 4m * 4m - 3m * 3m - 2m * 2m
... available on turbo squid, the world's leading provider of digital 3d models for visualization, films, television, and games.
3d_export
$5

automatic 3m mask production line
...automatic 3m mask production line
3dexport
automatic 3m mask production line
turbosquid
$59

Voshod 3M Cafe Racer
... available on turbo squid, the world's leading provider of digital 3d models for visualization, films, television, and games.
turbosquid
$5

3M Furniture chair armchair table
...odel 3m furniture for download as c4d, max, 3ds, obj, and fbx on turbosquid: 3d models for games, architecture, videos. (1542370)
turbosquid
$79

Voshod 3M Gulf Racing TT
... available on turbo squid, the world's leading provider of digital 3d models for visualization, films, television, and games.
turbosquid
$1

Tape Holder - Scotch C38 - 3M
... available on turbo squid, the world's leading provider of digital 3d models for visualization, films, television, and games.
Filters
3d_export
$10
cartridge filter
...cartridge filter
3dexport
cartridge filter
3d_export
$6
Bag filter
...bag filter
3dexport
bag filter
3d_export
$10

of dust filter
...of dust filter
3dexport
3d model of dust filter
3d_export
$10

of bag filter
...of bag filter
3dexport
3d model of bag filter
3d_export
$7

of bag filter
...of bag filter
3dexport
3d model of bag filter
turbosquid
$20

Filter
...ty free 3d model filter for download as ma, max, obj, and fbx on turbosquid: 3d models for games, architecture, videos. (1512887)
3d_export
$10
bag filter
...he ash hopper. when the gas containing fine dust passes through the filter material, the dust is retained and the gas is purified
3ddd
$1

UFI Filter
...ufi filter
3ddd
фильтр , ufi
ufi oil filter
turbosquid
$30

Filter
... available on turbo squid, the world's leading provider of digital 3d models for visualization, films, television, and games.
turbosquid
$5

filters
... available on turbo squid, the world's leading provider of digital 3d models for visualization, films, television, and games.
Optimized
turbosquid
$3

VolleyBall Optimized
... model volleyball optimized for download as obj, fbx, and dae on turbosquid: 3d models for games, architecture, videos. (1370381)
turbosquid
free
m4a1 optimized
... available on turbo squid, the world's leading provider of digital 3d models for visualization, films, television, and games.
turbosquid
free

PTERODACTYL Optimized CreatureCharacter
...l pterodactyl optimized creaturecharacter for download as fbx on turbosquid: 3d models for games, architecture, videos. (1705900)
turbosquid
$2
XIOLLA: Optimized Character
...free 3d model xiolla: optimized character for download as fbx on turbosquid: 3d models for games, architecture, videos. (1705725)
turbosquid
$8
Melia Azedarach Optimized
...l melia azedarach optimized for download as max, obj, and fbx on turbosquid: 3d models for games, architecture, videos. (1634816)
turbosquid
$80
Game Optimized Tools
... available on turbo squid, the world's leading provider of digital 3d models for visualization, films, television, and games.
3d_export
$13

Subaru B11S Optimized 3D Model
...ubaru b11s optimized 3d model
3dexport
subaru car cars b11s optimized 3onder
subaru b11s optimized 3d model 3onder 10518 3dexport
turbosquid
$15

Tutanhamon 3D - Unity Optimized
... 3d model tutanhamon 3d - unity optimized for download as fbx on turbosquid: 3d models for games, architecture, videos. (1182225)
turbosquid
$39
Rock Scanned "OPTIMIZED"
...
royalty free 3d model rock for download as max, fbx, and obj on turbosquid: 3d models for games, architecture, videos. (1292372)
turbosquid
$3

The Dead General Optimized Character Rig
...d model the dead general optimized character for download as on turbosquid: 3d models for games, architecture, videos. (1705429)
Updated
turbosquid
$5

orthographic room (updated)
...ee 3d model orthographic room (updated) for download as blend on turbosquid: 3d models for games, architecture, videos. (1375451)
turbosquid
$95

Romantic Bedroom - Updated
... available on turbo squid, the world's leading provider of digital 3d models for visualization, films, television, and games.
turbosquid
$39

Sofa. Updated release
... available on turbo squid, the world's leading provider of digital 3d models for visualization, films, television, and games.
turbosquid
$15

Procedurally updating cartoon crystal
...l procedurally updating cartoon crystal for download as blend on turbosquid: 3d models for games, architecture, videos. (1525853)
3d_export
$5

10 Surfboard s UPDATE
...10 surfboard s update
3dexport
3d_export
$10
chair updated rocking
...chair updated rocking
3dexport
armchair renewed plywood 18 mm. for cnc machines. layout in the stp archive.
turbosquid
free

Marble Table Updated
...el marble table for download as 3ds, obj, fbx, blend, and dae on turbosquid: 3d models for games, architecture, videos. (1201300)
turbosquid
$35
Mauser 1930the model is updated with the kits
... available on turbo squid, the world's leading provider of digital 3d models for visualization, films, television, and games.
turbosquid
$145

Contemporary Bedroom Collection Vol 1 - Updated
... available on turbo squid, the world's leading provider of digital 3d models for visualization, films, television, and games.
turbosquid
$16

B&B Mart Armchair MPRN (Updated)
...art armchair mprn (updated) for download as max, obj, and fbx on turbosquid: 3d models for games, architecture, videos. (1284355)
Generic
3d_export
$17
Generator
...generator
3dexport
generator
archibase_planet
free
Generator
...base planet
generator electric generator
generator electric n300715 - 3d model (*.gsm+*.3ds+*.max) for interior 3d visualization.
design_connected
$20
Generation
...generation
designconnected
knoll generation computer generated 3d model. designed by formway design.
3d_export
$8

generator
...generator
3dexport
generator - obj, 3ds, fbx.
3d_export
$7

generator
...generator
3dexport
generator extures 4k resolution, basecolor -normal -metallic -ao-roughness-height tris:3084
turbosquid
free
generator
...rator
turbosquid
free 3d model generator for download as max on turbosquid: 3d models for games, architecture, videos. (1492909)
3ddd
$1

general
...general
3ddd
генерал
turbosquid
$99

generator
...urbosquid
royalty free 3d model generator for download as ma on turbosquid: 3d models for games, architecture, videos. (1514125)
turbosquid
$20

Generator
...rbosquid
royalty free 3d model generator for download as max on turbosquid: 3d models for games, architecture, videos. (1244841)
turbosquid
$2
Generator
...rbosquid
royalty free 3d model generator for download as fbx on turbosquid: 3d models for games, architecture, videos. (1245541)
Printing
design_connected
$27

...print
designconnected
moroso print computer generated 3d model. designed by wanders, marcel.
3ddd
free

Eichholtz Prints
...- eichholtz print central station i
13 - eichholtz print central station ii
14 - eichholtz print marisa
15 - eichholtz print tish
3ddd
$1

Eichholtz Prints
...print abstract - set of 2
10 - eichholtz print orange abstract
11 - eichholtz print buddha right
12 - eichholtz print buddha left
turbosquid
$1

... available on turbo squid, the world's leading provider of digital 3d models for visualization, films, television, and games.
3ddd
free

Eichholtz Prints
...of 4
2 - print dunbar 2 set of 4
3 - print guadeloupe 1 set of 4
4 - print guadeloupe 2 set of 4
5 - print giles
6 - print trett
3ddd
$1

Eichholtz Prints
...nt tutti frutti
3 - eichholtz prints watson - set of 2
4 - eichholtz prints antique nautilus - set of 2
5 - eichholtz print tiara
3d_export
$5

Monster for printing
...monster for printing
3dexport
monster 3d model printing
3ddd
free

printed rug
...printed rug
3ddd
ковер
very creative printed rug
3ddd
free

Eichholtz Prints
...иал: бумага
габариты (вхш): 72 x 62 см
описание: print sweetmeat - постер в деревянной раме.
3 - prints varsity set of 2
арти
3ddd
free

Art Print Posters
...art print posters
3ddd
прованс
art print posters by patrician prints