Thingiverse
Ultimate lego beam and frame generator by dejfrcr
by Thingiverse
Last crawled date: 3 years, 1 month ago
This is a work in progress, I make over two updates per week and always test twice everything possible before upload.
Version 0.577215
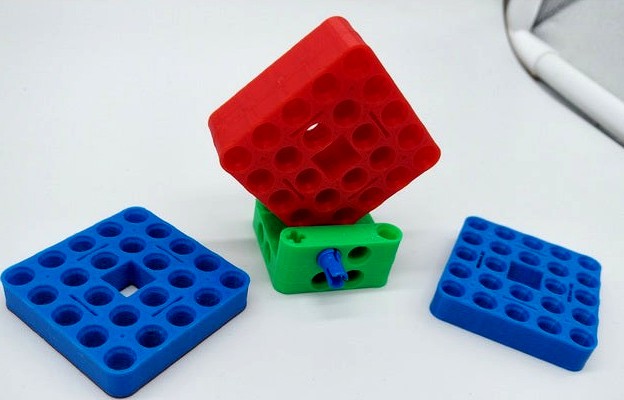
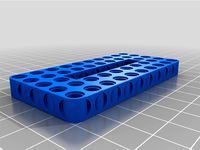
Redesigned to allow double durable frames. Capable of both halfheight and full height and their multiples to reasonable levels. Every beam or couple of beams has separate height setting available. + hole could be rotated 45 degrees to x.
Added horizontal round holes and ability of sharp corners to make sense to inline ones. Well, now its ultimate tool already :)
Added load of useful presets to begin with including printer dimension test presets meant to use with planned material constants
Fixed horizontal holes vertical positioning, hopefully for goof
1) Basic manual
The "SHAPE" of the brick to print: can be L, T, O, #, 2# or 4#. 2# variation double y axes, 4# double both axes on edges - you need overhang to not render them over basic axes.
You can also create straight beam by setting the y axis holes to a one character string.
Be careful on junction points, y axis ovewrites x axis and outer axis overwrites inner axis. Mind that with Smart corners they get Sharp shape even if inline hole is overwritten.
Final object consists of one or more layers of single or half HEIGHT. Multiplied halfheight has more inner cylinders to fit half pins, but does not support horizontal holes (yet).
With use_advanced true separate per axis setting of height is available.
The HOLES string sets the length of axis and sets the hole configuration from 0,0 corner. So paired axes are symetrical.
Use the character "o" (lowercase letter, not the number) to represent a vertical round hole, "-" horizontal crossing round hole, "i" horizontal inline round hole, "A" for all directions round hole - be carefull with this one, many print setups may fail on it and physical endurance wont be best.
Use "+" (the plus symbol) to represent a notched vertical axle hole, "x" for 45 degree rotated axle hole.
Any other character will create a blank space - I use "W" for readability. Original version and older builds used x for this purprose, but I decided to use that one otherwise.
OVERHANG determines how far from end of inner axis is the crossing axis. I plan overhang for outer axes too, but later.
ADVANCED features allow different hole, length and height configurations of outer axes. As long as we originate everything from corner different lenghts will produce asymetrical shapes. I plan to have a choice to originate in center or some more robust solution to allow cross shaped frames with closed edges and other tricks.
With zero overhang and different heights for inner and outer axes, you can have two kinds of layers without interlacing. The more you overwrite the slower is rendering, so keep outer height less or equal to half of inner.
2) Why this happened and what to expect. I got my hands on Lego mindstorms EV3 and went back to chilhood with my kids playing with it. Soon we got out of bricks, so I ordered here, there...having like tripple of original parts + I have all my old lego kept for decades waiting for me to have kids.
Soon I realized that some constructs I do are too weak, expensive and time consuming as they consit of too many tiny parts forming bigger one, that was never designed and sold by Lego. Thus I found my way to thingiverse and sought for every model that was irregular eventually finding some customizable builders. While the brick making one is heavy, beam kind was cool, but limited to either halfheight simple or up to # shape with full height, one layer only and vertical holes only. I got my way to printer and started doing things, learning everything but programming principles from zero.
Currently my thing is able to do a decent job in both simple custom beams and huge beasts minded for gearboxes and similar stuff. I did a lot of work in fixing correct sizes for everything, but surely its not proven in all cases and every print setup may create its own displacements. For testing I designed Printer test presets that are simplest, least material consuming objects that could be used for calibration. Ofc they are of little construction use, so feel free to choose any other.
It does only things I have thought of and maybe you need something more. I plan a lot of things (see comented customizer items), but many of them require deep rewrite of current code. Feel free to tell me your wish or make a remix.
3) Based on this:
Super Customizable Lego Technic Beam
Modified by Christopher Litsinger
January 2018
Based on Even More Customizable Straight LEGO Technic Beam
which in turn was Based on Customizable Straight LEGO Technic Beam
and Parametric LEGO Technic Beam by "projunk" and "stevemedwin"
www.thingiverse.com/thing:1119651
Modified by Sam Kass
November 2015
Customizable Straight LEGO Technic Beam
Based on Parametric LEGO Technic Beam by "projunk"
www.thingiverse.com/thing:203935
Modified by Steve Medwin
January 2015
Version 0.577215
Redesigned to allow double durable frames. Capable of both halfheight and full height and their multiples to reasonable levels. Every beam or couple of beams has separate height setting available. + hole could be rotated 45 degrees to x.
Added horizontal round holes and ability of sharp corners to make sense to inline ones. Well, now its ultimate tool already :)
Added load of useful presets to begin with including printer dimension test presets meant to use with planned material constants
Fixed horizontal holes vertical positioning, hopefully for goof
1) Basic manual
The "SHAPE" of the brick to print: can be L, T, O, #, 2# or 4#. 2# variation double y axes, 4# double both axes on edges - you need overhang to not render them over basic axes.
You can also create straight beam by setting the y axis holes to a one character string.
Be careful on junction points, y axis ovewrites x axis and outer axis overwrites inner axis. Mind that with Smart corners they get Sharp shape even if inline hole is overwritten.
Final object consists of one or more layers of single or half HEIGHT. Multiplied halfheight has more inner cylinders to fit half pins, but does not support horizontal holes (yet).
With use_advanced true separate per axis setting of height is available.
The HOLES string sets the length of axis and sets the hole configuration from 0,0 corner. So paired axes are symetrical.
Use the character "o" (lowercase letter, not the number) to represent a vertical round hole, "-" horizontal crossing round hole, "i" horizontal inline round hole, "A" for all directions round hole - be carefull with this one, many print setups may fail on it and physical endurance wont be best.
Use "+" (the plus symbol) to represent a notched vertical axle hole, "x" for 45 degree rotated axle hole.
Any other character will create a blank space - I use "W" for readability. Original version and older builds used x for this purprose, but I decided to use that one otherwise.
OVERHANG determines how far from end of inner axis is the crossing axis. I plan overhang for outer axes too, but later.
ADVANCED features allow different hole, length and height configurations of outer axes. As long as we originate everything from corner different lenghts will produce asymetrical shapes. I plan to have a choice to originate in center or some more robust solution to allow cross shaped frames with closed edges and other tricks.
With zero overhang and different heights for inner and outer axes, you can have two kinds of layers without interlacing. The more you overwrite the slower is rendering, so keep outer height less or equal to half of inner.
2) Why this happened and what to expect. I got my hands on Lego mindstorms EV3 and went back to chilhood with my kids playing with it. Soon we got out of bricks, so I ordered here, there...having like tripple of original parts + I have all my old lego kept for decades waiting for me to have kids.
Soon I realized that some constructs I do are too weak, expensive and time consuming as they consit of too many tiny parts forming bigger one, that was never designed and sold by Lego. Thus I found my way to thingiverse and sought for every model that was irregular eventually finding some customizable builders. While the brick making one is heavy, beam kind was cool, but limited to either halfheight simple or up to # shape with full height, one layer only and vertical holes only. I got my way to printer and started doing things, learning everything but programming principles from zero.
Currently my thing is able to do a decent job in both simple custom beams and huge beasts minded for gearboxes and similar stuff. I did a lot of work in fixing correct sizes for everything, but surely its not proven in all cases and every print setup may create its own displacements. For testing I designed Printer test presets that are simplest, least material consuming objects that could be used for calibration. Ofc they are of little construction use, so feel free to choose any other.
It does only things I have thought of and maybe you need something more. I plan a lot of things (see comented customizer items), but many of them require deep rewrite of current code. Feel free to tell me your wish or make a remix.
3) Based on this:
Super Customizable Lego Technic Beam
Modified by Christopher Litsinger
January 2018
Based on Even More Customizable Straight LEGO Technic Beam
which in turn was Based on Customizable Straight LEGO Technic Beam
and Parametric LEGO Technic Beam by "projunk" and "stevemedwin"
www.thingiverse.com/thing:1119651
Modified by Sam Kass
November 2015
Customizable Straight LEGO Technic Beam
Based on Parametric LEGO Technic Beam by "projunk"
www.thingiverse.com/thing:203935
Modified by Steve Medwin
January 2015
Similar models
thingiverse
free

LegoTechnic: Double Angular Beam Customizable by shusy
...ith 3 x 7 pins holes, this is a compatible lego part:4111998: double angular beam 3x7 45° and4234240: double angular beam 3x7 45°
thingiverse
free

Lego Technic: Axle and Pin Connector Perpendicular Customizable by shusy
...echnic.
with three pin holes, this is a compatible 4538007 lego part.
with two pin holes, this is a compatible 32291 lego part.
thingiverse
free

Lego Technic: Perpendicular Beam Connector Customizable by shusy
....
with 4 x 2 pins holes, this is a compatible 4120017 lego part.
with 5 x 3 pins holes, this is a compatible 4142823 lego part.
thingiverse
free

Even More Customizable Straight Beam for LEGO Technic by samkass
...he holes.edit v4: additional comments to highlight the fact that you can do sideways holes or blank spots. no structural changes.
thingiverse
free

Super Customizable Lego Technic Beam by x0pherl
...n renders much quicker, and the code should be more useful for folks who want to build crazy shapes beyond what is provided here.
thingiverse
free

Polaroid cube lego technic adapter by jcarolinares
...ks of projunk and pouland to make this thing:
http://www.thingiverse.com/thing:203935
http://www.thingiverse.com/thing:824448
thingiverse
free

Technic Beam 3 x 3 T-shaped by apcks
... bazmarc's "5m lego technic beam (with chamfer on one side)", this piece also does not require media to be printed.
thingiverse
free

Customizable LEGO Technic Hub by stevemedwin
...lways be a multiple of the technic beam hole spacing (8mm). if you want another hole count, just edit the openscad file directly.
grabcad
free

NXT Lego - Straight beam
...nxt lego - straight beam
grabcad
straight beam supplied with lego nxt 9 hole
3dwarehouse
free

Lego Technic Beam 15 Holes
...lego technic beam 15 holes
3dwarehouse
lego technic beam 15 holes
Dejfrcr
thingiverse
free

Lego frames assortment by dejfrcr
...lego frames assortment by dejfrcr
thingiverse
colection of frames made in https://www.thingiverse.com/thing:4790266
thingiverse
free

Lego Plate asortment by dejfrcr
...lego plate asortment by dejfrcr
thingiverse
some plates i rendered using my generator: https://www.thingiverse.com/thing:4790266
thingiverse
free
Lego Frames with fancy look by dejfrcr
...print as they are, as there are printing direction corrections for holes.
created using https://www.thingiverse.com/thing:4790266
thingiverse
free
Lego Technic Beam 5 with Alternating holes and fancy modding by dejfrcr
...verse
beam5 in alternating holes configuration and a few design mods. generated using: https://www.thingiverse.com/thing:4790266
Ultimate
turbosquid
$3
Ultimate Grave
...model ultimate grave for download as blend, obj, stl, and fbx on turbosquid: 3d models for games, architecture, videos. (1636144)
turbosquid
$79

ULTIMATE GIRAFFE
... available on turbo squid, the world's leading provider of digital 3d models for visualization, films, television, and games.
turbosquid
$5
The Ultimate Bowl
... available on turbo squid, the world's leading provider of digital 3d models for visualization, films, television, and games.
turbosquid
$1

Ultimate Revolver
... available on turbo squid, the world's leading provider of digital 3d models for visualization, films, television, and games.
3ddd
$1

Kimera Ultimate DVD System
...kimera ultimate dvd system
3ddd
dvd
schneider kimera ultimate dvd system
cg_studio
$49

The Ultimate Lioness3d model
... model
cgstudio
.max .obj .fbx - the ultimate lioness 3d model, royalty free license available, instant download after purchase.
turbosquid
$5
Ultimate Brick Castle
...yalty free 3d model ultimate brick castle for download as fbx on turbosquid: 3d models for games, architecture, videos. (1335247)
turbosquid
$31

Zombie Ultimate pack
... available on turbo squid, the world's leading provider of digital 3d models for visualization, films, television, and games.
turbosquid
$8

Barrels Ultimate Pack
...ls ultimate pack for download as ma, max, obj, fbx, and blend on turbosquid: 3d models for games, architecture, videos. (1353281)
turbosquid
$25

Ultimate "F" Bomb
... available on turbo squid, the world's leading provider of digital 3d models for visualization, films, television, and games.
Beam
archibase_planet
free
Beam
...beam
archibase planet
beam camber-beam hammer-beam
balance beam 2 - 3d model for interior 3d visualization.
design_connected
$16

Beam
...beam
designconnected
van rossum beam computer generated 3d model. designed by rossum, van.
design_connected
$11
Beam
...beam
designconnected
mdf italia beam computer generated 3d model. designed by arrivillaga, luis alberto.
turbosquid
$25

beam
...am
turbosquid
royalty free 3d model beam for download as stl on turbosquid: 3d models for games, architecture, videos. (1674400)
turbosquid
free

beam
... available on turbo squid, the world's leading provider of digital 3d models for visualization, films, television, and games.
3ddd
$1

ZERO, BEAM
...zero, beam
3ddd
zero
поворотная люстра zero , beam
archive3d
free

Beam 3D Model
...archive3d
beam camber-beam hammer-beam
balance beam 2 - 3d model for interior 3d visualization.
3ddd
free
Studio Beam
... navy
светильники studio beam
модели: mariner, ocean mariner, navy.
могут быть в разных цветах
3ddd
$1
Studio Beam
...grupius
производитель studio beam
модели: edison’s rocket pendant, edison’s rocket table lamp,romanov,elena pendant,grupius 1919.
design_connected
$11
I-Beam
...i-beam
designconnected
glas italia i-beam computer generated 3d model. designed by massaud, jean-marie.
Lego
3ddd
$1

Lego
...lego
3ddd
lego , конструктор
lego
3ddd
$1

Lego
...lego
3ddd
lego , конструктор , машина
lego
3ddd
$1

Lego
...lego
3ddd
lego , конструктор , машина
lego
3ddd
free
Lego
...lego
3ddd
конструктор , lego , замок
lego
3ddd
$1
Lego
...lego
3ddd
lego , конструктор
домик из lego
3d_export
$5

lego
...lego
3dexport
lego man
3d_ocean
$5

Lego
...lego
3docean
basic children cube games lego low poly toy
basic lego tile.
3ddd
$1

Lego человески
...lego человески
3ddd
lego
человечки lego
3ddd
$1

Lego полицейский
...lego полицейский
3ddd
lego
lego полицейский
3ddd
$1

LEGO Duplo
...lego duplo
3ddd
lego , конструктор
lego duplo
Generator
3d_export
$17
Generator
...generator
3dexport
generator
archibase_planet
free

Generator
...base planet
generator electric generator
generator electric n300715 - 3d model (*.gsm+*.3ds+*.max) for interior 3d visualization.
design_connected
$20

Generation
...generation
designconnected
knoll generation computer generated 3d model. designed by formway design.
3d_export
$8

generator
...generator
3dexport
generator - obj, 3ds, fbx.
3d_export
$7

generator
...generator
3dexport
generator extures 4k resolution, basecolor -normal -metallic -ao-roughness-height tris:3084
turbosquid
free
generator
...rator
turbosquid
free 3d model generator for download as max on turbosquid: 3d models for games, architecture, videos. (1492909)
3ddd
$1

general
...general
3ddd
генерал
turbosquid
$99

generator
...urbosquid
royalty free 3d model generator for download as ma on turbosquid: 3d models for games, architecture, videos. (1514125)
turbosquid
$20

Generator
...rbosquid
royalty free 3d model generator for download as max on turbosquid: 3d models for games, architecture, videos. (1244841)
turbosquid
$2
Generator
...rbosquid
royalty free 3d model generator for download as fbx on turbosquid: 3d models for games, architecture, videos. (1245541)
Frame
archibase_planet
free

Frame
...frame
archibase planet
frame photo frame
frame n190813 - 3d model (*.gsm+*.3ds) for interior 3d visualization.
archibase_planet
free

Frame
...frame
archibase planet
frame photo frame
frame n071113 - 3d model (*.gsm+*.3ds) for interior 3d visualization.
3ddd
$1

Frame
...frame
3ddd
frame
3ddd
free

Frame
...frame
3ddd
frame
archibase_planet
free

Frame
...frame
archibase planet
frame mirror frame ornament
frame n260113 - 3d model (*.gsm+*.3ds) for interior 3d visualization.
archibase_planet
free

Frame
...frame
archibase planet
frame photo frame
frame photo n190813 - 3d model (*.gsm+*.3ds) for interior 3d visualization.
archibase_planet
free

Frame
...frame
archibase planet
frame window window frame
frame 1 - 3d model (*.gsm+*.3ds) for interior 3d visualization.
archibase_planet
free

Frame
...frame
archibase planet
frame window frame window
frame 3 - 3d model (*.gsm+*.3ds) for interior 3d visualization.
archibase_planet
free

Frame
...frame
archibase planet
frame wall frame decoration
frame 1 - 3d model (*.gsm+*.3ds) for interior 3d visualization.
archibase_planet
free

Frame
...frame
archibase planet
frame window window frame
frame 2 - 3d model (*.gsm+*.3ds) for interior 3d visualization.