Thingiverse
UltiCube by Geaz
by Thingiverse
Last crawled date: 3 years ago
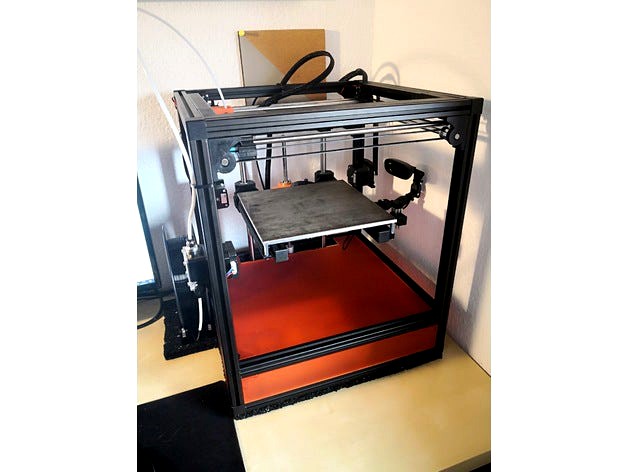
This is my take on a small Ultimaker Clone.
Update 19 (26.06.2020):
Added Mount for United Pro B3510X05B Fan.
Update 18 (27.03.2019):
Small redesign of the Hotend fanmount and shroud. Updated the Fan Shroud and the 3 Point Leveling zip file.
Update 17 (24.01.2019):
I redesigned the hotend mount and gantry mounts.
The new gantry mounts have a build-in belt tensioner.
The new hotend mount design now uses 2 LM8UU bearings instead of the bronze sinter bushings. I had the problem, that the bushings didn't fit the 8mm rods exactly. This caused the hotend to have some play on the rods and could wobble in some circumstances. The LM8UU bearings should fix this problem. Furthermore the new mount gives better access to the hotend.
Will update the pictures soon.
Print Area: 220x220x210 (X/Y/Z in mm)
Printer Size: 360x380x440 (X/Y/Z in mm)
Features:
Using a RAMPS 1.4 board running on Klipper Firmware
Raspberry PI with Octoprint
LED Stripes with custom plugin for Octoprint for heating and printing status feedback
Webcam running on octoprint for timelapses and print monitoring (Used a combination of this and this plus the custom 2020 mount)
Wipe Zone for nozzle cleaning before the print starts. It is a variation of this thing
Filament spool holder (Credits: https://www.thingiverse.com/thing:2047554) I used the credited thing for one half and the custom half to mount it to the 2020 frame.
Here you can find the complete model in Fusion 360: https://a360.co/2rAbleL
Used extrusions:
20x20 Aluminium Extrusions Black with corner cubes
7x 340mm (X Axis)
6x 320mm (Y Axis)
4x 400mm (Z Axis)
1x 220mm (X Bed)
2x 230mm (Y Bed)
8x Corner Cubes
Used materials for the gantry:
10x https://www.robotdigg.com/product/23/GT2-Pulley-20-Tooth-8mm-Bore
8x https://www.robotdigg.com/product/217/Flanged-Ball-Bearing-F688ZZ
2x 350mm GT2 6mm Closed Loops
1x a few meters (3 were enough) GT2 6mm Belt
12x GT2 Pulley 20 Tooth 8mm
4x 8mm Inner Diameter 12mm Outer Diameter 20mm length Sinter Bronze
2x LM8UU (Hotend Mount)
4x LM12UU bearings (Z Axis)
1x 300mm Length 8mm Diameter Rod
1x 320mmL 8mmD Rod
1x 360mmL 8mmD Rod
1x 400mmL 8mmD Rod
1x 380mmL 8mmD Rod
2x 360mmL 12mmD Rod
1x 280mm 8mm Leadscrew (took it from Anet A8 and cutted it)
Used Screws (I hope nothing is missing!):
Bunch of M5 8mm (I think I got around 150 pieces and this was enough)
Bunch of M3 8mm and 12mm (For the motor mounts and Z mounts)
Bunch of M3 & M2 nuts
8x M2 10mm (for the sliders)
5x M3 20mm (for the hotend and gantry mounts)
2x M3 22mm (for the part cooler)
Update 1 (14.05.2018):
I ordered all necessary items to build this printer. I hope they all arrive within one or two weeks. Will keep you up to date.
Update 2 (18.05.2018):
Most of the parts got shipped! I am just waiting for the extrusions now. Will post updates of the build process as soon as I got everything ready.
Update 3 (26.05.2018):
Unfortunately I am still waiting for the extrusions ...
Hope they will get shipped by next week. In the meanwhile I printed all necessary corner rod mounts (see pictures).
Update 4 (04.06.2018):
The extrusions arrived! And I already assembled some parts :) (see pictures)
Update 5 (09.06.2018):
I printed the Gantry Mounts (see pictures) and today I will try to get the Hotend Mount ready.
Update 6 (11.06.2018):
The Gantry is assembled! The Z Axis is next ...
Update 7 (19.06.2018):
Changed the Z-Axis to LM12UU Bearings. Updated Renderings.
Update 8 (27.06.2018):
The Z-Axis is now assembled!
After some problems with the hotend mount, I redesigned it. Now the X-Y-Axis runs smooth. Furthermore I created the endstop mounts which are already present in the Fusion 360 model. I will try to update the pictures today or tomorrow. Now it gets exiting! Electronics are next!
Update 9 (03.07.2018):
After test driving the Z-Axis I saw, that the designed version of my bed brackets weren't stiff enough and bend quite a bit. Therefore I designed new bed brackets which are holding the bed really well now. Updated designs and renderings.
Update 10 (04.07.2018):
RAMPS Board connected! The first homing was successful.
Update 11 (05.07.2018):
Everything connected. And first test prints are running!
Update 12 (09.07.2018):
I redesigned the part fan, because the single 40mm axial fan wasn't powerfull enough. I switched to a single radial fan with a surrounding fan shroud. Updated renderings.
Update 13 (16.07.2018):
Added PSU, Raspberry PI, RAmps and Mosfet Mount. The electronics are all mounted and now I am waiting for a new hotend and extruder. And tomorrow I will try to mount some LEDs to the printer. Furthermore, I am thinking about switching the four point bed mount to a three point one. Will keep you up to date.
Update 14 (19.07.2018):
I changed the bed mount now to a three point one. Works really well. Seems I don't have a need for a probe anymore. I think I will remove the probe to use the freed room for a nozzle wipe zone.
Update 15 (04.08.2018):
I finally finished it! I am so happy :D
Update 16 (21.12.2018):
I replaced the old "alternative" fan shroud with a new one. Also replaced the old "3 Point Leveling Package". The new one includes a new z stop mount.
Similar models
thingiverse
free
Remix of Ulticube by shivackt
... m2 8mm (for the hotend)
2x m3 22mm (for the part cooler)
https://youtu.be/60zclhke-rehttps://www.youtube.com/watch?v=izpw6stqzsy
thingiverse
free

Dual GT2 Belt Driven Z Axis for Hypercube by n9jcv
...or placement of pulleys (i just printed plastic washers not critical).
again i am 100% happy with the performance of the z now.
thingiverse
free

Openbeam Printer by xsmarty
...e
also i am using a 300mmx300mm silicon adhesive heatpad
i hope you enjoy my designhttps://www.youtube.com/watch?v=auoyjmhpzpw
thingiverse
free

Prusa mini Z axis 8mm version by feridund
...usa mini z axis 8mm version by feridund
thingiverse
prusa min 8mm rod and lm8uu linear bearing edition.
all axis 8mm rod version
thingiverse
free
LM8UU Bearing Mount by Brainy_Ryan
...lm8uu bearing mount by brainy_ryan
thingiverse
this is a bearing mount used for mounting the z axis to rods
thingiverse
free

8mm Axis mount & Linear Bearingr mount for 20mm&15mm extrusion by mming1106
...& linear bearing mount for 20mm&15mm extrusion
(the lm8uu mount can use lm8uu x2 or lm8luu x1)http://youtu.be/qhv4mslvimm
thingiverse
free

DIY 3018 CNC - More expensive, but stronger by TheXGamerYt
...h the bed correctly
position endstop switches to limit the axis movements
design bed support to t8 anti backlash nut (underneath)
thingiverse
free

KP08 bearings on-table mount for Z-axis 8mm rod by jaddar
...d be useful to fix vertical z-axis threaded rod if there is no free space to install bracket on 2040 extrusions for some reasons.
thingiverse
free
Aster-X 3D printed full screw CNC machine by moosmutzel
..._switch_mount_mod (redesign of me)
2x knob_m6 (designer unknown)
have fun building after ... i would be glad about a feedback
.
thingiverse
free

Drawing Machine, LM8UU derivative by gigl
...the z stage really slow to gain momentum. in my place it works with marlin settings for z stage velocity vmax=1 or 2 at the most.
Geaz
thingiverse
free
Osu!Cents by Geaz
...az
thingiverse
a custom touch sensitive two-key keyboard for the game osu!
find the code here: https://github.com/geaz/osu-cents
thingiverse
free

Anet A8 - Chain Piece with Filament Guide by Geaz
... the problem that my filament always scratched on the chain. therefore i added a small filament guide to one of the chain pieces.
thingiverse
free

Customizable Filament Swatch by Geaz
... of the brand namefilamentcolorsize: font size of the color
parameters - box:
inlaycount: number of swatches the box should hold
thingiverse
free

Anet A8 - RAMPS 1.4 Mount - Uses Original Frame by Geaz
...why i quickly designed this one.
it is possible to use it along with this mosfet mount: https://www.thingiverse.com/thing:2018906
thingiverse
free

(Added stabilization) Super Nintendo SNES Controller Case for Raspberry Pi Zero Retropie by Geaz
...holes broke. i didn't know why, but i decided to add some stabilization. the first print after the addition came out perfect.
thingiverse
free
Remix of Ulticube by shivackt
...shivackt thingiverse date: 24.09.2018 i very thanks to @ geaz for wonderful easy design & to share his work....