Thingiverse

Ugly Parametric Magnetic Effector by rodsmith
by Thingiverse
Last crawled date: 3 years ago
Quick Start
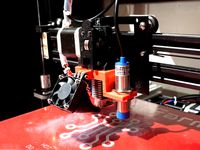
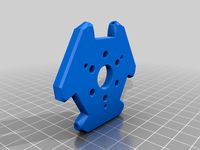
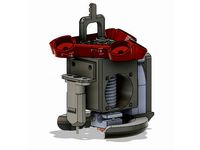
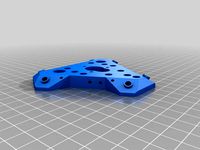
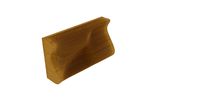
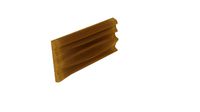
This Thing is a highly parametric effector for use with magnetic diagonal rods on delta-style printers. It consists of three parts, each of which has 2 or 4 variants (in .stl form):
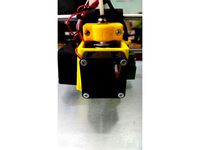
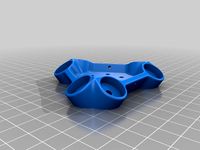
Effector-{hotend}-{probe|noprobe}.stl -- This is the effector itself. I provide versions for the E3D V6 (and clones) and for the Hexagon hotend. Both variants include versions with and without a mount for a bed probe, such as an inductive sensor.
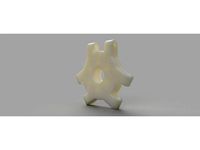
Lock-{hotend}.stl -- This is a small triangular piece that locks the hot end in place.
FanDuct-{hotend}.stl -- This is an optional 180-degree fan duct for a 50mm centrifugal (aka "blower" or "radial") fan.
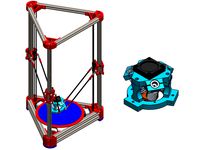
If you have an E3D V6, a clone of it, or a Hexagon hotend, you should be able to print one set of three parts (or two parts, if you don't want to use a part cooling fan) and go; however, you'll need to find a carriage with a matching 51mm inter-ball distance to use the provided .stl files. (My carriage, "Yet Another Kossel Magnetic Carriage," https://www.thingiverse.com/thing:2833905, comes with such a variant.) If you need to use the effector with a carriage that uses another inter-ball spacing, you'll need to customize this effector, as described later.
Non-Printed Parts
To use this effector, you'll need a number of non-printed parts, in addition to the hot end:
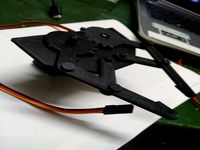
6x magball studs -- These are often sold with magnetic arms from vendors such as UltiBots and Filastruder. You'll normally use matching studs on the carriage.
7x M3 nuts -- You need six nuts for the magball studs and one for the fan's mounting screw.
2x - 4x M3x16 screws -- These are needed for the hot end fan. Optimum length depends on the fan's depth, but 16mm works for most fans.
2x M3x6 screws -- These attach the fan duct to the effector.
3x M3x10 screws -- These attach the locking nut to the effector. You may be able to get by with M3x8 screws, particularly on the Hexagon variant.
1x M3x25 screw -- This screw attaches the centrifugal fan to its fan shroud.
Fans -- The Hexagon version uses a 25mm hot end fan, and the E3D V6 version uses a 30mm fan. (These sizes match what comes with each hot end.) The part cooling duct is designed for a 50mm centrifugal fan.
Of course, if you don't use the part cooling fan duct, you won't need the three screws or the nut associated with it.
Features & Caveats
I designed this effector with several goals in mind:
Parametric, to enable easy adaptation to different hot ends and diagonal rod spacing.
Support for a part-cooling fan.
Support for an inductive bed sensor. (This turned out not to work too well; see below.)
Designed for use with magnetic diagonal rods.
Low attachment point for diagonal rods, to maximize print height; but not so low that the view of the hot end's nozzle is seriously obstructed or that the heat block would come into near-direct contact with the effector's plastic.
No need for supports or rafts when printing. (The effector includes two concentric hollow cylinders that function as built-in supports for the top piece. These are easily removed after printing.)
This effector does meet these goals; however, there are several caveats:
The centrifugal fan protrudes significantly from the effector, which robs about 10mm of print area on one side. This figure may be greater or less for you. Using a 40mm centrifugal fan should reduce this loss; but the 40mm fans I have are thicker than the 50mm fan I have, so this would require further tweaks to the design, likely including a wider inter-ball spacing to make room for the mounting screws.
In use on my printer, the bed sensor's trigger height varied significantly depending on the point on the bed being probed. This greatly reduced the bed sensor's usefulness, to the point that I switched to a Delta Smart Effector. Using Force-Sensitive Resistors (FSRs) under the print bed rather than an inductive sensor might have worked as well.
There seems to be no standardization of inter-ball spacing for magnetic diagonal rods. I used 51mm spacing to match an earlier effector design I tried. Thus, customization of the OpenSCAD file and rebuilding the .stl file, as described in the next section, or doing the equivalent for the carriage, may be necessary for most people.
Customization
I designed this effector to be highly parametric, so it's easy to customize it. I used OpenSCAD (http://www.openscad.org), which is free software, so you can customize this Thing quite easily with a minimal understanding of OpenSCAD. The main file is Ugly-Parametric-Magnetic-Effector.scad; it contains designs for all three parts. Variables that you're most likely to want to change are on lines 6-48:
makeSensorMount -- Set this to true to build the effector with the sensor mount, or to false to omit the sensor mount.
makeWireTieDown -- Set this to true to add a half-torus above the hot end fan mount. I intended this for helping to secure wires, but it proved to get in the way more than help, at least for me. You might decide otherwise.
recycleNum -- Set this to a number greater than 0 to add a recycling symbol and number on the effector and fan duct. Note that this feature requires the recycling_symbol.scad file from the OpenSCAD Recycling Symbol Library (https://www.thingiverse.com/thing:216963) to be in the same directory as the other .scad files.
ballDistance -- Set this value to match the ball spacing on your carriage. The ball spacing on the effector and carriage MUST match! Greater ball distances can increase stability, but too great and the ball mounts will physically detach from the main base and/or the ball mounts from different sides will begin to overlap.
baseLength -- Setting this shorter will bring the mounting balls closer to the hot end without changing the distance between parallel balls. Shorter baseLength values increase stability, but too short and the effector becomes structurally unsound and/or the ball studs won't fit in place. Also, a baseLength much shorter than the default of 51 makes it impossible to mount the fan duct to the effector. (Note that this variable sets the size of the triangle that forms the basis of the effector's base.) The baseLength and ballDistance values are normally similar -- they're both 51mm in the default configuration and .stl files I provide.
makeEffector -- Set this to 1 to build the effector model with a Preview (F5) or Render (F6) operation.
makeLock -- Set this to 1 to build the lock model with a Preview (F5) or Render (F6) operation.
makeCentrifugalFanShroud -- Set this to 1 to build the fan duct model with a Preview (F5) or Render (F6) operation.
sensorDiameter -- This sets the inner diameter of the Z probe sensor mount.
sensorBrimDiameter -- This sets the outer diameter of the Z probe sensor mount. It must be greater than sensorDiameter.
In addition, lines 27-29 include the .scad files that hold measurements of the hot end; you must uncomment the line for the hot end you're using and comment out the rest. If you want to build a version of this effector for another hot end, you can create your own .scad file for it and include that file. Use one of the existing hot end files as a model. I provide three sample files, for the E3D V6, the Hexagon, and an effector that looked like a Hexagon clone on eBay but that turned out to be quite different.
Additional variables in lines 6-103 may interest you if you have exotic needs. The heFanSize variable, in the hot end .scad file, sets the size of the fan used by the effector.
Work in Progress
I designed this effector for a homebrew Kossel XL; however, I was unsatisifed with the performance of my inductive bed probe and so decided to buy a Delta Smart Effector. Thus, I've abandoned this effector, at least for the moment. I put a lot of work into it, though, and thought it might be of interest to others -- particularly those who want to build delta printers using Hexagon or more exotic hot ends. I have used this effector with both
an E3D V6 and the Hexagon not-really-a-clone. Although I've printed the version for the genuine Hexagon to see that it fits, I've not actually printed with it.
The main problem I had with the inductive bed probe is that, because of varying effector tilt at different points on the bed, its readings were not consistent, compared to actual nozzle height. This necessitated tedious measurements to make the RepRapFirmware's G32 command produce good results, and G29 never produced good results for me. You may have better luck with force-sensitive resistors (FSRs) under the print bed, or simply doing manual bed leveling. Perhaps another firmware, or a future version of RepRapFirmware, will work better even with an inductive sensor. It's also conceivable that other physical design aspects might improve the reliability of an inductive sensor.
Shortly before buying my Smart Effector, I began experimenting with a design to put a smaller 40mm box fan above the main body of the effector, so as to recover the print area lost to the centrifugal fan. You can see what this looks like by setting makeBoxFanShroud = 1 on line 19. I never printed (or even completed) this design, since it looked ridiculously top-heavy and would have blocked the hot end's filament entry hole. I've left the code in the .scad file in case somebody else might want to modify it into something useful.
This Thing is a highly parametric effector for use with magnetic diagonal rods on delta-style printers. It consists of three parts, each of which has 2 or 4 variants (in .stl form):
Effector-{hotend}-{probe|noprobe}.stl -- This is the effector itself. I provide versions for the E3D V6 (and clones) and for the Hexagon hotend. Both variants include versions with and without a mount for a bed probe, such as an inductive sensor.
Lock-{hotend}.stl -- This is a small triangular piece that locks the hot end in place.
FanDuct-{hotend}.stl -- This is an optional 180-degree fan duct for a 50mm centrifugal (aka "blower" or "radial") fan.
If you have an E3D V6, a clone of it, or a Hexagon hotend, you should be able to print one set of three parts (or two parts, if you don't want to use a part cooling fan) and go; however, you'll need to find a carriage with a matching 51mm inter-ball distance to use the provided .stl files. (My carriage, "Yet Another Kossel Magnetic Carriage," https://www.thingiverse.com/thing:2833905, comes with such a variant.) If you need to use the effector with a carriage that uses another inter-ball spacing, you'll need to customize this effector, as described later.
Non-Printed Parts
To use this effector, you'll need a number of non-printed parts, in addition to the hot end:
6x magball studs -- These are often sold with magnetic arms from vendors such as UltiBots and Filastruder. You'll normally use matching studs on the carriage.
7x M3 nuts -- You need six nuts for the magball studs and one for the fan's mounting screw.
2x - 4x M3x16 screws -- These are needed for the hot end fan. Optimum length depends on the fan's depth, but 16mm works for most fans.
2x M3x6 screws -- These attach the fan duct to the effector.
3x M3x10 screws -- These attach the locking nut to the effector. You may be able to get by with M3x8 screws, particularly on the Hexagon variant.
1x M3x25 screw -- This screw attaches the centrifugal fan to its fan shroud.
Fans -- The Hexagon version uses a 25mm hot end fan, and the E3D V6 version uses a 30mm fan. (These sizes match what comes with each hot end.) The part cooling duct is designed for a 50mm centrifugal fan.
Of course, if you don't use the part cooling fan duct, you won't need the three screws or the nut associated with it.
Features & Caveats
I designed this effector with several goals in mind:
Parametric, to enable easy adaptation to different hot ends and diagonal rod spacing.
Support for a part-cooling fan.
Support for an inductive bed sensor. (This turned out not to work too well; see below.)
Designed for use with magnetic diagonal rods.
Low attachment point for diagonal rods, to maximize print height; but not so low that the view of the hot end's nozzle is seriously obstructed or that the heat block would come into near-direct contact with the effector's plastic.
No need for supports or rafts when printing. (The effector includes two concentric hollow cylinders that function as built-in supports for the top piece. These are easily removed after printing.)
This effector does meet these goals; however, there are several caveats:
The centrifugal fan protrudes significantly from the effector, which robs about 10mm of print area on one side. This figure may be greater or less for you. Using a 40mm centrifugal fan should reduce this loss; but the 40mm fans I have are thicker than the 50mm fan I have, so this would require further tweaks to the design, likely including a wider inter-ball spacing to make room for the mounting screws.
In use on my printer, the bed sensor's trigger height varied significantly depending on the point on the bed being probed. This greatly reduced the bed sensor's usefulness, to the point that I switched to a Delta Smart Effector. Using Force-Sensitive Resistors (FSRs) under the print bed rather than an inductive sensor might have worked as well.
There seems to be no standardization of inter-ball spacing for magnetic diagonal rods. I used 51mm spacing to match an earlier effector design I tried. Thus, customization of the OpenSCAD file and rebuilding the .stl file, as described in the next section, or doing the equivalent for the carriage, may be necessary for most people.
Customization
I designed this effector to be highly parametric, so it's easy to customize it. I used OpenSCAD (http://www.openscad.org), which is free software, so you can customize this Thing quite easily with a minimal understanding of OpenSCAD. The main file is Ugly-Parametric-Magnetic-Effector.scad; it contains designs for all three parts. Variables that you're most likely to want to change are on lines 6-48:
makeSensorMount -- Set this to true to build the effector with the sensor mount, or to false to omit the sensor mount.
makeWireTieDown -- Set this to true to add a half-torus above the hot end fan mount. I intended this for helping to secure wires, but it proved to get in the way more than help, at least for me. You might decide otherwise.
recycleNum -- Set this to a number greater than 0 to add a recycling symbol and number on the effector and fan duct. Note that this feature requires the recycling_symbol.scad file from the OpenSCAD Recycling Symbol Library (https://www.thingiverse.com/thing:216963) to be in the same directory as the other .scad files.
ballDistance -- Set this value to match the ball spacing on your carriage. The ball spacing on the effector and carriage MUST match! Greater ball distances can increase stability, but too great and the ball mounts will physically detach from the main base and/or the ball mounts from different sides will begin to overlap.
baseLength -- Setting this shorter will bring the mounting balls closer to the hot end without changing the distance between parallel balls. Shorter baseLength values increase stability, but too short and the effector becomes structurally unsound and/or the ball studs won't fit in place. Also, a baseLength much shorter than the default of 51 makes it impossible to mount the fan duct to the effector. (Note that this variable sets the size of the triangle that forms the basis of the effector's base.) The baseLength and ballDistance values are normally similar -- they're both 51mm in the default configuration and .stl files I provide.
makeEffector -- Set this to 1 to build the effector model with a Preview (F5) or Render (F6) operation.
makeLock -- Set this to 1 to build the lock model with a Preview (F5) or Render (F6) operation.
makeCentrifugalFanShroud -- Set this to 1 to build the fan duct model with a Preview (F5) or Render (F6) operation.
sensorDiameter -- This sets the inner diameter of the Z probe sensor mount.
sensorBrimDiameter -- This sets the outer diameter of the Z probe sensor mount. It must be greater than sensorDiameter.
In addition, lines 27-29 include the .scad files that hold measurements of the hot end; you must uncomment the line for the hot end you're using and comment out the rest. If you want to build a version of this effector for another hot end, you can create your own .scad file for it and include that file. Use one of the existing hot end files as a model. I provide three sample files, for the E3D V6, the Hexagon, and an effector that looked like a Hexagon clone on eBay but that turned out to be quite different.
Additional variables in lines 6-103 may interest you if you have exotic needs. The heFanSize variable, in the hot end .scad file, sets the size of the fan used by the effector.
Work in Progress
I designed this effector for a homebrew Kossel XL; however, I was unsatisifed with the performance of my inductive bed probe and so decided to buy a Delta Smart Effector. Thus, I've abandoned this effector, at least for the moment. I put a lot of work into it, though, and thought it might be of interest to others -- particularly those who want to build delta printers using Hexagon or more exotic hot ends. I have used this effector with both
an E3D V6 and the Hexagon not-really-a-clone. Although I've printed the version for the genuine Hexagon to see that it fits, I've not actually printed with it.
The main problem I had with the inductive bed probe is that, because of varying effector tilt at different points on the bed, its readings were not consistent, compared to actual nozzle height. This necessitated tedious measurements to make the RepRapFirmware's G32 command produce good results, and G29 never produced good results for me. You may have better luck with force-sensitive resistors (FSRs) under the print bed, or simply doing manual bed leveling. Perhaps another firmware, or a future version of RepRapFirmware, will work better even with an inductive sensor. It's also conceivable that other physical design aspects might improve the reliability of an inductive sensor.
Shortly before buying my Smart Effector, I began experimenting with a design to put a smaller 40mm box fan above the main body of the effector, so as to recover the print area lost to the centrifugal fan. You can see what this looks like by setting makeBoxFanShroud = 1 on line 19. I never printed (or even completed) this design, since it looked ridiculously top-heavy and would have blocked the hot end's filament entry hole. I've left the code in the .scad file in case somebody else might want to modify it into something useful.
Similar models
thingiverse
free
Makerfarm Pegasus E3D v6 Mount with Fan and 18mm Inductive Probe Sensor by gregington
...9;s fan shroud works with this mount, or you can use my derivative which is the same but with slightly larger fan mounting holes.
thingiverse
free

DC42 probe holder for HE3D hot end and Robotdigg effector by bgkdavis
...probe holder is specifically designed to suit the he3d hot end mounted to a robotdigg delta effector, and holds a dc42 bed probe
thingiverse
free

b2x X-Carriage Bed Fan Mount by b2x
...ver you want. i'm thinking at some point i may modify it with some mounts for leds to make viewing the printing part easier.
thingiverse
free

Prusa i3 Hexagon Bowden mount by liu_d
...cs due to the increased airflow restriction in this mount.
it uses 23mm square (m4) mounting hole spacing for the carriage mount.
thingiverse
free

Chimera/Cyclops Hot End Mount for FLSun Cube carriage modification by nigel42
... sensor here: https://www.thingiverse.com/thing:2995894
and a compatible fan duct here: https://www.thingiverse.com/thing:2995919
thingiverse
free

chimera fan mount by bradyhoover_designs
...f slightly less direct cooling from the right duct.
have fun printing and get those overhangs better with more efficient cooling.
thingiverse
free
DMS DP5 - 40mm fans duct and holders, auto-leveling sensor mount by mexusbg
...dging capabilities.
you can replace the original part, inductive sensor is in the same position.
i use 40x40x20 sunon maglev fans
thingiverse
free

Inductive Proximity Sensor Mount for Bed Leveling by swissarmyknife
...riage and used for bed leveling.
sensor used:https://www.amazon.com/uxcell-lj12a3-4-z-approach-inductive-proximity/dp/b0058gdrro
thingiverse
free

Hypercube Hexagon Hot End Mount (with fan) by tetious
...so it is possible i'll make a few adjustments to this once my build is complete. it seems to fit and will probably even work!
thingiverse
free

E3D Titan + v6 probe and fan mount by Hezik
...ud is simply pushed over the 5cm centrifugal fan opening, no screws. your mileage may vary, on my printer it's a perfect fit.
Rodsmith
thingiverse
free

Ugly Parametric Magnetic Effector - Magnets remix for HE3D 3in1 Hotend by sineline
...easily (look at the code). all credit goes to rodsmith wip - i'll document later...
thingiverse
free
Robo3D R1+ LCD Panel Bracket by rodsmith
...hat the photos show the mount glued to a screen in its housing and
mounted on the printer. the rendering shows this thing alone.)
thingiverse
free

Parametric U Clamp by rodsmith
...customization tool that might help simplify matters, but i've never used that feature myself, so i make no promises about it.
thingiverse
free

Adjustable 2020 End Stop Bracket by rodsmith
...his is a kossel xl, but the bracket should work fine on any printer that uses 2020 extrusions that should hold end stop brackets.
thingiverse
free

Yet Another Kossel XL Bed Support by rodsmith
...esigned to be used with the kossel mini 2020 frame brace (https://www.thingiverse.com/thing:1686378), but can be used without it.
thingiverse
free

Yet Another Kossel Magnetic Carriage by rodsmith
...plus that extra length.
2x or 6x m3 nuts -- 2x for the ball studs and 4x for the screws (assuming the slider design needs them).
thingiverse
free

Heavy-Duty AquaPure water filter wrench by rodsmith
...ur plumbing, so be careful!
this wrench should be used to remove the filter housing. do not use it to tighten the filter housing!
thingiverse
free

Delta Smart Effector Circular Fan Duct by rodsmith
...t print cooling fan mount for duet3d pcb effector and
e3d v6 volcano (https://www.thingiverse.com/thing:2573606) might be useful.
thingiverse
free

Robo3D R1+ / Bigtreetech SKR Pro Adapter Mount by rodsmith
...a lot without supports, and the bridge on the micro-sd mount will also droop a lot, necessitating more cleanup, without supports.
Effector
3d_ocean
$5

Radial Sound Effector
...e spheres will expand with your song. fully customisable, change the color, the size of the spheres or even put in different s...
3d_ocean
$12

3D Customizable Puzzle Set (16x10)
...mograph compatible (you can effect the pieces with mograph effector) - included also a non-mograph version with...
thingiverse
free
Effector by olo2000pm
...effector by olo2000pm
thingiverse
effector
thingiverse
free
CERAMBOT-Effector
...cerambot-effector
thingiverse
cerambot-effector
thingiverse
free

modulize effector by candyasdf
...ulize effector by candyasdf
thingiverse
mount things on effector with m3 screws
effector radius : 25.4mm
rod arm distance : 40mm
thingiverse
free
Delta Effector by zavier
...delta effector by zavier
thingiverse
delta effector with radial fan 50 and bltouch
thingiverse
free
D810 Effector by WhiteTiger13
...d810 effector by whitetiger13
thingiverse
this is d810 effector for d810 without autocalibration, and also cap for it.
thingiverse
free
Effector for Delta Printer
...effector for delta printer
thingiverse
effector for delta printer (3 color)
using diamond hotend
thingiverse
free
Delta effector magnetic by fpassos
...delta effector magnetic by fpassos
thingiverse
effector for e3dv6 hotend. i needed put the spheres (10mm) on the effector.
thingiverse
free
End Effector Gripper
...end effector gripper
thingiverse
end effector gripper
for a robotic arm
uses mg995 servo motor
Ugly
3d_export
$15
The ugly
... is base and no base version. also there is separated version (head torso, stomach and legs) and lastly there is low poly version
turbosquid
$1

ugly head
...y free 3d model ugly head for download as 3ds, fbx, and blend on turbosquid: 3d models for games, architecture, videos. (1263525)
3d_export
$5
ugly sofa
...dered it. worthy to be in the living room of your worst enemy. but it still looks better than the every sofa from bethesda games.
turbosquid
$5

ugly man head
... available on turbo squid, the world's leading provider of digital 3d models for visualization, films, television, and games.
turbosquid
$1
Ugly Donald Trump
... available on turbo squid, the world's leading provider of digital 3d models for visualization, films, television, and games.
turbosquid
free

Ugly Fatman Head
... available on turbo squid, the world's leading provider of digital 3d models for visualization, films, television, and games.
turbosquid
$15

Plane - N754 Ugly Duck
...lane - n754 ugly duck for download as max, fbx, obj, and 3ds on turbosquid: 3d models for games, architecture, videos. (1691625)
3d_export
$49

Collection of models from the good the bad and the ugly
...good the bad and the ugly", and "the fistful of dollars". models of clint eastwood, eli wallach and lee van cleef.
3d_export
$15

The bad
...the bad from the good the bad and the ugly ...
3d_export
free
troll-ogr
...troll-ogr 3dexport the most ugly troll in this marketplace:) totalpolys=160813;...
Parametric
turbosquid
$25
Parametric
...oyalty free 3d model parametric for download as blend and stl on turbosquid: 3d models for games, architecture, videos. (1683196)
3ddd
$1
Parametric Wall
...parametric wall
3ddd
панель
parametric wall with shelf
3d_export
$5
parametric table
...parametric table
3dexport
parametric table model created on rhinoceros 6. this 3d model includes: .gh, .3dm files
turbosquid
$2
parametrical chandelier
...lty free 3d model parametrical chandelier for download as dxf on turbosquid: 3d models for games, architecture, videos. (1257635)
turbosquid
$2
Parametric Seat
...id
royalty free 3d model parametric seat for download as max on turbosquid: 3d models for games, architecture, videos. (1691557)
turbosquid
$2
Parametric Wall
...id
royalty free 3d model parametric wall for download as max on turbosquid: 3d models for games, architecture, videos. (1690373)
turbosquid
$1
Parametric Wall
...id
royalty free 3d model parametric wall for download as max on turbosquid: 3d models for games, architecture, videos. (1691303)
turbosquid
$1
Parametric Wall
...id
royalty free 3d model parametric wall for download as max on turbosquid: 3d models for games, architecture, videos. (1691148)
turbosquid
$19
Parametric Bench
...ty free 3d model parametric bench for download as max and max on turbosquid: 3d models for games, architecture, videos. (1713396)
turbosquid
free

Parametric wall
...ee 3d model parametric wall for download as max, obj, and fbx on turbosquid: 3d models for games, architecture, videos. (1356869)
Magnetic
3d_ocean
$2

Magnet
...magnet 3docean 3d 3ds max electric magnet magnetic magnetism max model polygon realistic tesla magnet created in...
turbosquid
$6
Magnet
...
turbosquid
royalty free 3d model magnet for download as obj on turbosquid: 3d models for games, architecture, videos. (1548733)
turbosquid
$6

magnet
...uid
royalty free 3d model magnet for download as 3dm and max on turbosquid: 3d models for games, architecture, videos. (1670606)
turbosquid
$1

Magnet
...y free 3d model magnet for download as 3ds, max, obj, and fbx on turbosquid: 3d models for games, architecture, videos. (1215037)
turbosquid
$7

Magnet
...agnet for download as blend, unitypackage, fbx, gltf, and obj on turbosquid: 3d models for games, architecture, videos. (1576588)
3d_export
$5

magnetic knife holder
...magnetic knife holder
3dexport
ordinary magnetic knife holder
archive3d
free

Fridge magnet 3D Model
...3d model archive3d refrigerator magnet fridge magnet magnet toy magnetic s n280712 - 3d model (*.3ds) for interior 3d...
turbosquid
$35

Magnetic butterflies
...alty free 3d model magnetic butterflies for download as blend on turbosquid: 3d models for games, architecture, videos. (1315792)
turbosquid
$2
Magnetic Board
...quid
royalty free 3d model magnetic board for download as ma on turbosquid: 3d models for games, architecture, videos. (1264141)
turbosquid
$977
Magnetic Lego
...oyalty free 3d model magnetic lego for download as ma and obj on turbosquid: 3d models for games, architecture, videos. (1142761)