Thingiverse
Tzir_Blake's 1:1 Scale Mjolnir (Thor's Hammer) by TzirBlake
by Thingiverse
Last crawled date: 4 years, 2 months ago
Howdy True Believers!
So I have been reading Thor and Marvel for close to 20 years now, and when I saw Garrett's creation (love your channel buddy!) my jaw just dropped at what he had designed! He seriously deserves a sub and a like on all of his videos if you have never checked him out
Now being who I am as a person, I felt the need to tinker just a little bit with his design. I am a member of the RPF and I love seeing people craft and wear their fandom so I decided to modify a few things here and there so I could satisfy my love of both the MCU hammer and also the design from the comics!
So here is a list of changes/upgrades I have made:
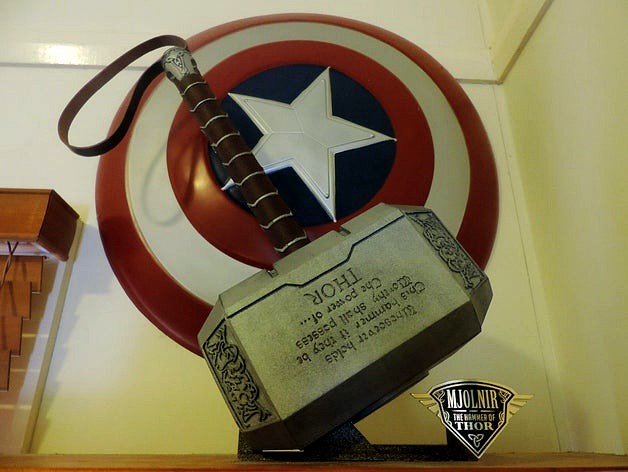
I scanned in a comic from my collection and using polylines traced the "Worthy" inscription straight from the pages of Jason Aaron and Russell Dauterman's Thor #1. I did however make a small change as the inscription is now Gender Neutral so both genders can cosplay with my Mjolnir no problems! Lady Thor is freaking Kickass yo!
I redesigned the handle so the chevrons are more prominent. This was done so I could template and use genuine Kangaroo hide to leather wrap my handle as they did with the MCU Hero Prop. If you can get your hands on it, aim for leather with a thickness of around 700gsm. Barge Glue Works wonders for this part!
I designed a new end cap for the handle, pre-notched and ready to accept a 40cm long, 2-2.4mm thick leather strap. And Last but not least...
I redesigned Garrets Stand so it can accept a data plaque made by BrotherFoster. :)
Here is my design for the stand:
http://www.thingiverse.com/thing:1632630
And here is the link to BrotherFosters' Etsy Store if you want a plaque of your own:
https://www.etsy.com/au/listing/177626781/thor-mjolnir-nameplate-for-your-hammer?ref=hp_rv
In terms of finishing the piece, this is my process:
1: Sand my part with 100 grit sandpaper to knock the majority of excess plastic off quickly. This takes around 10 hours per part.
2: Wet Sand with 200 grit sandpaper until the part is smooth to the touch (20-30 hours)
3: Spray with a High Fill Catalysed auto primer (to catch any areas I may have missed)
4: Repeat steps 1-3 until the part looks injection moulded.
5: Wet Sand with 320 grit sandpaper (20-30 hours) for a mirror like surface.
6: Prime the part again with a normal spray primer.
7: Apply Paint to my part.
In terms of Paint, I first laid down a gloss black (Dulux Brand) and then I took a hammered metal spray-paint (also dulux brand) and lightly misted the surface until I got the shiny Uru metallic sheen I wanted. If you want the more MCU look, skip the black and lay down hammered metal quite heavily and then finish the entire piece with a black acrylic wash once complete. :) It will make your details pop!
And that's about it! Let me tell you, just holding this thing makes you feel Worthy. ;) Happy printing!
Edit: I have had a few requests for a 'Whole' hammer for those with a larger printer. :) The parts have been uploaded under the filename "Mjolnir (Whole)" but I will leave print orientation up to you as it will be a 90 hour print at 0.3mm resolution (conservatively) with a TON of support material. You will also need to print the "Mjolnir End Cap" separately if you plan on attaching a leather loop on the end of the handle. The loop needs to be screwed down so there wasn't a lot I could do about that one... :)
So I have been reading Thor and Marvel for close to 20 years now, and when I saw Garrett's creation (love your channel buddy!) my jaw just dropped at what he had designed! He seriously deserves a sub and a like on all of his videos if you have never checked him out
Now being who I am as a person, I felt the need to tinker just a little bit with his design. I am a member of the RPF and I love seeing people craft and wear their fandom so I decided to modify a few things here and there so I could satisfy my love of both the MCU hammer and also the design from the comics!
So here is a list of changes/upgrades I have made:
I scanned in a comic from my collection and using polylines traced the "Worthy" inscription straight from the pages of Jason Aaron and Russell Dauterman's Thor #1. I did however make a small change as the inscription is now Gender Neutral so both genders can cosplay with my Mjolnir no problems! Lady Thor is freaking Kickass yo!
I redesigned the handle so the chevrons are more prominent. This was done so I could template and use genuine Kangaroo hide to leather wrap my handle as they did with the MCU Hero Prop. If you can get your hands on it, aim for leather with a thickness of around 700gsm. Barge Glue Works wonders for this part!
I designed a new end cap for the handle, pre-notched and ready to accept a 40cm long, 2-2.4mm thick leather strap. And Last but not least...
I redesigned Garrets Stand so it can accept a data plaque made by BrotherFoster. :)
Here is my design for the stand:
http://www.thingiverse.com/thing:1632630
And here is the link to BrotherFosters' Etsy Store if you want a plaque of your own:
https://www.etsy.com/au/listing/177626781/thor-mjolnir-nameplate-for-your-hammer?ref=hp_rv
In terms of finishing the piece, this is my process:
1: Sand my part with 100 grit sandpaper to knock the majority of excess plastic off quickly. This takes around 10 hours per part.
2: Wet Sand with 200 grit sandpaper until the part is smooth to the touch (20-30 hours)
3: Spray with a High Fill Catalysed auto primer (to catch any areas I may have missed)
4: Repeat steps 1-3 until the part looks injection moulded.
5: Wet Sand with 320 grit sandpaper (20-30 hours) for a mirror like surface.
6: Prime the part again with a normal spray primer.
7: Apply Paint to my part.
In terms of Paint, I first laid down a gloss black (Dulux Brand) and then I took a hammered metal spray-paint (also dulux brand) and lightly misted the surface until I got the shiny Uru metallic sheen I wanted. If you want the more MCU look, skip the black and lay down hammered metal quite heavily and then finish the entire piece with a black acrylic wash once complete. :) It will make your details pop!
And that's about it! Let me tell you, just holding this thing makes you feel Worthy. ;) Happy printing!
Edit: I have had a few requests for a 'Whole' hammer for those with a larger printer. :) The parts have been uploaded under the filename "Mjolnir (Whole)" but I will leave print orientation up to you as it will be a 90 hour print at 0.3mm resolution (conservatively) with a TON of support material. You will also need to print the "Mjolnir End Cap" separately if you plan on attaching a leather loop on the end of the handle. The loop needs to be screwed down so there wasn't a lot I could do about that one... :)