Thingiverse
Tronxy Zonestar P802M Multi-Axis Overhaul Pack Bear Exxa 1.0 MK3S Optional Bowden Upcycled Extruder by JBieri
by Thingiverse
Last crawled date: 3 years, 3 months ago
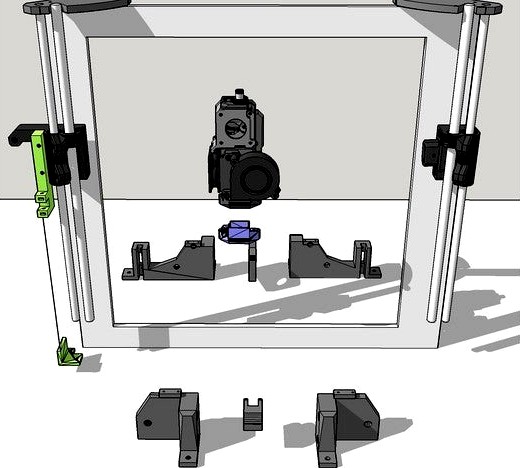
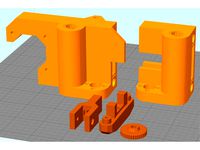
This is an overhaul pack for the Tronxy, Zonestar, and other P802M cheap Shenzhen export 3D printers focused to accept the BEAR Extruder and X-Axis (Bear Exxa 1.0) assembly from the 2020 Prusa MK3S. There are three extruder options including: Bear 1.0 direct drive extruder using Bondtech gears, a Bear Bowden extruder (using a special lid), or you can up-cycle the P802M's stock extruder.
Features
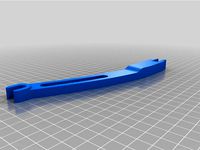
-Complete Y Axis Overhaul
-New Z Top Plates
-Fixated Z-Endstop Height with Fine Adjustment Screw
-Bear 1.0 X-Axis
-Bear 1.0 Direct Drive Extruder (Option)
-Bowden Bear Extruder Lid (Option)
-Recycle P802M Stock Extruder w/ Remixed Bear Cooling Fan Duct (Option)
GOAL
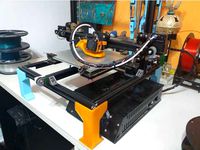
Take the cheap P802M and update it to 2020 standards, while removing as many design flaws as possible on a super strict pandemic budget.
This overhaul is not for the faint of heart. You will have to cannibalize your P802M for parts, visit the hardware or parts bin, drill/rig things for endstops, and likely re-flash the firmware. I replaced Melzi with RAMPS 1.4 because I don't like repetier. Do not tear your P802M apart until you have all printed parts and or a secondary printer.
Y-AXIS
The Y axis on the P802M isn't the best; the motor mount drifts out of horizontal orientation, causing belt alignment, and other issues that may ultimately break the acrylic front and or rear plate of the machine. The end stop mount also sucks; mine is currently screwed into a block of wood, super glued to the original mount.
The original Prusa i3 Y axis is cheap, strong, adjustable, and adaptable at minimal cost compared to aluminum extrusions. The frame of the P802M also already accepts the threaded rod design, which saves time and avoids replacing the center frame plate, which would require a full tear down. Also, completely replacing the Y axis, avoids having to print the massive reinforcement brackets that many people install into Anet A8 machines.
I remixed some the Thingiverse's favorites into the Y axis to make it easier to square, screw/bolt down to retain alignment, and keep upgrade costs under $20. I designed it for mild abuse. The motor mount is available at the remixed design and I've remixed and reinforced the Y Belt Tensioner which is available in this thing.
Current Y Belt Holderhttps://www.thingiverse.com/thing:1669305
I cut a paint stick as wide as the carriage where the belt fits. Cut a second. Layered them and used the belt holder above. I also had to cut a notch in the frame so the lower belt would not rub on the central frame of the printer as the pulley is lower than the frame.
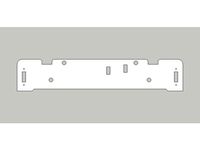
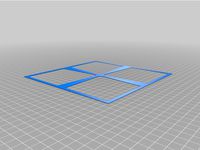
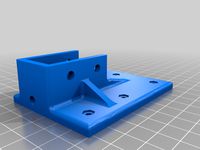
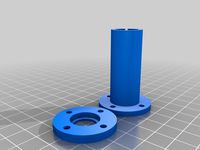
Z TOP PLATES
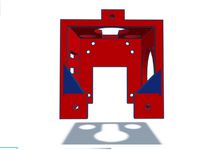
I redesigned the top plates, replacing the odd rear outer edges with sweeping curves to improve strength, avoid catch points, and ensure the smooth rods align with the new BEAR Exxa Z motor mounts. At present, the lead screws on the test platform are unconstrained without issue. Possible update will be added in the future.
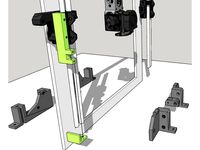
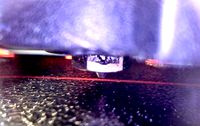
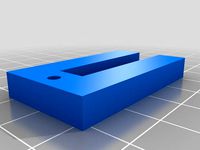
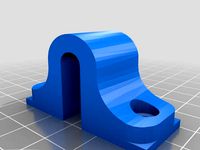
*Z-ENDSTOP FIXATION**
The Z endstop height adjustment on the P802M sucks and isn't reliable. I've redesigned it fixating it and adding a fine adjustment screw. You'll have to drill the holes for your specific endstop; same 1mm drill bit. See thing for more details if needed. See 'remixed' design for files, the link below, or find the lid included in the files for this thing as well for convenience.
Bear Exxa Z Axis Endstop Fixated with Fine Adjustment Screwhttps://www.thingiverse.com/thing:4592796
X-AXIS
The Bear Exxa is awesome! Cheers to Grégoire Saunier for his elegant design and the subsequent remix/es.
Bear Exxa 1.0 is available here:https://www.thingiverse.com/thing:4362586
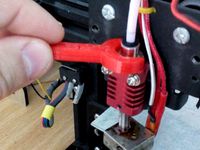
IMPORTANT: The Bear X axis will currently limit you to what alternative extruder/tool options you can mount without creating an adapter plate as it is different than previous Prusa models. Be sure to read through the documentation to ensure you know what you're getting into. There are good assembly videos on youtube for Bear Exxa. I spent about $15 in hardware on the X-axis and extruder.
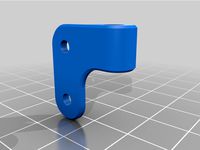
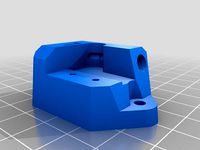
I printed the X-axis components, cannibalizing the P802M for components. The MK3S does not use endstops, so I mounted my endstop to the lower X-carriage cap by drilling two holes for screws with a 1mm drill and then mounted a block on the X-Motor End for it to run into. Be careful while setting it, better to give up some X movement than risk slamming your fan unit or carriage into the X motor end (use images with red X-carriage mount for guidance). Importing the carriage cap file into sketchup breaks it. I gave up after trying a few other programs with no success.
EXTRUDER
There are three options for the extruder set up.
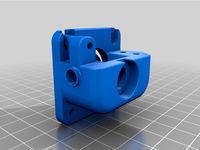
(1) BEAR DIRECT EXTRUDER: Print the Bear extruder, use the parts from the P802M to complete it, purchase Bondtech gears, and follow standard assembly instructions.
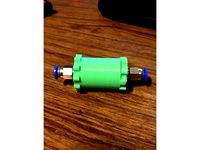
(2) BEAR BOWDEN EXTRUDER: Print the Bear extruder, hone the filament hole with a 2mm drill bit (or larger if you plan to line it with PTFE, print the Bear Bowden lid that I've designed, get yourself one of those Creality Metal Bowden kits with a Capricorn tube, and go from there. See 'remixed' design for files, the link below, or find the lid included in the files for this thing as well for convenience.
Bear Bowden Extruder Lid:https://www.thingiverse.com/thing:4582453
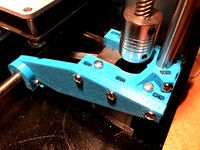
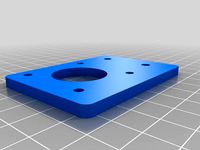
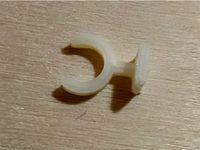
(3) RECYCLE P802M DIRECT EXTRUDER: Take the P802M extruder apart, so all you have is the metal bracket, take the mounting plate for the Bear X-Carriage, clamp it together carefully, making sure it's level/square, and drill three holes in it. Bolt it together, reassemble the extruder, mount it and run the wires through the carriage/follow standard assembly after that for the Bear X axis.
The P802M's stock cooling duct is a bit dated, so I remixed the Bear extruder's cooling fan duct by adding 10mm to get near the P802M's nozzle height. See 'remixed' design for files, the link below, or find the lid included in the files for this thing as well for convenience.
Bear Extruder Hot End Part Cooling Fan Duct Dropped 10MM for P802Mhttps://www.thingiverse.com/thing:4592771
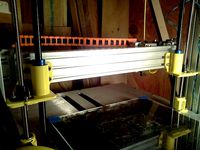
Final Notes
During final testing I was able to reach micron level output resolution (EG: 20.00XXX mm) on all axes. Reliability testing while printing LowRider2 CNC is underway. The heat bed could be insulated and a co-planar bed leveling system would be nice additions beyond this upgrade pack.
Features
-Complete Y Axis Overhaul
-New Z Top Plates
-Fixated Z-Endstop Height with Fine Adjustment Screw
-Bear 1.0 X-Axis
-Bear 1.0 Direct Drive Extruder (Option)
-Bowden Bear Extruder Lid (Option)
-Recycle P802M Stock Extruder w/ Remixed Bear Cooling Fan Duct (Option)
GOAL
Take the cheap P802M and update it to 2020 standards, while removing as many design flaws as possible on a super strict pandemic budget.
This overhaul is not for the faint of heart. You will have to cannibalize your P802M for parts, visit the hardware or parts bin, drill/rig things for endstops, and likely re-flash the firmware. I replaced Melzi with RAMPS 1.4 because I don't like repetier. Do not tear your P802M apart until you have all printed parts and or a secondary printer.
Y-AXIS
The Y axis on the P802M isn't the best; the motor mount drifts out of horizontal orientation, causing belt alignment, and other issues that may ultimately break the acrylic front and or rear plate of the machine. The end stop mount also sucks; mine is currently screwed into a block of wood, super glued to the original mount.
The original Prusa i3 Y axis is cheap, strong, adjustable, and adaptable at minimal cost compared to aluminum extrusions. The frame of the P802M also already accepts the threaded rod design, which saves time and avoids replacing the center frame plate, which would require a full tear down. Also, completely replacing the Y axis, avoids having to print the massive reinforcement brackets that many people install into Anet A8 machines.
I remixed some the Thingiverse's favorites into the Y axis to make it easier to square, screw/bolt down to retain alignment, and keep upgrade costs under $20. I designed it for mild abuse. The motor mount is available at the remixed design and I've remixed and reinforced the Y Belt Tensioner which is available in this thing.
Current Y Belt Holderhttps://www.thingiverse.com/thing:1669305
I cut a paint stick as wide as the carriage where the belt fits. Cut a second. Layered them and used the belt holder above. I also had to cut a notch in the frame so the lower belt would not rub on the central frame of the printer as the pulley is lower than the frame.
Z TOP PLATES
I redesigned the top plates, replacing the odd rear outer edges with sweeping curves to improve strength, avoid catch points, and ensure the smooth rods align with the new BEAR Exxa Z motor mounts. At present, the lead screws on the test platform are unconstrained without issue. Possible update will be added in the future.
*Z-ENDSTOP FIXATION**
The Z endstop height adjustment on the P802M sucks and isn't reliable. I've redesigned it fixating it and adding a fine adjustment screw. You'll have to drill the holes for your specific endstop; same 1mm drill bit. See thing for more details if needed. See 'remixed' design for files, the link below, or find the lid included in the files for this thing as well for convenience.
Bear Exxa Z Axis Endstop Fixated with Fine Adjustment Screwhttps://www.thingiverse.com/thing:4592796
X-AXIS
The Bear Exxa is awesome! Cheers to Grégoire Saunier for his elegant design and the subsequent remix/es.
Bear Exxa 1.0 is available here:https://www.thingiverse.com/thing:4362586
IMPORTANT: The Bear X axis will currently limit you to what alternative extruder/tool options you can mount without creating an adapter plate as it is different than previous Prusa models. Be sure to read through the documentation to ensure you know what you're getting into. There are good assembly videos on youtube for Bear Exxa. I spent about $15 in hardware on the X-axis and extruder.
I printed the X-axis components, cannibalizing the P802M for components. The MK3S does not use endstops, so I mounted my endstop to the lower X-carriage cap by drilling two holes for screws with a 1mm drill and then mounted a block on the X-Motor End for it to run into. Be careful while setting it, better to give up some X movement than risk slamming your fan unit or carriage into the X motor end (use images with red X-carriage mount for guidance). Importing the carriage cap file into sketchup breaks it. I gave up after trying a few other programs with no success.
EXTRUDER
There are three options for the extruder set up.
(1) BEAR DIRECT EXTRUDER: Print the Bear extruder, use the parts from the P802M to complete it, purchase Bondtech gears, and follow standard assembly instructions.
(2) BEAR BOWDEN EXTRUDER: Print the Bear extruder, hone the filament hole with a 2mm drill bit (or larger if you plan to line it with PTFE, print the Bear Bowden lid that I've designed, get yourself one of those Creality Metal Bowden kits with a Capricorn tube, and go from there. See 'remixed' design for files, the link below, or find the lid included in the files for this thing as well for convenience.
Bear Bowden Extruder Lid:https://www.thingiverse.com/thing:4582453
(3) RECYCLE P802M DIRECT EXTRUDER: Take the P802M extruder apart, so all you have is the metal bracket, take the mounting plate for the Bear X-Carriage, clamp it together carefully, making sure it's level/square, and drill three holes in it. Bolt it together, reassemble the extruder, mount it and run the wires through the carriage/follow standard assembly after that for the Bear X axis.
The P802M's stock cooling duct is a bit dated, so I remixed the Bear extruder's cooling fan duct by adding 10mm to get near the P802M's nozzle height. See 'remixed' design for files, the link below, or find the lid included in the files for this thing as well for convenience.
Bear Extruder Hot End Part Cooling Fan Duct Dropped 10MM for P802Mhttps://www.thingiverse.com/thing:4592771
Final Notes
During final testing I was able to reach micron level output resolution (EG: 20.00XXX mm) on all axes. Reliability testing while printing LowRider2 CNC is underway. The heat bed could be insulated and a co-planar bed leveling system would be nice additions beyond this upgrade pack.
Similar models
thingiverse
free
Bear Exxa Z Axis Endstop Fixated with Fine Adustment Screw by JBieri
... different types out there); mid line is best as mine came out a bit higher than i would like in terms of adjustment (see photo).
thingiverse
free

Bear Extruder Bowden Filament Lid Conversion for Push to Fit PTFE Tube Connector by JBieri
...ire a bowden style bear extruder, or run into issues with filament that is out of spec and causes issues with the bondtech gears.
thingiverse
free
Floating X carriage mount for Trinity Labs Aluminatus 1. De-couples Z axis lift from X-Y variance by kenaaker
...tty.
this is just an update. i've stiffened the rim of the bearing holder and adjusted the location of the lead screw hole.
thingiverse
free
x carriage for RepRapPro Mendel to support extruder mounts with holes for bolts 23mm apart. by RemoteFlyer
...on't reach the endstop switch.
the cover holds the belt in place and has an extension to activate the x axis endstop switch.
thingiverse
free
Hesine M505 Anet A8 (Prusa i3) X-Mounts incl. 8mm bearing (LM8UU) and belt tensioner by Spirit00
...thing:2389929 - version without tensioning
just pick what you need or ask me for a change if you have an idea for an optimization
thingiverse
free
X1 Filament Relocator for X-Axis Belt Tensioner by thebeline
...t twisted filament from getting between the gantry and sensor, which is bad).
use the rg gantry support
profit!
no supports. g2g
thingiverse
free

X-endstop after X and Z-axis MGN12H upgrade by siegfriedestrada
...using the single extruder stock carriage. so i decided to design one using sketchup. installed and working fine on my unit. :)
thingiverse
free

Tronxy p802m x axis belt tensioner by teesked
...m. might need to be heated with water and bended slightly depending on the quality of the x carriages. no need to buy a new belt.
thingiverse
free

Bear Exxa - Bolted Belt Tensioner by M_88
...axis belt tensioner because i wanted a bolted connection that feels more secure instead of cutting a screw and leave it hanging..
thingiverse
free

X-carriage with chain mount for E3Dv6 Bowden by ebarriosjr
...a i3https://www.thingiverse.com/thing:547706
i created this remix to be able to attach a cable chain to this extruder x-carriage.
Exxa
thingiverse
free
Bear Exxa - Bolted Belt Tensioner by M_88
...axis belt tensioner because i wanted a bolted connection that feels more secure instead of cutting a screw and leave it hanging..
thingiverse
free
Bear Exxa Z Axis Endstop Fixated with Fine Adustment Screw by JBieri
... different types out there); mid line is best as mine came out a bit higher than i would like in terms of adjustment (see photo).
thingiverse
free
Nozzle Cam for Prusa MK3s / Bear Exxa by Photogad
... to more securely hold the endoscope camera without making the other wires stick out too far and bump into the frame when homing.
thingiverse
free

Bear (V1.0) Orbiter (V1.5) Extruder mount by St0fzuiger
...st0fzuiger thingiverse this is a modification of the bear exxa (1.0) to mount the orbiter (v1.5). don't forget when...
thingiverse
free
Bear Extruder Bowden Filament Lid Conversion for Push to Fit PTFE Tube Connector by JBieri
...community who run into issues while upgrading to bear exxa desire a bowden style bear extruder, or run into...
thingiverse
free

Ram and Bear Automated Infinite Queue Printing Extruder Attachment for Automatic Print Removal Small Scale Manufacturing by JBieri
...that mounts to the lower portion of the bear exxa 1.0 on the 2020 prusa i3 mk3s. the ram...
Jbieri
thingiverse
free

Lowrider 2 CNC RAMPS Case 80mm Cooling Fan Lid by JBieri
...e of a single 80x80x10/20mm case fan, while maintaining the overall strength of the lid without significantly disrupting airflow.
thingiverse
free
Tronxy Zonestar P802M Rear Frame Plate Replacement by JBieri
...d, cut out on a cnc machine, or printed at scale as a plan drawing that could subsequently be used to cut out the plate manually.
thingiverse
free

Bear Extruder 623 Idler Door Swiss MK2S MK3S Suisse by JBieri
...ut to grégoire saunier (the original designer of the bear extruder) as a conversation piece you're in the right place. enjoy!
thingiverse
free
Bear Exxa Z Axis Endstop Fixated with Fine Adustment Screw by JBieri
... different types out there); mid line is best as mine came out a bit higher than i would like in terms of adjustment (see photo).
thingiverse
free
Bear Extruder Bowden Filament Lid Conversion for Push to Fit PTFE Tube Connector by JBieri
...ire a bowden style bear extruder, or run into issues with filament that is out of spec and causes issues with the bondtech gears.
thingiverse
free

Bear Extruder Hot End Part Cooling Fan Duct Dropped 10MM for ZoneStar Tronxy P802M Other Reprap by JBieri
...he duct work where it attaches to the part cooling fan. hopefully it significantly improves printing outcomes over the stock one.
thingiverse
free

Tronxy Zonestar P802M & Anet A8 Easy Print Top T Corner Frame Reinforcement Bracket by JBieri
...stalling it on my machine, i'm not really sure about this 'thing' original or remixed. it helps, but only marginally.
thingiverse
free
Ram and Bear Automated Infinite Queue Printing Extruder Attachment for Automatic Print Removal Small Scale Manufacturing by JBieri
...s in the front centre of the push space.
i'll add ideas as i test in the future and feel free to collaborate in the comments.
P802M
thingiverse
free

Damper for Zonestar P802M by Bengelen
...damper for zonestar p802m by bengelen
thingiverse
made the mount 1 mm smaller to fit my zonestar p802m
thingiverse
free
P802m Zonestart Filament Guide by momi
...p802m zonestart filament guide by momi
thingiverse
this is filament guide for the prusa i3 p802m
thingiverse
free

TRONXY P802M Fan Duct OEM
...tronxy p802m fan duct oem
thingiverse
stl file for the oem fan duct as used on the tronxy p802m and others.
thingiverse
free
Tronxy P802M bed level test by Lowich
...tronxy p802m bed level test by lowich
thingiverse
bed level test for tronxy p802m or anet a8
thingiverse
free

Pen holder for Tronxy P802M by Dashwood
...p802m by dashwood
thingiverse
remixed version for tronxy p802m.
also should be suitable for anet a8 and other same 3d printers.
thingiverse
free

Tronxy p802m corner by teesked
...tronxy p802m corner by teesked
thingiverse
t corner for tronxt p802
thingiverse
free
Porta Bobina Filamento per Zonestar P802M by kyoday
...porta bobina filamento per zonestar p802m by kyoday
thingiverse
filament spool holder for zonestar p802m
thingiverse
free

Autolevel mounting bracket for P802M printer by yanez99
...anez99
thingiverse
those are the original printed versione of autolevel mounting bracket for p802m and p802n aliexpress printer.
thingiverse
free

Hitch for the Tronxy P802M printer by efra1
...e found here:https://github.com/repetier/repetier-firmware/blob/master/boards/zonestar%20p802m/configuration_for_mega_and_ramps.h
thingiverse
free

Tool Holder for P802M
...p width t0 17.9mm to fit. cups printed upright with no support as overhang very small.
2nd holder in progress.will publish soon.
Upcycled
3d_export
$28

Upcycled Bicycle Chain Chandeliers 3D Model
...t
chandelier bicycle chains model fontoura carolina upcycled bike
upcycled bicycle chain chandeliers 3d model kein 78900 3dexport
3ddd
$1

Vintage 1950s Bartholomew Cocktail Chair
...vintage 1950s bartholomew cocktail chair 3ddd vintage upcycled vintage 1950s bartholomew cocktail chair - charcoal grey underground...
3ddd
$1

Valve Lamp by H&H
...если не про то не выкладывать industrial black steel upcycled red valve & red cord pendant...
3ddd
$1
Alta Caixa side table by Azadeh Shladovsky
...working on a line of fashion accessories made from upcycled materials and a collection of ceramic lighting sculptures with...
3d_ocean
$16

Pallet bed for bedroom interior
...ing, linen and pillows are uvw unwrapped with adjustable external texture files (jpg). model includes low poly europallete mod...
3d_export
$28

ottomans bench l luxury hallway bench furniture
...room furniture, furniture vintage, shabby chic furniture, farmhouse furniture, upcycled furniture, ottomans, bedroom ottoman, end of bed seating, end...
thingiverse
free

Upcycled cardboard (Grass) by OLBA3D
...upcycled cardboard (grass) by olba3d
thingiverse
upcycled cardboard named grass.
cardboard ø73mm.
thingiverse
free
Upcycled Cardboard (Lava) by OLBA3D
...upcycled cardboard (lava) by olba3d
thingiverse
upcycled cardboard named lava.
cardboard ø73mm.
sketchfab
$5

Lamp - Soda Can Upcycling Project
... as a project for upcycling. - lamp - soda can upcycling project - buy royalty free 3d model by fabio orsi (@fabioorsi) [b5e0b01]
thingiverse
free
Upcycled Birkenstock E-Concertina by Saiman
...oller. for further information about the e-concertina please have a look into the "econcertina_documentation.pdf" file.
Overhaul
3d_ocean
$89

Opel Corsa 3door 2011
...spin: http://www.youtube.com/watch?v=0pr3xhlbjxq the opel corsa’s makeover continues: following the overhaul of everything under its skin in 2010, opel’s successful...
3d_export
$360

leahy class guided missile cruiser
...areas were refurbished, and the engineering plant was fully overhauld. cg 16 uss leahy1962 bath iron works, bath, maine...
thingiverse
free

Overhaul - BattleBots Season 2 by teamtestbot
...ot overhaul, shown in its season 2 form! movable, posable joints!
note: this model may not be reproduced for commercial purposes.
thingiverse
free
Wanhao Brace Overhaul by carternick01
...rhaul by carternick01
thingiverse
this brace was part of my addition to making my tower frame extremely rigid. very great print.
thingiverse
free

XYZ DaVinci PRO Complete Arduino Overhaul by Indigo4
...t with any regular software like repetier host.
more stl's for parts coming soon.
https://www.youtube.com/watch?v=iflgxwv9s-8
thingiverse
free

Overhaul's Mask BNHA
...n area out and add foam padding to make it more comfortable. i can even throw in the blend file if anyone wants to improve on it.
thingiverse
free

Davinci MiniMaker Complete Overhaul by s-kybound
...mk8 hotend
-direct drive
-part cooling fan
-new psu
-small heated bed
-new motherboard + raspberry pi to use klipper
-lcd display
thingiverse
free

Anycubic i3 Mega Hotend Overhaul Remix
...ps into place onto the belt. enough space is provided on the belt clips to go over any of the cable ties used to fasten the belt.
thingiverse
free

FLSun i3 OVERHAUL by Choutos2
...s with this mod, or if you find better mod combinations, or if you just find it great or crap.
comments and thumbs are wellcome!
thingiverse
free

Monoprice MP Select Mini V2 (MPSM V2) Electronics Overhaul by 8FootedAlgaeEater
...t: https://www.tardigradeoutdoors.com/blog/overhauling-a-monoprice-mp-select-mini-v2-mpsm-v2-with-skr-14-board-octoprint-and-more
Zonestar
thingiverse
free

Zonestar Blower by juliocfranco
...zonestar blower by juliocfranco
thingiverse
beter eficience blower for dual extruder zonestar 805
thingiverse
free
Zonestar Z5 by Cinefil001
...zonestar z5 by cinefil001
thingiverse
pièces pour zonestar z5 fourni dans la carte sd
thingiverse
free
hotted container zonestar
...metal plank for the zonestar z5mr2 (p802qr2)
este adaptador fue hecho para colocarse en la placa de metal original de la zonestar
thingiverse
free

Zonestar Power Adapter by ReePlay
...zonestar power adapter by reeplay
thingiverse
for my new zonestar printer
reeplay
thingiverse
free
Zonestar P802n mounting by Ashley1973
...zonestar p802n mounting by ashley1973
thingiverse
zonestar p802n mounting shorter to suit the 802n
thingiverse
free
Damper for Zonestar P802M by Bengelen
...damper for zonestar p802m by bengelen
thingiverse
made the mount 1 mm smaller to fit my zonestar p802m
thingiverse
free

Cable chain for Zonestar Z6FB by wmon
...cable chain for zonestar z6fb by wmon
thingiverse
cable chain for zonestar z6fb
thingiverse
free
Zonestar P802Q Bracing by ioquatix
...the zonestar p802q/p802qa 3d printer.
for latest parts and more details visit https://github.com/ioquatix/zonestar-p802q-bracing.
thingiverse
free

ZoneStar Lower Filament Guide by JKCreate
...zonestar lower filament guide by jkcreate
thingiverse
a lower filament guide for the zonestar p802qr2.
thingiverse
free
Zonestar Z6 - Z axis stabilizer
...zonestar z6 - z axis stabilizer
thingiverse
zonestar z6 - z axis stabilizer
Tronxy
thingiverse
free
LMF8LUU for tronxy x5s
...lmf8luu for tronxy x5s
thingiverse
lmf8luu for tronxy x5s
thingiverse
free

TRONXY XY2PRO by MaiMaiFACTORY
...tronxy xy2pro by maimaifactory
thingiverse
tronxy xy2-pro
sadebox
thingiverse
free

Power_supply_cover for TRONXY by Karollo
...power_supply_cover for tronxy by karollo
thingiverse
power supply cover for tronxy.
thingiverse
free
Tronxy support by d3m1sf
...tronxy support by d3m1sf
thingiverse
soporte para impresora tronxy x3.
thingiverse
free
Tronxy 13mm wrench
...tronxy 13mm wrench
thingiverse
13mm wrench for hotend fitting on tronxy x1...
thingiverse
free

Tronxy x5s by alex190074
...tronxy x5s by alex190074
thingiverse
tronxy x5s cart x fully adjustable only !!
thingiverse
free
Tronxy Logo
...tronxy logo
thingiverse
made this logo
thingiverse
free

Patas TronXY X3 - Vitofeli - TronXY Legs by Todopic
...todopic
thingiverse
patas separadoras para la tronxy x3, permite colocar la caja de control debajo y aprovechas mejor el espacio
thingiverse
free
TRONXY X5S EXTRUDER by ADAM98
...tronxy x5s extruder by adam98
thingiverse
tronxy x5s extruder
thingiverse
free

Belt tensioner Tronxy by jpalianak
...belt tensioner tronxy by jpalianak
thingiverse
belt tensioner tronxy
Mk3S
turbosquid
$50

cention mk3
...ty free 3d model cention mk3 for download as ma, obj, and fbx on turbosquid: 3d models for games, architecture, videos. (1454148)
turbosquid
$129

MK3 Tank
... available on turbo squid, the world's leading provider of digital 3d models for visualization, films, television, and games.
turbosquid
$100

Toyota Supra MK3
... available on turbo squid, the world's leading provider of digital 3d models for visualization, films, television, and games.
turbosquid
$44

cention mk3 low poly
...d model cention mk3 low poly for download as ma, obj, and fbx on turbosquid: 3d models for games, architecture, videos. (1454666)
turbosquid
$30

Challenger I Mk3 Falcon
... available on turbo squid, the world's leading provider of digital 3d models for visualization, films, television, and games.
turbosquid
$10

American Frag hand grenade MK3
...free 3d model american frag hand grenade mk3 for download as on turbosquid: 3d models for games, architecture, videos. (1393624)
turbosquid
$20

Mk3 US Navy Combat Knife
...ty free 3d model mk3 us navy combat knife for download as fbx on turbosquid: 3d models for games, architecture, videos. (1172791)
3d_export
$29

Ford Fiesta MK3 Modified 3D Model
...7 tumerfx mtumer mehmet t?mer 1993 1995 1996 wrc special modifed modifiye
ford fiesta mk3 modified 3d model mtumer 30698 3dexport
3d_export
$99

Toyota Supra Mk3 19861993 3D Model
...ort fast coupe japan 1986 1987 1988 1989 1990 1991 1992 1993 tuning turbo
toyota supra mk3 19861993 3d model squir 62530 3dexport
turbosquid
$5

Timothy Oulton Mars Chair MK3
...on mars chair mk3 for download as 3ds, max, obj, fbx, and dae on turbosquid: 3d models for games, architecture, videos. (1209782)
Bowden
turbosquid
$199
Vintage Ben Bowden Spacelander bike
... available on turbo squid, the world's leading provider of digital 3d models for visualization, films, television, and games.
3ddd
$1

Manooi Artica
...and pendants in various sizes and forms. suspension: galvanized bowden - dia. 1,5 mm. bulb: max 60 w -...
thingiverse
free
Remix Compact Bowden extruder - m6 bowden couplers and bowden tube pass-through
...ouplers and bowden tube pass-through
thingiverse
remix compact bowden extruder - m6 bowden couplers and bowden tube pass-through
thingiverse
free

Bowden Extruder
...bowden extruder
thingiverse
i have created bowden extruder for flsun delta 3d printer.
thingiverse
free

bowden 3mm by spee_D
...bowden 3mm by spee_d
thingiverse
for bowden 3mm
thingiverse
free
Bowden Tube Cutter
...bowden tube cutter
thingiverse
bowden tube cutter
thingiverse
free
Customizable Bowden Clip
...customizable bowden clip
thingiverse
customizable bowden clip
thingiverse
free
Bowden Oiler by fcheshire
...bowden oiler by fcheshire
thingiverse
inline bowden oiler
thingiverse
free

Bowden adapter by helkaroui
...bowden adapter by helkaroui
thingiverse
this is a fixed bowden adapter
thingiverse
free

Adventure3 Bowden Clip
...adventure3 bowden clip
thingiverse
adventure3 bowden clip
Axis
3ddd
$1

Мария Axis
...
3ddd
кухня , классическая , axis
модель кухни.
3d_export
$22

Axis robot 6-axis robotic arm
...ing parts drawings, standard parts purchased parts list, can be produced directly according to the drawings, welcome to download!
3ddd
free

Versatile Axis
...ddd
nexus , плитка
http://bvtileandstone.com/ceramic-porcelain/versatile-axis/
3d_export
$19

robot 2 axis
...robot 2 axis
3dexport
robot 2 axis
turbosquid
$40

Axis R5F
... available on turbo squid, the world's leading provider of digital 3d models for visualization, films, television, and games.
turbosquid
$40

Axis S5F
... available on turbo squid, the world's leading provider of digital 3d models for visualization, films, television, and games.
turbosquid
$30

Axis Athlon
... available on turbo squid, the world's leading provider of digital 3d models for visualization, films, television, and games.
turbosquid
$10

Linear Axis
... available on turbo squid, the world's leading provider of digital 3d models for visualization, films, television, and games.
3d_export
$15

drawing axis
...drawing axis
3dexport
simple rendering of the scene file
3ddd
$1

versatile axis ARC
...versatile axis arc
3ddd
versatile , плитка
versatile axis arc red dot design award
Extruder
3ddd
$1

Extruded Chair
...extruded chair
3ddd
extruded , tom dixon
inspired by tom dixon extruded chair
turbosquid
$15

Extruded Table
... extruded table for download as blend, dae, fbx, obj, and stl on turbosquid: 3d models for games, architecture, videos. (1634137)
turbosquid
$2

3D Printer Extruder
...d
royalty free 3d model 3d printer extruder for download as on turbosquid: 3d models for games, architecture, videos. (1537359)
turbosquid
$1

Zombie extruded text
...oyalty free 3d model zombie extruded text for download as obj on turbosquid: 3d models for games, architecture, videos. (1322198)
turbosquid
$4

Extruder conical screw
...el extruder conical screw for download as sldpr, ige, and stl on turbosquid: 3d models for games, architecture, videos. (1524433)
turbosquid
$50

3d PRINTER - Extruder
... available on turbo squid, the world's leading provider of digital 3d models for visualization, films, television, and games.
turbosquid
$15

Extruded Table 2
...xtruded table 2 for download as blend, dae, fbx, obj, and stl on turbosquid: 3d models for games, architecture, videos. (1621846)
turbosquid
$10

Maya Extrude Tool
... available on turbo squid, the world's leading provider of digital 3d models for visualization, films, television, and games.
3d_export
$5

world earth extrude map
...world earth extrude map
3dexport
3ddd
$1

Simply Elegant Extruded Tree Coffee Table Design
...ble by link studios. the silhouette of a tree is visible at one angle, extruded from the surface to create the support structure.
Multi
3d_export
$5
multi handle
...multi handle
3dexport
multi handle
3d_export
free

Multi socket
...multi socket
3dexport
multi socket
design_connected
$22

Multy Loveseat
...multy loveseat
designconnected
ligne roset multy loveseat 2-seater computer generated 3d model. designed by claude brisson.
turbosquid
$10

multi pan
...
royalty free 3d model multi pan for download as max and ige on turbosquid: 3d models for games, architecture, videos. (1161690)
turbosquid
$9

Multi Plug
...
royalty free 3d model multi plug for download as max and fbx on turbosquid: 3d models for games, architecture, videos. (1355953)
turbosquid
$39
Multi Gym
...y free 3d model multi gym for download as obj, fbx, and blend on turbosquid: 3d models for games, architecture, videos. (1275571)
3ddd
free
Ligne Roset Multy
... sofa , мебель
двухместный диван multy от французского производителя ligne roset
3d_export
$5

multi-colored pencils
...multi-colored pencils
3dexport
multi-colored pencils on a mirror surface
3d_export
$5

multi function box
...multi function box
3dexport
it is multi function box in iges format
3ddd
free
ligne roset / MULTY
...ligne roset / multy
3ddd
ligne roset , multy
минималистический диван
Bear
3d_export
$6
Bear
...bear
3dexport
bear
3d_export
$5
bearing
...bearing
3dexport
bearing
3d_export
$12
bear
...bear
3dexport
bear for 3d printing toy
3d_ocean
$9
Bearing
...ne ball ballbea bearing bearings engine hard industrial machine mechanic metal part piece plastic ring screw sphere steel
bearing
archibase_planet
free

Bear
...bear
archibase planet
statuette bear picturesque element
bear - 3d model (*.gsm+*.3ds) for interior 3d visualization.
3d_export
$5

bear
...bear
3dexport
bear have a stl.,3dm files
archibase_planet
free

Bear
...bear
archibase planet
bear animals omnivorous animal
bear angry n250907- 3d model (*.gsm+*.3ds) for interior 3d visualization.
archibase_planet
free

Bear
...bear
archibase planet
bear animals omnivorous animal
bear easy n250907 - 3d model (*.gsm+*.3ds) for interior 3d visualization.
3ddd
$1

Teddy bear
...teddy bear
3ddd
teddy bear , медведь
teddy bear :)
3d_ocean
$12
Bear
... formats. created with 3d max 9.0. this file is very useful for learning & rigging. it can be used for any professional work.
0
turbosquid
$12

Calligraphic Digit 0 Number 0
...hic digit 0 number 0 for download as max, obj, fbx, and blend on turbosquid: 3d models for games, architecture, videos. (1389318)
3d_export
$6

set-0
...set-0
3dexport
turbosquid
$6

hedge 0
...yalty free 3d model hedge 0 for download as max, obj, and fbx on turbosquid: 3d models for games, architecture, videos. (1450353)
turbosquid
$5

Nuber 0
...oyalty free 3d model nuber 0 for download as ma, obj, and fbx on turbosquid: 3d models for games, architecture, videos. (1564674)
turbosquid
$22

0.jpg
... available on turbo squid, the world's leading provider of digital 3d models for visualization, films, television, and games.
turbosquid
free

Steam Locomotive Fowler 4F 0-6-0
... available on turbo squid, the world's leading provider of digital 3d models for visualization, films, television, and games.
turbosquid
$10

Liquid Number 0
... model liquid number 0 for download as c4d, 3ds, fbx, and obj on turbosquid: 3d models for games, architecture, videos. (1689919)
turbosquid
$45

Dragon360_perspShape_tmp.0.jpg
... available on turbo squid, the world's leading provider of digital 3d models for visualization, films, television, and games.
turbosquid
$8

Rocks Debris 0
... available on turbo squid, the world's leading provider of digital 3d models for visualization, films, television, and games.
3d_export
$18

wood-guardrail-fence 0
...wood-guardrail-fence 0
3dexport
wood-guardrail-fence 0<br>3ds max 2015
Pack
3d_export
$5
pack
...pack
3dexport
low poly pack
archibase_planet
free

Packing
...packing
archibase planet
wrapping wrapper packing
packing 2 - 3d model (*.gsm+*.3ds) for interior 3d visualization.
archibase_planet
free

Packing
...packing
archibase planet
packaging wrapping packing
packing 3 - 3d model (*.gsm+*.3ds) for interior 3d visualization.
archibase_planet
free

Packing
...packing
archibase planet
wrapper packing packaging
packing 4 - 3d model (*.gsm+*.3ds) for interior 3d visualization.
archibase_planet
free

Packing
...packing
archibase planet
packaging wrapping packing
packing 5 - 3d model (*.gsm+*.3ds) for interior 3d visualization.
archibase_planet
free

Packing
...packing
archibase planet
packing packaging wrapper
packing 7 - 3d model (*.gsm+*.3ds) for interior 3d visualization.
3d_export
$7

Health Pack Armor Pack and Ammo Pack 3D Model
...pack 3d model
3dexport
health armor ammo pack check point game
health pack armor pack and ammo pack 3d model u2501 99166 3dexport
3d_ocean
$79

Turrets Pack - Tower Defense Pack
...be used in any sf type of game, especially in tower defense games. the pack includes: - flack cannon: 6239 polygons - chain gu...
3d_export
$7
arbalet pack
...arbalet pack
3dexport
arbalet pack
3d_export
$5

rocks pack
...rocks pack
3dexport
rocks pack
Optional
3ddd
$1
Фритюр SG14S with Options
...фритюр sg14s with options
3ddd
фритюр
проф. фритюр sg14s with options
3d_ocean
$15

trophy options
...e material property props trophy winner
-trophy options -low polys -obj, fbx,blender, 3ds. -zip : 5.7 mb - include gold material.
turbosquid
$2

keyboard 3 options
...oyalty free 3d model keyboard 3 options for download as blend on turbosquid: 3d models for games, architecture, videos. (1711408)
design_connected
$18

Swivel Chairs with Footrest Option
...swivel chairs with footrest option
designconnected
swivel chairs with footrest option computer generated 3d model.
design_connected
$16

Swivel Armchairs with Footrest Option
...swivel armchairs with footrest option
designconnected
swivel armchairs with footrest option computer generated 3d model.
3d_export
$19

1955 sideboard 3 options
...1955 sideboard 3 options
3dexport
turbosquid
$29

Office Chair with Multi Options
... 3d model office chair with multi options for download as max on turbosquid: 3d models for games, architecture, videos. (1380794)
turbosquid
$25

claddagh ring two options
...y free 3d model claddagh ring two options for download as 3dm on turbosquid: 3d models for games, architecture, videos. (1673087)
turbosquid
$20

PADDY PLANE OPTION 12
...yalty free 3d model paddy plane option 12 for download as max on turbosquid: 3d models for games, architecture, videos. (1696286)
turbosquid
$18

pendant sun three options
...free 3d model pendant sun three options for download as 3dm on turbosquid: 3d models for games, architecture, videos. (1555386)
1
turbosquid
$69

armchairs(1)(1)
... available on turbo squid, the world's leading provider of digital 3d models for visualization, films, television, and games.
turbosquid
$15

ring 1+1
... available on turbo squid, the world's leading provider of digital 3d models for visualization, films, television, and games.
turbosquid
$10

chair(1)(1)
... available on turbo squid, the world's leading provider of digital 3d models for visualization, films, television, and games.
turbosquid
$8

Chair(1)(1)
... available on turbo squid, the world's leading provider of digital 3d models for visualization, films, television, and games.
turbosquid
$2

RING 1(1)
... available on turbo squid, the world's leading provider of digital 3d models for visualization, films, television, and games.
turbosquid
$1

house 1(1)
... available on turbo squid, the world's leading provider of digital 3d models for visualization, films, television, and games.
turbosquid
$1

Table 1(1)
... available on turbo squid, the world's leading provider of digital 3d models for visualization, films, television, and games.
turbosquid
$59

Formula 1(1)
...lty free 3d model formula 1 for download as max, fbx, and obj on turbosquid: 3d models for games, architecture, videos. (1567088)
design_connected
$11

No 1
...no 1
designconnected
sibast no 1 computer generated 3d model. designed by sibast, helge.
turbosquid
$2

desert house(1)(1)
...3d model desert house(1)(1) for download as 3ds, max, and obj on turbosquid: 3d models for games, architecture, videos. (1055095)