Thingiverse
Tronxy X5SA Z Synchronization with Belt Tensioner by Toto-42
by Thingiverse
Last crawled date: 2 years, 10 months ago
The iterations of my Z axis lead screws synchronization:
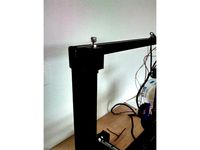
Z sync (kit from Tronxy) initially installed above lead screw couplershttps://www.aliexpress.com/item/1005001659453055.html
Z sync moved from above to below lead screw couplers to get additional Z range (2x GT2 24T 5B timing pulleys required)https://www.aliexpress.com/item/32659887427
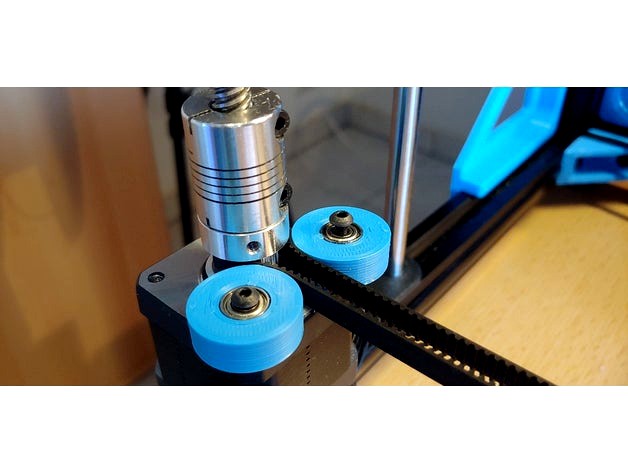
Z sync belt tension idler pulleys designed and installed (2x F623ZZ or 623ZZ bearings, M3x12/14mm screw, and M3 nut required per idler pulley)https://www.amazon.de/gp/product/B0859ZD1NQhttps://www.amazon.de/gp/product/B07H5GQ6X9
Because the 1068mm/534T closed belt is quite slackly with only those two 24T pulleys from the kit (or my latter replacements) I wanted to enhance tension.
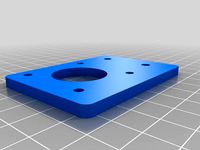
The M3 mount holes at the Nema 17 Z stepper motors seemed a practical choice for positioning some idler pulleys.
After some testing with different radii and heights I came to the current design for the idler pulleys:
The bore is 10mm to hold two 623ZZ or F623ZZ bearings.
The outer diameter is 23mm - the maximum without touching the 24T pulley.
Intentionally it has no additional flange because that would limit its useful diameter.
The height is 8mm to cover the full height of toothed section of the 24T pulley.
You can use up to 4 of these idler pulleys: at one or both Nema Z steppers, each with one or two idlers. The more idler pulley - the more belt tension you will get.
With all 4 idler pulleys installed I get a belt tension equivalent to 67Hz (measured with Gates Carbon Drive App, see screenshot).
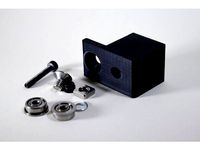
Preparation prior to installation:
Place the two bearings in the 10mm borehole.
Use a M3 screw as a shaft for the bearings.
Place a M3 nut underneath the idler pulley as spacer and bed for the lower bearing.
Installation:
Screw the prepared unit into the Nema stepper M3 mounting hole.
Fix the to M3 nut against the Nema stepper to lock the screw against it.
Videos on how it is working can be found in the Videos section below or in this Youtube playlist. All show an Auto-Bed-Levelling tour with obviosly some Z movements.
Z sync (kit from Tronxy) initially installed above lead screw couplershttps://www.aliexpress.com/item/1005001659453055.html
Z sync moved from above to below lead screw couplers to get additional Z range (2x GT2 24T 5B timing pulleys required)https://www.aliexpress.com/item/32659887427
Z sync belt tension idler pulleys designed and installed (2x F623ZZ or 623ZZ bearings, M3x12/14mm screw, and M3 nut required per idler pulley)https://www.amazon.de/gp/product/B0859ZD1NQhttps://www.amazon.de/gp/product/B07H5GQ6X9
Because the 1068mm/534T closed belt is quite slackly with only those two 24T pulleys from the kit (or my latter replacements) I wanted to enhance tension.
The M3 mount holes at the Nema 17 Z stepper motors seemed a practical choice for positioning some idler pulleys.
After some testing with different radii and heights I came to the current design for the idler pulleys:
The bore is 10mm to hold two 623ZZ or F623ZZ bearings.
The outer diameter is 23mm - the maximum without touching the 24T pulley.
Intentionally it has no additional flange because that would limit its useful diameter.
The height is 8mm to cover the full height of toothed section of the 24T pulley.
You can use up to 4 of these idler pulleys: at one or both Nema Z steppers, each with one or two idlers. The more idler pulley - the more belt tension you will get.
With all 4 idler pulleys installed I get a belt tension equivalent to 67Hz (measured with Gates Carbon Drive App, see screenshot).
Preparation prior to installation:
Place the two bearings in the 10mm borehole.
Use a M3 screw as a shaft for the bearings.
Place a M3 nut underneath the idler pulley as spacer and bed for the lower bearing.
Installation:
Screw the prepared unit into the Nema stepper M3 mounting hole.
Fix the to M3 nut against the Nema stepper to lock the screw against it.
Videos on how it is working can be found in the Videos section below or in this Youtube playlist. All show an Auto-Bed-Levelling tour with obviosly some Z movements.
Similar models
thingiverse
free

TRONXY X5S - Z motor sync by WT1704
...e platform on the stepper and 3 * m5 screws and nuts for the pulley
1 * m3 screw and nut to hold the tension stick with the block
thingiverse
free

ZSync Tensioner Ender Extender 400 by Automated_Pie_Slicer
...duct/b07bpkwm9d/ref=ppx_yo_dt_b_asin_title_o04_s00?ie=utf8&psc=1
2x m3 20mm socket screws
2x m3 10mm socket screws
2x m3 nuts
thingiverse
free

Simple Belt Tensioner for GT2 with F623ZZ (Updated) by Krapozok
...verse
belt tensioner for gt2 with f623zz
parts
2x f623zz
2x m3 20mm
1x m3 nuts
05/08/2015 --> update : new version
thingiverse
free
Micromake C1 belt tensioner by vasco1814
...at least 3 m5 nuts
an m3 screw, m3 nut
a gt2 idler pulley 16 teeth or the two small bearings that were used in the original part.
thingiverse
free

Nema 17 stepper motor Belt tensioner by Flytech81
...that mounts to a nema 17 stepper motor using m3 screws. for the tensing hardware i used two 8mm bearings with a 1/4-20 inch bolt.
thingiverse
free

GT2 idler for 608 bearing M3 NEMA 17 stepper
...
idler for 6mm gt2 belt, designed to mount onto a nema 17 stepper motor and leave room for a 16 tooth pulley
step files included
thingiverse
free

GT2-Idler for (623ZZ 3x10x4mm and F623ZZ ) by hackerbijay
...) by using this gt2 belt move properly .
link:
https://www.prusaprinters.org/prints/66060-gt2-idler-for-623zz-3x10x4mm-and-f623zz
thingiverse
free
Tronxy X3 Belt Idler by 1sPiRe
...d° - gearbest°
tronxy x3° from gearbest°
12% off coupon from gearbest : gbte
part of my tronxy x3 upgrades collection
° affiliate
thingiverse
free

Dual Z Single Stepper Belt tensioner Ender 3 / 2020 T Slot extrusion 608 bearings by Its_3d_Willy
...0mm/60 tooth pulleys, any size will work
1x timing belt (from 696mm to ~800mm, i use 752mm)
m3 mounting hardware and t slot nuts.
thingiverse
free

Low Stress XY Idler - Pulley Replacement for Hypercube by alanmcruickshank
...x flanged 623zz bearing (each on snaps into one of the half-pulleys)
2x m3 nyloc nuts
2x m3x35 screws (i've used socket head)
X5Sa
thingiverse
free
Chain riser X5SA by xanatorium
...chain riser x5sa by xanatorium
thingiverse
chain risers for x5sa
thingiverse
free
Tronxy X5S X5SA Organizer
...tronxy x5s x5sa organizer
thingiverse
organizer for tronxy x5s; x5sa
thingiverse
free
Tronxy X5SA Z-Blocker by n02m4n
...tronxy x5sa z-blocker by n02m4n
thingiverse
a z-blocker for my x5sa.
thingiverse
free

Tronxy X5SA Fan Duct by Noobik4ever
...tronxy x5sa fan duct by noobik4ever
thingiverse
fun duct for tronxy x5sa
thingiverse
free

Tronxy X5S, X5SA linear rail
...tronxy x5s, x5sa linear rail
thingiverse
linear rail tronxy x5sa
thingiverse
free

Tronxy X5SA Filament holder Screw
...tronxy x5sa filament holder screw
thingiverse
better holder for tronxy x5sa filament as screw
thingiverse
free
TronXY X5SA PRO BLTouch Mount
...tronxy x5sa pro bltouch mount
thingiverse
a simple bltouch mount for the tronxy x5sa pro.
thingiverse
free
Tronxy X5SA Extruder TPU Upgrade
...tronxy x5sa extruder tpu upgrade
thingiverse
redesigned anycubic kossel extruder tpu upgrade for tronxy x5sa
thingiverse
free

X5SA Tronxy Towline by Daelin89
... towline by daelin89
thingiverse
broke the towline on my tronxy x5sa-400. so i remade it in fusion 360. have yet to test print
thingiverse
free
Tronxy X5SA Display Offset by Darkwulf3D
...tronxy x5sa display offset by darkwulf3d
thingiverse
tronxy x5sa pro display offset for the large table adjustment wheels
Toto
3ddd
$1

Toto
...toto
3ddd
toto
раковина toto
3ddd
$1

toto PPY1620W
...toto ppy1620w
3ddd
toto , ванна
toto ppy1620w
3ddd
$1

Toto sgabello
...toto sgabello
3ddd
барный
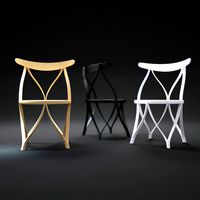
bar chair toto sgabello.
3ddd
$1

Toto VL10084C
...toto vl10084c
3ddd
смеситель
смеситель toto однорычажный серии мн.
3ddd
$1

Rainshower Toto PSU1000E.
...rainshower toto psu1000e.
3ddd
toto
rainshower toto psu1000e.
turbosquid
$8

Character Toto
...free 3d model character toto for download as ma, obj, and fbx on turbosquid: 3d models for games, architecture, videos. (1312260)
3ddd
$1

Ванна TOTO PAY1740PWEE
...ливным и переливным гарнитуром и ножками для ванны
size (wxhxd in mm): 1700 x 850 x 640
material: acrylic resin
country: japan
3d_ocean
$5

TOTO Kiwami Renesse Faucet
...stic toto kiwami renesse deck-mount widespread model. no need any additional modeling and texturing. - only model - low-poly m...
turbosquid
$19
Bar Chair Toto
... available on turbo squid, the world's leading provider of digital 3d models for visualization, films, television, and games.
3ddd
$1

Автоматический унитаз-биде TOTO Neorest AH
... neorest
автоматический унитаз-биде toto neorest ahhttp://812vann.ru/?mode=product&product;_id=736217201
Synchronization
turbosquid
$29

Gatsby Chandelier by Synchronicity
...chandelier by synchronicity for download as max, obj, and fbx on turbosquid: 3d models for games, architecture, videos. (1299138)
turbosquid
$60

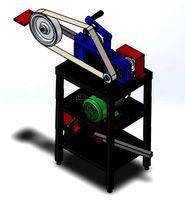
The synchronous belt sander
...elt sander for download as 3ds, max, ige, obj, fbx, and sldas on turbosquid: 3d models for games, architecture, videos. (1424296)
3d_export
$5

Synchronization Symbol
...max 2015,blender,cinema4d obj fbx stl warning:dont forget to active turbosmooth after final modeling. enjoy 3d modeling good luck
3d_export
$60

the synchronous belt sander
...r the purchase.<br>designed with solidworks 2017, render with photoview 360<br>**************************************
3d_export
$14

turnover hydraulic mold base
...alistic, the innovation is the synchronous mechanism, there is a certain reference learning value, welcome to download and learn!
3d_export
$50

SDRAM 3D Model
...ccess memory dimm computer electronic double data rate dual in-line module laptop desktop
sdram 3d model plutonius 21264 3dexport
3d_export
$9

large lifting mechanism
...any questions also you can email to me. designed with solidworks 2017, render with keyshot **************************************
3d_export
free

profile gantry shifting mechanism
...any questions also you can email to me. designed with solidworks 2017, render with keyshot **************************************
cg_studio
$45
Wiper with transmission and drive unit3d model
...c4d .lwo .obj - wiper with transmission and drive unit 3d model, royalty free license available, instant download after purchase.
3d_export
$17
Automatic unloading mobile welding machine
...he solder joints are firm, and there are no burn marks. the welding speed is fast, and the operation is simple and easy to learn.
Tronxy
thingiverse
free
LMF8LUU for tronxy x5s
...lmf8luu for tronxy x5s
thingiverse
lmf8luu for tronxy x5s
thingiverse
free
TRONXY XY2PRO by MaiMaiFACTORY
...tronxy xy2pro by maimaifactory
thingiverse
tronxy xy2-pro
sadebox
thingiverse
free

Power_supply_cover for TRONXY by Karollo
...power_supply_cover for tronxy by karollo
thingiverse
power supply cover for tronxy.
thingiverse
free
Tronxy support by d3m1sf
...tronxy support by d3m1sf
thingiverse
soporte para impresora tronxy x3.
thingiverse
free
Tronxy 13mm wrench
...tronxy 13mm wrench
thingiverse
13mm wrench for hotend fitting on tronxy x1...
thingiverse
free

Tronxy x5s by alex190074
...tronxy x5s by alex190074
thingiverse
tronxy x5s cart x fully adjustable only !!
thingiverse
free
Tronxy Logo
...tronxy logo
thingiverse
made this logo
thingiverse
free

Patas TronXY X3 - Vitofeli - TronXY Legs by Todopic
...todopic
thingiverse
patas separadoras para la tronxy x3, permite colocar la caja de control debajo y aprovechas mejor el espacio
thingiverse
free
TRONXY X5S EXTRUDER by ADAM98
...tronxy x5s extruder by adam98
thingiverse
tronxy x5s extruder
thingiverse
free

Belt tensioner Tronxy by jpalianak
...belt tensioner tronxy by jpalianak
thingiverse
belt tensioner tronxy
Tensioner
3d_export
$5

adjustable tension lock
...adjustable tension lock
3dexport
adjustable tension lock
turbosquid
$5

tension ring
...oyalty free 3d model tension ring for download as fbx and stl on turbosquid: 3d models for games, architecture, videos. (1553452)
turbosquid
$3

Tension Chair
...free 3d model tension chair for download as obj, c4d, and fbx on turbosquid: 3d models for games, architecture, videos. (1251503)
3d_export
$5
transformador de tension
...transformador de tension
3dexport
transformador de tension entrada 460vac salida 220vac marca audax
turbosquid
$20
Motorbike Chain Tensioner
...y free 3d model motorbike chain tensioner for download as stl on turbosquid: 3d models for games, architecture, videos. (1428322)
turbosquid
$25
TENSION-WOOD-CHAIR
... available on turbo squid, the world's leading provider of digital 3d models for visualization, films, television, and games.
turbosquid
$25

tension-bentwood-chair
... available on turbo squid, the world's leading provider of digital 3d models for visualization, films, television, and games.
turbosquid
$19

Tension engagement ring
...n engagement ring for download as obj, fbx, 3dm, dwg, and stl on turbosquid: 3d models for games, architecture, videos. (1491631)
3d_export
$10

Ruby Tension set Ring 3D Model
...ruby tension set ring 3d model
3dexport
tension set ruby ring in 18k
ruby tension set ring 3d model rehansheikh 25254 3dexport
turbosquid
$20
Superficial Tension Exp. Image.max
... available on turbo squid, the world's leading provider of digital 3d models for visualization, films, television, and games.
42
design_connected
$16

No.42
...no.42
designconnected
great dane no.42 computer generated 3d model. designed by kristiansen, kai.
design_connected
free

42
...42
designconnected
artek 42 free models computer generated 3d model. designed by alvar aalto.
design_connected
$16

Wogg 42
...wogg 42
designconnected
wogg wogg 42 computer generated 3d model. designed by boner, jörg.
3ddd
$1

PLANTS 42
...ants 42
3ddd
цветок , горшок
plants 42,, planters from rh vetro series,, enjoy the model
3d_ocean
$20

Maschinengewehr 42
...hine maschinengewehr mg mg-42 mg42 pistol ready rifle sniper weapon
low polygon and very well detailed maschinengewehr 42 (mg42).
turbosquid
$10

building 42
...urbosquid
royalty free 3d model building 42 for download as on turbosquid: 3d models for games, architecture, videos. (1362755)
turbosquid
$6

Bedcloth 42
...osquid
royalty free 3d model bedcloth 42 for download as max on turbosquid: 3d models for games, architecture, videos. (1522746)
turbosquid
$50

MG-42
...osquid
royalty free 3d model mg-42 3d model for download as on turbosquid: 3d models for games, architecture, videos. (1555634)
turbosquid
$12

Curtains 42
...royalty free 3d model curtains 42 for download as max and obj on turbosquid: 3d models for games, architecture, videos. (1650289)
turbosquid
$7

RG-42
...quid
royalty free 3d model rg-42 for download as max and obj on turbosquid: 3d models for games, architecture, videos. (1166505)
Belt
turbosquid
$9
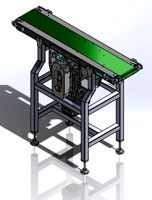
Belt conveyor belt
...t conveyor belt for download as 3ds, ige, obj, stl, and sldas on turbosquid: 3d models for games, architecture, videos. (1226546)
3d_export
$6
belt
...d then comes off and fastens at the front of the seat. version: 2015 units: millimetres x-form: yes polys: 120 950 verts: 163 944
3d_export
$7
belt grinder
...belt grinder
3dexport
belt grinder
3d_export
$5
Belt conveyor
...belt conveyor
3dexport
belt conveyor
3ddd
$1
column belt
...column belt
3ddd
колонна
column belt
turbosquid
$5

Belt
... available on turbo squid, the world's leading provider of digital 3d models for visualization, films, television, and games.
3d_ocean
$5
Leather Belt
...ather belt is created in 3dsmax 2011 and rendered with vray 1.5 and it has all the texture included with the multiple obj format.
3d_ocean
$5

Belt Ring
...belt ring
3docean
belt jewelry ring
belt ring 3d model. total weight 3.5 gram & 1.1 stone size. 3dm and obj file format.
design_connected
$11
Belt Round
...belt round
designconnected
meridiani belt round computer generated 3d model. designed by parisio, andrea.
design_connected
$11
Belt Oval
...belt oval
designconnected
meridiani belt oval computer generated 3d model. designed by parisio, andrea.
Z
3d_export
$5

nissan z
...nissan z
3dexport
nissan z
3ddd
$1

Vase Z
...vase z
3ddd
vase z
3ddd
$1

полотенцесушить Z
...полотенцесушить z
3ddd
полотенцесушитель
полотенцесушить z
design_connected
free

Z-Chair
...z-chair
designconnected
free 3d model of z-chair designed by karman, aleksei.
design_connected
$11

Z Lamp
...z lamp
designconnected
phillips z lamp computer generated 3d model. designed by kalff, louis.
3d_export
$5

Dragon balls z
...dragon balls z
3dexport
dragon ball z
turbosquid
$20

Fighter Z
...
turbosquid
royalty free 3d model fighter z for download as on turbosquid: 3d models for games, architecture, videos. (1292563)
turbosquid
$9

Pen Z
...pen z
turbosquid
free 3d model pen z for download as obj on turbosquid: 3d models for games, architecture, videos. (1686775)
turbosquid
free

z chair
...z chair
turbosquid
free 3d model z chair for download as max on turbosquid: 3d models for games, architecture, videos. (1410230)
turbosquid
$5

Letter Z
...urbosquid
royalty free 3d model letter z for download as max on turbosquid: 3d models for games, architecture, videos. (1408540)