Thingiverse
TronXY X5S MKS Sbase 32 bit Smoothieware with 3dTouch probe by JD_Printing
by Thingiverse
Last crawled date: 4 years, 1 month ago
Update: Use the new adjustable 3dTouch mount 'Remix TronXY X5S 3dTouch probe mount' https://www.thingiverse.com/thing:3089857
It also has information of setting Z probe offset and a 'new' start code.
I finally have gotten around installing my MKS Sbase 32 bit controller on my TronXY X5S. Here is a quick explanation and sources of how I got it working with the 3DTouch probe.
Special thanks to SgaboLab for config.txt basics to get me started. https://www.thingiverse.com/thing:2818468 Tronxy X5S MKS sbase config.txt by SgaboLab. This has the basic setup for the TronXY X5S config.txt
I added a bit to it and many hours of testing to get it working.
Added PID configuration for Extruder and Heat Bed http://smoothieware.org/temperaturecontrol-pid-autotuning
a. Use E0 for the extruder
b. Use E1 for the heatbed
Added 3DTouch autoleveling
a. http://smoothieware.org/zprobe
b. I used 1.23 for servo HWPWM
c. I used any open axis ports for power and ground.
Special note:
You must keep the Z axis endstop when using the Z probe. You can’t do a G28 Z0 with the Z axis probe. It must have the Z axis endstop to get close for using autoleveling. Moved the Z axis probe to 1.29 port on the MKS Sbase board.
G29 will not work for autoleveling (if coming from Marlin). You have to use G32 along with G and M codes for controlling the probe.
Finding the offset between the 3dtouch probe and the nozzle tip can take awhile, and it is set in your start code using G30 Zxxx.xx (where xxx.xx is the offset). My current offset is G30 Z 0.98. This I expect to change if a different nozzle is used.
Using the latest Smoothieware software V1.3.
Helpful instruction and board pinout.
a. https://www.instructables.com/id/Configuring-MKS-Sbase-V12-32-bit-Controller-Basics/
I have included my Smoothieware configuration file (config.txt)
And Startup code that I put in Slic3r Printer Settings Custom G-code.
3D Touch probe https://www.ebay.com/itm/Improve-Print-Precision-3D-Touch-Auto-Bed-Leveling-Sensor-for-3D-Printer-TE871/142688347016?ssPageName=STRK%3AMEBIDX%3AIT&_trksid=p2057872.m2749.l2649
TronXY X5S Modifications I have designed or modified from others.
E3D V6 extruder and mount https://www.thingiverse.com/thing:3005856
Extruder cooling fan https://www.thingiverse.com/thing:3026171
Parts cooling fan: https://www.thingiverse.com/thing:3005866
24V power supply for heatbed and Mosfet holder https://www.thingiverse.com/thing:2897121 I will probably redo this when I mount the MKS Sbase board.
Heat Bed insulation
Metal build plate CNC https://www.thingiverse.com/thing:3005813
Added plate glass build plate. I had some old windows around and cut a few plates out of them.
3dTouch (BLTouch) mounting bracket with X axis endstop
Various pully mods to align the drive belts and make them parallel. (more work is still needed on this). https://www.thingiverse.com/thing:3039540
Filament Spool Holder. https://www.thingiverse.com/thing:2854669
Were all these mods necessary? Yes, No and maybe.
The heat bed insulation and 24Volt conversion – Yes! It now heats up super quick.
With the metal build plate and glass on top I will let you decide with your printer. My bed is now so flat that the Z axis barely moves when correcting for level. But I have this and a 3DTouch probe on my other printer and I wouldn’t trade it for anything.
The quality of print has gone up with the 32 bit board. I’m still experimenting and tweeking (That is what we like to do – isn’t it?) so the final quality of print is not there yet
.
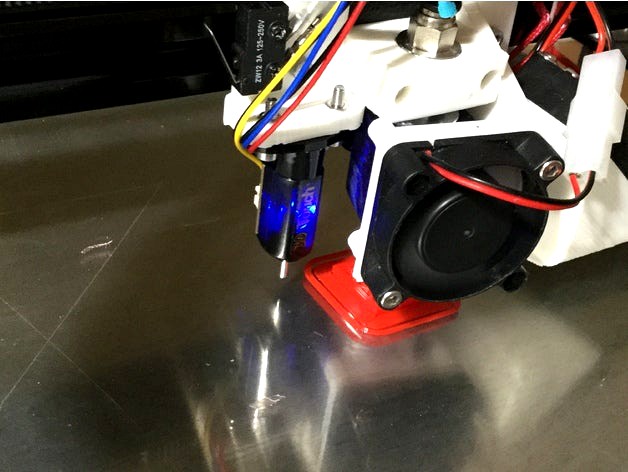
I love the extruder, cooling fan and touch mounts. Having them separate and modular makes any maintenance super easy.
I’m not an expert on these mods, and I may have forgotten something in this post. Let me know if I can answer any questions.
As always the internet has information on this topic – it is just scattered over many sites. I just tried to bring the references together to help you.
Let me know if I missed giving someone the proper credit!
So much for a quick explanation!
Happy Printing.
It also has information of setting Z probe offset and a 'new' start code.
I finally have gotten around installing my MKS Sbase 32 bit controller on my TronXY X5S. Here is a quick explanation and sources of how I got it working with the 3DTouch probe.
Special thanks to SgaboLab for config.txt basics to get me started. https://www.thingiverse.com/thing:2818468 Tronxy X5S MKS sbase config.txt by SgaboLab. This has the basic setup for the TronXY X5S config.txt
I added a bit to it and many hours of testing to get it working.
Added PID configuration for Extruder and Heat Bed http://smoothieware.org/temperaturecontrol-pid-autotuning
a. Use E0 for the extruder
b. Use E1 for the heatbed
Added 3DTouch autoleveling
a. http://smoothieware.org/zprobe
b. I used 1.23 for servo HWPWM
c. I used any open axis ports for power and ground.
Special note:
You must keep the Z axis endstop when using the Z probe. You can’t do a G28 Z0 with the Z axis probe. It must have the Z axis endstop to get close for using autoleveling. Moved the Z axis probe to 1.29 port on the MKS Sbase board.
G29 will not work for autoleveling (if coming from Marlin). You have to use G32 along with G and M codes for controlling the probe.
Finding the offset between the 3dtouch probe and the nozzle tip can take awhile, and it is set in your start code using G30 Zxxx.xx (where xxx.xx is the offset). My current offset is G30 Z 0.98. This I expect to change if a different nozzle is used.
Using the latest Smoothieware software V1.3.
Helpful instruction and board pinout.
a. https://www.instructables.com/id/Configuring-MKS-Sbase-V12-32-bit-Controller-Basics/
I have included my Smoothieware configuration file (config.txt)
And Startup code that I put in Slic3r Printer Settings Custom G-code.
3D Touch probe https://www.ebay.com/itm/Improve-Print-Precision-3D-Touch-Auto-Bed-Leveling-Sensor-for-3D-Printer-TE871/142688347016?ssPageName=STRK%3AMEBIDX%3AIT&_trksid=p2057872.m2749.l2649
TronXY X5S Modifications I have designed or modified from others.
E3D V6 extruder and mount https://www.thingiverse.com/thing:3005856
Extruder cooling fan https://www.thingiverse.com/thing:3026171
Parts cooling fan: https://www.thingiverse.com/thing:3005866
24V power supply for heatbed and Mosfet holder https://www.thingiverse.com/thing:2897121 I will probably redo this when I mount the MKS Sbase board.
Heat Bed insulation
Metal build plate CNC https://www.thingiverse.com/thing:3005813
Added plate glass build plate. I had some old windows around and cut a few plates out of them.
3dTouch (BLTouch) mounting bracket with X axis endstop
Various pully mods to align the drive belts and make them parallel. (more work is still needed on this). https://www.thingiverse.com/thing:3039540
Filament Spool Holder. https://www.thingiverse.com/thing:2854669
Were all these mods necessary? Yes, No and maybe.
The heat bed insulation and 24Volt conversion – Yes! It now heats up super quick.
With the metal build plate and glass on top I will let you decide with your printer. My bed is now so flat that the Z axis barely moves when correcting for level. But I have this and a 3DTouch probe on my other printer and I wouldn’t trade it for anything.
The quality of print has gone up with the 32 bit board. I’m still experimenting and tweeking (That is what we like to do – isn’t it?) so the final quality of print is not there yet
.
I love the extruder, cooling fan and touch mounts. Having them separate and modular makes any maintenance super easy.
I’m not an expert on these mods, and I may have forgotten something in this post. Let me know if I can answer any questions.
As always the internet has information on this topic – it is just scattered over many sites. I just tried to bring the references together to help you.
Let me know if I missed giving someone the proper credit!
So much for a quick explanation!
Happy Printing.