Thingiverse

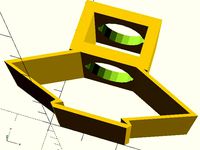
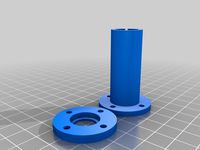
Tronxy P802e Inductive/Capacitive Sensor Mount by srbaude86
by Thingiverse
Last crawled date: 3 years, 1 month ago
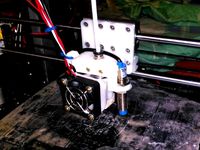
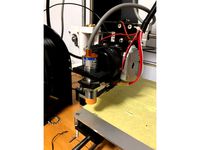
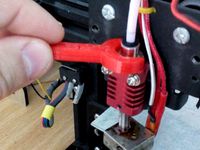
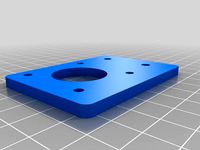
Mounting Bracket to Hold a LJC18A3-B-Z/BX Sensor
Suited to the Hotend Bracket of a Tronxy P802e from Aliexpress
Update
I have my probe working with Repetier Firmware and i thought i would post some notes given how little information there is on the Web.
LJC18A3-B-Z/BX Sensor Wiring
The Brown wire is +, Blue Wire is - and Black wire is Signal.
If using a Melzi board (like I am). I connect Brown to the 12V PSU +, Blue to PSU - and the Black Signal to the Z min endstop signal.
Repetier Firmware
I use Repetier firmware, please dont ask questions about Marlin as i have no idea.
Use the online tool https://www.repetier.com/firmware/v092/ to make changes to your firmware.
Make sure ALWAYS_CHECK_ENDSTOPS is set to false. This in on the Mechanics Tab.
On the Features Tab, enable Z-Probing and also set the method of Auto Bed leveling you want to use. I use n*n grid and set the grid to 4 (16 Z probe points). Leave the rest as default as you can set the Probe height, offsets and probe points in the eeprom.
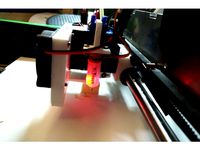
I have my probe set to trigger when the nozzle is roughly 2mm above the print bed, so i have set my Probe height to 2mm.
To get the Z Probe value and you have a Z min end stop. Move the Nozzle so that the sensor is off your print bed and home Z so that it is just touching your print bed (manual calibration). Slowly move your nozzle so that the sensor is over the bed with the nozzle still touching the bed. Now move Z up 10mm and then send a G30 command to your printer. This is will return the value Z moved down when the probe was triggered, for example 8.23mm. Now subtract that value from 10mm. in my example 10- 8.23 would be 1.77mm. To be safe, set your Z probe Height in eeprom as 1.75 which gives 0.02mm clearance.
My Start G-Code is as follows.
G28 X0 Y0 ;Home X and Y
G1 Z10 F{Z_TRAVEL_SPEED} ;Move Z UP 10mm
G1 X150 Y150 F{TRAVEL_SPEED} ;Move X and Y to the centre of your print bed.
G28 Z0 ;Home Z (when the probe triggers it will then move down past the trigger point 2mm, as set as the probe height).
G1 Z10 F{Z_TRAVEL_SPEED} ;Move Z UP 10mm
G32 S2 ;Perform the auto levelling calibration
G32 S2 will store the calibration results in eeprom, which means if nothing changes, you dont have to perform the calibration everytime. And will remain after a Power Cycle. However, I like to run my calibration before everyprint, as i cannot guarantee that nothing has changed. It only takes a minute or two.
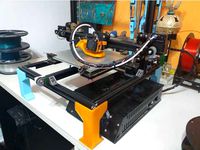
This is how i have setup my Prusa I3 Clone and it works for me. Warning, you may need to use different values. I hope at least some of this information helps somebody out - i know i would have liked to have known at least half of whats written here before i installed my probe - would have saved my me 2 days of yelling at my printer. Good luck
Suited to the Hotend Bracket of a Tronxy P802e from Aliexpress
Update
I have my probe working with Repetier Firmware and i thought i would post some notes given how little information there is on the Web.
LJC18A3-B-Z/BX Sensor Wiring
The Brown wire is +, Blue Wire is - and Black wire is Signal.
If using a Melzi board (like I am). I connect Brown to the 12V PSU +, Blue to PSU - and the Black Signal to the Z min endstop signal.
Repetier Firmware
I use Repetier firmware, please dont ask questions about Marlin as i have no idea.
Use the online tool https://www.repetier.com/firmware/v092/ to make changes to your firmware.
Make sure ALWAYS_CHECK_ENDSTOPS is set to false. This in on the Mechanics Tab.
On the Features Tab, enable Z-Probing and also set the method of Auto Bed leveling you want to use. I use n*n grid and set the grid to 4 (16 Z probe points). Leave the rest as default as you can set the Probe height, offsets and probe points in the eeprom.
I have my probe set to trigger when the nozzle is roughly 2mm above the print bed, so i have set my Probe height to 2mm.
To get the Z Probe value and you have a Z min end stop. Move the Nozzle so that the sensor is off your print bed and home Z so that it is just touching your print bed (manual calibration). Slowly move your nozzle so that the sensor is over the bed with the nozzle still touching the bed. Now move Z up 10mm and then send a G30 command to your printer. This is will return the value Z moved down when the probe was triggered, for example 8.23mm. Now subtract that value from 10mm. in my example 10- 8.23 would be 1.77mm. To be safe, set your Z probe Height in eeprom as 1.75 which gives 0.02mm clearance.
My Start G-Code is as follows.
G28 X0 Y0 ;Home X and Y
G1 Z10 F{Z_TRAVEL_SPEED} ;Move Z UP 10mm
G1 X150 Y150 F{TRAVEL_SPEED} ;Move X and Y to the centre of your print bed.
G28 Z0 ;Home Z (when the probe triggers it will then move down past the trigger point 2mm, as set as the probe height).
G1 Z10 F{Z_TRAVEL_SPEED} ;Move Z UP 10mm
G32 S2 ;Perform the auto levelling calibration
G32 S2 will store the calibration results in eeprom, which means if nothing changes, you dont have to perform the calibration everytime. And will remain after a Power Cycle. However, I like to run my calibration before everyprint, as i cannot guarantee that nothing has changed. It only takes a minute or two.
This is how i have setup my Prusa I3 Clone and it works for me. Warning, you may need to use different values. I hope at least some of this information helps somebody out - i know i would have liked to have known at least half of whats written here before i installed my probe - would have saved my me 2 days of yelling at my printer. Good luck
Similar models
thingiverse
free
Hictop e3d V6 carriage proximity sensor mount by ZhenyaKa
...o set z-position to zero and correct z_probe_height in eeprom or firmware (greater - head will go lower)
g28 x0 y0; home extruder
thingiverse
free

Anycubic Kossel Calibration Coaxial Sensor Holder by SalvatoreOne
...bration so i had to do everything again so i don't use it.
later on i will possibly make more "step by step" guide
thingiverse
free

G2S Inductive Proximity Probe Holder by amphealy
...larger, but i get good results from this.
z_probe_x1 -30
z_probe_y1 -30
z_probe_x2 30
z_probe_y2 -30
z_probe_x3 -30
z_probe_y3 30
thingiverse
free

Repetier auto-level 0.92.9 for DMY3DP-001 (p802m / anet a8 clone) by crazytiti
...need and isp to put the arduino bootloader on your board, then use classic arduino usb upload.
demo :https://youtu.be/xs7vn1hkf7k
thingiverse
free

Hall-E - height adjustable endstop holder for Hall-E-Endstops by Sprenger
...an the real one. after that you have set g29)
i developed it for my spindel prusa, but you can easilly adapt it to other systems!
thingiverse
free
Ormerod BLTouch Mount by dapol
...0 p3 s10 i1 ; deploy probe
g4 p75 ; wait 75ms
and a "retractprobe.g" which reads
m280 p3 s90 i1 ; retract bltouch probe
thingiverse
free

QuadFusion MGN12 PrecisionPiezo Andromeda Mount
...lue, offset and trigger height
be careful setting trigger point, as with any z probe configuration you can damage your print bed.
thingiverse
free
Alunar m508 Z Sensor Front Fan Holder by jacobf18
...cause the sensor should the sensing distance that goes below the extruder nozzle. use 7-zip file manager to extract my firmware.
thingiverse
free
Z probe for Micromake D1 by born_to_kill
...1 mm on a radius of 80 mm the second option is to connect without soldering, it is necessary to invert the signal in the firmware
thingiverse
free
Auto-level trigger for induction bed sensor by neveroddoreven
...this part out in tpu (aka ninjaflex) or something similary rubbery. i found that semiflex pla was not flexible...
P802E
thingiverse
free

Tronxy P802E y belt tensioner by lea229
...tronxy p802e y belt tensioner by lea229
thingiverse
a simple remix for tronxy p802e
thingiverse
free
Tronxy P802E Spool Holder Feet by TeaJae923
...tronxy p802e spool holder feet by teajae923
thingiverse
feet to mount the tronxy p802e spool holder.
thingiverse
free

Z wobble fix for Tronxy P802e by Larsico
...z wobble fix for tronxy p802e by larsico
thingiverse
this part is for fixing the wobble in z axis for tronxy p802e
thingiverse
free

Tronxy p802e PSU Cover - No Switch by srbaude86
...tronxy p802e psu cover - no switch by srbaude86
thingiverse
psu cover to suit tronxy p802e from aliexpress
thingiverse
free

Tronxy P802E Marlin 1.1.9 with BLTouch Activated
...02e marlin 1.1.9 with bltouch activated
thingiverse
marlin 1.1.9 firmware configured for tronxy p802e with bltouch pin (a4-d27).
thingiverse
free

Z-Axis top bracket for Tronxy P802E by Ferreous
...z-axis top bracket for tronxy p802e by ferreous
thingiverse
z-frame for tronxy p802e instead of acryl
thingiverse
free

Z-Endstop For Tronxy P802E by cherubim
...
i remixed this z endstop to fit my tronxy p802e. it fits perfectly behind the x-axis belt, even with the original short screws.
thingiverse
free

Mainboard case - Tronxy P802E by lea229
...erse
hello, here is my design for mainboard of tronxy p802e.
i used 2 coolers fan 40x40x10
hope you print it and upload a photo!
thingiverse
free

Tronxy P802e by JackJakobs
...to hole a few inches below extruder motor. (not sure what the hole was originally intended for but works great for this purpose).
thingiverse
free

Tronxy P802E Direct bowden mount
...y p802e -
will need 25mm long m4 screws for mounting to sc8uu blocks as the ones that come with the printer are not long enough.
Capacitive
3d_export
$20

c4d octane cpu chip core capacitance scifi circuit board
...
c4d octane cpu chip core capacitance scifi circuit board gpu:2080ti polygon:719067 vertices:1010546 non-overlapping polygon mesh
3d_export
$20

c4d octane cpu chip core capacitance scifi circuit board
...pu chip core capacitance scifi circuit board octane render gpu:2080ti polygon:415094 vertices:792706 non-overlapping polygon mesh
3d_ocean
$6

Electrolytic Capacitors Set
... ended capacitors and 3 double endend capacitors with straight and bended conductors. the textuering, shading, lighting and th...
archibase_planet
free
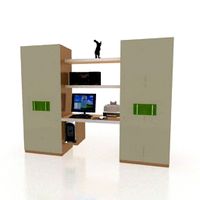
Shelving
...shelving
archibase planet
shelving rack stand
capacites shkap - 3d model for interior 3d visualization.
archive3d
free

Shelving 3D Model
...d model
archive3d
shelving rack stand
capacites shkap - 3d model for interior 3d visualization.
3d_export
free
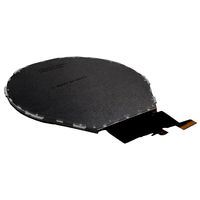
34 800x800 Round 350 nits Free View Capacitive Touch TFT -MIPI
...0 cd/m2<br>drive ic : ili9881c,hx8526-e30<br>operation temperature : -20℃~70℃<br>storage temperature : -30℃~80℃
3d_export
$10

Capacitor 3D Model
...circuit board capacitance current
capacitor 3d model download .c4d .max .obj .fbx .ma .lwo .3ds .3dm .stl firdz3d 106626 3dexport
3d_export
$10

Capacitor V3 3D Model
...cuit board capacitance current
capacitor v3 3d model download .c4d .max .obj .fbx .ma .lwo .3ds .3dm .stl firdz3d 106654 3dexport
3d_export
$10
Capacitor v2 3D Model
...cuit board capacitance current
capacitor v2 3d model download .c4d .max .obj .fbx .ma .lwo .3ds .3dm .stl firdz3d 106632 3dexport
thingiverse
free

Capacitive Moisture Case by falsanu
...capacitive moisture case by falsanu
thingiverse
a simple case for the capacitive moisture sensor v1.2
Tronxy
thingiverse
free
LMF8LUU for tronxy x5s
...lmf8luu for tronxy x5s
thingiverse
lmf8luu for tronxy x5s
thingiverse
free
TRONXY XY2PRO by MaiMaiFACTORY
...tronxy xy2pro by maimaifactory
thingiverse
tronxy xy2-pro
sadebox
thingiverse
free

Power_supply_cover for TRONXY by Karollo
...power_supply_cover for tronxy by karollo
thingiverse
power supply cover for tronxy.
thingiverse
free
Tronxy support by d3m1sf
...tronxy support by d3m1sf
thingiverse
soporte para impresora tronxy x3.
thingiverse
free
Tronxy 13mm wrench
...tronxy 13mm wrench
thingiverse
13mm wrench for hotend fitting on tronxy x1...
thingiverse
free

Tronxy x5s by alex190074
...tronxy x5s by alex190074
thingiverse
tronxy x5s cart x fully adjustable only !!
thingiverse
free
Tronxy Logo
...tronxy logo
thingiverse
made this logo
thingiverse
free

Patas TronXY X3 - Vitofeli - TronXY Legs by Todopic
...todopic
thingiverse
patas separadoras para la tronxy x3, permite colocar la caja de control debajo y aprovechas mejor el espacio
thingiverse
free
TRONXY X5S EXTRUDER by ADAM98
...tronxy x5s extruder by adam98
thingiverse
tronxy x5s extruder
thingiverse
free

Belt tensioner Tronxy by jpalianak
...belt tensioner tronxy by jpalianak
thingiverse
belt tensioner tronxy
Inductive
turbosquid
$2
Induction hob
...quid
royalty free 3d model induction hob for download as skp on turbosquid: 3d models for games, architecture, videos. (1564919)
turbosquid
$10
Induction Hob
... 3d model whirlpool induction hob for download as max and obj on turbosquid: 3d models for games, architecture, videos. (1390871)
3ddd
$1

Siemens Induction Cooktop
...duction cooktop
3ddd
варочная поверхность , siemens
induction cooktop siemens eh975md21p
turbosquid
$10
Induction cooker
...del induction cooker for download as sldpr, max, fbx, and obj on turbosquid: 3d models for games, architecture, videos. (1698439)
3d_export
$15

Induction Furnace Model 3D Model
...l
3dexport
inductor induction furnace ironworks cast steel stove hearth
induction furnace model 3d model conqueror 38004 3dexport
turbosquid
$38

Wimshurst Static Machine Induction
...st static machine induction for download as max, obj, and fbx on turbosquid: 3d models for games, architecture, videos. (1404224)
turbosquid
$25

Britannia Delphi Induction Oven
... available on turbo squid, the world's leading provider of digital 3d models for visualization, films, television, and games.
turbosquid
$50

Induction 4-Burner Cooktop Gaggenau
...3d model induction 4-burner cooktop gaggenau for download as on turbosquid: 3d models for games, architecture, videos. (1256929)
turbosquid
$25
48W_Tuscany Range - Burners-Griddle-Induction
... available on turbo squid, the world's leading provider of digital 3d models for visualization, films, television, and games.
turbosquid
$15
Miele KM 6115 Induction Cooker
... available on turbo squid, the world's leading provider of digital 3d models for visualization, films, television, and games.
Sensor
3d_export
free

parking sensor
...parking sensor
3dexport
car parking sensor
turbosquid
$1

Sensor
... available on turbo squid, the world's leading provider of digital 3d models for visualization, films, television, and games.
3d_export
$5

Smoke sensor
...port
smoke sensor, can be an impressive element for your projects. easy to use, realistic image, low polygon, quality materials.
3d_export
$5

Air Quality Sensor v1
...air quality sensor v1
3dexport
air quality sensor v1
3d_export
$15

float sensor
...e up render. - all parts and materials are logically named. other formats ================= - collada (.dae) - autodesk fbx - obj
turbosquid
$26

Wind sensor C
...free 3d model wind sensor c for download as 3ds, obj, and fbx on turbosquid: 3d models for games, architecture, videos. (1328943)
turbosquid
$26

Wind sensor B
...free 3d model wind sensor b for download as 3ds, obj, and fbx on turbosquid: 3d models for games, architecture, videos. (1328168)
3d_export
$5

ultrasound sensor
...ivers convert ultrasound into electrical signals, and transceivers can both transmit and receive ultrasound. export in: -obj -fbx
3ddd
free

Вытяжка Shindo pallada sensor
... вытяжка
вытяжка shindo pallada sensor. в двух размерах - 600 и 900. текстуры в комплекте.
turbosquid
$52

Wind sensor A B C
...
royalty free 3d model wind sensor a b c for download as fbx on turbosquid: 3d models for games, architecture, videos. (1408406)
Mount
3d_export
free

mounting bracket
...mounting plate is the portion of a hinge that attaches to the wood. mounting plates can be used indoors, cabinetry and furniture.
turbosquid
$2

MOUNTING
... available on turbo squid, the world's leading provider of digital 3d models for visualization, films, television, and games.
turbosquid
free

Mounts
... available on turbo squid, the world's leading provider of digital 3d models for visualization, films, television, and games.
turbosquid
free

Mount Fuji
...fuji
turbosquid
free 3d model mount fuji for download as obj on turbosquid: 3d models for games, architecture, videos. (1579977)
3d_export
$5

Headphone mount LR
...headphone mount lr
3dexport
headphone mount l+r
turbosquid
$39

Mount rainier
...quid
royalty free 3d model mount rainier for download as fbx on turbosquid: 3d models for games, architecture, videos. (1492586)
turbosquid
$5

pipe mounting
...quid
royalty free 3d model pipe mounting for download as obj on turbosquid: 3d models for games, architecture, videos. (1293744)
turbosquid
$3

Mounting Tires
...uid
royalty free 3d model mounting tires for download as fbx on turbosquid: 3d models for games, architecture, videos. (1708511)
3d_export
$5

Magnetic GoPro Mount
...pro mount
3dexport
cool magnetic mount for gopro. allows you to mount the camera on flat metal surfaces and get exclusive shots.
turbosquid
$5

Stone Mount
...ty free 3d model stone mount for download as ma, obj, and fbx on turbosquid: 3d models for games, architecture, videos. (1370306)