Thingiverse

Titanfall Data Knife - Advanced Version for Electronics by FusedCreations
by Thingiverse
Last crawled date: 3 years, 1 month ago
https://www.youtube.com/watch?v=01RfFmuc26k
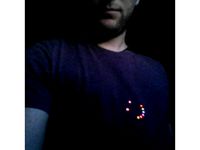
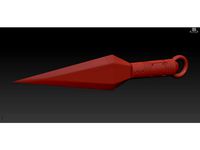
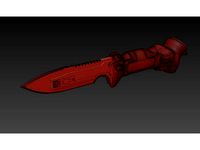
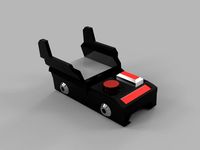
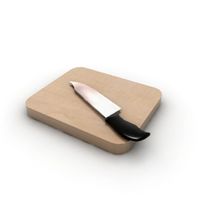
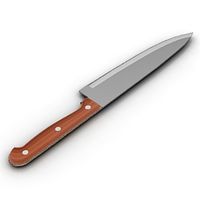
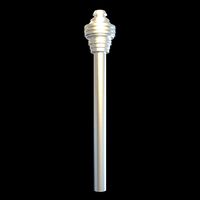
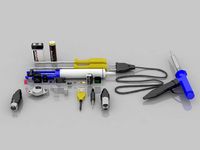
This is a recreation of the Titanfall Data Knife. It is not exactly the knife from either Titanfall 1 or Titanfall 2, but somewhere in the middle. It features hollow areas specifically sized to accept electronic components. The final assembled knife can be switched on to play a hacking animation with lights and sound.
For a simpler version, see the basic version. No electronics, just a static prop.
This model was designed around the following parts:
12BH510-GR Battery Holder for N-Style Batteries
A23 12V Batteries
SPPH410100 Latching Pushbutton Switch
CPE-220 Piezo Buzzer
3mm Blue LEDs x2
Adafruit Arduino Trinket Microcontroller (5v)
Adafruit Neopixel Jewel (RGBW - Cool White)
I’ll go on record as saying that the A23 batteries are not ideal. The Neopixel Jewel can draw a lot of current at its peak, and the A23 batteries are basically just a couple of coin cells in a tube. That said, they’re something I had a bunch of lying around, and they fit in the handle without too much hassle. All I’m saying is, buy 10 of them, not just 1, because by the time you’re done testing everything you’ll have gone through 2 or 3.
The switch is also something I just happen to have kicking around. It’s overkill for this, but it’s a push-button toggle with a satisfying amount of travel, so you could do worse.
The Adafruit Trinket is a great little board, but it has some limitations. First, it only has 8kb of programmatic memory to work with, and ~2.5kb of that is taken up by their bootloader (which is excellent, as bootloaders go, by the way!). I trimmed absolutely as much fat as I could from the code below to get it under the Trinket’s default maximum of 5310 bytes, and I was able to get it under that threshhold, but then I discovered that I could use another, bigger Arduino (such as the Uno) to program the trinket and free up all that extra space that the bootloader was taking up. The secret to this is here – those particular instructions tell you how to put the bootloader back on in case you screw it up, but the same method can also be used to push code onto the trinket, using the “Arduino as ISP” programmer in the Arduino IDE. Once I found out I could do that, I relaxed a bit, and added a few extra things like the startChime() feature below, which produced a nice little start-up noise. If you’re desperate to fit this on a stock trinket, you can, but you’ll have to comment out some functionality.
This code uses Adafruit's NeoPixel library, because it is excellent and does what I am not smart enough to do. If you have not installed this library, make sure you do
Similar models
thingiverse
free

Mount for Adafruit Trinket. by monnerby
... ring https://learn.adafruit.com/adafruit-neopixel-uberguide/arduino-library on my 3d printed inmoov robot. http://www.inmoov.fr.
thingiverse
free

Doctor Strange - Eye of Agamotto (remix) by nmsr1196
... shown) by adding newopixel jewel 7 [adafruit part#2226] with gemma. i will need to add a recharge board for this future option.
thingiverse
free

Voronoy Lamp by Grogo666
... button is 6mm :https://www.adafruit.com/product/367
i can share the code (derivated from the neopixels example code) if you like
thingiverse
free
NeoPixel Rainbow Ring Pendant by v1kings
...erse.com/thing:79502)
micro switch (8mm/3mm/3mm)
some wire
source code
https://github.com/achorein/rainbowring-arduino
have fun !
thingiverse
free

Neopixel Lithophane Frame by elagente404
... go through different colors.
you can grab de trinket code and schematic from github.
more info at agente404's blog (spanish)
thingiverse
free
Titanfall 2 Pulse Blade - Electronics Version by FusedCreations
...mall holes for 1.5mm alignment pins, if you want to cut up some brass rod or plastic to make sure you get things joined up right.
thingiverse
free
Magic Wand by downeym
...be purchased here: http://www.adafruit.com/products/1501
led strip can be purchased here: http://www.adafruit.com/products/1138
thingiverse
free

Helmet Light w/Adafruit Neopixil Ring by NickRBrewer
...e's a video of it in action. - http://www.youtube.com/watch?v=3tjqs1vw82k&feature=share&list=uu_on_hqkojj1-vfrqzmieeg
thingiverse
free

Noel Christmas Light by upperpeninsulaplastics
...ruit.com/adafruit-neopixel-uberguide/the-magic-of-neopixels
4xaa holder: http://www.taydaelectronics.com/aa-battery-holder-4.html
thingiverse
free

Arduino Geocache Locator by seanhodgins
...tery and charger.
it will look for locations that you set inside the code and point you towards them.https://youtu.be/lljkikmwpbw
Fusedcreations
thingiverse
free
Titanfall Data Knife - Basic Version by FusedCreations
... the titanfall data knife, sliced to be easily-printable.
a version adapted for use with electronic components is available here
thingiverse
free
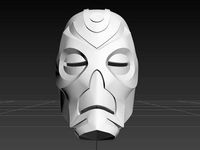
Skyrim Dragon Priest Mask by FusedCreations
...ting as one piece without a lot of supports on the inside given how concave it is.
you probably have to play with the scale, too.
thingiverse
free
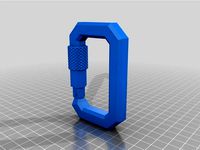
Titanfall Pilot Caribeaner by FusedCreations
...ing. sorry, it doesn't actually clip, but it's just designed to have a loop of fabric sewn through it and onto the armor.
thingiverse
free

K40 Exhaust Duct for 4" Blower by FusedCreations
...n the same standard slot on the back of the k40 as the original. printed mine in two parts mostly to limit the supports required.
thingiverse
free
Carbon Fiber Stencil by FusedCreations
...the right settings, but flexible like paper, so you can tape it up against things and spray paint for a cool carbon fiber effect.
thingiverse
free

Star Lord Arm Badge / Jacket Patch by FusedCreations
...ovie jacket he wears. i imagine printing this in something flexible might make it easy to attach to a jacket, but i have no idea.
thingiverse
free
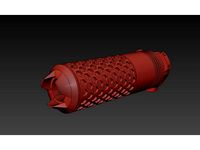
Titanfall Smart Pistol Mk5 - Silencer Attachment by FusedCreations
... advanced model. it has been sectioned into two parts to make it a little easier to print and to minimize any necessary supports.
thingiverse
free
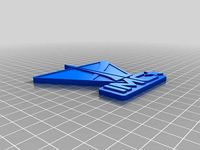
Titanfall Data Knife - Alternate Blade Model by FusedCreations
...fe from titanfall 2. it has been separated into the four parts you've got here to make printing and painting a little easier.
thingiverse
free

Guardians of the Galaxy / Star Lord Infinity Orb Electromagnet Display Base V2 by FusedCreations
...#39;base' that the orb magnetizes down onto was a solid triangle, but it instead appears to be three prongs pointing inwards.
thingiverse
free

Dropper Paint Bottle Holder - 4x4 Version by FusedCreations
...hat much more straightforward.
the shelves are at a 45 degree angle. i should have probably exported them flat side down, sorry.
Titanfall
3d_export
$99
titanfall atlas rigged
...d, and includes only neutral pose model.<br>v-ray render and materials<br>lighting setup is not included in the file!
3d_export
$99
titanfall stryder
...<br>(8.png)4096 x 4096<br>v-ray render and materials (1.50 sp4a)<br>lighting setup is not included in the file!
3d_export
$79

titanfall pilot
...tures formats: - 8192 x 8192<br>v-ray render and materials (1.50 sp4a)<br>lighting setup is not included in the file!
thingiverse
free

Titanfall 2 NORTHSTAR
...titanfall 2 northstar
thingiverse
a titan from titanfall 2.
thingiverse
free
Titanfall 2 TONE
...titanfall 2 tone
thingiverse
my favorite titan from titanfall 2.
thingiverse
free
Titanfall Hammond Logo by Arcanite214
...titanfall hammond logo by arcanite214
thingiverse
prepare for titanfall- the logo of hammond robotics from the game titanfall.
thingiverse
free

Titanfall Militia Logo by Arcanite214
...all militia logo by arcanite214
thingiverse
prepare for titanfall- the logo of the frontier militia from from the game titanfall
thingiverse
free
Titanfall IMC Logo by Arcanite214
...nite214
thingiverse
prepare for titanfall- the logo of the interstellar manufacturing corporation (imc) from the game titanfall.
thingiverse
free
Titanfall HCOG weapons sight
...ed this hcog weapons sight from titanfall 2 based on the art of titanfall 2 book designs. scaled to eotech 511 holographic sight.
thingiverse
free

Titanfall Logo by toypaj
...iverse
i love the titanfall games and wanted to create and print a logo for my home office.
no offence intended to respawn or ea
Knife
archibase_planet
free
Knifes
...knifes
archibase planet
knifes kitchen knife case-knifes
knifes - 3d model (*.gsm+*.3ds) for interior 3d visualization.
archibase_planet
free
Knife
...knife
archibase planet
knife kitchen-knife carving-knife
knife - 3d model (*.gsm+*.3ds) for interior 3d visualization.
archibase_planet
free
Knife
...knife
archibase planet
knife kitchen knife carving knife
knife - 3d model (*.gsm+*.3ds) for interior 3d visualization.
archibase_planet
free

Knifes
...knifes
archibase planet
kitchen-knifes knife carving-knifes
knifes - 3d model (*.gsm+*.3ds) for interior 3d visualization.
archibase_planet
free

Knife
...knife
archibase planet
knife kitchen-knife carving-knife
knife n211207 - 3d model (*.gsm+*.3ds) for interior 3d visualization.
archibase_planet
free

Knife
...knife
archibase planet
kitchen-knife knife carving-knife
knife n010808 - 3d model (*.gsm+*.3ds) for interior 3d visualization.
archibase_planet
free
Knife
...knife
archibase planet
knife bread knife kitchen knife
knife n040212 - 3d model (*.gsm+*.3ds) for interior 3d visualization.
archibase_planet
free
Knife
...fe
archibase planet
knife penknife pocket knife clasp-knife
knife n300715 - 3d model (*.gsm+*.3ds) for interior 3d visualization.
archibase_planet
free
Knife
...e
archibase planet
knife kitchen knife kitchen ware kitchen-knife
knife n090212 - 3d model (*.3ds) for interior 3d visualization.
archibase_planet
free

Knife
...knife
archibase planet
knife kitchen knife
knife n220807 - 3d model for interior 3d visualization.
Advanced
turbosquid
$139
Carol (Advanced)
... available on turbo squid, the world's leading provider of digital 3d models for visualization, films, television, and games.
turbosquid
$15

Explay Advance
... available on turbo squid, the world's leading provider of digital 3d models for visualization, films, television, and games.
turbosquid
$15
ADVANCED ROOM.max
... available on turbo squid, the world's leading provider of digital 3d models for visualization, films, television, and games.
turbosquid
$2

Advanced Crate
... available on turbo squid, the world's leading provider of digital 3d models for visualization, films, television, and games.
turbosquid
$1
Advanced Canister
... available on turbo squid, the world's leading provider of digital 3d models for visualization, films, television, and games.
turbosquid
$20

automatic Advance Gun
...
royalty free 3d model automatic advance gun for download as on turbosquid: 3d models for games, architecture, videos. (1609069)
turbosquid
$4

Advanced Shower Equipment
...free 3d model advanced shower equipment for download as blend on turbosquid: 3d models for games, architecture, videos. (1282411)
turbosquid
$1

Advanced Sniper Rifle
...oyalty free 3d model advanced sniper rifle for download as obj on turbosquid: 3d models for games, architecture, videos. (720205)
3d_ocean
$32

Advanced Hospital Bed
...ds max 2010 or higher and many others. formats *.max scanline *.max vray *.max mentalray *.c4d advanced render *.c4d cinema 4d...
turbosquid
$17

Advance Rifle Patrol
...free 3d model advance rifle patrol for download as ma and obj on turbosquid: 3d models for games, architecture, videos. (1409260)
Data
turbosquid
$3
Data cylinder
...quid
royalty free 3d model data cylinder for download as stl on turbosquid: 3d models for games, architecture, videos. (1333495)
3d_export
free
Olar Data Armchair
...olar data armchair
3dexport
olar data armchair
turbosquid
$9

DATA black coin
...id
royalty free 3d model data black coin for download as max on turbosquid: 3d models for games, architecture, videos. (1495567)
turbosquid
$9

DATA gold coin
...uid
royalty free 3d model data gold coin for download as max on turbosquid: 3d models for games, architecture, videos. (1495565)
3d_export
$35
Conveyor data 3D Model
...conveyor data 3d model
3dexport
conveyors
conveyor data 3d model robertmelinda 83052 3dexport
turbosquid
$85
Dubai City 3d model with extra data August 2020 GIS data
...nload as c4d, c4d, c4d, dae, dxf, 3ds, c4d, obj, fbx, and stl on turbosquid: 3d models for games, architecture, videos. (1600663)
turbosquid
$60

Chinese MSGothic set1to21 data
...free 3d model chinese msgothic set1to21 data for download as on turbosquid: 3d models for games, architecture, videos. (1216976)
turbosquid
$9

DaTa eXchange black coin
...ty free 3d model data exchange black coin for download as max on turbosquid: 3d models for games, architecture, videos. (1495575)
turbosquid
$9

DaTa eXchange gold coin
...lty free 3d model data exchange gold coin for download as max on turbosquid: 3d models for games, architecture, videos. (1495569)
3d_export
$5

Kingston Data Traveler 3D Model
...kingston data traveler 3d model
3dexport
kingston data traveler 3d model shasiru 7868 3dexport
Electronics
turbosquid
$1

electron
...urbosquid
royalty free 3d model electron for download as max on turbosquid: 3d models for games, architecture, videos. (1157488)
turbosquid
$50

electronic
...
royalty free 3d model electronic for download as max and obj on turbosquid: 3d models for games, architecture, videos. (1289427)
turbosquid
$40

Electron
... available on turbo squid, the world's leading provider of digital 3d models for visualization, films, television, and games.
3d_ocean
$8
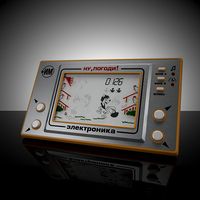
Electronic game
...electronic game
3docean
electronic games nu pogody wait a minute well
electronic game “well, wait a minute”, “nu pogody”
3ddd
$1
Brilux Electronic
...brilux electronic
3ddd
подвес. brilux electronic. польша. материалы настроены.
3d_export
free

electronic shop
...lectronic shop with high quality interior and exterior. it has tvs smartphone play station printer and many more electronic item.
3ddd
$1

Термостаты OJ Electronics
...ермостаты oj electronics
3ddd
oj electronics , термостат
термостаты фирмы oj electronics
3d_export
$8

electron 714
...electron 714
3dexport
game ready model for export to unreal engine soviet tv electron 714 pbr 4k
3ddd
$1

Термостат OJ Electronics
... oj electronics
3ddd
oj electronics , термостат
термостат occ2-1991 фирмы oj electronics
turbosquid
$60
Electronics Stuff
...
royalty free 3d model electronics stuff for download as max on turbosquid: 3d models for games, architecture, videos. (1624680)
Version
3ddd
$1
Diamond version
...nd , version , ванна
visionnaire - diamond bath
turbosquid
$50
LibraryMini Version
...free 3d model librarymini version for download as max and jpg on turbosquid: 3d models for games, architecture, videos. (1617724)
design_connected
$34

Barocco Version 01
...barocco version 01
designconnected
zanotta barocco version 01 computer generated 3d model. designed by progetti, emaf.
design_connected
$27

Barocco Version 02
...barocco version 02
designconnected
zanotta barocco version 02 computer generated 3d model. designed by progetti, emaf.
turbosquid
free
![Door [2 versions]](/t/13243146.jpg)
Door [2 versions]
...rbosquid
free 3d model door [2 versions] for download as fbx on turbosquid: 3d models for games, architecture, videos. (1223985)
turbosquid
$2
seat version 0.1
...
royalty free 3d model seat version 0.1 for download as blend on turbosquid: 3d models for games, architecture, videos. (1432653)
turbosquid
$12
Chip Version 03
...lty free 3d model chip version 03 for download as c4d and fbx on turbosquid: 3d models for games, architecture, videos. (1241145)
3d_export
$10

magnolia grandiflora mature version
...magnolia grandiflora mature version
3dexport
magnolia grandiflora mature version
3d_export
$8
room assets and voxel version
...room assets and voxel version
3dexport
room assets and voxel version
turbosquid
$35
Zil Civilian version
... model zil civilian version for download as cgf, fbx, and obj on turbosquid: 3d models for games, architecture, videos. (1639420)