Thingiverse
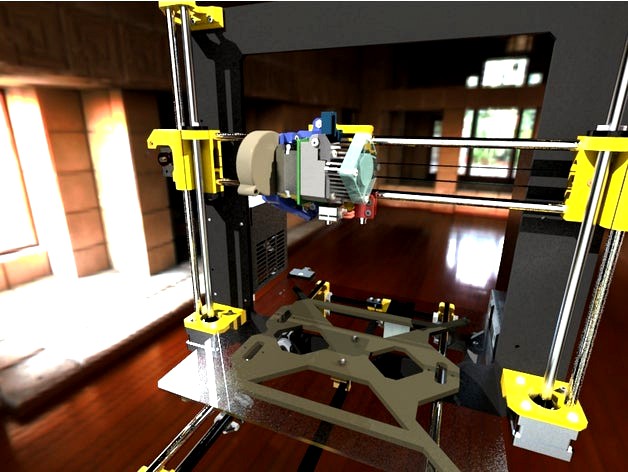
Titan Aero Upgrade for Original Prusa i3 MK2(s) by jltx
by Thingiverse
Last crawled date: 3 years ago
Why do you want this Titan Aero upgrade for your Prusa i3 MK2?
Benefits:
Lighter, more compact assembly with center of mass closer to axis -> higher print speeds, more immune to knocks
see video: http://e3d-online.com/Titan-Aero-Standard-175-12V
440 cc more build volume due to shorter stack
Full X and Y range with additional Z height
Shorter filament path means less ooze and better handles flexible filaments
Easier manual loading and unloading of filament
Simpler nozzle changes with no disassembly
Better print visibility for progress or identify issues
Manual tension adjust, cleaning, maintenance without tools/disassembly
Enhanced part cooling
Minimal changes to stock:
NO FIRMWARE CHANGES
These 4 printed parts + 4 screws + Titan Aero + Motor^
^ This is designed to use a short body nema 17, not the stock unit.
Motor body length must be <= 23mm , such as: https://www.amazon.com/gp/product/B00PNEQ79Q/
If you want to use a motor with 24-26mm body, such as http://e3d-online.com/Electrical/Stepper-Motors/NEMA17-Titan-Slimline, you lose 3mm of X range. See notes at end of build section. You may need to adjust currents as well (see end).
Print (slic3r PE instructions):
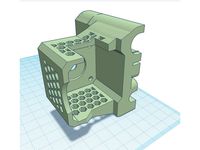
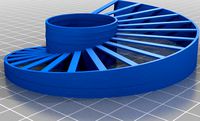
I recommend printing x carriage, aero, pinda mount together
Print in ASA or ABS. PETG can work. Because I am taking advantage of the shorter Titan stack to improve Z, the heater block is closer to the x carriage, so I recommend the e3d silicone sock. The glass transition is roughly: ABS/ASA 100C, PETG 80C, PLA 60C.
aero mount -> object settings: infill 80% or 100% for strength (other two can be normal infill I suspect)
add supports -> use on build plate only which should add very little support
also add brim, maybe 8mm, to help corners hold with ABS/ASA
I printed these in ABS and they came out pretty well. First clean your bed with alcohol and then acetone. I used a 0.4 nozzle, 0.2mm layer, 20% infill, 255C nozzle and 105C bed, no fan. I also put a large plastic tub over the printer as a cheap enclosure to trap heat. I had to clean up the pinda mount slot and aero mount center pin with a knife. Otherwise everything fit nicely.
Blower mount can be printed in PLA, with supports.
I have had good luck with these support settings on PLA
contact Z: 0.15
pattern angle: 20
interface spacing: 0.5
XY: 70%
Build (assumes you are upgrading from stock):
Please read through first to know the order of steps and take your time.
Unwire the extruder wire bundle from the RAMBO. Remove two screws on X motor to loosen and remove belt. Cut the zip ties on x-carriage. Remove stock extruder + x carriage.
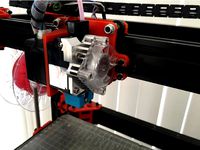
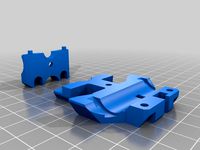
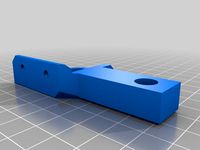
Fit pins of aero mount into holes in X-carriage and screw two ends down with 2 M3x20 (or longer) and washers and nuts, very snug. Screw head fits in recess on back, nut and washer in front. Make sure base of mount is flush against carriage all the way across.
X-carriage mounts like stock onto the X-axis rods (see steps X.8 - X.11 in manual) with zip-tie to linear bearings. Make sure upper left bearing (nearest X motor) is all the way to the outside against the lip of the X-carriage so it most clearance for filament gear.
Insert Nema-17 short body on left side of aero mount with wires toward back and route through wire channel. If your motor has a plug connector, you will need to orient to the front and run wires around to the back. There are zip-tie channels on bottom edge of aero mount to help.
Mount titan on right following instructions at https://wiki.e3d-online.com/wiki/Titan_Aero#Assembly_Steps. You will use no spacer and the short set of screws. Don’t mount heatsink fan yet.
Install cartridges in heater block opposite of what is shown on e3d, so wires exit other direction.
Make sure screws are snug and check clearance of filament gear in slot and between linear bearings on back of X-carriage.
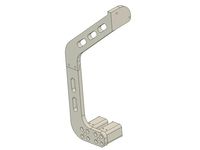
Insert PINDA into pinda mount and add two screws and nuts loosely for now.
Screw pinda mount onto X-carriage, lining up arrows, using M3x25, nut optional. Rotate PINDA body so wire is toward back (it is not centered) to get best clearance to heatsink. Route wire through channel on X-carriage.
Mount heatsink fan onto heatsink according to e3d instructions and route wires next to PINDA wire in channel.
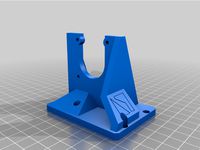
Mount blower fan into blower mount by tipping outlet into mount and rotate to snap in top. Screw with M3x25, head in recess, nut on left.
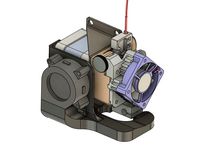
Attach blower mount using ends of the two M3x20 screws holding the aero mount, outside of the existing nuts. There should be room for second nut. See renderings for reference.
Route blower wires alongside the motor wires in channel.
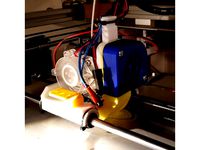
Angle the heater block so the nozzle is nearest the blower outlet and clamp screw is nearest the PINDA. Both the heater and thermistor wires should point right back through the bottom wire channel. Optional: tape piece of aluminum foil to X carriage in recess behind heater and through bottom wire channel to deflect heat, especially if using PETG.
Add e3d silicone sock over heater block.
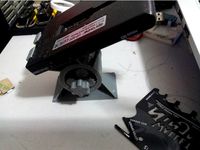
Slide X carriage to extreme left and right and make sure end-stop clicks and no other obstructions. NOTE: if you have MK2S, you may need to Dremel off a bit of the X motor end support if the corner of the motor hits. See photo, marked in green. The pancake motor above should not require this.
Bundle wires and run back to the RAMBO. You can follow the MK2S instruction manual or I recommend cable chain for the extruder, such as: https://www.thingiverse.com/thing:2311596NOTE: you must wire backwards or reverse plug into RAMBO to make extruder turn correct direction since you've added a gear in the path.
Reattach belt and screw in X motor to restore tension. Double check no binding on full range of X.
If you are building for a 25mm motor, print two extend and one bumper piece. Clip the bumper onto the x-carriage where it contacts the end stop. Add the extend pieces to the blower mount by inserting into blower mount holes and screwing down extender using an extra washer. If you have MK2s, you will need to grind a bit off the motor end support as described above.
Software:
Only change required is to change extruder steps to account for 3:1 gearing.
Simplest:
add this to your start g-code in slic3r
M92 E418.5
Note: if you are using a 0.9 step motor, you need to double the number above..
Better:
use the command above and then perform an extruder calibration to adjust value as necessary. Once satisfied, you can commit the change to eeprom using the command from Pronterface or Octoprint terminal. This will make the firmware load/unload function correctly.
M500
Note: if you are using the e3d slim motor you may need to add this to your start g-code to increase the motor current:
M907 E900
History:
V1-V5: beta test versions to get kinks sorted out. Many thanks to spid303 for testing.
12/13/17: I added the step files for your hacking pleasure.
Benefits:
Lighter, more compact assembly with center of mass closer to axis -> higher print speeds, more immune to knocks
see video: http://e3d-online.com/Titan-Aero-Standard-175-12V
440 cc more build volume due to shorter stack
Full X and Y range with additional Z height
Shorter filament path means less ooze and better handles flexible filaments
Easier manual loading and unloading of filament
Simpler nozzle changes with no disassembly
Better print visibility for progress or identify issues
Manual tension adjust, cleaning, maintenance without tools/disassembly
Enhanced part cooling
Minimal changes to stock:
NO FIRMWARE CHANGES
These 4 printed parts + 4 screws + Titan Aero + Motor^
^ This is designed to use a short body nema 17, not the stock unit.
Motor body length must be <= 23mm , such as: https://www.amazon.com/gp/product/B00PNEQ79Q/
If you want to use a motor with 24-26mm body, such as http://e3d-online.com/Electrical/Stepper-Motors/NEMA17-Titan-Slimline, you lose 3mm of X range. See notes at end of build section. You may need to adjust currents as well (see end).
Print (slic3r PE instructions):
I recommend printing x carriage, aero, pinda mount together
Print in ASA or ABS. PETG can work. Because I am taking advantage of the shorter Titan stack to improve Z, the heater block is closer to the x carriage, so I recommend the e3d silicone sock. The glass transition is roughly: ABS/ASA 100C, PETG 80C, PLA 60C.
aero mount -> object settings: infill 80% or 100% for strength (other two can be normal infill I suspect)
add supports -> use on build plate only which should add very little support
also add brim, maybe 8mm, to help corners hold with ABS/ASA
I printed these in ABS and they came out pretty well. First clean your bed with alcohol and then acetone. I used a 0.4 nozzle, 0.2mm layer, 20% infill, 255C nozzle and 105C bed, no fan. I also put a large plastic tub over the printer as a cheap enclosure to trap heat. I had to clean up the pinda mount slot and aero mount center pin with a knife. Otherwise everything fit nicely.
Blower mount can be printed in PLA, with supports.
I have had good luck with these support settings on PLA
contact Z: 0.15
pattern angle: 20
interface spacing: 0.5
XY: 70%
Build (assumes you are upgrading from stock):
Please read through first to know the order of steps and take your time.
Unwire the extruder wire bundle from the RAMBO. Remove two screws on X motor to loosen and remove belt. Cut the zip ties on x-carriage. Remove stock extruder + x carriage.
Fit pins of aero mount into holes in X-carriage and screw two ends down with 2 M3x20 (or longer) and washers and nuts, very snug. Screw head fits in recess on back, nut and washer in front. Make sure base of mount is flush against carriage all the way across.
X-carriage mounts like stock onto the X-axis rods (see steps X.8 - X.11 in manual) with zip-tie to linear bearings. Make sure upper left bearing (nearest X motor) is all the way to the outside against the lip of the X-carriage so it most clearance for filament gear.
Insert Nema-17 short body on left side of aero mount with wires toward back and route through wire channel. If your motor has a plug connector, you will need to orient to the front and run wires around to the back. There are zip-tie channels on bottom edge of aero mount to help.
Mount titan on right following instructions at https://wiki.e3d-online.com/wiki/Titan_Aero#Assembly_Steps. You will use no spacer and the short set of screws. Don’t mount heatsink fan yet.
Install cartridges in heater block opposite of what is shown on e3d, so wires exit other direction.
Make sure screws are snug and check clearance of filament gear in slot and between linear bearings on back of X-carriage.
Insert PINDA into pinda mount and add two screws and nuts loosely for now.
Screw pinda mount onto X-carriage, lining up arrows, using M3x25, nut optional. Rotate PINDA body so wire is toward back (it is not centered) to get best clearance to heatsink. Route wire through channel on X-carriage.
Mount heatsink fan onto heatsink according to e3d instructions and route wires next to PINDA wire in channel.
Mount blower fan into blower mount by tipping outlet into mount and rotate to snap in top. Screw with M3x25, head in recess, nut on left.
Attach blower mount using ends of the two M3x20 screws holding the aero mount, outside of the existing nuts. There should be room for second nut. See renderings for reference.
Route blower wires alongside the motor wires in channel.
Angle the heater block so the nozzle is nearest the blower outlet and clamp screw is nearest the PINDA. Both the heater and thermistor wires should point right back through the bottom wire channel. Optional: tape piece of aluminum foil to X carriage in recess behind heater and through bottom wire channel to deflect heat, especially if using PETG.
Add e3d silicone sock over heater block.
Slide X carriage to extreme left and right and make sure end-stop clicks and no other obstructions. NOTE: if you have MK2S, you may need to Dremel off a bit of the X motor end support if the corner of the motor hits. See photo, marked in green. The pancake motor above should not require this.
Bundle wires and run back to the RAMBO. You can follow the MK2S instruction manual or I recommend cable chain for the extruder, such as: https://www.thingiverse.com/thing:2311596NOTE: you must wire backwards or reverse plug into RAMBO to make extruder turn correct direction since you've added a gear in the path.
Reattach belt and screw in X motor to restore tension. Double check no binding on full range of X.
If you are building for a 25mm motor, print two extend and one bumper piece. Clip the bumper onto the x-carriage where it contacts the end stop. Add the extend pieces to the blower mount by inserting into blower mount holes and screwing down extender using an extra washer. If you have MK2s, you will need to grind a bit off the motor end support as described above.
Software:
Only change required is to change extruder steps to account for 3:1 gearing.
Simplest:
add this to your start g-code in slic3r
M92 E418.5
Note: if you are using a 0.9 step motor, you need to double the number above..
Better:
use the command above and then perform an extruder calibration to adjust value as necessary. Once satisfied, you can commit the change to eeprom using the command from Pronterface or Octoprint terminal. This will make the firmware load/unload function correctly.
M500
Note: if you are using the e3d slim motor you may need to add this to your start g-code to increase the motor current:
M907 E900
History:
V1-V5: beta test versions to get kinks sorted out. Many thanks to spid303 for testing.
12/13/17: I added the step files for your hacking pleasure.
Similar models
thingiverse
free

Titan Aero Extruder for Maxmicron by LukasKun
...: set the motor mount to the x carriage
2nd: install the titan aero extruder
3rd: set the fan in the blower then screw the 2 bolt
thingiverse
free
E3D Titan Aero Part Cooling 40x20mm Blower Fan Mount and Shroud by NorcoT
...otend to allow for silicone heater block cover. removed 1 of the fan screw holes. added a tab/hole for cable tie point for wires.
thingiverse
free
Flyingbear P902 E3D Titan Aero X Carriage by martinengstrom
...the main carriage and belt clip in petg or similar pla will get mushy if the extruder motor gets...
thingiverse
free

Remixed Hevo E3D titan Extruder carriage by alexflin
...he pinda probe with a mount for the optical sensor.
the sensor is mounted with screws for which you'll need to place inserts.
thingiverse
free
X Carriage E3D Titan Aero light by Andycode
...hingiverse
this is a light direct extruder mount for the e3d titan aero.
i designed it for the the small nema17 pancake stepper.
thingiverse
free

X-Carriage E3D Titan Aero light by Andycode
...ingiverse
this is a light direct extruder mount for the e3d titan aero.
i designed it for the the small nema17 pancake stepper.
thingiverse
free

E3D Titan Mount for Prusa i3 Mk2-style X Carriage by josefcub
...ile this a bit to let the gear turn freely.
caveat emptor, as i don't actually own an original prusa i3 mk2 to test this on.
thingiverse
free
E3D Titan Aero carriage for D-Bot by alexmx
...l design petg filament.
i've included a copy of the carriage in step format if anyone wants to modify things in cad software.
thingiverse
free
Titan Aero mount with air duct for Geeetech i3
...you will need a couple of m2 screws to fix the fan.
to fix the entire thing to the carriage plate, i used the original m3 screws.
thingiverse
free

E3D Titan Aero Layer Cooler by ngen33r
...nt layer cooler for the e3d titan aero. it uses a 40mm x 40mm blower fan and mounts direct to the front of the extruder assembly.
Jltx
thingiverse
free

Skelestruder Mosquito reSTEP by hnzxdv
...original thing: https://www.thingiverse.com/thing:3697630 all credit goes to ringo1508 and jltx for their amazing designs! changelog: 9/6/2020: initial upload. due...
thingiverse
free

Prusa MK3 - toolbox by KurzyKocour
...prusa i3 mk3 reuses the t nuts designed by jltx works fine for storing your 3d printer...
thingiverse
free

Prusa MK3 Indirect filament sensor mod for stock extruder by jltx
...c with any improvements i make going forward. so i made this interposer to translate the mount to mine. see instructions below.
thingiverse
free

Rigid feet for Prusa i3 MK3 by steelfab
...have the need to unscrew the foot. thank you jltx and ff8jake for your nice work! history: 2018/9/3: first...
thingiverse
free
MK3 X carriage back plate with belt access - two parts by Hungrymonkey80
...again, so i did a 2 part version of jltx#39;s x carriage back plate. i used a precision saw...
thingiverse
free

Reinforced 3 bolt Y axis motor mount for Prusa i3 mk3 with End Stop by massigrn
...stop was a bit off. now is equal to jltx#39;s model which works pretty...
thingiverse
free

Prusa i3 MK3 Y-Axis Motor Holder with End Stop by motocoder
...potential to move the bearing out of position. user jltx created a modified motor mount that uses it and...
thingiverse
free
PRUSA MK3 Frame Brace by Skiid
...stronger. i modified the extrusion nuts from https://www.thingiverse.com/thing:2805753 by jltx and made them turn 90 degrees clockwise and stop....
thingiverse
free
MultiPart Bridging Test by BarnesEd
...volumes and provide smaller wipe towers with less waste. jltx did a great job on explaining how to use...
thingiverse
free
Prusa MK3 Top Z Mount with Bowden fitting by jakevsnake
...well as one for a 6mm. credit goes to jltx for his z axis mod files i am about...
Aero
3d_export
$129
Scania R1000 2014 AeroTrailer 3D Model
...mi transport scania r1000 r-1000 hevy wheeler trailer tir aerotrailer
scania r1000 2014 aerotrailer 3d model squir 73046 3dexport
3d_export
$99

Morgan Aero 8 2012 3D Model
...orts 2006 2007 2008 2009 2010 2011 2012 2013 2014 2-door coupe sport premium
morgan aero 8 2012 3d model humster3d 85453 3dexport
3d_export
$99

Mercedes Actross AeroTrailer 2014 3D Model
...ractor semi transport hevy wheeler trailer tir actros aerotrailer
mercedes actross aerotrailer 2014 3d model squir 69938 3dexport
3ddd
$1

Барный стул Aero
... барный
барный стул, фабрика производителя: aero, хит продаж у меня в салоне, опора: хром,сидушка: кожа
3ddd
$1

Eichholtz Chair Aero Left
...
chair aero left
item no.: 110196
information:
cameron deep turquoise fabric | swivel base
dimensions:
56 x 66 x h. 72 cm
3ddd
$1
desiree aero
...desiree aero
3ddd
фабрика - desiree
коллекция - aero
описание - диван/sofa
сайт -http://www.euromobil.com
3ddd
$1

Aero Leather Round Ottomans
... круглый
aero leather round ottomanshttp://www.roomandboard.com/catalog/living/ottomans/aero-leather-round-ottomans
3ddd
$1
Royal Aero Balloon
... от authentic models
размеры: l = 32 см, h = 56 смhttp://authenticmodels.com/collection/?product=ap163e#tab-description
3d_ocean
$89

SSC Ultimate Aero 2009
...y, in real units of measurement, qualitatively and maximally close to the original. model formats: - *.max (3ds max 2008 scanl...
3d_ocean
$89

Saab 9-5 Aero wagon 2005
...y, in real units of measurement, qualitatively and maximally close to the original. model formats: - *.max (3ds max 2008 scanl...
Mk2
3d_ocean
$89

Volkswagen Golf Mk2 3-door 1983
...y, in real units of measurement, qualitatively and maximally close to the original. model formats: - *.max (3ds max 2008 scanl...
3d_ocean
$89

Renault Megane Grandtour 2003
...2003 3docean 2002-2008 5-door estate france french grandtour megane mk2 renault renault megane wagon the 3d model was created...
3d_ocean
$89

Chevrolet Camaro 1974
...2 door 70s camaro chevrolet chevrolet camaro chevy coupe mk2 muscle racing car second generation sport sportcar us the...
3d_ocean
$89

Ford Focus sedan 2008
...door american brazil europe facelift focus ford ford focus mk2 saloon sedan us the 3d model was created on...
3d_ocean
$89

Ford Focus hatchback 3-door 2008
...compact car europe facelift focus ford ford focus hatchback mk2 us the 3d model was created on real car...
3d_ocean
$89

Ford Mustang coupe 1974
...3docean 1974-1978 2 door american coupe ford ford mustang mk2 mkii muscle mustang racing car second generation sport us...
3d_ocean
$12

MK2 Grenade
...s max and scanline renderer. materials. (tested with vray & mentalray also) the scene has 53304 polygons / 27467 vertices....
3d_ocean
$55

VW Golf Mk 2
...vw a very accurate model of a vw golf mk2 the model comes in three formats: -.blend, rendered with...
3d_ocean
$89

Renault Clio Mercosur Sport 5-door hatchback 2013
...brazilian clio compact car family france french hatchback mercosur mk2 renault renault clio small sport the 3d model was...
3d_ocean
$89

Toyota Auris hatchback 5-door 2013
...2013 3docean 2012-2016 5-door auris compact hatchback japan japanese mk2 second generation toyota toyota auris the 3d model was...
Titan
3d_export
free

Download free Mercedes benz logo 3D Model
...cars benz new best mercedes benz logo 3d model titan 53313...
3ddd
$1

Titanic Lamp
...рльз тревельян (charles trevelyan) разработал для компании “fluke” светильник “titanic”.
высота: 45 см
длина: 52 см
ширина: 36 см
3ddd
$1
плитка Vives - Special Pieces Titan
...литки.
ссылка на производителя:http://www.vivesceramica.com/en/products/floor-tiles/porcelain-clay/serie.html?sid=521
3d_ocean
$15

Double Stairs with Carpet and Handrail v2
...stairs realistic red render rug spiral stair staircase stairs titanc with double stairs with carpet and handrail and metal...
3d_ocean
$25
Titan
...nfs nfshs one ps ps1 psone rod speed sports stakes titan transport vehicle
quality exterior and low polygon interior concept car.
3d_ocean
$89

Nissan Titan 2011
...m/watch?v=nf5mmfs6zse the 3d model was created on real car base. model is created accurately, in real units of measurement, qu...
3d_ocean
$12

car rim
...wheel car rim that i designed in 2013, nbl titan no:9 high detailed multiformat material isnt included.for the chrome...
3d_ocean
$25

Titan Hotrod
... nfshs one ps ps1 psone rod speed sports stakes titan transport vehicle
quality exterior and low polygon interior concept hotrod.
3d_ocean
$12

Spiral stairs
...stairs realistic red render rug spiral stair staircase stairs titanc with 6.2 meters...
3d_ocean
$25
RMS Titanic
...rms titanic
3docean
ship steamer titanic
3d model of the rms titanic
Upgrade
3d_export
$199

Stadium Level 6 Day 3D Model
...sidewalk city architecture element block gameready unity lowpoly football upgrade people stadium level 6 day 3d model fabelar 90971...
3d_export
$199

Stadium 04 3D Model
...modular pathway sidewalk city architecture element block lowpoly football upgrade people stadium 04 3d model download .c4d .max .obj...
cg_studio
$37

Car service Level 73d model
...modular city architecture element block game gameready unity lowpoly upgrade mechanic vehicle repair jack tyre .obj .max .fbx .dae...
cg_studio
$29

Fan shop Level 33d model
...shop level 33d model cgstudio fan shop building modular upgrade city soccer game lowpoly polygonal merchandise supporter tshirt clothing...
cg_studio
$25

Casino Level 13d model
...model cgstudio casino roulette tables american chips building modular upgrade city gambling game lowpoly polygonal tree column fountain architecture...
cg_studio
$37

Casino Level 73d model
...model cgstudio casino roulette tables american chips building modular upgrade city gambling game lowpoly polygonal tree column fountain architecture...
cg_studio
$41

Casino Level 93d model
...model cgstudio casino roulette tables american chips building modular upgrade city gambling game lowpoly polygonal tree column fountain architecture...
cg_studio
$31

Car service Level 43d model
...modular city architecture element block game gameready unity lowpoly upgrade mechanic vehicle repair jack tyre .obj .max .fbx .dae...
cg_studio
$29

Car service Level 33d model
...modular city architecture element block game gameready unity lowpoly upgrade mechanic vehicle repair jack tyre .obj .max .fbx .dae...
cg_studio
$33

Fan shop Level 53d model
...shop level 53d model cgstudio fan shop building modular upgrade city soccer game lowpoly polygonal merchandise supporter tshirt clothing...
I3
3d_ocean
$55
BMW i8
...bmw i8 3docean audi bavaria bmw car ferrari hybrid i3 i8 new rim series sport a very accurate model...
3d_ocean
$55
BMW i8 black
...i8 black 3docean audi bavaria bmw car ferrari hybrid i3 i8 new rim series sport a very accurate model...
3d_ocean
$89

BMW i3 2014
...y, in real units of measurement, qualitatively and maximally close to the original. model formats: - *.max (3ds max 2008 scanl...
3d_ocean
$89

BMW i3 2012
...y, in real units of measurement, qualitatively and maximally close to the original. model formats: - *.max (3ds max 2008 scanl...
3d_ocean
$29

Razer Christine
...christine 3docean 3d best blade christine computer core gamer i3 i5 i7 intel justtomas laptop model pc pro processor...
3d_ocean
$19

Razer blade 14
...blade 14 3docean blade 14 computer core gamer gt i3 i5 i7 intel justtomas laptop nvidia pro razer razer...
cg_studio
$99

BMW i3 Concept 20113d model
...i3
.3ds .c4d .fbx .lwo .max .obj - bmw i3 concept 2011 3d model, royalty free license available, instant download after purchase.
cg_studio
$99

BMW i3 20123d model
...tudio
.3ds .c4d .fbx .lwo .max .mb .obj - bmw i3 2012 3d model, royalty free license available, instant download after purchase.
cg_studio
$99

BMW i3 20143d model
...
cgstudio
.3ds .c4d .fbx .lwo .max .obj - bmw i3 2014 3d model, royalty free license available, instant download after purchase.
cg_studio
$50

Kitchen set i33d model
...el
cgstudio
.3ds .lwo .max .obj .pz3 - kitchen set i3 3d model, royalty free license available, instant download after purchase.
Prusa
3d_export
$30

geisha by jonathan adler
...** i did a 3d printing test in the prusa software, you can find it among the attached images.<br>exchange:<br>.blend...
3d_export
free

prusa i3 mk3s laser mount for opt lasers
...to learn more about the blue laser technology that conceived the cutting and engraving laser heads from opt lasers, please visit:
turbosquid
$2

Frame Filament Guide Clip-On for Prusa Mk3
...rame filament guide clip-on for prusa mk3 for download as stl on turbosquid: 3d models for games, architecture, videos. (1634730)
turbosquid
free

Prusa small printer adapter holder
...er for download as ipt, skp, dwg, dxf, fbx, ige, obj, and stl on turbosquid: 3d models for games, architecture, videos. (1642936)
thingiverse
free
Prusa i3 Nema17 Extruder Motor Heatsink Clamp by Revenson
...he heatsink.
pictured are standard 40x40mm aluminum heatsinks with thermal adhesive: https://www.amazon.com/gp/product/b07d4fvc61
thingiverse
free
Prusa Bear Mounted 5 x PTFE Holder by simpsqo
...by simpsqo
thingiverse
this is a mounted ptfe guide for mmu2 5 tubes that allows securing the tubes and under the desk filaments
thingiverse
free

Zohd Dart 250g Micro Cam Mount by derEnCh
...if you like to do adjustments. printed on a prusa i3 mk3 with 0,2mm layer and no support. please...
thingiverse
free

Raspberry Pi 3B+ case for mounting on top of the Prusa Mk3S by PoRD
...rusa mk3s by pord
thingiverse
grand and eloquent thingiverse scrollers!!!
behold my remix of a raspberry pi cae fir the prusa!!!
thingiverse
free
Planetary Phone Stand by amasraff
...when doing a "test print.stl", enable "detect bridging parameter" (prusa slicer) to simulate the real print use support enforcer...
thingiverse
free

roll holder by spartano83
...or wet wipes amazon basic print profile by default prusa slicer, i recommend turning off the base for the...
Original
3d_export
$15
Pendant lamp Original BTC Stirrup Pendant Size 2 3D Model
...al btc stirrup black stainless steel silver
pendant lamp original btc stirrup pendant size 2 3d model pluscreative 90616 3dexport
3ddd
$1

Dering Hall Torino Chandelier
...h40 style: industrial the model is based on the original manufacturer dimensions and technical data. materials and groups are...
3ddd
$1
Currey & Company Balthazar
...pkg wt: 16 the model is based on the original manufacturer dimensions and technical data. materials and groups are...
3ddd
$1

Currey & Company Orion
...pkg wt: 34 the model is based on the original manufacturer dimensions and technical data. materials and groups are...
3d_ocean
$89

Maserati Alfieri 2014
...units of measurement, qualitatively and maximally close to the original model formats: - *.max (3ds max 2008...
3d_ocean
$89

BMW 2 Series Active Tourer (F45) 2014
...units of measurement, qualitatively and maximally close to the original model formats: - *.max (3ds max 2008...
3d_ocean
$12

Hoverboard BTTF
...hoverboard from the future! sorry from now. model with original handelrbar, textures and correct scale. including scene from prev...
3d_ocean
$9

Floor Mirror Ikea Knapper
...160 cm polygons: 10 355 vertices: 10 768 - originaly modeled in 3ds...
3d_ocean
$12

Junior Chair Ikea Ingolf White
...77 cm polygons: 2 556 vertices: 2 636 - originaly modeled...
3d_ocean
$15

Robot
...hydraulic-machine industrial-robot max mechanical model nano sci-fi worker-robot robot originaly created with 3ds max 2011 format : 3d max...