Thingiverse
Tiny Whoop Gate Base - Easy Print by kiteless
by Thingiverse
Last crawled date: 3 years, 3 months ago
Easy Print Tiny Whoop Race Gates – USB Powered LED's.
First off full credit to David Just for the original design that I based the idea of this design from.
https://www.thingiverse.com/thing:3323922
Backstory:
The drive came from my good printer being out of service, so I was using my old PrinterBot Metal Plus to make his design and it was just a bit too rough. I also purchased the wrong size PVC and found that the print tolerances were just not good enough on my PrinterBot for the area of his design where the polyurethane tube goes in. I decided I wanted to make something on my own based on his idea of using PVC tubes as feet. So after a few hours in TinkerCAD I came up with a v1 design. The entire goal was to make it as quick and easy to print as possible using PLA while still being strong enough to take a hit from a TinyWhoop. After the v1 was printed and tested I found that it needed more zip ties. I also added a concave area on the top to give the polyurethane tubing a little more surface area to grip on.
Overall Dave's design is superior, but I really wanted something simple and quick.
Pros: quick print time, around 2 hours, Strong, easy to print on almost any printer even if it's not well calibrated.
Cons: Doesn't grip the polyurethane tubing as well as Dave's design, no way to mount on a pole, kinda ugly. :D
Parts needed:
Filament: Any PLA (that your printer likes) is fine.
PVC tubing: Any PVC that is about 22mm outer diameter (roughly 0.75 inches). I believe I ended up with Schedule 40 cold water PVC. It should say something on it like “PVC 1120 SDR 13.5 PR 315”. The stuff I used is Charlotte Pipe 23155. Clear as mud? OK good. My advice is to print one of these and just take it to the hardware store.
This is the PVC I used:https://www.lowes.com/pd/Charlotte-Pipe-1-2-in-dia-x-10-ft-L-315-PSI-SDR-13-5-PVC-Pipe/1000080799
Polyurethane Tube:https://www.menards.com/main/plumbing/rough-plumbing/pipe-tubing-hoses-fittings-accessories/hoses-tubing/polyethylene-tubing/sioux-chief-3-8-od-x-25-polyethylene-tubing/901-03103w0025m/p-1470660864282.htm
Small zip ties: Using wider zip ties that fit into the slits will give you a little more grip.
Lights: Whatever USB powered lighting you want. I used these USB powered fairy lights. These are WAAAAAAAY too long, but can be cut shorter.https://www.amazon.com/gp/product/B085MBTFSK
NOTE: plug in your light source before you do all this below to make sure it works. :D
Instructions:
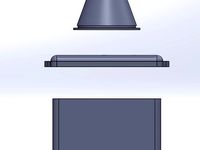
Print the base. I used 20% infill, no raft or brim. Could maybe get away with 10% infill but haven't tried that yet. The part is a little weak in the center where the cable strain relief is, could improve this with thicker top & bottom layer.
Cut a length of polyethylene tubing to 55 inches (140cm). In Dave's design he called for 59 inches (150cm). This will result in a slightly bigger gate if you want one.
Cut 2x 12” sections of PVC for the feet. PVC cutter is recommended for this.
You can measure out enough fairy lights to fold them in half, try to space them out evenly for a nicer look, cut off the extra and feed them through the tube. When you cut make sure to give a little space between the positive and negative wires to they can't ever touch. Just do an angle cut or something.
This next part is tricky. The lights do fit but the more you push through the more resistance you get. I ended up using some 18 gauge wire that had some slightly stuff casing on it, feeding it through, taping it to the lights and pulling it through the tube. Was actually really surprised how much I could pull and they didn't break. Feeding it through by pushing while pulling on the wire also helped a lot. This is fiddly and annoying to do alone, if you have an extra set of hands it helps a lot.
BONUS: You can actually fold over the lights 3 times and they will fit as long as the individual lights aren't ontop of each other. 2 loops (one loop folded in half) is reasonably bright, especially with the room lights dimmed a little.
BONUS 2: skip to step 9 then feed a single length through till it comes through the other side of the hoop, feed that end back into the other side , this lets you push and pull at the same time. This is still fiddly and annoying, but another way to do it. Now back to step 8 then 10.
Make sure to feed a little bit of the USB cable into the tubing.
Zip tie the tubing to the base (3D printed part). Do this in what ever process you feel is best. Make sure the locking part of the zip tie is flush with the base to get maximum grip. I start off with one zip tie on each side to hold the tube in place, then I do the other one on each side facing the same direction.
Zip tie down the USB cable with the provided strain relief slits. I did this to the back of the base for a cleaner look and to put the USB battery behind the base, but it doesn't matter what side you use. Get them snug but don't torque them hard. Make sure there's enough slack that the cable has enough motion for the hoop to be knocked down 90 degrees in case of a TinyWhoop strike.
Insert your PVC, you may need to clean up some burrs and such. They should fit in slightly snug.
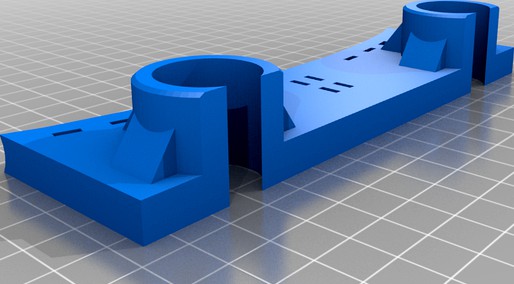
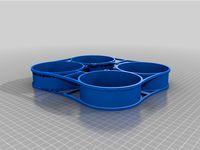
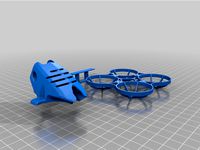
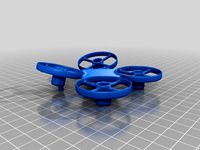
See pictures for how I arranged the zip ties & USB cable.
That's it, your done. Plug in USB power and enjoy.
Specs for the print in the pics:
Layer Height: 0.25mm
Shell Thickness: 0.8mm
Bottom & Top thickness: 0.4mm
Infill: 20%
Speed: 40mm/sec
Filament: 1.75mm PLA
Nozzel: 0.4mm
Supports: None
Final notes:
At some point soon I'll be releasing a version that will be pole mountable and still easy to print. I have some other variation ideas as well. All with the goal of being as easy/quick to print as possible.
Please post your makes and remixes! Cheers and happy Whoopin! I'm excited to finally release something that other people might actually make! Haha.
This was made with TinkerCAD. This is about as advanced as I get when it comes to CAD or 3D modeling at all. I'm very much an amateur with this stuff. That said I'm really happy with how it came out.
First off full credit to David Just for the original design that I based the idea of this design from.
https://www.thingiverse.com/thing:3323922
Backstory:
The drive came from my good printer being out of service, so I was using my old PrinterBot Metal Plus to make his design and it was just a bit too rough. I also purchased the wrong size PVC and found that the print tolerances were just not good enough on my PrinterBot for the area of his design where the polyurethane tube goes in. I decided I wanted to make something on my own based on his idea of using PVC tubes as feet. So after a few hours in TinkerCAD I came up with a v1 design. The entire goal was to make it as quick and easy to print as possible using PLA while still being strong enough to take a hit from a TinyWhoop. After the v1 was printed and tested I found that it needed more zip ties. I also added a concave area on the top to give the polyurethane tubing a little more surface area to grip on.
Overall Dave's design is superior, but I really wanted something simple and quick.
Pros: quick print time, around 2 hours, Strong, easy to print on almost any printer even if it's not well calibrated.
Cons: Doesn't grip the polyurethane tubing as well as Dave's design, no way to mount on a pole, kinda ugly. :D
Parts needed:
Filament: Any PLA (that your printer likes) is fine.
PVC tubing: Any PVC that is about 22mm outer diameter (roughly 0.75 inches). I believe I ended up with Schedule 40 cold water PVC. It should say something on it like “PVC 1120 SDR 13.5 PR 315”. The stuff I used is Charlotte Pipe 23155. Clear as mud? OK good. My advice is to print one of these and just take it to the hardware store.
This is the PVC I used:https://www.lowes.com/pd/Charlotte-Pipe-1-2-in-dia-x-10-ft-L-315-PSI-SDR-13-5-PVC-Pipe/1000080799
Polyurethane Tube:https://www.menards.com/main/plumbing/rough-plumbing/pipe-tubing-hoses-fittings-accessories/hoses-tubing/polyethylene-tubing/sioux-chief-3-8-od-x-25-polyethylene-tubing/901-03103w0025m/p-1470660864282.htm
Small zip ties: Using wider zip ties that fit into the slits will give you a little more grip.
Lights: Whatever USB powered lighting you want. I used these USB powered fairy lights. These are WAAAAAAAY too long, but can be cut shorter.https://www.amazon.com/gp/product/B085MBTFSK
NOTE: plug in your light source before you do all this below to make sure it works. :D
Instructions:
Print the base. I used 20% infill, no raft or brim. Could maybe get away with 10% infill but haven't tried that yet. The part is a little weak in the center where the cable strain relief is, could improve this with thicker top & bottom layer.
Cut a length of polyethylene tubing to 55 inches (140cm). In Dave's design he called for 59 inches (150cm). This will result in a slightly bigger gate if you want one.
Cut 2x 12” sections of PVC for the feet. PVC cutter is recommended for this.
You can measure out enough fairy lights to fold them in half, try to space them out evenly for a nicer look, cut off the extra and feed them through the tube. When you cut make sure to give a little space between the positive and negative wires to they can't ever touch. Just do an angle cut or something.
This next part is tricky. The lights do fit but the more you push through the more resistance you get. I ended up using some 18 gauge wire that had some slightly stuff casing on it, feeding it through, taping it to the lights and pulling it through the tube. Was actually really surprised how much I could pull and they didn't break. Feeding it through by pushing while pulling on the wire also helped a lot. This is fiddly and annoying to do alone, if you have an extra set of hands it helps a lot.
BONUS: You can actually fold over the lights 3 times and they will fit as long as the individual lights aren't ontop of each other. 2 loops (one loop folded in half) is reasonably bright, especially with the room lights dimmed a little.
BONUS 2: skip to step 9 then feed a single length through till it comes through the other side of the hoop, feed that end back into the other side , this lets you push and pull at the same time. This is still fiddly and annoying, but another way to do it. Now back to step 8 then 10.
Make sure to feed a little bit of the USB cable into the tubing.
Zip tie the tubing to the base (3D printed part). Do this in what ever process you feel is best. Make sure the locking part of the zip tie is flush with the base to get maximum grip. I start off with one zip tie on each side to hold the tube in place, then I do the other one on each side facing the same direction.
Zip tie down the USB cable with the provided strain relief slits. I did this to the back of the base for a cleaner look and to put the USB battery behind the base, but it doesn't matter what side you use. Get them snug but don't torque them hard. Make sure there's enough slack that the cable has enough motion for the hoop to be knocked down 90 degrees in case of a TinyWhoop strike.
Insert your PVC, you may need to clean up some burrs and such. They should fit in slightly snug.
See pictures for how I arranged the zip ties & USB cable.
That's it, your done. Plug in USB power and enjoy.
Specs for the print in the pics:
Layer Height: 0.25mm
Shell Thickness: 0.8mm
Bottom & Top thickness: 0.4mm
Infill: 20%
Speed: 40mm/sec
Filament: 1.75mm PLA
Nozzel: 0.4mm
Supports: None
Final notes:
At some point soon I'll be releasing a version that will be pole mountable and still easy to print. I have some other variation ideas as well. All with the goal of being as easy/quick to print as possible.
Please post your makes and remixes! Cheers and happy Whoopin! I'm excited to finally release something that other people might actually make! Haha.
This was made with TinkerCAD. This is about as advanced as I get when it comes to CAD or 3D modeling at all. I'm very much an amateur with this stuff. That said I'm really happy with how it came out.
Similar models
thingiverse
free

Bowden Tube Cable Clip by candre23
.../mount. i printed it light with 2 wall lines and 10% infill, and they barely weigh more than the zip ties they're replacing.
thingiverse
free

Toyota USB cable Blank by wittless
...b device. cable holds in place by running a zip tie through the holes in the back.
i recommend printing in petg or abs over pla.
thingiverse
free

USB holder for open end USB by Pete2345
...39;ve fixed mine with double sided tape but i've also added tabs with screw holes should you wish to fix it more permanently.
thingiverse
free

Tie base by lukeskymuh
...base by lukeskymuh
thingiverse
40x40mm base to glued or bolted to fix something(cables) on a wall with zip ties (up to 7mm wide)
thingiverse
free

Cable Clips for use with cable/zip ties by TheHotEndChannel
...with cable/zip ties by thehotendchannel thingiverse i saw something similar in the hardware store and thought.. i can make...
thingiverse
free

Zip Tie Bracket for 20mm T-Slot Frame by rebeltaz
...this is a quick print that gets the job done!
another sketchup model - debunking the myth that sketchup is useless in 3d printing
thingiverse
free

Ender 5 Hotend Cable Guide
...holes could be countersunk more to accomodate the bolt heads, but it hasn't caused an issue with mine, so i've been lazy.
thingiverse
free

Bird feeder - 3" PVC PIPE by ddubbs
... in the top. make it long enough to tie a loop for hanging.
cut the pipe 431.8mm (17") long and it will be approx. 2 liters
thingiverse
free

Cable tie holder for IKEA Skadis by ipusiron
...creates a space for the cable ties to pass through.
you can use either of the stl files by cutting the excess part with a nipper.
thingiverse
free

Paracord Cable Wrap by Ancisace
...ends of it through the cable wraps. tie a good knot on each end so that they won't pull through, and you're ready to go.

Whoop
thingiverse
free
whoop by MichaelJFPV
...whoop by michaeljfpv
thingiverse
whoop
thingiverse
free
Tiny Whoop holder for 2 whoops by d2000
...tiny whoop holder for 2 whoops by d2000
thingiverse
tiny whoop holder for 2 whoop mini drones and battery
thingiverse
free
Whoop frame by Brassekongo
...whoop frame by brassekongo
thingiverse
a tiny whoop frame
thingiverse
free

Whoop frame by Brassekongo
...whoop frame by brassekongo
thingiverse
my first whoop frame.
thingiverse
free
WHOOPS 4
...
whoops is another
big cinewhoop as addon for hyperlite tooth fairy race frame 4"
first flight https://youtu.be/xm9afwiiass
thingiverse
free
Tiny Whoop 65mm by binaryfpv
...tiny whoop 65mm by binaryfpv
thingiverse
tiny whoop 65mm
thingiverse
free
V-Tail Whoop by Mystereon
...v-tail whoop by mystereon
thingiverse
v-tail whoop .. wip
thingiverse
free
Tiny Whoop Case by 3DRCStore
...tiny whoop case by 3drcstore
thingiverse
tiny whoop case for transport.
thingiverse
free
Tiny Whoop Calibration Base
...tiny whoop calibration base
thingiverse
a base usefull to calibrate your tiny whoop
thingiverse
free
Tiny Whoop Gate by Imozeb
...tiny whoop gate by imozeb
thingiverse
custom tiny whoop gate. requires hot glue for assembly.
Tiny
turbosquid
$3

Tiny Mushroom
...squid
royalty free 3d model tiny mushroom for download as ma on turbosquid: 3d models for games, architecture, videos. (1562284)
turbosquid
$2
Tiny Tank
...osquid
royalty free 3d model tiny tank for download as blend on turbosquid: 3d models for games, architecture, videos. (1542044)
turbosquid
$3

Tiny Knife
...
royalty free 3d model tiny knife for download as max and fbx on turbosquid: 3d models for games, architecture, videos. (1358937)
3d_export
$5

Tiny house
...tiny house
3dexport
https://www.dock4all.com/
3d_export
free

Tiny Toy
...tiny toy
3dexport
turbosquid
$30

Tiny Tank
...lty free 3d model tiny tank for download as max, obj, and fbx on turbosquid: 3d models for games, architecture, videos. (1608730)
turbosquid
$20

Tiny houses
...lty free 3d model tiny house for download as ma, fbx, and obj on turbosquid: 3d models for games, architecture, videos. (1642651)
turbosquid
$100

Tiny boy
... available on turbo squid, the world's leading provider of digital 3d models for visualization, films, television, and games.
turbosquid
$50

Tiny Man
... available on turbo squid, the world's leading provider of digital 3d models for visualization, films, television, and games.
turbosquid
$39

Tiny House
... available on turbo squid, the world's leading provider of digital 3d models for visualization, films, television, and games.
Gate
archibase_planet
free
Gate
...gate
archibase planet
gate gates garage gate
gate 1 - 3d model (*.gsm+*.3ds) for exterior 3d visualization.
archibase_planet
free
Gate
...gate
archibase planet
gate garage gate gates
gate 2 - 3d model (*.gsm+*.3ds) for exterior 3d visualization.
archibase_planet
free
Gate
...gate
archibase planet
gate garage gate gates
gate garage n050214 - 3d model (*.gsm+*.3ds) for interior 3d visualization.
archibase_planet
free
Gates
...gates
archibase planet
gates gate
gates - 3d model (*.gsm+*.3ds) for interior 3d visualization.
archibase_planet
free

Gate
...gate
archibase planet
gate gates barrier
gate - 3d model (*.gsm+*.3ds) for exterior 3d visualization.
archibase_planet
free
Gate
...gate
archibase planet
gate gates barrier
gate n210114 - 3d model (*.3ds) for exterior 3d visualization.
archibase_planet
free
Gate
...gate
archibase planet
gate gates barrier
gate n180914 - 3d model (*.gsm+*.3ds) for exterior 3d visualization.
archibase_planet
free

Gate
...gate
archibase planet
gate gates fence
gate n050814 - 3d model (*.gsm+*.3ds) for exterior 3d visualization.
archibase_planet
free
Gates
...gates
archibase planet
gate gates fencing
gates n120708 - 3d model (*.gsm+*.3ds) for interior 3d visualization.
archibase_planet
free

Gates
...gates
archibase planet
gate gates fencing
gates n140708 - 3d model (*.gsm+*.3ds) for interior 3d visualization.
Easy
design_connected
$16
Easy
...easy
designconnected
sollos easy computer generated 3d model. designed by almeida, jader.
design_connected
$20
Easy
...easy
designconnected
established & sons easy armchairs computer generated 3d model. designed by ed carpenter.
3d_ocean
$1

Easy Button
... it is accurate in close-ups. you can drop this model right into any setting. the textures are included as well as links to do...
design_connected
$16
Easy Armchair
...easy armchair
designconnected
easy armchair computer generated 3d model. designed by jeanneret, pierre.
3ddd
$1
Pouf EASY
... easy
3ds max 2010.v-ray 2.40.03.file formats fbx,obj. pouf desiree 2014 easy. dimensions 100x100x45 cm.
design_connected
$18
Easy Armchair
...easy armchair
designconnected
fsm easy armchair computer generated 3d model. designed by hartmann, markus.
design_connected
$16
Easy Chair
...easy chair
designconnected
magis easy chair computer generated 3d model. designed by seymour, jerszy.
design_connected
$16

Easy Rider
...easy rider
designconnected
bulo easy rider computer generated 3d model. designed by venlet, danny.
design_connected
$11

Easy Footstool
...easy footstool
designconnected
fsm easy footstool computer generated 3d model. designed by hartmann, markus.
design_connected
$18

Doda - Easy
...doda - easy
designconnected
molteni & c doda - easy computer generated 3d model. designed by laviani, ferruccio.
Base
archibase_planet
free
Base
...base
archibase planet
base column column base
base 1 - 3d model (*.gsm+*.3ds) for interior 3d visualization.
archibase_planet
free
Base
...base
archibase planet
base column base column
base 5 - 3d model (*.gsm+*.3ds) for interior 3d visualization.
archibase_planet
free
Base
...base
archibase planet
base column column base
base 7 - 3d model (*.gsm+*.3ds) for interior 3d visualization.
archibase_planet
free
Base
...base
archibase planet
base column column base
base 2 - 3d model (*.gsm+*.3ds) for interior 3d visualization.
archibase_planet
free

Base
...base
archibase planet
base column column base
base 3 - 3d model (*.gsm+*.3ds) for interior 3d visualization.
archibase_planet
free
Base
...base
archibase planet
base column column base
base 4 - 3d model (*.gsm+*.3ds) for interior 3d visualization.
archibase_planet
free
Base
...base
archibase planet
base column base column
base 6 - 3d model (*.gsm+*.3ds) for interior 3d visualization.
archibase_planet
free
Base
...base
archibase planet
foundation base
column base ionic - 3d model (*.gsm+*.3ds) for interior 3d visualization.
archibase_planet
free
Base
...base
archibase planet
foundation base
column base tuscan - 3d model (*.gsm+*.3ds) for interior 3d visualization.
design_connected
$18
Base
...base
designconnected
tom dixon base computer generated 3d model. designed by dixon, tom.
design_connected
$27

...print
designconnected
moroso print computer generated 3d model. designed by wanders, marcel.
3ddd
free

Eichholtz Prints
...- eichholtz print central station i
13 - eichholtz print central station ii
14 - eichholtz print marisa
15 - eichholtz print tish
3ddd
$1

Eichholtz Prints
...print abstract - set of 2
10 - eichholtz print orange abstract
11 - eichholtz print buddha right
12 - eichholtz print buddha left
turbosquid
$1

... available on turbo squid, the world's leading provider of digital 3d models for visualization, films, television, and games.
3ddd
free

Eichholtz Prints
...of 4
2 - print dunbar 2 set of 4
3 - print guadeloupe 1 set of 4
4 - print guadeloupe 2 set of 4
5 - print giles
6 - print trett
3ddd
$1

Eichholtz Prints
...nt tutti frutti
3 - eichholtz prints watson - set of 2
4 - eichholtz prints antique nautilus - set of 2
5 - eichholtz print tiara
3d_export
$5

Monster for printing
...monster for printing
3dexport
monster 3d model printing
3ddd
free

printed rug
...printed rug
3ddd
ковер
very creative printed rug
3ddd
free

Eichholtz Prints
...иал: бумага
габариты (вхш): 72 x 62 см
описание: print sweetmeat - постер в деревянной раме.
3 - prints varsity set of 2
арти
3ddd
free

Art Print Posters
...art print posters
3ddd
прованс
art print posters by patrician prints