
Thingiverse
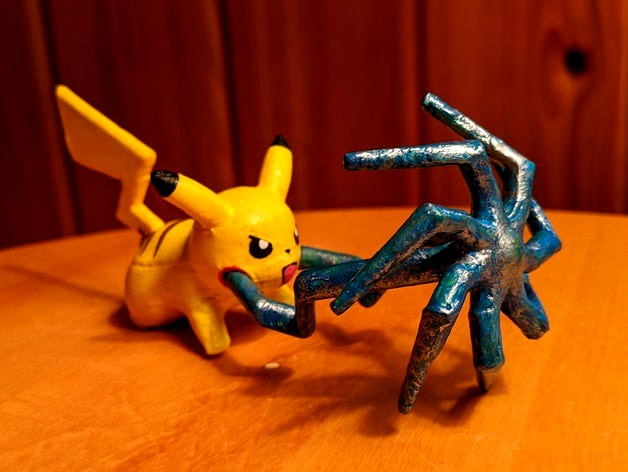
Thunderbolt Pikachu
by Thingiverse
Last crawled date: 6 years, 5 months ago
I made a basic electric attack accessory for Prolific3D's Pikachu model. I designed it in Solidworks, mainly through a series of lofts. It actually prints quite well with minimal and easy to remove supports and attaches nicely to the Pikachu model (glue not necessary for most purposes).
To Print:
Pikachu needs to be printed with holes in its face (representing the red spots) for the thunderbolt model to fit into. I didn't actually edit Prolific3D's Pikachu's stl to add these holes, instead I just added a copy of the thunderbolt stl as a modifier in PrusaSlicer. If you use PrusaSlicer, the "pika with thunderbolt holes.3mf" file can be loaded as a project with the thunderbolt modifier already in place and all you have to do is click slice to get a gcode with holes (pictures attached). Otherwise, you can use the "Use this to make holes in Pikachu's face_Pika Thunderbolt basic.STL" to model the holes. Note this file has a larger diameter at the end then the "pika thunderbolt final assembly.stl" file to create the appropriate tolerances.
The thunderbolt can be printed with the spiral ball end facing down. I found that it prints with just a small cylindrical support enforcer at its base. Again, the "Pika Thunderbolt.3mf" has this project made in PrusaSlicer. Otherwise, use the "pika thunderbolt final assembly.stl" file.
Assembly:
Here is a short video demonstrating how the thunderbolt fits in. It holds reasonably well without glue (the two ends pinch towards each other to hold it in place).https://youtu.be/7z0ZFMMwvYk
Painting:
I'm new to painting models and trying to mimic lightning with acrylic paints proved to be quite a challenge. The best solution I found was a neon blue base with a light dry brushing of metallic silver on top. I tried doing a yellow base lightning, but it failed to contrast with pikachu and didn't look very good. It might also be worth trying just a straight metallic silver coat with nothing else, I was just hesitant to try it because I thought it might look like metal as opposed to lightning.
To Print:
Pikachu needs to be printed with holes in its face (representing the red spots) for the thunderbolt model to fit into. I didn't actually edit Prolific3D's Pikachu's stl to add these holes, instead I just added a copy of the thunderbolt stl as a modifier in PrusaSlicer. If you use PrusaSlicer, the "pika with thunderbolt holes.3mf" file can be loaded as a project with the thunderbolt modifier already in place and all you have to do is click slice to get a gcode with holes (pictures attached). Otherwise, you can use the "Use this to make holes in Pikachu's face_Pika Thunderbolt basic.STL" to model the holes. Note this file has a larger diameter at the end then the "pika thunderbolt final assembly.stl" file to create the appropriate tolerances.
The thunderbolt can be printed with the spiral ball end facing down. I found that it prints with just a small cylindrical support enforcer at its base. Again, the "Pika Thunderbolt.3mf" has this project made in PrusaSlicer. Otherwise, use the "pika thunderbolt final assembly.stl" file.
Assembly:
Here is a short video demonstrating how the thunderbolt fits in. It holds reasonably well without glue (the two ends pinch towards each other to hold it in place).https://youtu.be/7z0ZFMMwvYk
Painting:
I'm new to painting models and trying to mimic lightning with acrylic paints proved to be quite a challenge. The best solution I found was a neon blue base with a light dry brushing of metallic silver on top. I tried doing a yellow base lightning, but it failed to contrast with pikachu and didn't look very good. It might also be worth trying just a straight metallic silver coat with nothing else, I was just hesitant to try it because I thought it might look like metal as opposed to lightning.