Thingiverse
TheFilclone by revere521
by Thingiverse
Last crawled date: 4 years ago
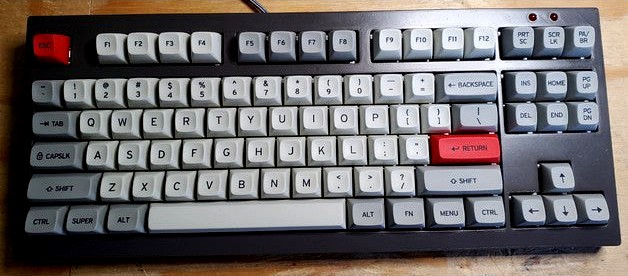
Since I designed a designed a Filco - compatible keyboard case that emulates the shape of the Drop CTRL, it was logical to also just design one that was similar to the majestouch...so i give you TheFilclone!
My intention again was to glue-up the individual parts; then sand and fill the print and paint it. This is again based on the Phantom PCB (since that's originally a Filco replacement board), but rather than design a custom plate - this uses the many choices of commercially available plates.
This should mean that you can build a keyboard PCB - plate sandwich with the phantom and a corresponding plate, or with many other TKL PCB's and plates out there designed to fit in case layout similar to the Filco Majestouch, or just refresh you existing Filco with something custom.
I did put the LEDs in a non standard location, I still don't like the choice to place them in the row gap.
I included all the files as STEP in the archive, so feel free to remix or modify to your heart's content. This also means that if you wanted to try to build a GoN NERD/NERD TKL, H87a, or the Kprepublic XD87 should all be able to fit - possibly with some small custimization to the model.
More to come as I sort this out, but the files themselves are ready to print.
Parts List:
Phantom PCB (mechanicalkeyboards.com)
125 ANSI Aluminum Plate (mechanicalkeyboards.com)
Teensy 2.0 (available all over the place - amazon.com, pjrc.com)
87 switches of your choice
5 .Plate Mount TKL stabilizer kit - i like the sentraq ones on amazon
87x IN4148 diodes - you can get 100 pack on Amazon for just a few dollars
2x 5mm LEDs and appropriate resistors
USB B Mini cable (for the teensy - other boards and controllers may have USB b micro, or USB C)
8x M4x12mm screws (socket insert cap screws) to attach the top to the bottom.
Keycaps
Assembly:
Print the top and bottom halves along with the small cable cover if you want.
Trim and file the edges to clean the print - especially the mating faces
Pin the halves together to form a full top and bottom. The halves are designed to be pinned with 1/8" brass rod - but you can use bamboo skewers as well.
Test your assembled keyboard for fitment and alignment - some trimming, filing, etc. will most likely be needed to get everything fitted nicely. (if you went with the Phantom - there are several guides on the internet and youtube for assembly)
Glue up the top halves and bottom halves (I just use gel superglue)
once its all dry, assemble the top and bottom to test fit again - this time i included M4 threads in the top to help keep the assembly tight, but don't over-torque the threads
Optional: Sanding and Painting
with the top and bottom all assembled and screwed together, sand all the faces with 320 grit sandpaper to remove any printing lines and blemishes.
Use sandable putty / moldable epoxy / automotive body filler to fill any voids (try not to fill the seam between the top and bottom.
Once dry, sand again with 320 grit, then 600, then 800 - repeat as desired to get the smoothness you want. PLA will clean up surprisingly nice this way.
once you are ready, separate the parts and paint with a few light coats of spray paint following the product instructions. I used Rustoleum painter's touch. It will adhere to plastic just fine and does not require primer.
allow everything to dry and reassemble the keyboard including the internal parts
Similar models
thingiverse
free
TheDroppelganger - A Filco Compatible 87 Key Mechanical Keyboard by revere521
...mazon
diodes
2 5mm leds and appropriate resistors
usb b mini cable
8x m4x12mm screws (socket insert cap screws)
keycaps
assembly:
thingiverse
free

100 "00" Capsule Filler Machine
...ed, and then you are done. (you will normally hear a click when a capsule is closed.)
*note: top half is the small capsule plate.
thingiverse
free
TKL Keyboard Shell by DatulabTech
...rt to be compatible with the usb port of the teensy. i haven't tested this yet, so if it doesn't fit, please let me know.
thingiverse
free
The1987 - A Modular Retro-Inspired 87 Key Mechanical Keyboard
...pcb (if you go that way) teensy 2.0 or similar micro-controller 2 leds (i used these:3mm low intensity red...
thingiverse
free

Pokeball USB Battery Holder by chronarion
...it:
added a nice render :)
added some wip pictures of bondo covered half.
i'll add more pictures as my paint finishes drying.
thingiverse
free

Modular Mechanical Keyboard Hotswap Sockets by elgiraffe
...he pcb, then pressed that into the bottom, then wired in the controller, then pressed the plate on and added switches and kecaps.
thingiverse
free

Gherkin Bottom Plate by msglab
...too low to plug the usb cable.
for a little more information you can check the page i put together about assembling it:
msglab.co
thingiverse
free

Ducky One Cable Saver (Full and TKL) by doctriam
... in place, and i have made two unusable $100+ mechanical keyboards once more usable.
no special printing details. no supports.
thingiverse
free

Mercutio Keyboard Case by HamsterDuffy
...bottom screw holes with a small screwdriver or something similar with a diameter of less than 2mm.) -- assemble...
thingiverse
free

MicroMesh Holder & Drying Rack by tswalter
...hed sanding, rinse all the pads under running water and set out to dry. when dry you can store them in the rack on the left side.
Revere521
thingiverse
free

5x5 Numpad Bumper by revere521
...easy to print, 10% infill with no need for rafts or supports on my i3 clone.
pictures of it installed - ignore my cluttered desk.
thingiverse
free

Arcade Button - 6mm Tactile Pushbutton Switch Remix by revere521
... topped in the body; and to add a little resistance to the press (not strictly necessary, just an aesthetic choice for the feel).
thingiverse
free

Mini UNTZtrument Midi Controller - Pro Micro Remix by revere521
...s to use the teeonardu board library in the arduino ide
i included my sketch, but its unchanged from the one on the adafruit site
thingiverse
free

TheBasic - A Minimalist 87 Key Mechanical Keyboard by revere521
...ready have, a standard filco compatible tkl plate and want to use that rather than having a cutting service make you one.
enjoy!
thingiverse
free
TheDroppelganger - A Filco Compatible 87 Key Mechanical Keyboard by revere521
...mazon
diodes
2 5mm leds and appropriate resistors
usb b mini cable
8x m4x12mm screws (socket insert cap screws)
keycaps
assembly:
thingiverse
free

TheUltiPad - a 23 Key Number Pad/Macropad with Rotary Encoder by revere521
...
let me know how you make out!
edit, added a slightly shorted bottom half (by 3mm) its the bare minimum to fit my internal parts.