Thingiverse

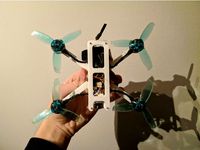
The WU TANK : Micro Freestyle FPV frame by ledroneclub
by Thingiverse
Last crawled date: 2 years, 11 months ago
If you like my work please consider following/subscribing to my feeds : Instagram and YouTube
Or you can support me via ko-fi
The WU TANK! is an evolution of my previous MOD-L design. It's still intended to be a versatile platform but i tried to remove the limitations of the previous version regarding to bigger setups (5 and 6" mainly). The 5" frame is 65g. it's slightly heavier than an ultralight like the 2Fiddy but it's more durable and less vibration prone.
So now this frame can be used for freestyle and even long range !
Here are the improvements & specs :
arm options (for now) :
5.25" WideX
5.25" DeadCat
6" WideX
6" DeadCat
HD capable (obviously)
WAY stronger and stiffer (better at vibrations management)
Low profile body (16mm tall for a Vista setup while still having 22mm for the camera in the front)
improved arm interlock
Supports 20x20, 25.5x25.5 (AIO turned 45°) and 30.5x30.5 electronics
12x12 motor mount (thought for 2203.5/2204/2205/2203.5 setups mainly), it even supports Ummagawd 2004 motors !
M2 hardware
backward compatible with most of the printable accessories of the MOD-L
Assembly and hardware needed
The whole body assembly is using some uncommon components but they're easy to find, here,s what you need :
12x BetaFPV M2 pressnuts : https://betafpv.com/products/m2-clamping-nuts (available in various shops as well)
8x M2x10mm screws for arms locking
4x M2x18mm screws for rear vista assembly
12x M2x6mm screws for the standoffs
4x M2 22mm standoffs (front) : https://www.aliexpress.com/item/32958289804.html
2x M2 16mm pressnuts (rear, you can add 2 more if you don't use a Vista) : https://www.aliexpress.com/item/32958289804.html
Check this tips guide for assembly (pdf and images)
getting the frame cut
My recommended places are www.cncmadness.com (CA/US/Worldwide) and www.carbon-posten.de (EU). Great quality cuts and fair pricing/delivery time.
you need to send the provided DXF files with the following instructions :
4x arms (choose the 5in or 6in file according to your needs) : 4mm carbon fiber
1x front plate : 2mm carbon fiber
1x rear plate : 2mm (or even 1.5mm) carbon fiber
1x top plate : 2mm carbon fiber
You can optionally ask for countersunk holes on the rear of the top plate and have your screws sitting flush.
Feel free to ask me for directions and help.
Installing the vista
Some infos here. on this frame the Vista is supposed to be installed in such a way that it's mounting screws are touching the top plate.
To achieve this i provide some 2.5mm TPU spacers to sit under the vista and highly recommend using M2x18mm hex screws coming from the top of the Vista trough the pressnuts on the frame. This allows the vista assembly to support the center of the top plate as there are no standoffs here.
Check the pictures and document provided, you'll get the idea quite easily.
Extra gear
I'm slowly adding accessories, for now :
Universal cam mount (m3 hole)
Insta360 GO (the 1st one) mount (m3 hole)
Insta360GO 2 mount (m3 hole, untested)
GoPro Lite V2 mount (m3 hole)
Insta SMO4K mount (m3 hole)
DJI 20x20 cam mount
Video antenna mount (cherry and Atomic, 4mm diameter hard tube)
I modified the mount of the mod-l which was M2 to make it M3 and slightly bigger and stronger. So this one provided here is not backward compatible.
Similar models
thingiverse
free

FRL v# by stynkebutt
...ad screw m3 x 12, qty 9 (arms)
button head screw m2 x16, qty 4 (vista)
hex nut m2, qty 4 (vista)
3mm standoff, round, 35mm, qty 4
thingiverse
free

Mini X Quad Frame for ZMR250 Arms by Phil_590
...scs
1x naze32 or cc3d board
1x reciever (i used the frsky d4r-ii)
2x 5x3 props (cw)
2x 5x3 props (ccw)
1x 1000mah 3s lipo battery
thingiverse
free
Standardlad X 3" Universal durable Carbon frame by Flowr
...otor post
instead of standoffs use m2*25mm screws and 3d printed standoffs + camera mount (14x14mm nano size cameras compatible)
thingiverse
free

VIFLY Finder 2 Screw Mount for QAV Frames by CodeGrue
...for the standoffs and the forward holes are m2 for vista unit compatible screws.
build out of tpu for the light to shine through,
thingiverse
free

5to6 Incher - Custom Ultralight Freestyle Frame Prototype by Flowr
...ped from aliexpress (enough hardware for 2 builds)
total price : $36 shipped (as a bonus you can choose your own standoff color)
thingiverse
free

DIY Fpv Drone Motor Mount and Frame Center Arm by onratak
...ore strength motor mount)
2x pertinax with holes ( this piece generaly used in electronic )
4x m2 20mm screw and nut ( for frame)
thingiverse
free

Jetson Nano Enclosure
...&var=592004786161&_trksid=p2057872.m2749.l2649
if the module does not come with m3 standoffs you'll need 4x of those.
thingiverse
free

Creality CR-5 Pro - BTT SKR MINI E3 V2.0 support plate by FlorianKinder
...x) m3*8 screws (attach the plate to the chassis)
5x m3*12 screws (controller)
4x m2*12 screws (raspberry)
4x m2*12 screws (relay)
thingiverse
free

Switchblade 180 Quadcopter by Bsand1215
...fs (or your choice of standoffs)
assortment of provided m3 spacers
p.s. i know my build is messy. i have plans on fixing it soon.
thingiverse
free

Tadpole Caddx Vista Nebula Pro Camera Mount - zip tie by pathfinderzero
...adpole camera cage.
i also have another camera mount using m2 standoffs. see link here https://www.thingiverse.com/thing:4816308
Ledroneclub
thingiverse
free

M3 TPU Spacers by ledroneclub
...
thingiverse
those are m3 4mm and 3mm height spacers.
i use those on my flosstyle quadcopter frame to fit the 4 in 1 esc and fc.
thingiverse
free

RC Remote switch knob/end by ledroneclub
...ub
thingiverse
custom stick end for rc remote switches. i use these on the prearm and arm switches to make them more accessible.
thingiverse
free

FrSky Taranis X9D Gimbal protection by ledroneclub
...ectly in place. so this one is a bit larger.
i also added one hole in order to be able to attach both gimbal protectors together.
thingiverse
free

FlosStyle rear plate (vtx mount) by ledroneclub
...ubes have a length difference because this frame uses 4,5 mm lock nuts on the middle standoffs.
i print this using tpu filament.
thingiverse
free

FlosStyle GoPro Session Mount 30° by ledroneclub
...camera.
changelog
18 apr. 2019 : uploaded a v2 version that has a thicker bottom base. prevent ripping the mount on a hard crash.
thingiverse
free

Project AK5 by ledroneclub
...r shorter) screws for assembling the body and arms (depends on carbon thickness, 10mm would correspond to 4mm arm and 2mm plates)
thingiverse
free

DC 5.5mm barrel plug cover + holder by ledroneclub
...little holder attaches to the plug cable and prevents losing the cap.
this is intended to be printed using tpu/flexible filament.
thingiverse
free

Caddx Ant Lite mount for Toothpicks and Whoops by ledroneclub
... ant lite fpv camera made primarily for whoops and toothpicks. it's a remix of my previous design for the runcam nano3 camera
thingiverse
free

Yet another SMA spinner (finger wrench) by ledroneclub
...lug, that means that the diameter is a bit smaller than sma plug specification. i use tpu and it's fine but be aware of that.
thingiverse
free

generic quadcopter 25° gopro camera mount by ledroneclub
...quot; size camera as well as a hero (3 and newer) format one.
it's still being tested and i plan to add other angles as well.
Wu
turbosquid
$3

WU MODEL
...alty free 3d model wu model for download as max, fbx, and obj on turbosquid: 3d models for games, architecture, videos. (1644769)
turbosquid
$600

wu-tang.max
... available on turbo squid, the world's leading provider of digital 3d models for visualization, films, television, and games.
3d_export
$65

wu gorge
...wu gorge
3dexport
simple rendering of the scene file
3d_export
$65

wu peng boat
...wu peng boat
3dexport
simple rendering of the scene file
3d_export
$15

golden wu lou
...e up render. - all parts and materials are logically named. other formats ================= - collada (.dae) - autodesk fbx - obj
turbosquid
free

Wu Tang Clan Logo Statuette
...model wu tang clan logo statuette for download as obj and fbx on turbosquid: 3d models for games, architecture, videos. (1296321)
3d_export
$5
eggcollective wu side table stool
...x4096)<br>materials ready for v-ray and corona (2016-2018 3ds max)<br>also, there're .3ds, .dwg, .fbx, .obj files
3d_export
$99

Monkey King 3D Model
...king 3d model 3dexport the monkey king sun wukong wu kong china chinese qitiantaisheng bi mawen journey to the...
3d_export
$59

Cartoon The Monkey King 3D Model
...king 3d model 3dexport the monkey king sun wukong wu kong china chinese journey pilgrimage to west myth orangutan...
3d_export
$70
caic wz-10
...air-to-air combat capability as well. initiated by chief designer wu ximing, the project had early russian involvement with kamov...
Freestyle
turbosquid
$1

bmx freestyle
...quid
royalty free 3d model bmx freestyle for download as max on turbosquid: 3d models for games, architecture, videos. (1423770)
3ddd
free
Кушетка-Freestyle фабрика Modo
..., modo , кушетка
кушетка-freestyle фабрика modo
3ddd
$1

Molteni & C Freestyle
... подушка , плед , пуф
molteni & c freestyle
3d_export
$15

Yoyo freestyle 3D Model
...e 3d model
3dexport
yoyo smile freestyle hobby fun trick happy enjoy have roll toy
yoyo freestyle 3d model moodycz 79929 3dexport
3ddd
$1
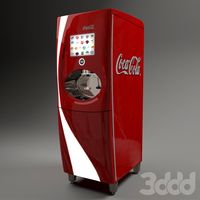
Freestyle Coke dispencer
...cer
3ddd
автомат
автомат для раздачи прохладительных напитков для ресторанов и баров, разработан дизайнерским центром пининфарина
turbosquid
$15

Cola Freestyle Soda dispensing machine
...oda dispensing machine for download as max, max, fbx, and obj on turbosquid: 3d models for games, architecture, videos. (1609536)
3d_export
$20

Samsung the Freestyle
... e3d, one color is configured, white. - formats: aep, bip, blender, e3d, f3d, fbx, iges, ksp, max 2014, max 2017, obj, step, stl.
humster3d
$75
3D model of Mazda BT-50 Freestyle Cab 2016
... model of mazda bt-50 freestyle cab 2016 in various file formats. all our 3d models were created maximally close to the original.
cg_studio
$159

Coca Cola Freestyle Jet Fountain of the Future3d model
... .xsi - coca cola freestyle jet fountain of the future 3d model, royalty free license available, instant download after purchase.
3d_ocean
$6
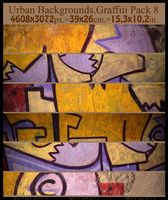
Urban backgrounds(v-8)
...urban backgrounds(v-8) 3docean art backgrounds design freestyle graffiti grunge messy print retro texture underground urban wall...
Fpv
turbosquid
$1

FPV VTX Antenna
...e 3d model fpv vtx antenna for download as obj, fbx, and stl on turbosquid: 3d models for games, architecture, videos. (1230317)
3d_export
$9

Fpv logo 3D Model
...onogram vehicle part of auto transport 3d model logo emblem detailed high quality badge
fpv logo 3d model rmodeler 59628 3dexport
3d_export
$8
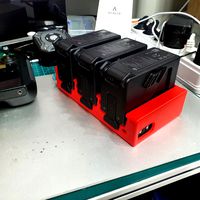
dji fpv battery slot holder
...er for 3 dji fpv batteries. holds perfectly without shaking. need 1 m3 countersunk head bolt. need to print 6 pin, 1 case, 1 cap.
3d_export
$10
fpv camera hd 700tvl
...aterials are logically named<br>the main format is in 3ds max 2009.<br>satisfcation garranteed..<br>thank you !
thingiverse
free
FpV Mount (SOPORTE FPV) by elborjas1987
...fpv mount (soporte fpv) by elborjas1987
thingiverse
this is a fpv mount with the same holes of naza base.
thingiverse
free
fpv by tbutera
...fpv by tbutera
thingiverse
fpv
thingiverse
free
fpv by tbutera
...fpv by tbutera
thingiverse
fpv
thingiverse
free
FPV DRONE ROOSTER DJI FPV PART
...fpv drone rooster dji fpv part
thingiverse
fpv drone rooster dji fpv install part
thingiverse
free
FPV monitor
...tml?rmmds=myorder&cur_warehouse=cn
link for download : https://cults3d.com/fr/mod%c3%a8le-3d/divers/fpv-monitor-ecran-fpv-faf
thingiverse
free
FPV receiver mount for FPV display by petrex
...eceiver mount for fpv display by petrex
thingiverse
aomway receiver mount for field view 777 fpv monitor. with small cable tray.
Micro
3ddd
$1
Micro
...micro
3ddd
автобус
turbosquid
$80

MICRO
...ty free 3d model micro for download as max, c4d, obj, and fbx on turbosquid: 3d models for games, architecture, videos. (1700743)
3ddd
$1

JBL Micro Wireless
... micro , колонка , плеер
jbl micro wireless
turbosquid
$10
Suppressor Micro
...quid
royalty free 3d model suppressor micro for download as on turbosquid: 3d models for games, architecture, videos. (1380433)
turbosquid
$20
Micro Meter
...osquid
royalty free 3d model micro meter for download as fbx on turbosquid: 3d models for games, architecture, videos. (1350448)
turbosquid
$7

NIghtstand Micro
...d
royalty free 3d model nightstand micro for download as max on turbosquid: 3d models for games, architecture, videos. (1248117)
3ddd
$1
Micro wind turbine
...micro wind turbine
3ddd
турбина
micro wind turbine for your green building projects
turbosquid
$29

Micro Servo.max
... available on turbo squid, the world's leading provider of digital 3d models for visualization, films, television, and games.
turbosquid
$29
Micro Speakers
... available on turbo squid, the world's leading provider of digital 3d models for visualization, films, television, and games.
turbosquid
$20

micro anime.mov
... available on turbo squid, the world's leading provider of digital 3d models for visualization, films, television, and games.
Tank
archibase_planet
free

Tank
...ibase planet
tank tank-wagon tank-truck tank-car
tank train small n110113 - 3d model (*.gsm+*.3ds) for exterior 3d visualization.
3d_ocean
$49
Tank
...tank
3docean
kv-1s tank
tank kv-1s
archibase_planet
free
Tank
...tank
archibase planet
tank medium tank
tank wmcvun n070712 - 3d model (*.3ds) for exterior 3d visualization.
archibase_planet
free
Tank
...k
archibase planet
tank light tank bt-2 high-speed tank
tank bt-2 n200814 - 3d model (*.gsm+*.3ds) for exterior 3d visualization.
3d_export
$5

tanks
...tanks
3dexport
tanks
3d_export
free
tank
...tank
3dexport
tank
archibase_planet
free
Tank
...tank
archibase planet
tank heavy tank
tank abrams l n090511 - 3d model (*.3ds) for exterior 3d visualization.
archibase_planet
free

Tank
...tank
archibase planet
tank medium tank
tank m60 n070712 - 3d model (*.gsm+*.3ds) for exterior 3d visualization.
archibase_planet
free

Tank
...tank
archibase planet
tank medium tank
tank female n070712 - 3d model (*.gsm+*.3ds) for exterior 3d visualization.
3d_export
$5
tank
...tank
3dexport
tank lowpoly
Frame
archibase_planet
free

Frame
...frame
archibase planet
frame photo frame
frame n190813 - 3d model (*.gsm+*.3ds) for interior 3d visualization.
archibase_planet
free

Frame
...frame
archibase planet
frame photo frame
frame n071113 - 3d model (*.gsm+*.3ds) for interior 3d visualization.
3ddd
$1

Frame
...frame
3ddd
frame
3ddd
free

Frame
...frame
3ddd
frame
archibase_planet
free

Frame
...frame
archibase planet
frame mirror frame ornament
frame n260113 - 3d model (*.gsm+*.3ds) for interior 3d visualization.
archibase_planet
free

Frame
...frame
archibase planet
frame photo frame
frame photo n190813 - 3d model (*.gsm+*.3ds) for interior 3d visualization.
archibase_planet
free

Frame
...frame
archibase planet
frame window window frame
frame 1 - 3d model (*.gsm+*.3ds) for interior 3d visualization.
archibase_planet
free

Frame
...frame
archibase planet
frame window frame window
frame 3 - 3d model (*.gsm+*.3ds) for interior 3d visualization.
archibase_planet
free

Frame
...frame
archibase planet
frame wall frame decoration
frame 1 - 3d model (*.gsm+*.3ds) for interior 3d visualization.
archibase_planet
free

Frame
...frame
archibase planet
frame window window frame
frame 2 - 3d model (*.gsm+*.3ds) for interior 3d visualization.