Thingiverse
The U Mansion by umarmirza322
by Thingiverse
Last crawled date: 2 years, 12 months ago
YouTube Video: https://www.youtube.com/watch?v=3O-guaq50j8
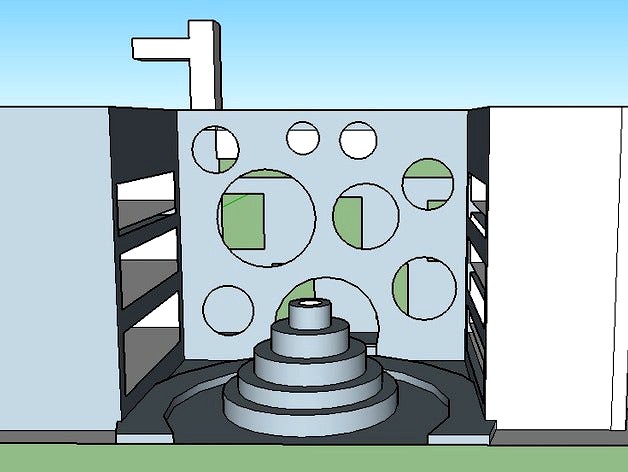
The U Mansion was inspired by a Mansion I saw in a Bollywood movie. The U Mansion was created using a 3D Object building software called SketchUp. The design started from a single sheet of filament placed virtually on the base of the software as a property location. Then the floorplan for the building was made, and the building was created.
The building was created by a series of push/ pull and erase. The first step was to pull the floor plan so it is 3d object. Then, the door was centered and creating using the curved line tool. The windows in the front were made using the circle tool and a good amount of circles were created making sure none overlapped. The side windows were next made using the rectangle tool and so were the back and front, side windows. The back door was made also using the rectangle tool. After all the doors and windows were created, the center portion of each door and window was erased. Then, I placed rectangles on the inside of the right and left side of the building to show floors as they will be able to be seen from the outside of the building. After the interior and exterior sides of the building was done, the last step was to create the top/ roof of the building. According to the movie, the mansion had a rectangular pool on one side the roof with tables on the other side. I created the pool and dive board using rectangles and the push/pull tool. The tables were created using the same circles that were used for the front windows of the building and the push/pull tool. On the top of the building, The fencing was also made using three rectangles that connected and he push/pull tool. Now the Mansion/ Main Building was completed, I needed to finish the front of the building.
The movie showed that the Mansion had a one way, half circle drive thru and a fountain. The drive thru was once again made using the half circle tool. I had to use the tool two times in order to make both sides of the drive thru. I then lifted the drive thru a bit to show it was a drive thru and not a part of the lawn of the mansion. The fountain was made partially the same way. First, in the center of the drive thru, and in front of the building I laid down 5 circles, one inside the other. Then, I used the push/pull tool to make them like a tower pulling one circle at a time. Finally I made a sixth circle on top of the fountain and then erased it to show the tube for water to flow from. After this step, the Mansion was finished.
Along the way, I had to redesign the the windows a bit because I could not compare all the actual dimension of the building compared to the windows because I did not have an actual blueprint or design of the building in hand. Other than that, the design was made according to the photos and video in the movie. My model can not move as it is an building and does not have any moving parts like a motor or robot. My model is cool because it shows a replica of something in the world I have not seen by my own eyes but from video and pictures from a movie I have seen.
In order to print the model correctly I recommend using both supports and rafts. Also, I recommend printing the model the way is was created and have the building straight. Not on it’s sides or back. Also, don’t forget to make sure the model is laid flat to the printing bed at time of printing. By following these steps, you should have a successful print.
Similar models
3dwarehouse
free

Push/Pull Tool
.../pool tool is a something thats pushed on a rectangle, circle and polygon. and use push/pull tool to use a building for sketchup.
3dwarehouse
free

Sketchup 8 icon
...sketchup 8 icon
3dwarehouse
i made this with a few tools (rectangle, paintbucket, eraser, and push/pull) #sketchup
3dwarehouse
free

greek temple
...greek temple
3dwarehouse
line, arc, eraser, follow me, push/pull, rectangle, circle, tape measure tool
3dwarehouse
free

only rectangle and push/pull used
...pull used
3dwarehouse
i made this thing whit only my rectangle and push and pull tool #amazing #fun #pull #push #rectangle #tool
grabcad
free

Tissue Box
...6" inch wide top. create a circle in the middle of the box. use the push pull tool push down the circle until it disappears.
3dwarehouse
free

Pyramid04
...the stairs were all made with a rectangle that was divided into individual stair steps and then extruded with the push/pull tool.
3dwarehouse
free

kohlcory
...kohlcory
3dwarehouse
used rectangle push/pull move and circle tools
3dwarehouse
free

My First Farm House
...s, sketchup tools such as move, erase, rectangle, circle/polygon, push/pull, follow me, offset, tape, orbit, hand, zooming etc...
3dwarehouse
free

Chair
...chair
3dwarehouse
created using pencil , rectangle , push / pull tool
3dwarehouse
free

Mirror
...mes step 6 click rotate step 7 rotate circle step 8 move step 9 click paint wood and colour gray and mirrors and you're done!
Mansion
3d_export
$5

Mansion
...mansion
3dexport
this is mansion 3d model. it have no furniture in there, but have some rooms
3ddd
free
Dan Mansion
...dan mansion
3ddd
dan mansion , барный
dan mansion
design_connected
$16
Mansion
...mansion
designconnected
erich ginder studio mansion computer generated 3d model. designed by ginder, erich.
turbosquid
$80

Mansion
...id
royalty free 3d model mansion for download as 3ds and max on turbosquid: 3d models for games, architecture, videos. (1258411)
turbosquid
$80

Mansion
...id
royalty free 3d model mansion for download as 3ds and max on turbosquid: 3d models for games, architecture, videos. (1257616)
3d_export
$100

mansion spencer
...mansion spencer
3dexport
i modeled a mansion based on resident evil 1's spencer mansion with furniture.
3d_export
$18
qin qiong mansion-gate of qin mansion
...qin qiong mansion-gate of qin mansion
3dexport
qin qiong mansion-gate of qin mansion<br>3ds max 2015
3d_export
$18

jingzhao mansion lobby-general mansion 12
...jingzhao mansion lobby-general mansion 12
3dexport
jingzhao mansion lobby-general mansion 12<br>3ds max 2015
3ddd
free

Mansion Bed
...3ddd
mansion
http://www.bedroomfurniturediscounts.com/wynwood-cordoba-king-mansion-bed-in-antiguo-blanco-w1636-95k.html
turbosquid
$85

mansion
... available on turbo squid, the world's leading provider of digital 3d models for visualization, films, television, and games.
U
3ddd
$1

wii u
...wii u
3ddd
wii , игровая приставка
wii u
turbosquid
$10

U Couch
...turbosquid
royalty free 3d model u couch for download as c4d on turbosquid: 3d models for games, architecture, videos. (1388804)
turbosquid
$7

U for Umbrella
...uid
royalty free 3d model u for umbrella for download as max on turbosquid: 3d models for games, architecture, videos. (1695419)
turbosquid
$5

Letter U
...urbosquid
royalty free 3d model letter u for download as max on turbosquid: 3d models for games, architecture, videos. (1408533)
turbosquid
$5

Letter u
...urbosquid
royalty free 3d model letter u for download as max on turbosquid: 3d models for games, architecture, videos. (1408532)
3d_ocean
$4
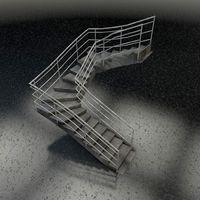
U-shape stairs
...u-shape stairs
3docean
concrete stairs u-shape
concrete u-shape stairs. ceiling height 300cm. stairs width 100cm.
turbosquid
$15
BonePile U
...oyalty free 3d model bonepile u for download as blend and obj on turbosquid: 3d models for games, architecture, videos. (1546306)
turbosquid
$4

FONT U
...quid
royalty free 3d model font u for download as ma and obj on turbosquid: 3d models for games, architecture, videos. (1549191)
3ddd
$1
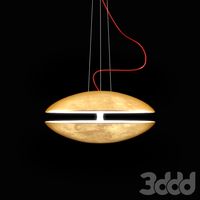
U-Light by Henge
...u-light by henge
3ddd
u-light , henge
designer: massimo castagna
3d_export
$25
gy t hy iy u j u k c b hy u 3D Model
...gy t hy iy u j u k c b hy u 3d model
3dexport
matani
gy t hy iy u j u k c b hy u 3d model tigo 37441 3dexport