Thingiverse
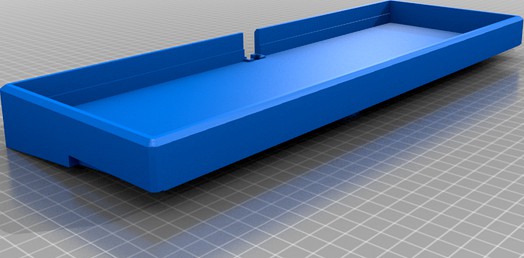
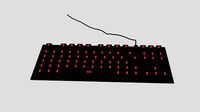
The Teamwolf Special (Front Side Cutouts) - A Ring Gasket Mount Case for the Teamwolf Zhuque Keyboard by BeagleChristo
by Thingiverse
Last crawled date: 3 years, 1 month ago
INTRODUCTION:
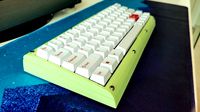
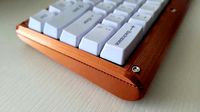
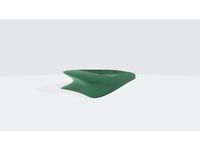
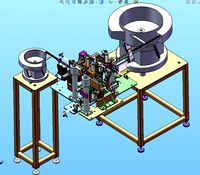
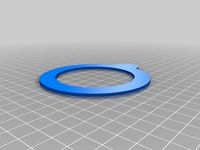
This is a ring gasket mount case for the Teamwolf Zhuque keyboard.
This version has rear side cutouts. Another version has front side cutouts.
INGREDIENTS:
(1) Teamwolf Zhuque plate, PCB, and cord.
(2) ring gasket material [I use the following 4mm diameter gasket: https://item.taobao.com/item.htm?spm=a1z09.2.0.0.26402e8dALgGgH&id=613137269072&_u=120rh52ke619]
ASSEMBLY INSTRUCTIONS
(1) Disassemble your Teamwolf Zhuque keyboard. You will only need the plate, PCB, and cord.
(2) Insert gasket material between the plate and PCB. The gasket will not ring the entire perimeter of the plate/PCB. It will only line the top and bottom, but not the sides, so a length of 720 mm or less should be sufficient. (You can either run the gasket material along the entire top and bottom lengths, or at discrete segments, as you prefer.)
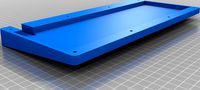
(3) Lower the assembly into the case, taking care to place the rectangular notch of the cord in the cord holder in the case. The gasket material should be resting on the ledges at the top and bottom of the case; the cord should be sandwiched between the metal prong on the Teamwolf plate and the cord holder.
If your print volume is large enough (length ~360mm), then you can print out the "Whole Case" all at once. For those with smaller print volumes, I've divided the case into thirds ("left part," "middle part," and "right part").
TO DO:
Implement replaceable cord mod.
This is a ring gasket mount case for the Teamwolf Zhuque keyboard.
This version has rear side cutouts. Another version has front side cutouts.
INGREDIENTS:
(1) Teamwolf Zhuque plate, PCB, and cord.
(2) ring gasket material [I use the following 4mm diameter gasket: https://item.taobao.com/item.htm?spm=a1z09.2.0.0.26402e8dALgGgH&id=613137269072&_u=120rh52ke619]
ASSEMBLY INSTRUCTIONS
(1) Disassemble your Teamwolf Zhuque keyboard. You will only need the plate, PCB, and cord.
(2) Insert gasket material between the plate and PCB. The gasket will not ring the entire perimeter of the plate/PCB. It will only line the top and bottom, but not the sides, so a length of 720 mm or less should be sufficient. (You can either run the gasket material along the entire top and bottom lengths, or at discrete segments, as you prefer.)
(3) Lower the assembly into the case, taking care to place the rectangular notch of the cord in the cord holder in the case. The gasket material should be resting on the ledges at the top and bottom of the case; the cord should be sandwiched between the metal prong on the Teamwolf plate and the cord holder.
If your print volume is large enough (length ~360mm), then you can print out the "Whole Case" all at once. For those with smaller print volumes, I've divided the case into thirds ("left part," "middle part," and "right part").
TO DO:
Implement replaceable cord mod.
Similar models
thingiverse
free

The Teamwolf Special (Rear Side Cutouts) - A Ring Gasket Mount Case for the Teamwolf Zhuque Keyboard by BeagleChristo
... into thirds ("left part," "middle part," and "right part").
to do:
implement replaceable cord mod.
thingiverse
free

The Cloclès - A Ring Gasket Mount Case for the Hexgears GK707 by BeagleChristo
...e. the gasket material will rest on the ledges inside the case.
to do:
fix interior cable guide.
implement replaceable cable mod.
thingiverse
free

The GK61 Special - A Pseudo Gasket Mount Case for the GK61 by BeagleChristo
...ket and non-gasket versions. in particular, the gasket version works exactly as planned.
november 17, 2020: weight version added.
thingiverse
free
The Château d'If - A Kit for Converting a 60% Tray-Mount Into a Taco Bumper Gasket-Mount Keyboard by BeagleChristo
...ill result in a bumper of about 5.5 mm thickness. this means that the poron will compress about 0.5 mm total in the gasket wells.
thingiverse
free
The Baptistin - A Kit for Converting 60% Tray-Mounts Into a Taco Bumper Gasket-Mount Keyboard by BeagleChristo
...ill result in a bumper of about 5.5 mm thickness. this means that the poron will compress about 0.5 mm total in the gasket wells.
thingiverse
free
The Zaccone - A Kit for Converting Any Standard 60% Tray-Mount Into a Taco Bumper Gasket-Mount Keyboard by BeagleChristo
...sure whether subsequent iterations of the gk61 will work. similary, the yc66 special is based on the yc66 plate...
thingiverse
free

The Baptistin - A Kit for Converting 60% Tray-Mounts Into a Taco Bumper Gasket-Mount Keyboard by BeagleChristo
...ill result in a bumper of about 5.5 mm thickness. this means that the poron will compress about 0.5 mm total in the gasket wells.
thingiverse
free

The Pastrini - A Kit for Converting Any Standard 60% Tray-Mount Into a Taco Bumper Gasket-Mount Keyboard, With Replaceable Magnetic Badge by BeagleChristo
...orenipsvm - https://www.thingiverse.com/thing:276836
ornate picture frame by unwohlpol - http://www.thingiverse.com/thing:2050191
thingiverse
free
The YC66 Special - Gasket Mount, Thick Bezel Version by BeagleChristo
... usb cutout downward by about 2 mm.
repair top center piece: currently, the ledge is not fully attached to the case.
hide screws.
thingiverse
free

PCB Mount Case for the Let's Split Keyboard by EthanSpitz123
...re of a circle rather than a square cutout. that should make it easier to print without supports and it should be more aesthetic.
Teamwolf
thingiverse
free
The Teamwolf Special (Rear Side Cutouts) - A Ring Gasket Mount Case for the Teamwolf Zhuque Keyboard by BeagleChristo
... into thirds ("left part," "middle part," and "right part").
to do:
implement replaceable cord mod.
thingiverse
free

Tenkeyless (TKL) Keyboard Tray by juancgarcia
...keyboard->bluetooth keyboard mod. it was designed to fit my teamwolf zhuque+, but should accomodate any keyboard up to 350mm...
Zhuque
thingiverse
free
The Teamwolf Special (Rear Side Cutouts) - A Ring Gasket Mount Case for the Teamwolf Zhuque Keyboard by BeagleChristo
... into thirds ("left part," "middle part," and "right part").
to do:
implement replaceable cord mod.
thingiverse
free
Generic mechanical keyboard foot by madcat1990
...these are the companies known to work with it: zhuque updates : 10th jan 2021 - re-adjusted the angle...
thingiverse
free
Tenkeyless (TKL) Keyboard Tray by juancgarcia
...keyboard mod. it was designed to fit my teamwolf zhuque, but should accomodate any keyboard up to 350mm wide...
cg_trader
$5

Low Poly Simple Car Zhuque
... zhuque
cg trader
3d asset low poly simple car zhuque , available formats max, obj, 3ds, fbx, mtl, ready for 3d animation and ot
cg_trader
$15

China mercy zhuque staff wings overwatch cosplay | 3D
...d
cg trader
3d print model china mercy zhuque staff wings overwatch , formats include stl, sldprt, ready for 3d animation and ot
Beaglechristo
thingiverse
free
The Mercédès - A Cherry MX-Style Beagle Switch Tester by BeagleChristo
... mx-style beagle switch tester by beaglechristo
thingiverse
this is a switch tester that can hold four cherry mx-style switches.
thingiverse
free

Low-Profile YC66 Foot by BeagleChristo
... is designed to fit a low-profile yc66 that is approximately 12.3 mm thick, so if your model is equivalent, the foot should work.
thingiverse
free

Mechanical Keyboard Spacer for 2011 MacBook Air by BeagleChristo
...ed this solution with my 2011 macbook air. i'm not sure whether it will work with other macbooks or other notebook computers.
thingiverse
free

The YC66 Special - Gasket Mount, Thin Bezel Version by BeagleChristo
...added an alternate version of the top layer that incorporates a blocker to cover the exposed top-right portion of the yc66 plate.
thingiverse
free

The Spada - A Bauhaus 60% Keyboard Case (Modified Tray or Ring Gasket Mount) by BeagleChristo
...auhaus school logo" by ktronik. many thanks to ktronik.
update sept. 7, 2020: added remarks regarding ring gasket mounting.
thingiverse
free
The YC66 Special (Bottom Mount Version) by BeagleChristo
...t bottom of case.
add case foam to bottom of tray.
sound tests:https://soundcloud.com/ogerrbogast/sets/typing-on-the-yc66-special
thingiverse
free

Thick Plate Model for Standard 60% Tray-Mount Keyboard Builds With PCB-Mounted Stabilizers by BeagleChristo
...s; and tinkercad to convert the .svg file to .stl format. (i couldn't figure out how to cut polygons using swillkb directly.)
thingiverse
free

The Herbault - A Sculpted 60% Modified-Tray-Mount Keyboard Case by BeagleChristo
... please note that i have not yet printed this model out, so cannot give any assurances about whether it is feasible or practical.
thingiverse
free

"Subtraction" Block for Use in the Design of 60% Keyboard Cases by BeagleChristo
... "subtraction" model for the usb port. if there is a need for those features, i will post another model on thingiverse.
thingiverse
free
The Faria - A Sculpted 60% Modified-Tray-Mount Keyboard Case by BeagleChristo
... please note that i have not yet printed this model out, so cannot give any assurances about whether it is feasible or practical.
Gasket
turbosquid
$5

Leather Gasket cutter old
...s blend, ma, c4d, max, wire, ztl, usd, ma, 3ds, dae, and gltf on turbosquid: 3d models for games, architecture, videos. (1675900)
turbosquid
$5

Leather Gasket cutter new
...blend, c4d, ma, usd, wire, ztl, max, ma, 3ds, dxf, dae, and d on turbosquid: 3d models for games, architecture, videos. (1675892)
turbosquid
$1
Head Gasket - Single Cylinder Engine
...ngle cylinder engine for download as ige, obj, stl, and sldpr on turbosquid: 3d models for games, architecture, videos. (1233315)
3d_export
$6
the plug for the lights citroen c-crosser
...plug for the lights citroen c-crosser. form for silicone gasket ...
3d_export
free

gothic capsule
...gothic capsule 3dexport die-cast aluminium body<br>pretreated powder coating<br>watertight silicone gasketlt;br>clear toughen dustproof glass<br>high current carrying cable<br>earthing safe connection<br>ss grade...
3d_export
free
first stage reducer
...driving gear shaft, driven shaft, gear, 62056202 bearing, bolt gasket and perspective cover and other small parts. the design...
3d_export
$15
20 sets of vibrating plate direct vibration feeding mechanism
...mechanism diagram, spring plate material distribution vibration plate feeding, gasket vibration plate direct vibration feeder material distribution structure drawing,...
thingiverse
free

Gasket
...gasket
thingiverse
antenna gasket prototype model.
thingiverse
free

gasket by habibisoft
...gasket by habibisoft
thingiverse
gasket
thingiverse
free
Parametric gasket
...just a parametric gasket, with the option of a tab or not.
made to replace a broken gasket from a large spring closed glass jar.
Cutouts
turbosquid
$15

Cutout floorlamp
... available on turbo squid, the world's leading provider of digital 3d models for visualization, films, television, and games.
turbosquid
$4

Cutout Carpet
... available on turbo squid, the world's leading provider of digital 3d models for visualization, films, television, and games.
3ddd
$1

Cutout Candleholders
...rs
3ddd
подсвечник , фонарь , свеча
подсвечники
turbosquid
$17

Cutout Fish Decor
...y free 3d model cutout fish decor for download as max and fbx on turbosquid: 3d models for games, architecture, videos. (1200663)
turbosquid
$8

Cutout 01 3ds
... available on turbo squid, the world's leading provider of digital 3d models for visualization, films, television, and games.
turbosquid
$8

Cutout 01 viz4
... available on turbo squid, the world's leading provider of digital 3d models for visualization, films, television, and games.
turbosquid
free
Circle Cutout Chair
... available on turbo squid, the world's leading provider of digital 3d models for visualization, films, television, and games.
turbosquid
free

Circle Cutout Barstool
... available on turbo squid, the world's leading provider of digital 3d models for visualization, films, television, and games.
3d_export
$5

Yellow flower cutout 3D Model
... flower cutout 3d model
3dexport
flower cutout yellow bloom plant garden bush
yellow flower cutout 3d model bimm3d 34825 3dexport
3d_export
$10

Cutout contactbreaker 3D Model
...breaker 3d model
3dexport
contact-breaker cut-out electro tools wires
cutout contactbreaker 3d model georg destroy 77859 3dexport
Keyboard
3d_ocean
$9
Keyboard
...odels computer electronics keyboard peripheral / part
computer keyboard 3d models. it’s computer keyboard. render ready keyboard.
archibase_planet
free
Keyboard
...keyboard
archibase planet
input keyboard keyboard office equipment
pro keyboard - 3d model for interior 3d visualization
3d_export
$5
keyboard
...keyboard
3dexport
computer keyboard
3d_export
$11
Keyboard
...keyboard
3dexport
gaming keyboard with backlight 1:1
3d_export
free

keyboard
...keyboard
3dexport
keyboard blender stl obj fbx
archibase_planet
free
Keyboard
...keyboard
archibase planet
keyboard pc equipment
keyboard apple n130315 - 3d model (*.gsm+*.3ds) for interior 3d visualization.
3d_export
free
keyboard gaming
...keyboard gaming
3dexport
keyboard gaming include: 1 x keyboard gaming.blend 3 x keyboard gaming.png
archibase_planet
free
Keyboard
...keyboard
archibase planet
keyboar pc equipment
keyboard - 3d model (*.gsm+*.3ds) for interior 3d visualization.
3d_ocean
$9

keyboard USB
...models computer electronics keyboard peripheral / part
keyboard for computer 3d models. high detailed model of computer keyboard.
turbosquid
$24

Keyboard
...urbosquid
royalty free 3d model keyboard for download as max on turbosquid: 3d models for games, architecture, videos. (1710291)
Special
3d_export
$5
special nut
...special nut
3dexport
special nut
3d_export
$5
Special Sofa
...special sofa
3dexport
special sofa. a wonderful special sofa created by blender. suitable for home furniture..
3d_export
$15
special vehicles
...special vehicles
3dexport
3d_ocean
$5

Special Tailor Scissors
...special tailor scissors
3docean
makas scissors special tailor
special modelling for tailor scissors
turbosquid
$15

Special Mug
...osquid
royalty free 3d model special mug for download as max on turbosquid: 3d models for games, architecture, videos. (1216485)
turbosquid
$30

special ring
...oyalty free 3d model special ring for download as 3dm and stl on turbosquid: 3d models for games, architecture, videos. (1362253)
turbosquid
$60

Interior Special
...e 3d model interior special for download as max, obj, and fbx on turbosquid: 3d models for games, architecture, videos. (1295666)
turbosquid
$50

Special Office
...ree 3d model special office for download as 3ds, fbx, and dwg on turbosquid: 3d models for games, architecture, videos. (1404922)
turbosquid
$10

Valentine Special
...d model valentine special for download as obj, fbx, and blend on turbosquid: 3d models for games, architecture, videos. (1364459)
turbosquid
$14

Special Pumpkin
... model special pumpkin for download as max, obj, fbx, and stl on turbosquid: 3d models for games, architecture, videos. (1624147)
Front
archibase_planet
free

Front
...front
archibase planet
facade front bluff
front 3d01a - 3d model (*.gsm+*.3ds) for interior 3d visualization.
3d_export
$5
front fork
...front fork
3dexport
front fork
3d_export
$5

Front Desk
...front desk
3dexport
modern and minimal reception front desk
3d_ocean
$4
Medical Front
...medical front
3docean
horror low medical
medical front
3d_ocean
$5
Front Desk
...front desk
3docean
desk front office reception
office reception counter or front desk. cad file and obj file included.
3ddd
free

Axor WaterDream by Front
...r , waterdream , front
axor waterdream by front
3d_export
$5

front nut eye
...front nut eye
3dexport
front nut eye
3d_export
$5
front screw eye
...front screw eye
3dexport
front screw eye
3d_export
$5
front clamping device
...front clamping device
3dexport
front clamping device
archive3d
free
Front 3D Model
...rchive3d
facade front bluff
front 3d01a - 3d model (*.gsm+*.3ds) for interior 3d visualization.
Case
3d_export
$1

case
...case
3dexport
case
archibase_planet
free

Case
...case
archibase planet
showcase show-case glass case
glass-case + cakes - 3d model for interior 3d visualization.
archibase_planet
free

Case
...case
archibase planet
showcase show-case glass case
glass-case for chips - 3d model for interior 3d visualization.
archibase_planet
free

Case
...case
archibase planet
case shelving drawer
case - 3d model for interior 3d visualization.
archibase_planet
free

Case
...case
archibase planet
case rack locker
case - 3d model for interior 3d visualization.
archibase_planet
free

Case
...case
archibase planet
case drawer kitchen furniture
case - 3d model for interior 3d visualization.
archibase_planet
free

Case
...case
archibase planet
case cupboard shelving
glass case - 3d model for interior 3d visualization.
archibase_planet
free

Case
...case
archibase planet
case handbag suitcase
case - 3d model (*.gsm+*.3ds) for interior 3d visualization.
archibase_planet
free

Case
...case
archibase planet
case suitcase
case 5 - 3d model (*.gsm+*.3ds) for interior 3d visualization.
archibase_planet
free

Case
...case
archibase planet
locker case dresser
case - 3d model (*.gsm+*.3ds) for interior 3d visualization.
Side
3ddd
free
Side-by-side холодильник
...side-by-side холодильник
3ddd
холодильник
side-by-side холодильник samsung
turbosquid
free

siding
... available on turbo squid, the world's leading provider of digital 3d models for visualization, films, television, and games.
3ddd
$1
Кресло Side
...ресло side
3ddd
side , eero saarinen
eero saarinen кресло side.
материалы corona render.
turbosquid
$15
Mausoleum Entrances Lined Side By Side
...model mausoleum entrances lined side by side for download as on turbosquid: 3d models for games, architecture, videos. (1696515)
3ddd
$1

Side-by-Side SHARP SJ-F78PEBE
... холодильник
холодильник side-by-side sharp sj-f78pebe, габариты (шxгxв) 89x77x183 см, с материалами
3ddd
$1

Liebherr Refrigerator Side By Side Sbes 7165
... side sbes 7165
3ddd
liebherr , холодильник
liebherr refrigerator side by side sbes 7165
3ddd
$1
Side table
...side table
3ddd
журнальный
classic side table
3ddd
$1

Зеркало Side
...зеркало side
3ddd
винтаж , зеркало
зеркало side
3ddd
$1
Side Table
...side table
3ddd
кофейный , круглый
side table
3ddd
$1
Side table
...side table
3ddd
приставной
bed side table, coffee table
Mount
3d_export
free

mounting bracket
...mounting plate is the portion of a hinge that attaches to the wood. mounting plates can be used indoors, cabinetry and furniture.
turbosquid
$2

MOUNTING
... available on turbo squid, the world's leading provider of digital 3d models for visualization, films, television, and games.
turbosquid
free

Mounts
... available on turbo squid, the world's leading provider of digital 3d models for visualization, films, television, and games.
turbosquid
free

Mount Fuji
...fuji
turbosquid
free 3d model mount fuji for download as obj on turbosquid: 3d models for games, architecture, videos. (1579977)
3d_export
$5

Headphone mount LR
...headphone mount lr
3dexport
headphone mount l+r
turbosquid
$39

Mount rainier
...quid
royalty free 3d model mount rainier for download as fbx on turbosquid: 3d models for games, architecture, videos. (1492586)
turbosquid
$5

pipe mounting
...quid
royalty free 3d model pipe mounting for download as obj on turbosquid: 3d models for games, architecture, videos. (1293744)
turbosquid
$3

Mounting Tires
...uid
royalty free 3d model mounting tires for download as fbx on turbosquid: 3d models for games, architecture, videos. (1708511)
3d_export
$5

Magnetic GoPro Mount
...pro mount
3dexport
cool magnetic mount for gopro. allows you to mount the camera on flat metal surfaces and get exclusive shots.
turbosquid
$5

Stone Mount
...ty free 3d model stone mount for download as ma, obj, and fbx on turbosquid: 3d models for games, architecture, videos. (1370306)
Ring
3d_export
$5

ring
...ring
3dexport
ring
3d_export
free

ring
...ring
3dexport
ring
3d_export
free

ring
...ring
3dexport
ring
3d_export
free

ring
...ring
3dexport
ring
3d_export
$10
ring
...ring
3dexport
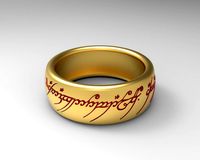
lord of the rings
3d_export
$5

ring
...ring
3dexport
golden ring
3d_export
free
ring
...ring
3dexport
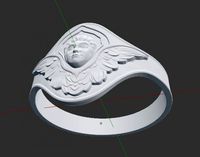
cherub ring
3d_export
$10
ring
...ring
3dexport
3d ring model
3d_export
$5
ring
...ring
3dexport
ring 3d model
3d_export
$5

ring
...ring
3dexport
ring top black...