Thingiverse
The Taz Pro Fix Project - Hardware Endstops, Wider Chassis, Carriage fixes, and other fixes by magdong
by Thingiverse
Last crawled date: 3 years, 4 months ago
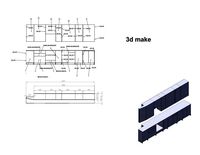
This is my personal repository for fixes I have made to the Taz Pro design. There aren't really going to be any instructions or how-to's with this, and use of anything here is done so at your own risk and voids your warranty.
The Taz Pro design seems to have some shortcomings. I attempt to address these shortcomings with various fixes.
Shortcoming 1 - The chassis seems to be too narrow to properly support single toolheads. So if you want to remove the behemoth dual head so you can print faster, and you install a single toolhead, keen observers may note that the toolhead just BARELY hits the front left pad. And sometimes, at least for me, the nozzle misses the pad completely and overshoots - because of Shortcoming 2 listed below (Software Endstops suck). And you can't shift the table or do anything else to address this, other than modify the back plate for the single toolhead - breaking compatibility with other machines. Fix? Widen the chassis. Instead of the horizontal 2020 rails being 530mm, I re-cut them to 540mm. This width still maintains compatibility with the original X rails and the Printed Solid enclosure. The rails only sit inset about 2.75mm on each end of the X-axis mounts, but that makes no functional difference and it still hits the set screws easily. The printed solid enclosure actually fits properly (rather than being wider) with this mod, as well, but you'll need revised "hangers" for holding the enclosure. I've provided those replacement parts. Widening the chassis also has the benefit of giving the dual head a bit more room to work without inappropriately ramming into things (particularly the right hand side overshoot) as well as giving a bit of a "filament dump" area on the left middle of the bed. You'll need to modify your firmware layout positions. I suggest using the DrunkenOctopus for a starting point, and modding from there.
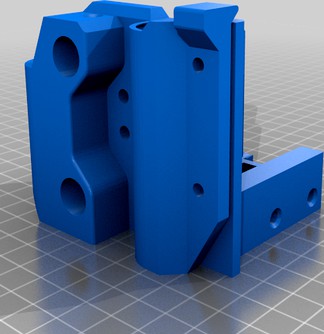
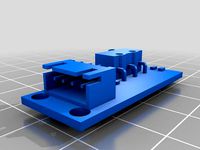
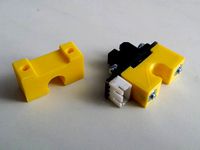
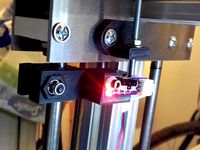
Shortcoming 2 - Software endstops. My opinion - a major mistake. The Taz Pro often overshoots and grinds because of the software endstops, but, surprisingly, that's not why I've changed it. I changed it because software endstops are too inaccurate to trust for print resumes. There is too much variance between where it stops - it's not precisely repeatable, and that leads to minor layer shifts if the printer stops and has to rehome (out of filament, or if you try to activate power loss recovery in the firmware). So I added hardware endstops to X and Y. For the Y axis, I used the stock motor mount parts from the Taz Workhorse (I've included the parts here, but are not my design or mods and anything prefixed "lulzbot_original" falls under Lulzbot's license terms, not these ones). For X, I made a custom mount. This requires that you do some additional wiring, and that you tweak the interconnect housing. There is room to stack 2 connectors on top of eachother in the interconnect housing, so that makes life easier. There is a replacement interconnect housing included here to fit the extra wire for the X axis. No additional space is needed for the Y axis as it's only 2 wires on a tiny connector, so you can stack them. For the wiring, I ordered the proper IGUS flexible cable, the exact same wiring that the Taz Pro comes with. For the cable chain, fortunately, there is room in the cable chain for one extra wire. I have a suspicion that, between this (cable chain room) and the fact that the PS enclosure fits properly at 540mm leads me to ponder the possibility that the Taz Pro was actually originally designed @ 540mm with hardware endstops, but that they cut this out to reduce BOM cost before production. I don't know.
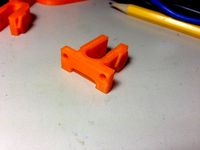
Shortcoming 3 - The X Carriage holders posilock nut holder is just marginally too small, at least for any of the posilock nuts I can find. So I widened it marginally, and thickened the top of the mount by 0.5mm. Why? Because without these changes, the damn top screw cracks the carriage mount when tightened sufficiently to remove the wobble from the top bearing, so these changes should prevent the crack.
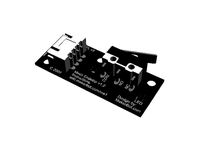
Shortcoming 4 - The interface board mount screw that retains the bearing/bushing, when torqued to lulzbot spec, tends to crack, even when proper inter-layer adhesion is achieved with high quality ABS. While making room for the revised thickened carriage (revised to avoid cracking), I thickened the base that the screw seats on to attempt to mitigate this cracking.
Shortcoming 5 - The single toolhead can't reach the calibration cube. Wow. This, too? Makes you think about how well this printer was tested before release. The only way to fix this properly, while maintaining compatibility with both the single toolheads and the dual toolheads, without changing toolhead design, would be to increase the length of the 2020 rails on Y by 10mm as well. But that means I need larger 10mm rails, and I don't want to order those - I'm already too $$$ on a printer that was, IMO, designed broken, and I'm not willing to do that. So, with widening to 540mm horizontal 2020 rail, we are now able to reach and therefore leverage the front right levelling washer for the hysteresis calibration, rather than the "calibration cube". Functionally, it's the same thing, though we're not able to reach all 4 corners - only 3. Good enough, from my test results.
Shortcoming 6 - The horizontal cable chain (X) has the motor mount side 2.5mm proud of the double bearing holder receiving side, so the chain assembly gets slightly twisted, which is inappropriate. Fixed.
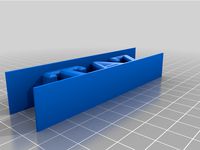
Other Fix - After adding an additional wire on the Z cable chain for the X min hardware end stop, the wires no longer stay in place at the end of the chain due to the short length before the control box. Created an alignment clip and a cable chain retainer pin to address.
There are other odds and sods in here and I may or may not add additional details regarding "why" - again, this is being posted primarily for me as a backup, but I thought perhaps other adventurous modders may want to try this too at their own risk.
Cheers.
The Taz Pro design seems to have some shortcomings. I attempt to address these shortcomings with various fixes.
Shortcoming 1 - The chassis seems to be too narrow to properly support single toolheads. So if you want to remove the behemoth dual head so you can print faster, and you install a single toolhead, keen observers may note that the toolhead just BARELY hits the front left pad. And sometimes, at least for me, the nozzle misses the pad completely and overshoots - because of Shortcoming 2 listed below (Software Endstops suck). And you can't shift the table or do anything else to address this, other than modify the back plate for the single toolhead - breaking compatibility with other machines. Fix? Widen the chassis. Instead of the horizontal 2020 rails being 530mm, I re-cut them to 540mm. This width still maintains compatibility with the original X rails and the Printed Solid enclosure. The rails only sit inset about 2.75mm on each end of the X-axis mounts, but that makes no functional difference and it still hits the set screws easily. The printed solid enclosure actually fits properly (rather than being wider) with this mod, as well, but you'll need revised "hangers" for holding the enclosure. I've provided those replacement parts. Widening the chassis also has the benefit of giving the dual head a bit more room to work without inappropriately ramming into things (particularly the right hand side overshoot) as well as giving a bit of a "filament dump" area on the left middle of the bed. You'll need to modify your firmware layout positions. I suggest using the DrunkenOctopus for a starting point, and modding from there.
Shortcoming 2 - Software endstops. My opinion - a major mistake. The Taz Pro often overshoots and grinds because of the software endstops, but, surprisingly, that's not why I've changed it. I changed it because software endstops are too inaccurate to trust for print resumes. There is too much variance between where it stops - it's not precisely repeatable, and that leads to minor layer shifts if the printer stops and has to rehome (out of filament, or if you try to activate power loss recovery in the firmware). So I added hardware endstops to X and Y. For the Y axis, I used the stock motor mount parts from the Taz Workhorse (I've included the parts here, but are not my design or mods and anything prefixed "lulzbot_original" falls under Lulzbot's license terms, not these ones). For X, I made a custom mount. This requires that you do some additional wiring, and that you tweak the interconnect housing. There is room to stack 2 connectors on top of eachother in the interconnect housing, so that makes life easier. There is a replacement interconnect housing included here to fit the extra wire for the X axis. No additional space is needed for the Y axis as it's only 2 wires on a tiny connector, so you can stack them. For the wiring, I ordered the proper IGUS flexible cable, the exact same wiring that the Taz Pro comes with. For the cable chain, fortunately, there is room in the cable chain for one extra wire. I have a suspicion that, between this (cable chain room) and the fact that the PS enclosure fits properly at 540mm leads me to ponder the possibility that the Taz Pro was actually originally designed @ 540mm with hardware endstops, but that they cut this out to reduce BOM cost before production. I don't know.
Shortcoming 3 - The X Carriage holders posilock nut holder is just marginally too small, at least for any of the posilock nuts I can find. So I widened it marginally, and thickened the top of the mount by 0.5mm. Why? Because without these changes, the damn top screw cracks the carriage mount when tightened sufficiently to remove the wobble from the top bearing, so these changes should prevent the crack.
Shortcoming 4 - The interface board mount screw that retains the bearing/bushing, when torqued to lulzbot spec, tends to crack, even when proper inter-layer adhesion is achieved with high quality ABS. While making room for the revised thickened carriage (revised to avoid cracking), I thickened the base that the screw seats on to attempt to mitigate this cracking.
Shortcoming 5 - The single toolhead can't reach the calibration cube. Wow. This, too? Makes you think about how well this printer was tested before release. The only way to fix this properly, while maintaining compatibility with both the single toolheads and the dual toolheads, without changing toolhead design, would be to increase the length of the 2020 rails on Y by 10mm as well. But that means I need larger 10mm rails, and I don't want to order those - I'm already too $$$ on a printer that was, IMO, designed broken, and I'm not willing to do that. So, with widening to 540mm horizontal 2020 rail, we are now able to reach and therefore leverage the front right levelling washer for the hysteresis calibration, rather than the "calibration cube". Functionally, it's the same thing, though we're not able to reach all 4 corners - only 3. Good enough, from my test results.
Shortcoming 6 - The horizontal cable chain (X) has the motor mount side 2.5mm proud of the double bearing holder receiving side, so the chain assembly gets slightly twisted, which is inappropriate. Fixed.
Other Fix - After adding an additional wire on the Z cable chain for the X min hardware end stop, the wires no longer stay in place at the end of the chain due to the short length before the control box. Created an alignment clip and a cable chain retainer pin to address.
There are other odds and sods in here and I may or may not add additional details regarding "why" - again, this is being posted primarily for me as a backup, but I thought perhaps other adventurous modders may want to try this too at their own risk.
Cheers.
Similar models
thingiverse
free

Anet A8 Cable Chain Mount by Lyweilian
...s an anchor point for the cable mount.
i've printed these and appear to work fine with no supports. your mileage will vary.
thingiverse
free

Taz 6 Workhorse Low Profile X Carriage Cover by magdong
... voids warranty, standard disclaimers.
print in abs with the same settings as the lulzbot workhorse carriage cover gcode.
cheers,
thingiverse
free

Custom Taz X Ends and X Carriage based off Lulzbot Mini by TechsavvyCNC
...ount can be downloaded from the lulzbot website: http://devel.lulzbot.com/easy_taz_mini/daffodil/production_parts/printed_parts/
grabcad
free

Vivedino Troodon Chamfered X Endstop
...dstop
grabcad
i had issues with cable chain sag so i modeled this up to fix the sagging cable from snagging the x endstop mount.
thingiverse
free

Taz 6 New Toolhead Carriage Conversion Mod - Use Toolheads from Taz Mini 2, Taz WE, and Taz Pro on your Taz 6 natively!
...ped/squeezed igus bushings! that should hopefully translate to more accurate, cleaner prints, with cooler running motors.
cheers!
thingiverse
free

Prusa I3 Hephestos X Cable Mount and Endstop by Raptorfx
...he cable chain from 11978 be glued in place. best seen in the pictures. also the other end is glued in place on the orignal part.
thingiverse
free

I3 X Axis cable chain mount by Syngenta
... prusa i3 pro b, the x carriage mount is from jh1985.
i have reinforced the cable chain mount so it doesnt brake off that easily.
thingiverse
free

Robo 3d R1 X Axis Stepper Motor Mount For Cable Chain System - Remixed Robo3d by derez
...it in yet, waiting to receive my z axis upgrade from robo 3d. i will do the cable chain and the z axis upgrade at the same time.
thingiverse
free

east3d gecko endstop cable chain +x-y tie down by delukart
...y-endstop wire.
and a tie down for the x-y motor wires.
( i used the small cable chain that i took off my duplicator i3 x axis..)
thingiverse
free

i3 Cable Chain Mounts by JBFromOZ
...ttachment for i3 cable ducts, allows for neat wiring to the x and z carriages, with single axis cable chain motion for all wiring
Magdong
thingiverse
free

Sterilite Container Blue Hinged Latch Replacement by magdong
...elps someone save some perfectly fine bins from ending up in the garbage, and again big thanks to dnard for the great v1!
cheers,
thingiverse
free
Taz 6 Workhorse Low Profile X Carriage Cover by magdong
... voids warranty, standard disclaimers.
print in abs with the same settings as the lulzbot workhorse carriage cover gcode.
cheers,
thingiverse
free

Hemera (Hermes) mount bracket for BL Touch (BLTouch) by magdong
...flipped it front to back (as is the way this design is shipped).
use at your own risk, may void your warranty, etc etc.
have fun!
Taz
3d_ocean
$19

TAZ RIGGED
...ax version only texture is used only for wb logo, taz dont need texture no special render engine needed, just unzip and render...
3d_export
$5

Taz character 3D Model
...taz character 3d model
3dexport
taz toon character cartoon
taz character 3d model supercigale 22095 3dexport
cg_studio
$10

Taz 3D3d model
...taz 3d3d model
cgstudio
.3ds .max - taz 3d 3d model, royalty free license available, instant download after purchase.
cg_studio
$15

Taz Rigged3d model
...ged3d model
cgstudio
.3ds .fbx .max .obj - taz rigged 3d model, royalty free license available, instant download after purchase.
3d_export
$10

Taz Toy Calendar 3D Model
... 3d model
3dexport
taz toy calendar day month year looney tunes cartoon kid child
taz toy calendar 3d model nkfrds 49687 3dexport
3d_export
$10

Taz Tasmanian Devil RIGGED 3D Model
...y tunes anime bunny rigged material fantasy creature diable dessin
taz tasmanian devil rigged 3d model supercigale 28390 3dexport
3d_export
$19
Thylacine 3D Model
...animalia chordata mammalia marsupial dog extinct animals tiger tassie taz thylacine 3d model poly3dmodels 90790...
3d_export
$12

Bowl Decorated 3D Model
...bowl decorated 3d model 3dexport bowl tazn elements ceramics kitchen plastic cup container decorative cake biscuits...
3ddd
$1

Crate & Barrel Serveware
...crate & barrel поднос -http://www.crateandbarrel.com/feast-platter/s186961 набор ножей для сыра -http://www.crateandbarrel.com/tazcheese-knife-3-piece-set/s681377 бокал...
thingiverse
free
TAZ by Taz8373
...taz by taz8373
thingiverse
my 1st print
Endstops
thingiverse
free
Endstop-holder for endstop v1.2 by albiuz
...endstop-holder for endstop v1.2 by albiuz
thingiverse
endstop-holder designed for mech endstop v1.2
thingiverse
free
Endstop by 3dboxpro
...endstop by 3dboxpro
thingiverse
endstop
thingiverse
free
Endstop by 1sPiRe
...endstop by 1spire
thingiverse
endstop model for conceptions
thingiverse
free

Endstop holder for Opto or Mechanical endstops by LulzBot
... endstops by lulzbot
thingiverse
these are the standard 1.0 prusa endstops with an added mounting hole for mechanical endstops.
thingiverse
free

Endstop Holder by onurhamdiuzun
...onurhamdiuzun thingiverse endstop holder for makerbot endstop and other endstops ...
thingiverse
free

Endstop Cover
...endstop cover
thingiverse
cover for endstop boards for makerbot design.
thingiverse
free
Endstop Mount for optical Endstops by Whitehawk2000
...whitehawk2000
thingiverse
use two 20mm m3 screws and nuts to screw the endstop onto the mount and just clip it onto the 8mm rod.
thingiverse
free

C-beam endstop mount for Makerbot type endstops
...c-beam endstop mount for makerbot type endstops
thingiverse
c-beam endstop mount for makerbot type endstop boards.
thingiverse
free

Endstop Mount for MakerBot Mecanical Endstop. by nka
...v-slots carriage.
endstop is screw with m3 (8mm) tapped hole and the endstop hold on the extrusion using a m5 (8mm) and t-nuts.
thingiverse
free
ENDSTOP 10mm by desert500
...endstop 10mm by desert500
thingiverse
endstop
Wider
turbosquid
$5

Wider Aquarium
...aquarium for download as blend, blend, 3ds, dae, fbx, and obj on turbosquid: 3d models for games, architecture, videos. (1560637)
3d_ocean
$12
Stylish Desk with Bookcase
...3ds files so it can be used in a wider range of programs. this model is to scale with...
3d_export
$5

pillory low-poly
...medieval environment ... this pilori is part of a wider medieval collection check my profile. originally created with maya...
3ddd
$1

Kristalia Joko with armrest
...appeal, a chair with all-embracing armrests and a slightly wider seat, and stools in two heights that studio bartoli...
3d_export
$50

monitor audio bronze
...to give even sound dispersion, improved time alignment and wider directivity for lifelike...
3d_export
$17

carrier bag container backpack of elegant sack
...located this new obsession with the backpack within the wider trend of ultra-comfortable clothing and accessories. baggy mom jeans...
3d_export
$14

Roman legionary helmet - Hagenau
...bronze and have a more-or-less hemispherical bowl, with a wider flat or sloping neckguard than those found on the...
3d_export
$6

blacksmith post vice
...you buy this package.<br>this item is part of a wider medieval blacksmith collection.<br>the material is composed of 4 textures:<br>albedo...
3d_export
$60

sikorsky ch-53e super stallion
...has new engines, new composite rotor blades, and a wider aircraft cabin; this is to replace the...
3d_export
$14

Roman legionary helmet - Hagenau
...bronze and have a more-or-less hemispherical bowl, with a wider flat or sloping neckguard than those found on the...
Carriage
archibase_planet
free

Carriage
...arriage
archibase planet
perambulator baby carriage pram
carriage n250908 - 3d model (*.gsm+*.3ds) for interior 3d visualization.
3d_export
free

carriage
...carriage
3dexport
old fashion carriage model, more files here:
turbosquid
$140

Carriage
...urbosquid
royalty free 3d model carriage for download as max on turbosquid: 3d models for games, architecture, videos. (1482052)
turbosquid
$25

Carriage
...urbosquid
royalty free 3d model carriage for download as max on turbosquid: 3d models for games, architecture, videos. (1285944)
3d_export
free

carriage
...carriage
3dexport
game cart
3d_ocean
$15

Barrel Carriage
...ieval oak old transport wheels wine wood
this model contains a barrel and a carriage. it is a medieval type of wood oak carriage.
turbosquid
$40

Carriage
...ty free 3d model carriage for download as obj, fbx, and blend on turbosquid: 3d models for games, architecture, videos. (1290094)
turbosquid
free

Carriage
...yalty free 3d model carriage for download as ma, obj, and fbx on turbosquid: 3d models for games, architecture, videos. (1239157)
3d_export
$5

Medieval carriage
...medieval carriage
3dexport
medieval carriage in fairy style
turbosquid
$58

Carriage
...d model carriage with scene for download as max, obj, and fbx on turbosquid: 3d models for games, architecture, videos. (1276262)
Chassis
design_connected
$16

Chassis
...chassis
designconnected
wilkhahn chassis chairs computer generated 3d model. designed by stefan diez.
3d_export
$10

truck chassis
...truck chassis
3dexport
truck chassis
3d_export
$5
Truck chassis
...truck chassis
3dexport
truck chassis
3d_export
$5

buggy chassi
...buggy chassi 3dexport chassis of a simple ride...
turbosquid
$35

Chassis
...odel chassis for download as 3ds, dxf, obj, c4d, fbx, and stl on turbosquid: 3d models for games, architecture, videos. (1413332)
design_connected
$16

Chassis Armchair
...chassis armchair
designconnected
baxter chassis armchair armchairs computer generated 3d model. designed by n/a.
turbosquid
$25
DRONE CHASSIS
...bosquid
royalty free 3d model drone chassis for download as on turbosquid: 3d models for games, architecture, videos. (1699724)
turbosquid
$79

Car Chassis
...quid
royalty free 3d model car chassis for download as blend on turbosquid: 3d models for games, architecture, videos. (1593376)
turbosquid
$50
Car Chassis
...osquid
royalty free 3d model car chassis for download as dwg on turbosquid: 3d models for games, architecture, videos. (1164087)
turbosquid
$75

Chassis 8x8
...free 3d model chassis 8x8 for download as ige, obj, and sldas on turbosquid: 3d models for games, architecture, videos. (1221250)
Hardware
3ddd
$1

Restoration Hardware
...restoration hardware
3ddd
restoration hardware
restoration hardware
3ddd
$1
RESTORATION HARDWARE
...restoration hardware
3ddd
restoration hardware , телескоп
restoration hardware
3ddd
$1

Restoration Hardware
...restoration hardware
3ddd
restoration hardware
restoration hardware, кресло,
3ddd
$1

Restoration Hardware
...restoration hardware
3ddd
restoration hardware , декоративный набор
restoration hardware
3ddd
$1

Restoration Hardware
...restoration hardware
3ddd
restoration hardware , декоративный набор
restoration hardware
3ddd
$1

Restoration Hardware
... hardware , боров , свинья
restoration hardware
3ddd
$1

Restoration Hardware
...ardware , корона , медведь
restoration hardware
3ddd
$1
Restoration Hardware
...ation hardware
3ddd
restoration hardware , тумба
тумба прикроватная restoration hardware
3ddd
free

Restoration Hardware
... кашпо , куст , свеча
restoration hardware
3ddd
free
Restoration Hardware
...restoration hardware
3ddd
restoration hardware
restoration hardware menlo table lamp
Fixes
3ddd
$1
Fixed Gear Велосипед
... fixed , bicycle
классический шоссейный велосипед, переделанный под fixed gear.
design_connected
$16

Idée fixe
...idée fixe
designconnected
jacco maris idée fixe computer generated 3d model. designed by maris , jacco.
3d_export
$5
fixing scale knob
...fixing scale knob
3dexport
fixing scale knob
turbosquid
$10

Mini Fix
...bosquid
royalty free 3d model mini fix for download as sldas on turbosquid: 3d models for games, architecture, videos. (1581558)
turbosquid
$49
fixed bike
... available on turbo squid, the world's leading provider of digital 3d models for visualization, films, television, and games.
turbosquid
$39

Fixed Bicycle
... available on turbo squid, the world's leading provider of digital 3d models for visualization, films, television, and games.
3ddd
$1
Bag Fixed
...bag fixed
3ddd
чемодан
a bag model by me
3ddd
$1
Кресло BEAU FIXE
...fixe
3ddd
beau fixe , ligne roset
кресло beau fixe:
w 80 cm d 106 cm h 97 cm sh 43,5 cm
turbosquid
free

Crowbar "Fixed"
... available on turbo squid, the world's leading provider of digital 3d models for visualization, films, television, and games.
3ddd
$1
Fixed gear
...fixed gear
3ddd
велосипед
шоссейный велосипед с фиксированной передачей
Fix
3ddd
$1
Fixed Gear Велосипед
... fixed , bicycle
классический шоссейный велосипед, переделанный под fixed gear.
design_connected
$16
Idée fixe
...idée fixe
designconnected
jacco maris idée fixe computer generated 3d model. designed by maris , jacco.
3d_export
$5
fixing scale knob
...fixing scale knob
3dexport
fixing scale knob
turbosquid
$10
Mini Fix
...bosquid
royalty free 3d model mini fix for download as sldas on turbosquid: 3d models for games, architecture, videos. (1581558)
turbosquid
$49
fixed bike
... available on turbo squid, the world's leading provider of digital 3d models for visualization, films, television, and games.
turbosquid
$39
Fixed Bicycle
... available on turbo squid, the world's leading provider of digital 3d models for visualization, films, television, and games.
3ddd
$1
Bag Fixed
...bag fixed
3ddd
чемодан
a bag model by me
3ddd
$1
Кресло BEAU FIXE
...fixe
3ddd
beau fixe , ligne roset
кресло beau fixe:
w 80 cm d 106 cm h 97 cm sh 43,5 cm
turbosquid
free
Crowbar "Fixed"
... available on turbo squid, the world's leading provider of digital 3d models for visualization, films, television, and games.
3ddd
$1
Fixed gear
...fixed gear
3ddd
велосипед
шоссейный велосипед с фиксированной передачей
Pro
turbosquid
$29

Pro
...ree 3d model mac pro for download as obj, c4d, fbx, and blend on turbosquid: 3d models for games, architecture, videos. (1505782)
turbosquid
$15

Apple Mac Pro and Pro Display
...ee 3d model apple mac pro and pro display for download as max on turbosquid: 3d models for games, architecture, videos. (1417078)
3d_export
$5

iphone 13 pro max and pro
...3 pro max and 13 pro the model is made in four colors (graphite, gold, silver, and blue), all of which are attached in the files.
3d_export
free

sapphire pro
...sapphire pro
3dexport
sapphire pro 3d printer head mask
3d_export
$4

macbook pro
...macbook pro
3dexport
macbook pro 13" inch 2020 years model
3ddd
free

GentleLase Pro
... syneron , candela
gentlelase pro аппарат для лазерной эпиляции
turbosquid
$25

PRO frame
...rbosquid
royalty free 3d model pro frame for download as max on turbosquid: 3d models for games, architecture, videos. (1148329)
turbosquid
$5

Alien pro
...osquid
royalty free 3d model alien pro for download as blend on turbosquid: 3d models for games, architecture, videos. (1678446)
turbosquid
$5

iphone11 pro
...uid
royalty free 3d model iphone11 pro for download as blend on turbosquid: 3d models for games, architecture, videos. (1562707)
3ddd
$1

Mac Pro (appel)
...mac pro (appel)
3ddd
компьютер , apple
mac pro
Project
3d_export
$7
project
...project
3dexport
project
3d_export
$20
Project
...project
3dexport
design_connected
$16

Project Chair
...project chair
designconnected
rex kralj project chair computer generated 3d model. designed by žitnik, marjan.
3ddd
$1

lectric Project
...настроены. сетка очень плотная.
доступно только для группы "profi"
про группу "profi" можно прочитать в чаво
3d_ocean
$19

Soon project
...kup. made in 3ds max 2013 1- 3dsmax with vray render included material and light 2- obj file 3- fbx file hope you like it plea...
turbosquid
$49

Joint | Project
...squid
royalty free 3d model joint | project for download as on turbosquid: 3d models for games, architecture, videos. (1297983)
turbosquid
$11

house project
...bosquid
royalty free 3d model house project for download as on turbosquid: 3d models for games, architecture, videos. (1672482)
turbosquid
$450
University project
...
royalty free 3d model university project for download as rvt on turbosquid: 3d models for games, architecture, videos. (1463354)
turbosquid
$30

smart projecter
...lty free 3d model smart projecter for download as max and obj on turbosquid: 3d models for games, architecture, videos. (1236214)
3d_export
$5
project drawing
...project drawing
3dexport
project drawing and 3d model<br>format jpg sldprt dwg<br>by 3d make
Other
design_connected
$16

ST12 Other
...signconnected
photo-realistic 3d models of the st12 other stool from e15 for 3d architectural and interior design presentations.
turbosquid
$26

Oar and Other
...quid
royalty free 3d model oar and other for download as fbx on turbosquid: 3d models for games, architecture, videos. (1473409)
turbosquid
$5
chair with other
...id
royalty free 3d model chair with other for download as ma on turbosquid: 3d models for games, architecture, videos. (1171468)
3ddd
$1

parfume and other
...parfume and other
3ddd
тумбочка
create by sametyuzer
turbosquid
$79

The Others Collection
...others collection for download as 3ds, max, obj, fbx, and dae on turbosquid: 3d models for games, architecture, videos. (1480228)
turbosquid
$25

Other Man
... available on turbo squid, the world's leading provider of digital 3d models for visualization, films, television, and games.
turbosquid
$15

other car.max
... available on turbo squid, the world's leading provider of digital 3d models for visualization, films, television, and games.
turbosquid
$2
Other Mothers Hand
... 3d model other mothers hand for download as ma, fbx, and obj on turbosquid: 3d models for games, architecture, videos. (1663825)
turbosquid
$8

other sport wheel
... available on turbo squid, the world's leading provider of digital 3d models for visualization, films, television, and games.
turbosquid
$2

pool and other elements
... available on turbo squid, the world's leading provider of digital 3d models for visualization, films, television, and games.