Thingiverse
The Perfect Pencil Holder: Student Virtual Prototyping Challenge by CoolKid127
by Thingiverse
Last crawled date: 3 years, 4 months ago
Project Description
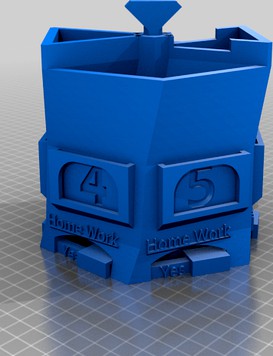
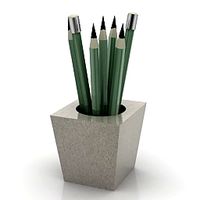
This desk organizer is a print-in-place multifaceted rotating pencil holder; It functions as a pencil holder, a phone stand, and a homework reminder. This desk organizer has every utility that a quarantined student could ever want. I made this desk organizer with the purpose of lessening the stress that we students are faced with in the ever-changing and disorientating situation that we find ourselves in. Having something to help us stay organized, both physically and mentaly, is the most valuable thing that I can think of. It is suggested that you read the how to use section.
How to Use
To use this Pencil holder you need to elevate the bearing’s outer race-- the outer race functions as the foot of this pencil holder. To elevate the outer race you must use three to six half-inch, self-adhesive, rubber pads. These rubber pads can be found relatively inexpensively at most big box and hardware stores; they are commonly used as bumpers to quiet the closing of drawers. A secondary effect of using rubber pads is to hold the foot of the pencil holder in place and prevent the pencil holder from sliding off desks. The rubber pads fit into sixteenth of an inch circular indents on the bottom of the desk organizer.
Description
This submission to the Thingiverse/Makerbot student-design-challenge competition is a print-in-place multifaceted desk organizer. The submission, in its most basic form, is a spinning pencil holder, but that description does not do this model justice. The pencil holder has many additional features that simplify the average quarantine-student’s workload. The most basic feature of the pencil holder is holding pencils‒ what a shocker! This basic function is aided by the addition of a 3D printed bearing which facilitates the rotation of the entire unit; the ability to rotate the pencil holder simplifies accessing pencils or other organized items. The desk organizer has four different compartments with varying purposes: the two taller compartments are intended for pens, pencils, markers, and highlighters; while the second shortest compartment is for wider and shorter items, such as calculators; and the shortest compartment is for small items that would be cumbersome to grasp at the bottom of a taller compartment, such as paper clips. The pencil holder’s functionality extends from that of being a stationary desk item: this pencil holder has a telescoping rod running the height of the body that functions as a handle and allows for the transportation of the desk organizer between locations so you can work whenever, wherever. The telescoping rod is not only limited to being a mere handle; it also functions, in conjunction with the grooves on the top of the pencil holder, as a phone stand. To properly configure the phone stand, one must first draw the central rod up through the body to a length of approximately five inches, place the phone (in the landscape orientation) within the grooves on the top of the pencil holder, and finally lower the rod down onto the phone holding it in place. This feature is intended for those students who lack a school-issued Chromebook or laptop and have resorted to using a phone to access their online classes. The final and most school-oriented feature of the pencil holder is its homework reminder. The six sides of the hexagonal desk organizer are each numbered in accordance with the six class hours of the average high school day. Each side has a numbered slot that can be fitted with a notecard or other stationery that may denote each class by name instead of the stock hour number. Below the hour numbers is the homework selector whereas the day progresses one may record the classes with homework.
Design
The design process of this model started with the basis of three separate criteria that I wanted to fulfill. The first being that the model must match the requirements of the competition: that being to make a desk organizer. To fulfill this requirement, I settled upon the idea of making a pencil holder. I felt this to be a good fit because pencil holders are something that most people have on their desks, so the average student would not find it unusual or as a novelty instead of a useful object. The next criteria that I wanted to fulfill was to make the model fit within the confines of most 3D printers to make this print accessible. The exact constraint that I settled on was a five-point-nine-inch cube. Since I wanted people to be able to print it on a raft, I lessened this constraint to a round five and a half inches. The final constraint was that the print must be print-in-place as it would be inconvenient to have to print multiple parts and fit them together.
While these constraints gave me a baseline for what I wanted to do, I still needed to make this print something truly special. My first idea to spice up the pencil holder was to make it spin. I recognize that this is not an original idea; there are plenty of spinning pencil holders on sites like Amazon, but I have not seen anyone do this on Thingiverse. To facilitate the rotation of the pencil holder I ran into a problem: I needed to lessen the friction between the top and base. There were two main ways of doing this that I could think of at the time; I could either make the top balance on a small spike that would offer little in the way of friction or design a bearing. The first solution seemed precarious so I settled on the latter. I decided to make a 3D printed bearing and I thought I knew just the way to do it. I was going to make a geared bearing like I had seen online before, but I soon realized that making gears was much harder than I had initially anticipated. Having forfeited my initial plan, I went searching for a different way. On Thingiverse, I found a different bearing design that seemed as if it would fit my needs beautifully (using Thingiverse for inspiration is a bit of a theme of my design process). I decided to convert this design to something that I felt would better suit my needs and modeled it. This bearing formed the base of the pencil holder; from here I would need to form the actual body. Initially, I looked toward modern architecture for inspiration; this approach was flawed as modern architecture favors complex shapes that would be difficult to model. Even so, I kept searching until I came across a building that reminded me of something I had seen before: 3D printed vases. 3D printed vases can be relatively simple to make, with a few lofts, and result in beautiful easy to print pieces of art. I decided to instead search Thingiverse for inspiration in the form of vases. I came across many vases that appeared interesting, but none of them just clicked. So I instead decided to search for something else-- something more indicative of what I am supposed to be doing. I searched for other submissions to the same competition that I entered. In doing this I stumbled upon an interesting idea presented by another user on Thingiverse. The model I had found was a pencil holder, not unlike mine, only his had selectors along the side that let the end user denote upcoming tests and homework, and his does not spin-- if it can’t spin, is it really even worth printing? Despite its lack of rotational abilities, I felt that the base idea had potential; while I struggle to see the utility in planning out tomorrow’s homework, I do often forget what today’s homework is. With this revelation, I charged forward with the idea of having a homework reminder on the side of the pencil holder. This idea gave shape to the body of the pencil holder as well; to separate all six classes I decided to put each class on a different side of the body. This meant that I needed to make the body of the pencil holder a hexagon. Having a simple hexagonal prism make up the body would be boring and make the print look uninteresting; to fix this, I revisited the ideas gathered from 3D printed vases and used lofts to form the body of the print.
Once I had formed the body of the print I began to realize that the pencil holder seemed oddly short; It looked as if It couldn't even hold a pencil in its compartment (at this time I had not even separated the compartments yet). I would later discover that the constraints that I had sketched up on each plane were five-and-a-half centered around the origin, this meant that I had only been utilizing half of the total height that I could have been using. My model was properly constrained so fixing this issue was not very difficult: changing the distance between the layers that make up the lofted body was all that was required.
I found that having a singular compartment, to hold all of my pens, pencils, markers, and highlighters, seemed cumbersome; I decided to split up the compartment into pieces-- six pieces to keep with the hexagonal theme. When I split up the compartment I ran into two issues: the walls that split up the compartments did not meet perfectly in the middle due to their odd shape and having six equally sized compartments felt pointless. I solved the latter problem by merging two pairs of compartments into two compartments. I also decided to make these newly merged compartments different depths to accommodate different items. This merging failed to fix the former issue; I felt that I needed to put something down the middle of the body to fill in the gap between the walls of the compartments but I also felt that whatever that thing was needed to have a reason for being there. To give the thing a reason I decided to make it a handle to carry the pencil holder by. Making a normal handle seemed too basic; I wanted something that would match the coolness that the rest of the model was exuding. I arbitrarily settled on a telescoping rod with a knob on the end of it.
Even after I had implemented the aforementioned ideas I still felt like the model was lacking something. I went searching on Thingiverse to find out what the thing was. I noticed that on many of the desk organizers submitted to the competition they in some way implemented a phone stand. I decided to repurpose the telescoping rod as a makeshift phone stand.
Printing
When printing this model the printer in question must be capable of bridging overhangs. The only major suggestions that I have are to prioritize the number of perimeters over the infill percentage and to print with a raft.
Prototyping
Of the attached images, some of them are that of a semi-failed prototype print. This print failed in many ways. The part cooling fan on the extruder came loose early into the print and required the addition of some strategic zip ties to prevent the absolute failure of the print. The application of the zip ties resulted in the print head being bumped slightly; this caused a layer shift in the first few sixteenths of the print. About halfway through the print, the Boden tube came loose causing a few layers halfway up the model to not be extruded at all. The final failure was a major layer shift in the last hour of the print resulting in the upper inch and a half of the print being shifted over an inch. These troubles with the printer spell out our desperate need for a new printer.
The prototype was not a complete failure as it led to many positive redesigns. The ‘balls’ in the bearing would spin freely in unintended ways because the tolerances in the bearing were too loose. The homework selector was too tight and would not move one bit. The slot for the phone stand was too small and would hold phones at too steep of an angle. Seeing the overall shape of the pencil holder in front of me led me to make some additional aesthetic changes.
Similar models
thingiverse
free

Desk Organizer by evanpeng
...d be cheaper and easier to mass produce, it would also be stronger since the walls can be made thicker with the cheaper material.
thingiverse
free

Pencil Holder/Phone Stand by jennidam
.... 3d printing would help strengthen my design because it would help me see the flaws in my design while it’s actually being used.
thingiverse
free

Desk organizer by JAIKENAGA
...er to 3d print. 3d printing would strengthen my design compared to building it by allowing for the phone stand to be made easier.
thingiverse
free

Desk Organzier by Smaslach21
...ensive to produce and make it more easily accessible for classmates to use the desk organizer to help them with virtual learning.
thingiverse
free

Desk Organizer w/ Phone Holder by paulkim0
... creating the 3d model already helped me improve my design a lot, actually 3d printing the model would help an incredible amount.
thingiverse
free

Desk Organizer and holder by Ivan313
...t smaller. or make holes in it to make it lighter.
3d printing would help my design be lighter which would make up for its size.
thingiverse
free

Desk Organizer by kenniav9904
...y to do school stuff. the 3d printing would help strengthen my design by making the slots bigger and more accessible to students.
thingiverse
free

Desktop Organizer by GabrielLivi123
...esine printable (although i was successful). the advantage of 3d printing the desktop organizer is that it is more accessibility.
thingiverse
free

Lap desk by jwhite2022
...help strengthen the design by it being able to be made by the student and the plastic will make it durable and able to be washed.
thingiverse
free

Anthony Luna by AnthonyL45
...heated. overall, 3d printing the design would add more convenience to the already simple, user friendly, and customizable design.
Pencil
archibase_planet
free
Pencil
...pencil
archibase planet
pencil copying pencil indelible pencil
pencil - 3d model for interior 3d visualization.
3d_export
$5
pencil
...pencil
3dexport
sharpened pencil and not sharpened pencil
archibase_planet
free
Pencils
...pencils
archibase planet
pencils pencil
pencils n100811 - 3d model (*.gsm+*.3ds) for interior 3d visualization.
3d_export
free

Pencil
...pencil
3dexport
triangular pencil
archibase_planet
free
Pencil
...ase planet
pencil lead pencil stationery writing materials
pencil n110811 - 3d model (*.gsm+*.3ds) for interior 3d visualization.
3d_export
$5

Pencil
...pencil
3dexport
simple pencil for decoration.
3d_export
free
pencil
...pencil
3dexport
pencil with simple lighting.
3d_export
free

Pencils
...pencils
3dexport
pencils 10 colors
archibase_planet
free

Pencils
...ils
archibase planet
pencils stationery writing materials
pencils n020708 - 3d model (*.gsm+*.3ds) for interior 3d visualization.
archibase_planet
free
Pencil
...pencil
archibase planet
pencil crayon writing materials
pencil 2 - 3d model (*.gsm+*.3ds) for interior 3d visualization.
Student
3d_export
free
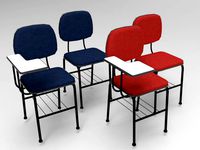
student chair
...student chair
3dexport
student chair low-poly 3d model
3d_export
$14

student
...ure diffuse only. low poly. ready smooth. already unwrapped non overlaoping made with a new blender 3.0 and rendered with cycle x
turbosquid
$10

Student Clothes
...uid
royalty free 3d model student clothes for download as ma on turbosquid: 3d models for games, architecture, videos. (1708017)
turbosquid
$20

Student giraffe
...lty free 3d model student giraffe for download as dae and obj on turbosquid: 3d models for games, architecture, videos. (1598952)
turbosquid
$19

Student Desk
...id
royalty free 3d model student desk 01 for download as max on turbosquid: 3d models for games, architecture, videos. (1343113)
turbosquid
$13

Student desk
... free 3d model student desk for download as max, obj, and fbx on turbosquid: 3d models for games, architecture, videos. (1354278)
3d_export
$5
ring for a student graduate
...ring for a student graduate
3dexport
design of a memorable gift for students (graduates) of the school
turbosquid
$60

Students dwelling
... available on turbo squid, the world's leading provider of digital 3d models for visualization, films, television, and games.
turbosquid
$49

Nerd student
... available on turbo squid, the world's leading provider of digital 3d models for visualization, films, television, and games.
turbosquid
$6

Student Chair
... available on turbo squid, the world's leading provider of digital 3d models for visualization, films, television, and games.
Virtual
3d_export
$99

virtual studio26
...virtual studio26
3dexport
3d model of the virtual tv studio
3d_export
$99

virtual studio19
...virtual studio19
3dexport
pbr model of the virtual tv studio
3d_ocean
$12
virtual dice
...virtual dice
3docean
3ds arman3dg dice games low max poly virtual
virtual dice. make up rules for your game …
3ddd
$1
Armstrong virtual
...armstrong virtual
3ddd
армстронг
набор для создания офисного потолка "армстронг virtual ".
размер 600х600.
3d_export
$99

virtual studio25
...virtual studio25
3dexport
3ds max model of the virtual studio pbr maps for vray, unity, redshift, unreal, pbr metal rough
turbosquid
$30

Virtual set
...royalty free 3d model virtual set, 3d set for download as c4d on turbosquid: 3d models for games, architecture, videos. (1602249)
turbosquid
$230

Virtual Secretary
... available on turbo squid, the world's leading provider of digital 3d models for visualization, films, television, and games.
turbosquid
$50

Virtual studio
... available on turbo squid, the world's leading provider of digital 3d models for visualization, films, television, and games.
turbosquid
$5

Virtual RAM
... available on turbo squid, the world's leading provider of digital 3d models for visualization, films, television, and games.
turbosquid
free

Virtual Set!
... available on turbo squid, the world's leading provider of digital 3d models for visualization, films, television, and games.
Challenge
turbosquid
$120
Challenger 2 and challenger 2 TES
...e 3d model challenger 2 and challenger 2 tes for download as on turbosquid: 3d models for games, architecture, videos. (1430319)
3d_export
$59
dodge challenger srt8
...dodge challenger srt8
3dexport
dodge challenger srt8
3d_export
$20
dodge challenger 1970
...dodge challenger 1970
3dexport
dodge challenger 1970
3d_export
$15
Dodge Challenger Hellcat
...dodge challenger hellcat
3dexport
dodge challenger hellcat
turbosquid
$80
challenger-2
...rbosquid
royalty free 3d model challenger-2 for download as on turbosquid: 3d models for games, architecture, videos. (1498848)
3d_export
$5
dodge challenger car
...dodge challenger car
3dexport
3d model dodge challenger!
turbosquid
$99
Dodge Challenger
...
royalty free 3d model dodge challenger for download as blend on turbosquid: 3d models for games, architecture, videos. (1489358)
turbosquid
$49
Dodge Challenger
...
royalty free 3d model dodge challenger for download as blend on turbosquid: 3d models for games, architecture, videos. (1698375)
turbosquid
$10
dodge challenger
...
royalty free 3d model dodge challenger for download as blend on turbosquid: 3d models for games, architecture, videos. (1405948)
3d_export
free

dodge challenger srt8
...dodge challenger srt8
3dexport
dodge challenger srt8 free model
Prototyping
3ddd
$1
iphone (prototype)
...e (prototype)
3ddd
iphone prototype телефон сотовый прототип , iphone
iphone (prototype)
turbosquid
$60
prototype
...y free 3d model prototype for download as , fbx, stl, and obj on turbosquid: 3d models for games, architecture, videos. (1516333)
turbosquid
free

prototype
... available on turbo squid, the world's leading provider of digital 3d models for visualization, films, television, and games.
turbosquid
free

Prototype Crossbow
...squid
free 3d model prototype crossbow for download as blend on turbosquid: 3d models for games, architecture, videos. (1237541)
turbosquid
$25

Atlas Prototype
... available on turbo squid, the world's leading provider of digital 3d models for visualization, films, television, and games.
turbosquid
$20

Prototype Airplane
... available on turbo squid, the world's leading provider of digital 3d models for visualization, films, television, and games.
3d_export
$10

starship prototype
...y manufactured in boca chica ,texas by spacex. this prototype consist features like forward flaps, bottom flaps and landing legs.
design_connected
$11
Jellyfish Chandelier (prototype)
...sakai design associate jellyfish chandelier (prototype) pendant lights computer generated 3d model. designed by toshihiko sakai.
turbosquid
free

Prototype Plasma Rifle
...d
free 3d model prototype plasma rifle for download as blend on turbosquid: 3d models for games, architecture, videos. (1237576)
turbosquid
$15

Prototype CNC Router
... model prototype cnc router for download as iam, ige, and stl on turbosquid: 3d models for games, architecture, videos. (1667298)
Perfect
turbosquid
$35

A perfect choise
... available on turbo squid, the world's leading provider of digital 3d models for visualization, films, television, and games.
turbosquid
$25

Perfection-Chair
... available on turbo squid, the world's leading provider of digital 3d models for visualization, films, television, and games.
turbosquid
$15

Perfect Matcha
... perfect matcha for download as max, obj, fbx, usdz, and gltf on turbosquid: 3d models for games, architecture, videos. (1672741)
turbosquid
$5

Perfect Diamond
... available on turbo squid, the world's leading provider of digital 3d models for visualization, films, television, and games.
turbosquid
$2

The perfect woman
... available on turbo squid, the world's leading provider of digital 3d models for visualization, films, television, and games.
3ddd
$1
Perfect Choice Wisdom
...perfect choice wisdom
3ddd
битбокс
perfect choice wisdom
turbosquid
$22

PERFORATED PERFECTION CHANDELIER
... perforated perfection chandelier for download as max and fbx on turbosquid: 3d models for games, architecture, videos. (1570812)
turbosquid
$1

Pokéball - Perfect model
... available on turbo squid, the world's leading provider of digital 3d models for visualization, films, television, and games.
3ddd
free
ERBA ITALIA - PERFECT DAY
...erba italia - perfect day
3ddd
erba , perfect day
http://erbaitalia.it/
3d_export
$50

3d perfect cartoon house
...3d perfect cartoon house
3dexport
Holder
archibase_planet
free

Holder
...holder
archibase planet
holder toilet paper holder
holder paper n070712 - 3d model (*.gsm+*.3ds) for interior 3d visualization.
archibase_planet
free

Holder
...e planet
holder rack toilet paper holder
holder toilet roll n240715 - 3d model (*.gsm+*.3ds+*.max) for interior 3d visualization.
archibase_planet
free

Holder
...holder
archibase planet
pen holder support prop
pen holder - 3d model for interior 3d visualization.
archibase_planet
free

Holder
...holder
archibase planet
pole post holder
сhurch cross pole holder - 3d model for interior 3d visualization.
archibase_planet
free

Holder
...holder
archibase planet
holder bathroom ware
shower holder - 3d model (*.gsm+*.3ds) for interior 3d visualization.
archibase_planet
free

Holder
...oilet paper holder
holder paper devon&devon; time black n241113 - 3d model (*.gsm+*.3ds+*.max) for interior 3d visualization.
archibase_planet
free

Holder
...holder
archibase planet
holder hanger hanger for towel
holder 7 - 3d model (*.gsm+*.3ds) for interior 3d visualization.
archibase_planet
free

Holder
...holder
archibase planet
holder hanger hanger for towel
holder 3 - 3d model (*.gsm+*.3ds) for interior 3d visualization.
archibase_planet
free

Holder
...holder
archibase planet
holder towel rack towel-horse
holder - 3d model (*.gsm+*.3ds) for interior 3d visualization.
archibase_planet
free

Holder
...lder
archibase planet
holder hanger hanger for towel
holder towel n250912 - 3d model (*.gsm+*.3ds) for interior 3d visualization.