Thingiverse
The #NanoLongRange by Dave_C_FPV
by Thingiverse
Last crawled date: 3 years ago
About
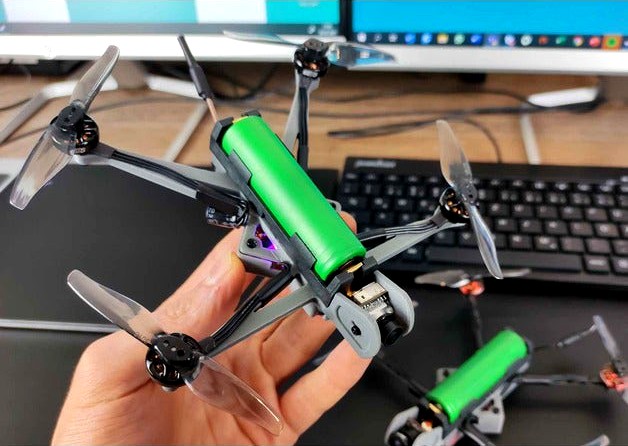
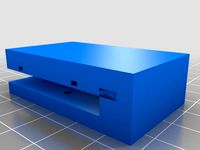
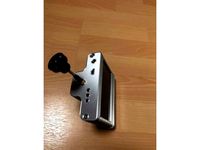
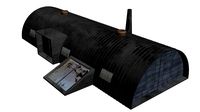
The #NanoLongRange basically a small FPV quadcopter designed around a single 18650 Lithium-Ion Battery
The whole thing is still somewhat experimental and you shouldn't expect any sort of spectacular flight performance out of something that weighs 100g and runs on only 3V.
But it's still better than I expected and a lot of fun to cruise around and there is something really neat about just popping in a battery like on the remote of TV and having this thing fly for over ten minutes.
This version is fully 3D printed apart from the battery tray to be a fun DIY project and not require souring any carbon parts.
Youtube Video about the NanoLongRange: https://youtu.be/hvgukykBTNo
Please note: This build isn't super easy because the components are tiny. A steady hand and minimum experience with soldering is required.
Shopping List (Doesn't have to be these exact products, but they should be similar):
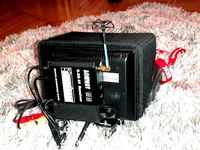
Keystone HA 1X18650 SA battery tray or this knock-off from AliexpressImportant: You will need a good Battery holder, if possible with gold plated contacts. The cheap ones with a helical spring will not work
High discharge 18650 battery: Sony Murata VTC6, VTC5A or similar
1S AIO Flight Controller: HGLRC Zeus or the Budget Option JHEMUC 1-2S
Video Transmitter: HGLRC 350mW or an Eachine Nano VTX
Motors: HGLRC 1202.5 11000kV or Flywoo 1202.5 11500kV
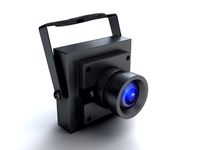
FPV Camera: Caddx Ant
5V Step-up
5V LC Filter
Props: Gemfan 3018
Small stuff: Four M2x8mm screws, superglue, and some electrical tape
New to FPV?
Cheap Controller
Budget Goggles
Reiceiver
Build Instructions:
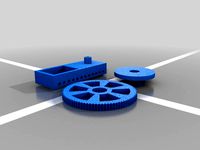
Print in PLA or PLA+ at 20% infill. You can cure it in an oven or on the hotbed with a cover at 80 celsius for 45min to make it stronger
Remove the little plastic knob on the bottom of the battery tray
Drill four 2mm holes in the tray exactly where the holes in the printed parts are
Apply some glue on where the print and the tray join
Use the M2 screws to mount
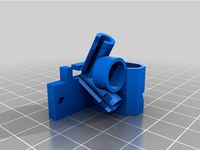
Wiring: Check the wiring instructions in the pictures. Please make sure you know what you are doing and have basic knowledge of FPV drone building. If you are new to it Joshua Bardwell's Youtube and Oscar Liang's blog are great resources to learn the basics.
PID Tune:
set p_pitch = 100
set i_pitch = 50
set d_pitch = 70
set f_pitch = 125
set p_roll = 90
set i_roll = 45
set d_roll = 65
set f_roll = 125
set p_yaw = 65
set i_yaw = 20
set d_yaw = 0
set f_yaw = 125
If you like my designs but prefer getting something pre-build check out my brand atRekonFPV.com or the Explorer and Hexplorer MiniLongRange Quads that I developed with Flywoo.
The #NanoLongRange basically a small FPV quadcopter designed around a single 18650 Lithium-Ion Battery
The whole thing is still somewhat experimental and you shouldn't expect any sort of spectacular flight performance out of something that weighs 100g and runs on only 3V.
But it's still better than I expected and a lot of fun to cruise around and there is something really neat about just popping in a battery like on the remote of TV and having this thing fly for over ten minutes.
This version is fully 3D printed apart from the battery tray to be a fun DIY project and not require souring any carbon parts.
Youtube Video about the NanoLongRange: https://youtu.be/hvgukykBTNo
Please note: This build isn't super easy because the components are tiny. A steady hand and minimum experience with soldering is required.
Shopping List (Doesn't have to be these exact products, but they should be similar):
Keystone HA 1X18650 SA battery tray or this knock-off from AliexpressImportant: You will need a good Battery holder, if possible with gold plated contacts. The cheap ones with a helical spring will not work
High discharge 18650 battery: Sony Murata VTC6, VTC5A or similar
1S AIO Flight Controller: HGLRC Zeus or the Budget Option JHEMUC 1-2S
Video Transmitter: HGLRC 350mW or an Eachine Nano VTX
Motors: HGLRC 1202.5 11000kV or Flywoo 1202.5 11500kV
FPV Camera: Caddx Ant
5V Step-up
5V LC Filter
Props: Gemfan 3018
Small stuff: Four M2x8mm screws, superglue, and some electrical tape
New to FPV?
Cheap Controller
Budget Goggles
Reiceiver
Build Instructions:
Print in PLA or PLA+ at 20% infill. You can cure it in an oven or on the hotbed with a cover at 80 celsius for 45min to make it stronger
Remove the little plastic knob on the bottom of the battery tray
Drill four 2mm holes in the tray exactly where the holes in the printed parts are
Apply some glue on where the print and the tray join
Use the M2 screws to mount
Wiring: Check the wiring instructions in the pictures. Please make sure you know what you are doing and have basic knowledge of FPV drone building. If you are new to it Joshua Bardwell's Youtube and Oscar Liang's blog are great resources to learn the basics.
PID Tune:
set p_pitch = 100
set i_pitch = 50
set d_pitch = 70
set f_pitch = 125
set p_roll = 90
set i_roll = 45
set d_roll = 65
set f_roll = 125
set p_yaw = 65
set i_yaw = 20
set d_yaw = 0
set f_yaw = 125
If you like my designs but prefer getting something pre-build check out my brand atRekonFPV.com or the Explorer and Hexplorer MiniLongRange Quads that I developed with Flywoo.
Similar models
thingiverse
free

Nanolongrange V2 GPS FPV drone with single 18650 by Unboxingexperience7
...tracer, elrs... i used immersionrc ghost
3x 6mm and 10x 4mm m2 screws (i used titanium to save around 1g over steel)
rubber bands
thingiverse
free

18650 Battery Tray Drilling Jig For Dave_C Nano Longrange FPV Quadcopter by barontechnologies
...ologies
thingiverse
i designed this to be able to easily drill holes in an 18650 tray to build some dave_c nano longrange quads.
thingiverse
free

Portable Power Supply (18650 Battery) by alextrim
...r high: 0.15mm
infill: 25%
temperature: 230°c
cooling: enable
support: disable
the top and bottom are screwed with a 2x5mm screw.
3dwarehouse
free

HGLRC 2-in-1 WS2812 5V LED
...se
hglrc 2-in-1 ws2812b 5v led with alarm buzzer fpv rc drone if you would like to support me: patreon.com/wizzx paypal.me/wizzx
thingiverse
free

FPV monitor 18650 mod by HeyItsTor
...r
thingiverse
18650 mod for cheap fpv monitor from banggood. about 45$ or so in total for everything will update with more later
thingiverse
free
Sync FPV FETtec car (Removable 18650 Version) by SyncFPV
...gned for the betafpv m01 camera.
thanks to errorash for the filled wheels and 20% larger width size that this remix was based on!
thingiverse
free

battery charger 18650 by lange23
...ad8qavd_bwe )
soldering tool,
something metal
and a battery 18650
if you want, there is a hole on the side for a connection to 5v
thingiverse
free

Rework of the ZOHD Dart's Battery tray to accommodate 18650 batteries and a standard 30.5mm FC by Texrx
...accommodate 18650 batteries and a standard 30.5mm fc by texrx
thingiverse
its setup to print flat, no fancy settings necessary.
thingiverse
free
Q X7 18650 battery tray by calviniba
...to use 18650 batteries in the frsky taranis q x7 using the stock battery terminals from the aa battery tray with no modification.
thingiverse
free

18650 Battery Insulator by DAcreates
...ant to wait or pay shipping they are also really cheap to print.
place the ring over the end of the battery cell before wrapping.
Nanolongrange
thingiverse
free

NanoLongRange short motor screws by gak4u
...nanolongrange short motor screws by gak4u
thingiverse
thingiverse
free

The #NanoLongRange rounded by FinalMadness
...ingiverse
thanks to dave_c_fpvhttps://www.thingiverse.com/thing:4769576
i made a version with rounded edges to save some weight.
thingiverse
free

The #NanoLongRange - 20x20 Remix by 1filth1
...the #nanolongrange - 20x20 remix by 1filth1
thingiverse
20x20 fc, 20x20 vtx & 20mm camera (runcam micro swift)
thingiverse
free

#NanoLongRange spacers by Mard0
...part while nano cams are usually 14mm wide. these spacers can be printed out of a soft squishy material (tpu) to fill up the gap.
thingiverse
free

#NanoLongRange / Rekon 3 Insta360 Go mount by nuxnik
...ght video using a 3d printed #nanolongrange drone, gps module and insta360 go camera:
https://www.youtube.com/watch?v=w7uvuorph2e
thingiverse
free

NanoLongRange Weight Reduced by justmaykit
...upted on the underside around the two back mounting holes.
it still holds a screw just fine so i never bothered to fix it. sorry.
thingiverse
free

NanoLongRange - 20x20 mount by Mariospin
...o recreate it and make a 20x20 setup powered with standard lipo.
there is enough space to put vtx. the prop guards are optional.
thingiverse
free

NanoLongRange with thicker camera plate by Floxflux
...lates were 15mm, this one is 14mm so it fits caddx ant without bending the plates. also added a brace at the bottom of the camera
thingiverse
free

Hotdog 2S li-ion nanolongrange by ph2t
...ith the abs print for me. this thing can be printed in pla/petg/abs. i use 30% infill. brim is recommended especially if abs.
Dave
3d_export
$15

Cyborg Dave
...cyborg dave
3dexport
cyborg dave from a parallel universe
turbosquid
$2

Crazy Dave
...bosquid
royalty free 3d model crazy dave for download as fbx on turbosquid: 3d models for games, architecture, videos. (1178843)
turbosquid
free

dave valve
...bosquid
free 3d model dave valve for download as dwg and stl on turbosquid: 3d models for games, architecture, videos. (1531462)
turbosquid
$20
Tosconova Dave
...alty free 3d model tosconova dave for download as max and fbx on turbosquid: 3d models for games, architecture, videos. (1343864)
turbosquid
$30

Winter Dave
... available on turbo squid, the world's leading provider of digital 3d models for visualization, films, television, and games.
3ddd
$1
Dave Shield Wood Table
...dave shield wood table
3ddd
журнальный
dave shield wood modern table
turbosquid
$8

Dave Table Lamp
... model dave table lamp for download as max, max, fbx, and obj on turbosquid: 3d models for games, architecture, videos. (1659415)
turbosquid
$20

Dave the hairy monster
... available on turbo squid, the world's leading provider of digital 3d models for visualization, films, television, and games.
turbosquid
free

Daves basketball court.max
... available on turbo squid, the world's leading provider of digital 3d models for visualization, films, television, and games.
3ddd
$1
Calia Italia DAVE. 852
...dave. 852
3ddd
dave
ссылка на сайт производителя:http://www.caliaitalia.com/en/categorie-collezioni/emporio/#ad-image-2
Fpv
turbosquid
$1

FPV VTX Antenna
...e 3d model fpv vtx antenna for download as obj, fbx, and stl on turbosquid: 3d models for games, architecture, videos. (1230317)
3d_export
$9

Fpv logo 3D Model
...onogram vehicle part of auto transport 3d model logo emblem detailed high quality badge
fpv logo 3d model rmodeler 59628 3dexport
3d_export
$8
dji fpv battery slot holder
...er for 3 dji fpv batteries. holds perfectly without shaking. need 1 m3 countersunk head bolt. need to print 6 pin, 1 case, 1 cap.
3d_export
$10
fpv camera hd 700tvl
...aterials are logically named<br>the main format is in 3ds max 2009.<br>satisfcation garranteed..<br>thank you !
thingiverse
free
FpV Mount (SOPORTE FPV) by elborjas1987
...fpv mount (soporte fpv) by elborjas1987
thingiverse
this is a fpv mount with the same holes of naza base.
thingiverse
free
fpv by tbutera
...fpv by tbutera
thingiverse
fpv
thingiverse
free
fpv by tbutera
...fpv by tbutera
thingiverse
fpv
thingiverse
free
FPV DRONE ROOSTER DJI FPV PART
...fpv drone rooster dji fpv part
thingiverse
fpv drone rooster dji fpv install part
thingiverse
free
FPV monitor
...tml?rmmds=myorder&cur_warehouse=cn
link for download : https://cults3d.com/fr/mod%c3%a8le-3d/divers/fpv-monitor-ecran-fpv-faf
thingiverse
free
FPV receiver mount for FPV display by petrex
...eceiver mount for fpv display by petrex
thingiverse
aomway receiver mount for field view 777 fpv monitor. with small cable tray.
C
3ddd
$1
Gustavsberg Skandic 160 c-c
...gustavsberg skandic 160 c-c
3ddd
gustavsberg , смеситель
3dmax 2009
3ddd
$1

Кресло Victoria C
...кресло victoria c
3ddd
victoria c , стул
victoria c
design_connected
$25

Mobius C
...mobius c
designconnected
zenith mobius c computer generated 3d model. designed by schamburg, marc.
3ddd
$1

Molteni & C
...molteni & c
3ddd
molteni&c
molteni & c
turbosquid
$10
Raids house C&C Tiberian sun
... raids house c&c tiberian sun for download as max and fbx on turbosquid: 3d models for games, architecture, videos. (1188376)
turbosquid
$10
Civilian Asylum C&C Tiberian sun
...ilian asylum c&c tiberian sun for download as max and fbx on turbosquid: 3d models for games, architecture, videos. (1188365)
3ddd
$1

Molteni & C
...molteni & c
3ddd
molteni&c
стул molteni & c
3ddd
free
kamina&c
...kamina&c
3ddd
kamina-c , табурет барашек
sheep chair by kamina-c
design_connected
$29

Extrasoft C
...extrasoft c
designconnected
living divani extrasoft c computer generated 3d model. designed by lissoni, piero.
design_connected
$4
Mono C
...mono c
designconnected
scp mono c tables computer generated 3d model. designed by konstantin grcic.