Thingiverse

The Geared Head of Feelings by reparator
by Thingiverse
Last crawled date: 3 years, 1 month ago
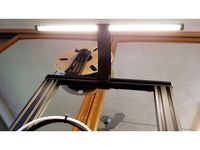
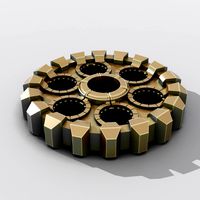
The Geared Head of Feelings
A 3D-printed kinetic art project by Stefan Kneip
Video: https://youtu.be/4p88s4axtr8
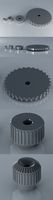
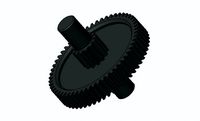
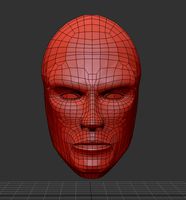
The Geared Head Of Feelings consists of 35 different gears moving in two layers.
The gear mechanism is driven by a small 12 V electro motor on the backside. With a mask in form of a head the installation symbolizes the small running wheels inside our heads which are controlling our minds and feelings.
The Electronics:
An Arduino based controller electronic is the "brain" of the installation. It can operate in different modes which are adjusted by means of a push-button with integrated LED.
Mode1:
The red push-button-LED is on: The gears are standing still, only the LED illumination is on (silent mode).Mode2:
The red pushbutton-LED is on: The gears are moving and drive the "Feelings Wheel". The LED illumination is on too.Mode3:
The red pushbutton-LED is blinking: The integrated motion detector is activ (must be attached). As soon as a motion near the installation is detected, the LED illumination is switched-on and the gears begin to move. If no motion is detected for about 30 seconds the electronic switches off the gears and the LEDs again.Mode4:
The red pushbutton-LED is off: Everything is switched off other than the arduino circuitry. (Power consumption in this mode is about 50 mA).
By pressing the pushbutton you can circle through these modes.
You can hang-up the frame like a picture or use the stands to dispose it on your desk.(see picture).
The motion detector is attached with small Nd-Magnets on the top side or buttom side of the frame (drill 8 mm countersink holes in the Ribba-Frame and glue the magnets in these holes).
What you need:
1x Frame Ribba 25 cm with (IKEA)
2x LED-illumination LEDberg 12V
1x Gearbox motor
2x sheet of AlDibond 25 x 25cm of 2 mm thickness
40x bearing 3x8x3mm (MR83ZZ)
Screws 3 mm with a lot of washers and self locking nuts
PIR-Motion detector (https://www.adafruit.com/product/189)
The circuit board attached (feel free to build one).
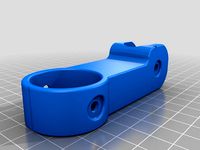
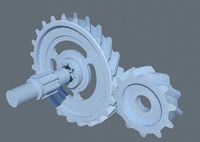
See picture GearsAssembly for details how to assemble the gears on the mount platform:
Press the bearings in the gears. Assemble everything in the mounting frame first.
A 3D-printed kinetic art project by Stefan Kneip
Video: https://youtu.be/4p88s4axtr8
The Geared Head Of Feelings consists of 35 different gears moving in two layers.
The gear mechanism is driven by a small 12 V electro motor on the backside. With a mask in form of a head the installation symbolizes the small running wheels inside our heads which are controlling our minds and feelings.
The Electronics:
An Arduino based controller electronic is the "brain" of the installation. It can operate in different modes which are adjusted by means of a push-button with integrated LED.
Mode1:
The red push-button-LED is on: The gears are standing still, only the LED illumination is on (silent mode).Mode2:
The red pushbutton-LED is on: The gears are moving and drive the "Feelings Wheel". The LED illumination is on too.Mode3:
The red pushbutton-LED is blinking: The integrated motion detector is activ (must be attached). As soon as a motion near the installation is detected, the LED illumination is switched-on and the gears begin to move. If no motion is detected for about 30 seconds the electronic switches off the gears and the LEDs again.Mode4:
The red pushbutton-LED is off: Everything is switched off other than the arduino circuitry. (Power consumption in this mode is about 50 mA).
By pressing the pushbutton you can circle through these modes.
You can hang-up the frame like a picture or use the stands to dispose it on your desk.(see picture).
The motion detector is attached with small Nd-Magnets on the top side or buttom side of the frame (drill 8 mm countersink holes in the Ribba-Frame and glue the magnets in these holes).
What you need:
1x Frame Ribba 25 cm with (IKEA)
2x LED-illumination LEDberg 12V
1x Gearbox motor
2x sheet of AlDibond 25 x 25cm of 2 mm thickness
40x bearing 3x8x3mm (MR83ZZ)
Screws 3 mm with a lot of washers and self locking nuts
PIR-Motion detector (https://www.adafruit.com/product/189)
The circuit board attached (feel free to build one).
See picture GearsAssembly for details how to assemble the gears on the mount platform:
Press the bearings in the gears. Assemble everything in the mounting frame first.
Similar models
thingiverse
free

Illuminated Heart Picture Frame by XylenC4
...at all. i was just using fastled with standard palettes to control the leds as an led string.
videos:video 1video 2video 3video 4
grabcad
free

LED Pushbutton
...utton
grabcad
led illuminated pushbutton that complies with adafruit16mm illuminated pushbutton - red momentary product id: 1439
grabcad
free

Motion Sensor Prank PCB
...buzzer does not stop until power is switch off.
how to make it, see link: https://www.instructables.com/motion-sensor-prank-pcb/
grabcad
free

Multicomp Pro - R13-502MA-05-R
...multicomp pro - r13-502ma-05-r
grabcad
pushbutton switches spst off-(on) red.
pushbutton switches spst off-(on) black.
thingiverse
free

PrintBot Droide by DroideComunidad
...ller bqzum
2x continuos rotation servo
1x micro servo (for ultrasonic module or claws)
2x ir module sensor
1x battery compartment
thingiverse
free

Geared Light Switch Plate by SRex
...en m3 bolts and large gears
if your not comfortable replacing a light switch plate or threading a hole please don't try this.
thingiverse
free
Ender 3 Rail Mount for Ikea Ribba LED Picture Light by BenjyBoo
...with holes for two screws. attaches to top frame of ender 3. made really strong at 80% infill, *probably overkill. (2hrs 18 mins)
thingiverse
free

Think Fun Maker Studio Electronics Expansion by Aams86
...hat the corners do not interfere when connectors are assembled at angle.
https://youtu.be/nui0ndlqycuhttps://youtu.be/ooxou8xa6ww
thingiverse
free

Foregrip with Trigger by moho_mine
...potentiometer.
allows for variable control of
13mm hole on top for a pushbutton switch
requires:
2x m3 12pan
1x m3 30pan
grabcad
free

Cutler Pushbutton GCX3153-120
...cutler pushbutton gcx3153-120
grabcad
an on/off, 120v, illuminated cutler double-headed pushbutton. model number gcx3153-120.
Reparator
thingiverse
free

Medaille reparer by Kenzay62
...medaille reparer by kenzay62
thingiverse
medaille reparer
thingiverse
free

Medaille repared by Kenzay62
...medaille repared by kenzay62
thingiverse
medaille repared
thingiverse
free

Eu Adapter Reparation by AndresVH
...eu adapter reparation by andresvh
thingiverse
used for the reparation of a broken adapter with eu plug
thingiverse
free

VesaAdapter75to100 by reparator
...vesaadapter75to100 by reparator
thingiverse
vesa-adapter 75x75 mm to 100 x 100 mm.
thingiverse
free

suport colle repar-EX by mactiti
...suport colle repar-ex by mactiti
thingiverse
suport colle repar-ex + accessoirs
thingiverse
free

Toaster repar part by sellemann
...toaster repar part by sellemann
thingiverse
print toast enjoy
thingiverse
free

Goldfinger reparation by wennes
...goldfinger reparation by wennes
thingiverse
if you want to lie in your bed like james bond...
https://youtu.be/gkn4kcahcei
thingiverse
free

ArduinoBreadboardAdapter by reparator
... not sufficient. the arduino is hold in place with bolds and clips.
lost junction and flying wires are a thing of the past now...
thingiverse
free
babychair repair ( reparation chaise haute ) by franck
...babychair repair ( reparation chaise haute ) by franck
thingiverse
thingiverse
free

Anti-Gravitator by reparator
...lso called levitator or levitron. it lets a small magnet sphere levitate in a magnetic field.
video: https://youtu.be/0ftbobwkf2y
Geared
3d_ocean
$4
Gears
...gears
3docean
gear gears iron
4 different size of gears
3d_export
$5
gear
...gear
3dexport
gear
3d_export
free
Gears
...gears
3dexport
gears
3d_export
$5
gear
...gear
3dexport
a simple model of gear
3d_export
$5

gear
...gear
3dexport
gear for transmission , case machine
3d_ocean
$3
Gears
...nical parts process steampunk vehicle wheel work
10 different gear models volume 01-10 files: .3ds .c4d .obj note: you need vray
3d_ocean
$1

Spur Gear
...spur gear
3docean
decoration gear
a typical spur gear
3d_ocean
$4
Gear wheels
...gear wheels
3docean
engine engineering gear gears industry machinery mechanical toothwheel wheel
pair of gear wheels : animated.
turbosquid
$9
Gear
...gear
turbosquid
royalty free 3d model gear for download as on turbosquid: 3d models for games, architecture, videos. (1712328)
turbosquid
$2

Gears
...rs
turbosquid
royalty free 3d model gears for download as ma on turbosquid: 3d models for games, architecture, videos. (1166710)
Feelings
3ddd
$1

Tomasella feel
...tomasella feel
3ddd
tomasella
кровать feel perla02.http://mebelmoscow.ru/goods/g5108292.htm
design_connected
$16

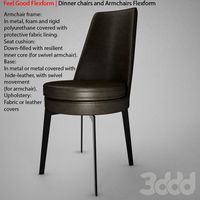
Feel Good
...nected
photo-realistic 3d models of the feel good barstool from flexform for 3d architectural and interior design presentations.
3ddd
$1

Flexform FEEL GOOD
...flexform feel good
3ddd
flexform , feel good
flexform feel good
3ddd
$1

feel good chair
...feel good chair
3ddd
flexform , feel good
feel good chair by flexform
3ddd
$1

Tonon - Feel Me
...tonon - feel me
3ddd
tonon , feel me
design for tonon, series feel me
3ddd
$1

диван FEEL GOOD
...иван feel good
3ddd
flexform , feel good
модель дивана feel good
производитель: flexform
3ddd
$1
Elica feel
...elica feel
3ddd
elica , вытяжка
вытяжка современная elica
3ddd
$1

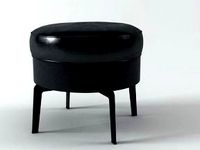
Feel Good Stool
...feel good stool
3ddd
барный
feel good stool antonio citterio
3ddd
$1
Feel Good - FlexForm
...feel good - flexform
3ddd
flexform
feel good flexform | dinner chairs and armchairs flexform
design_connected
$9
Feel Good Ottoman
...feel good ottoman
designconnected
flexform feel good ottoman computer generated 3d model. designed by citterio, antonio.
Head
3d_export
$5

head
...head
3dexport
simulated female head.
3d_ocean
$5

Deer Head
...deer head
3docean
deer head
simple model of deer head with neck.
cg_studio
$25

Marble Head - Head A3d model
... - head a3d model
cgstudio
.ma - marble head - head a 3d model, royalty free license available, instant download after purchase.
turbosquid
$5
Head
...ad
turbosquid
royalty free 3d model head for download as max on turbosquid: 3d models for games, architecture, videos. (1230068)
turbosquid
free

Head
...
turbosquid
royalty free 3d model head for download as blend on turbosquid: 3d models for games, architecture, videos. (1276899)
turbosquid
free

The Head
...urbosquid
royalty free 3d model the head for download as max on turbosquid: 3d models for games, architecture, videos. (1386205)
3d_export
$10

bull head
...bull head
3dexport
bull head
3d_export
$5

girl head
...girl head
3dexport
head girl
3d_export
$5

Tigger-head
...tigger-head
3dexport
tigger-head
3d_export
$5

head on a spear
...head on a spear
3dexport
head on a spear