Thingiverse

The Double D: Derringer Crossbow Pistol by mechanic403
by Thingiverse
Last crawled date: 3 years, 3 months ago
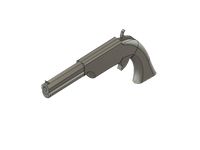
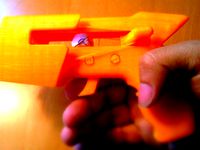
The Double D is a compact crossbow pistol which fires two arrows at the same time. It can be pre loaded with the two arrows ready in its chamber and can then be cocked quickly and fired. It has a break-action and is breech loaded.
Required Parts:
M4 Screws and nuts: 2x M4x20, 1x M4x12, 1x M4x10
M3 Screws and nuts: 3x M3x12, 1x M3x20
Small Rubber Bands
Large Rubber Bands
3x Magnets 5mm Diameter x 3mm cylindrical neodymium
Super Glue
If you dont have the magnets, print the _NonMagnetic part variants which use a different Barrel Latch mechanism.
UPDATE: Added engraved parts
Assembly Guide
Grip and Receiver
Gather the Grip_Left, Grip_Right, GripScale_Left, GripScale_Right, GripReceiverSidePlate_Left, GripReceiverSidePlate_Right, the Receiver, 2 M4x20 screws, 3 M3x12, an M3x20 and the small rubber band
Take one of the grip halves and the corresponding ReceiverSidePlate and feed the M3x20 screw into the hole in the ReceiverSidePlate and then through the Grip half's hole for the trigger. Place the trigger onto the screw through the other side of the Grip so it sits in the cut out chamber. Loop the rubber band around the trigger in the small notch and pull the band upwards so that it sits in the small channel in the top of the Grip. Then connect the other grip half with the screw and place the other ReceiverSidePlate on top, securing with the end of the screw and a hex nut. Loop the rubber band around the small hook on the grip and make sure that it has good tension, the stronger the better
Screw the GripScales onto the grip with the M4x20 screws and nuts.
Next, place the flat face of the Receiver against the front of the Grip and secure with two M3x12 screws. Make sure the screw heads are fully inserted into the Receiver so that the front surface is flat.
Check the images at the bottom for help assembling the latch
Take the BarrelLockLever halves and glue them together. Insert a magnet into the small hole in the thumb rest of the lever and glue into place. Place the other two magnets, stacked, in the small hole on the top of the Grip and ensure they have the opposite polarity as the one in the lever so that they repel. Screw the lever into the Receiver's hinge with the M3x12 screw. You should be able to press down the lever and have it spring back.
Alternatively, if youve printed the NonMagnetic parts, screw the M3x12 through the LockLever_NonMagnetic's top hole, then apply a bit of glue to the end of the screw once it comes out the other side. Screw this into the hole in the top of the Grip (the NonMagnetic version of the grip has a smaller, deeper hole than the regular version). Ensure the LockLever can rotate freely, yet is tight against the top face of the grip and doesnt wobble.
Barrel
Gather the Barrel, two ArrowRetentionTabs, BarrelLockLatch, BarrelHinge and BarrelBreechPlate, along with an M4x12 screw.
Insert the BarrelHinge into the rectangular slot on the bottom of the Barrel, closest to the breech, and glue in place. Insert the BarrelLockLatch into the small square slot on the top of the Barrel and glue into place. Ensure the angled slope faces towards the breech end. If using the NonMagnetic latch, ensure the longer thinner end is pointing towards the breech. Insert each ArrowRetentionTab into the long open rectangular slots on the barrel, glue the flat squarish face of the tab onto the small indent in the slot. The raised portion of the tab should point inward to the center of the barrel. These tabs keep the arrows in place when theyre inserted and prevent them from sliding out.
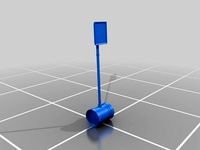
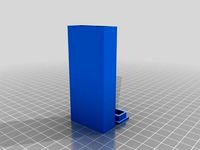
Sled
Gather all of the parts from the Sled_Assembly and get a short peice of filament (1.75mm). Check the images for the names of each part.
Glue the two rectangular peices together such that the two holes are aligned. Insert the two SledTabs into the slot in the SledMechanism and feed a peice of the filament through each hole such that the tabs can rotate. Use a knife to cut the filament so it is flush with each side of the SledMechanism.
Insert the SledGrip onto the SledMechanism via the slots and glue together. Insert the SledActuator into the thin slot on the rear of the SledMechanism. Ensure that it can slide back and forth and push up the two SledTabs so that they extend outwards. Finally, glue the SledTriggerHook onto the back of the SledMechaism so that it contains the SledActuator. Make sure to glue this very strongly as it holds all of the tension in the Derringer.
You can now insert the assembled sled into the barrel with the hook end facing towards the breech. It should slide freely along the channel in the barrel. You should be able to push arrows into the barrel via the breech and have them push the SledTabs downward and thus move the actuator back.
Final Assembly
With the Sled inserted into the barrel channel, place the BarrelBreechPlate onto the breech end of the barrel with the two small pegs inserted into the small holes on the Barrel and glue into place.
Connect the BarrelHinge to the Receiver with an M4x12 screw so that it can rotate freely. You should be able to rotate the barrel so that its flush with the Receiver and have the LockLever catch it and hold it in place.
Take the BarrelFrontBandSupport, or MuzzleBowArms / MuzzleBowArms_Compact and place it on the muzzle of the barrel. Use an M4x10 screw to secure it to the barrel. Loop a strong rubber band through the holes in the Sled such that each end of the band is connected to one of the sides of the Sled. The band should then be pulled over the FrontBandSupport and rest in its curved channel.
Alternatively, print the MuzzleBowArms part and use instead. Its a bit less streamlined but itll allow for more power!
Congrats! Youre done :) Just print two (or more) arrows and glue the halves together.
Loading and Firing
To load, first press down on the LockLever to open the barrel breech. Push the arrows into the shafts in the barrel. You should feel the SledTabs click down. The rear end of the arrows should be pressed in a small way so that theyre a bit past the face of the breech plate. Close the barrel so the LockLever locks it in place.
Now just pull the sled back all the way. It should click into place, pushing the SledActuator forward, rotating the SledTabs outward so that they can push against the rear end of the arrows when fired. Aim the Derringer and pull the trigger to fire both arrows at once! You can also optionally load a single arrow if you desire. Enjoy!
Required Parts:
M4 Screws and nuts: 2x M4x20, 1x M4x12, 1x M4x10
M3 Screws and nuts: 3x M3x12, 1x M3x20
Small Rubber Bands
Large Rubber Bands
3x Magnets 5mm Diameter x 3mm cylindrical neodymium
Super Glue
If you dont have the magnets, print the _NonMagnetic part variants which use a different Barrel Latch mechanism.
UPDATE: Added engraved parts
Assembly Guide
Grip and Receiver
Gather the Grip_Left, Grip_Right, GripScale_Left, GripScale_Right, GripReceiverSidePlate_Left, GripReceiverSidePlate_Right, the Receiver, 2 M4x20 screws, 3 M3x12, an M3x20 and the small rubber band
Take one of the grip halves and the corresponding ReceiverSidePlate and feed the M3x20 screw into the hole in the ReceiverSidePlate and then through the Grip half's hole for the trigger. Place the trigger onto the screw through the other side of the Grip so it sits in the cut out chamber. Loop the rubber band around the trigger in the small notch and pull the band upwards so that it sits in the small channel in the top of the Grip. Then connect the other grip half with the screw and place the other ReceiverSidePlate on top, securing with the end of the screw and a hex nut. Loop the rubber band around the small hook on the grip and make sure that it has good tension, the stronger the better
Screw the GripScales onto the grip with the M4x20 screws and nuts.
Next, place the flat face of the Receiver against the front of the Grip and secure with two M3x12 screws. Make sure the screw heads are fully inserted into the Receiver so that the front surface is flat.
Check the images at the bottom for help assembling the latch
Take the BarrelLockLever halves and glue them together. Insert a magnet into the small hole in the thumb rest of the lever and glue into place. Place the other two magnets, stacked, in the small hole on the top of the Grip and ensure they have the opposite polarity as the one in the lever so that they repel. Screw the lever into the Receiver's hinge with the M3x12 screw. You should be able to press down the lever and have it spring back.
Alternatively, if youve printed the NonMagnetic parts, screw the M3x12 through the LockLever_NonMagnetic's top hole, then apply a bit of glue to the end of the screw once it comes out the other side. Screw this into the hole in the top of the Grip (the NonMagnetic version of the grip has a smaller, deeper hole than the regular version). Ensure the LockLever can rotate freely, yet is tight against the top face of the grip and doesnt wobble.
Barrel
Gather the Barrel, two ArrowRetentionTabs, BarrelLockLatch, BarrelHinge and BarrelBreechPlate, along with an M4x12 screw.
Insert the BarrelHinge into the rectangular slot on the bottom of the Barrel, closest to the breech, and glue in place. Insert the BarrelLockLatch into the small square slot on the top of the Barrel and glue into place. Ensure the angled slope faces towards the breech end. If using the NonMagnetic latch, ensure the longer thinner end is pointing towards the breech. Insert each ArrowRetentionTab into the long open rectangular slots on the barrel, glue the flat squarish face of the tab onto the small indent in the slot. The raised portion of the tab should point inward to the center of the barrel. These tabs keep the arrows in place when theyre inserted and prevent them from sliding out.
Sled
Gather all of the parts from the Sled_Assembly and get a short peice of filament (1.75mm). Check the images for the names of each part.
Glue the two rectangular peices together such that the two holes are aligned. Insert the two SledTabs into the slot in the SledMechanism and feed a peice of the filament through each hole such that the tabs can rotate. Use a knife to cut the filament so it is flush with each side of the SledMechanism.
Insert the SledGrip onto the SledMechanism via the slots and glue together. Insert the SledActuator into the thin slot on the rear of the SledMechanism. Ensure that it can slide back and forth and push up the two SledTabs so that they extend outwards. Finally, glue the SledTriggerHook onto the back of the SledMechaism so that it contains the SledActuator. Make sure to glue this very strongly as it holds all of the tension in the Derringer.
You can now insert the assembled sled into the barrel with the hook end facing towards the breech. It should slide freely along the channel in the barrel. You should be able to push arrows into the barrel via the breech and have them push the SledTabs downward and thus move the actuator back.
Final Assembly
With the Sled inserted into the barrel channel, place the BarrelBreechPlate onto the breech end of the barrel with the two small pegs inserted into the small holes on the Barrel and glue into place.
Connect the BarrelHinge to the Receiver with an M4x12 screw so that it can rotate freely. You should be able to rotate the barrel so that its flush with the Receiver and have the LockLever catch it and hold it in place.
Take the BarrelFrontBandSupport, or MuzzleBowArms / MuzzleBowArms_Compact and place it on the muzzle of the barrel. Use an M4x10 screw to secure it to the barrel. Loop a strong rubber band through the holes in the Sled such that each end of the band is connected to one of the sides of the Sled. The band should then be pulled over the FrontBandSupport and rest in its curved channel.
Alternatively, print the MuzzleBowArms part and use instead. Its a bit less streamlined but itll allow for more power!
Congrats! Youre done :) Just print two (or more) arrows and glue the halves together.
Loading and Firing
To load, first press down on the LockLever to open the barrel breech. Push the arrows into the shafts in the barrel. You should feel the SledTabs click down. The rear end of the arrows should be pressed in a small way so that theyre a bit past the face of the breech plate. Close the barrel so the LockLever locks it in place.
Now just pull the sled back all the way. It should click into place, pushing the SledActuator forward, rotating the SledTabs outward so that they can push against the rear end of the arrows when fired. Aim the Derringer and pull the trigger to fire both arrows at once! You can also optionally load a single arrow if you desire. Enjoy!
Similar models
thingiverse
free

Gravitrax Compatible Ballista by mechanic403
...nel of the base. once a ball is rolled into the rear end, it should release the trigger and send the ball in the channel flying!
thingiverse
free

Bolt Action Air Rifle with Shell Ejection (CO2 Powered) by mechanic403
...n up the fit.
you can now insert a co2 cartridge into the handle of the pump and load up some shells and magazines and test fire!
thingiverse
free

Single Action CO2 Airgun Revolver by mechanic403
...was inspired by the webley revolver and has a similar form factor. disclaimer: by downloading these files, you agree...
thingiverse
free
Rubber Band Cannon (threaded barrel) by nakeib
...nsert plate with a stick and put the ball on a stick end. to prevent ball sliding off, just flatten a stick end with a hot knife.
thingiverse
free

Rubber band gun - easy spring insertion by SapoLAB
...by sapolab
thingiverse
remix that adds a hole to insert the spring after printing and a cap to fix the spring in place with glue
thingiverse
free

Floats and Boats Expansion Pack by Supergirl2000
... attached with string to the balloon clip or corresponding connectors. an additional challenge could be a water bottle submarine.
thingiverse
free

Extended Barrel Rubber Band Gun by Forgedinplastic3d
...extended barrel rubber band gun by forgedinplastic3d
thingiverse
a remix of a rubber band gun with extended barrel and grips.
thingiverse
free

Rubber Band Bow by ShakinBakin
...r clip at both ends when inserted, cut ends to length
found rolled paper with tape on end for added weight works best for arrows.
thingiverse
free

Rubber Band Powered Toy Cannon by unistrut
... hammer, make sure the rubber band on the sear is pulling it into position and not getting caught up in the rest of the workings.
thingiverse
free

Westar-35 live action Bo-Katan Mandalroian Blaster Pistol by sargentmyself
...hollow if you are so inclined there should be room inside for a small electronic setup to make it make blaster sounds and lights.
Mechanic403
thingiverse
free

Circuit Six Sided Dice by mechanic403
...ve included two variations: one with thin lines connecting the pips and one where the lines are the same width as the pips
enjoy!
thingiverse
free

Designer Six Sided Dice by mechanic403
...er printing, i painted each pip with nail polish. after fully dried, i wet sanded each face with 220 grit to clean up the paint.
thingiverse
free
![[Star Wars] Batuuan Spira Credits by mechanic403](/t/8363693.jpg)
[Star Wars] Batuuan Spira Credits by mechanic403
...t an exact replica but pretty close. the back side is blank. you can print two and glue them together for a double sided model.
thingiverse
free

Spongebob and Patrick Earrings by mechanic403
... patrick, i printed in whatever color, sanded smooth and then painted with pink nailpolish and finished with a clear coat.
enjoy!
thingiverse
free

Gravitrax Compatible Trap Door Tile by mechanic403
...lever can then be snapped into place in the trapdoorinsert. finally, insert the whole assembly into oostmeijer's basic tile.
thingiverse
free
![Lament Configuration [Minimalist Version] by mechanic403](/t/8099464.jpg)
Lament Configuration [Minimalist Version] by mechanic403
...the surface. itll stick well and wont leave any discolored residue.
update: fixed some small gaps in the connector bits on facec
thingiverse
free
Gravitrax Compatible Ballista by mechanic403
...nel of the base. once a ball is rolled into the rear end, it should release the trigger and send the ball in the channel flying!
thingiverse
free
Single Action CO2 Airgun Revolver by mechanic403
... and press all the way back to have the rimtabs lock the shell rims in place. push the plunger down to have all six shells drop!
thingiverse
free
Bolt Action Air Rifle with Shell Ejection (CO2 Powered) by mechanic403
...n up the fit.
you can now insert a co2 cartridge into the handle of the pump and load up some shells and magazines and test fire!
Derringer
thingiverse
free

DERRINGER 1800 by EmreTufanoglu
...derringer 1800 by emretufanoglu
thingiverse
model gun
thingiverse
free

Bullet to fit Derringer 357 by Cushwayt
...bullet to fit derringer 357 by cushwayt
thingiverse
a two part bullet to fit the awesome derringer 357
thingiverse
free
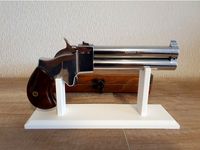
Derringer gun stand - gun holder by Viktor_Tekula
...derringer gun stand - gun holder by viktor_tekula
thingiverse
stnad for gun cal. 45 derringer from great gun company.
thingiverse
free
Derringer model by below_cho
...elow_cho
thingiverse
discovered this from another forum but some stl files have defect. it was repaired and welcome to print it.
thingiverse
free

Derringer gun holder (gun stand) by Viktor_Tekula
...a
thingiverse
this is gun holder for derringer cal. 45 from great gun company. very nice holder to exposure the gun n the shelf.
thingiverse
free

Derringer gun stand - gun holder NEW by Viktor_Tekula
... - gun holder new by viktor_tekula
thingiverse
stnad for gun cal. 45 derringer from great gun company. it for 2,5" version.
thingiverse
free

Rubber Band Derringer by patrickfaulkner
...g to print the final version in brass pla.
original design from rbguns : https://www.youtube.com/channel/ucj0tanuhfhmuoc_dhcipj_w
thingiverse
free

AIRSOFT DERRINGER 12 G by mussy
...ll explode on you, 6-8 shells minimum = 2 mm thick shells, be careful plz!
don't forget to try out my other designs enjoy ;)
thingiverse
free

Derringer SPLIT files by Lmpeeke
...verse
i used fusion 360 to cut up the plate model so that people may have an easier time when printing/ reprinting various parts
thingiverse
free

BSG; Colonial "Derringer" mini Blaster Pistol (Galactica 1980) by Straekers_Armory
...nger" mini baster pistol
i've done this because it was a nowhere to find prop!!
enjoy your print!!
regards, straeker!!
Crossbow
thingiverse
free

crossbow by DaanFontaine
...crossbow by daanfontaine
thingiverse
crossbow
thingiverse
free

Crossbow by josi1992
...crossbow by josi1992
thingiverse
crossbow to make itself with deductible
thingiverse
free

Crossbow pistol
...crossbow pistol
thingiverse
a crossbow pistol for your legoheim warband.
thingiverse
free

Project Crossbow by Neo000097
...project crossbow by neo000097
thingiverse
its a crossbow!
thingiverse
free

Project Crossbow by Neo000097
...project crossbow by neo000097
thingiverse
its a crossbow!
thingiverse
free

perfect crossbow
...t crossbow
thingiverse
i designed it myself.
perfect crossbow.
this is a video to assemble youtube.
https://youtu.be/swrugfgq9lc
thingiverse
free

Crossbow Trigger by The_Hacker
...crossbow trigger by the_hacker
thingiverse
this trigger is used to shoot with a crossbow
thingiverse
free

Chopsticks Crossbow by lukeboss
...chopsticks crossbow by lukeboss
thingiverse
little crossbow with chopsticks as a bow
thingiverse
free

Crossbow by SXC
...ingiverse
mini crossbow toy for a joy! :)
for small size is very powerful.
attention! it needs manual processing after printing.
thingiverse
free

nerf crossbow by F8_7772
...nerf crossbow by f8_7772
thingiverse
an untested but should be effective nerf crossbow
Pistol
thingiverse
free
pistol
...pistol
thingiverse
pistol
thingiverse
free

Pistol
...pistol
thingiverse
one pistol for your legoheim warband.
thingiverse
free

toxin pistol
...toxin pistol
thingiverse
toxin pistol for sick marines
thingiverse
free
Volcanic Pistol
...volcanic pistol
thingiverse
a model of a volcanic repeating arms pistol.
thingiverse
free
Crossbow pistol
...crossbow pistol
thingiverse
a crossbow pistol for your legoheim warband.
thingiverse
free

Pistol Display
...pistol display
thingiverse
sid way mount for a pistol on lovered panels
thingiverse
free

pistol grip by Lavenderguy
...pistol grip by lavenderguy
thingiverse
pistol grip for 22 pistol
thingiverse
free
Pistol by PROTODUCT
...ed by foam dart pistol: http://www.thingiverse.com/thing:7512
i redesigned the shape and relocated all the components related.
thingiverse
free

Pistol Brace for Pistol Buffer Tube by Apollyon12
...pistol brace for pistol buffer tube by apollyon12
thingiverse
modified pistol brace originally done by {nick true} {b- true}
thingiverse
free

Pistol by RiceSucks
...pistol by ricesucks
thingiverse
a generic pistol. feel free to edit/modify as you wish!
Double
thingiverse
free

Double Double by Adamkling524
...double double by adamkling524
thingiverse
toil and trouble
thingiverse
free

The Double by willdelphia
...the double by willdelphia
thingiverse
the double
thingiverse
free
the double by willdelphia
...the double by willdelphia
thingiverse
the double
thingiverse
free

double pipe
...double pipe
thingiverse
double pipe
thingiverse
free

Double Gear
...double gear
thingiverse
double gear by using solid work
thingiverse
free

double DNS by gyorgyattila
...double dns by gyorgyattila
thingiverse
double dns
thingiverse
free

Double Infinity by charlesstines
...double infinity by charlesstines
thingiverse
double infinity
thingiverse
free
Double container by speedtwin69
...double container by speedtwin69
thingiverse
double container
thingiverse
free

Double infinity by nevitdilmen
...double infinity by nevitdilmen
thingiverse
double infinity
thingiverse
free

Double flower by nevitdilmen
...double flower by nevitdilmen
thingiverse
double flower