Thingiverse

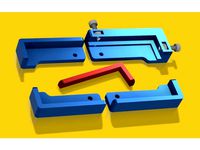
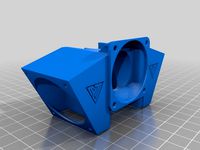
Tevo Tarantula Large Bed Glass Tensioner - Remix by BenKitesurfs
by Thingiverse
Last crawled date: 3 years, 1 month ago
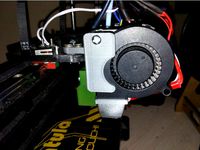
I printed the object designed by kkgian, and it didn't fit. I assume that Tevo has altered the design of the bed from the model kkgian used to design this in the first place. I have redesigned this part to fit my heated bed, which is the 220x280mm bed that came with my Tevo Tarantula purchased in October 2017.
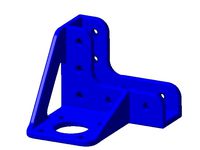
I have included drawings that detail the dimensions of the critical components. Please read these carefully, and take measurements of your heated bed before printing this part!
Also, keep in mind that this part will be in direct contact with the heated bed, and will get quite hot. You must use a high temperature material to print this part, such as ABS, PETG, or Nylon.
The hardware that you will need:
The M3 screws and springs that were included with your tarantula
(4) M3 nuts (DIN 934)
(4) M3 x 10mm SHCS
(1) Sheet of glass, 280x220x3.5mm
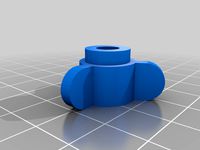
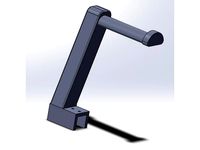
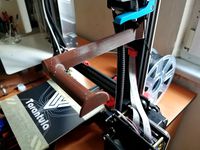
To assemble your heated bed with these parts, remove your heated bed from the printer. Slide the printed parts in from the front and rear. Note that you may need to "Push Back" the foil insulation on the bottom of the heated bed to avoid interference with the tensioning devices. Insert the stock taratula screws through both the bed and printed tensioners, installing the springs underneath.
Once your bed has been reinstalled on the printer with the new tensioners, drop the M3 nuts into the slots in the printed front tensioner bracket. The parts were designed to accommodate DIN 934 Nuts (Metric class 10) with a little bit of clearance. Nuts built to a different standard may not fit! Check the dimensions in the attached drawing to verify that you have purchased nuts that will fit!
Thread the M3 SHCS into the nuts, drop your sheet of glass in, and slowly apply tension in all directions with the (4) screws.
I have included drawings that detail the dimensions of the critical components. Please read these carefully, and take measurements of your heated bed before printing this part!
Also, keep in mind that this part will be in direct contact with the heated bed, and will get quite hot. You must use a high temperature material to print this part, such as ABS, PETG, or Nylon.
The hardware that you will need:
The M3 screws and springs that were included with your tarantula
(4) M3 nuts (DIN 934)
(4) M3 x 10mm SHCS
(1) Sheet of glass, 280x220x3.5mm
To assemble your heated bed with these parts, remove your heated bed from the printer. Slide the printed parts in from the front and rear. Note that you may need to "Push Back" the foil insulation on the bottom of the heated bed to avoid interference with the tensioning devices. Insert the stock taratula screws through both the bed and printed tensioners, installing the springs underneath.
Once your bed has been reinstalled on the printer with the new tensioners, drop the M3 nuts into the slots in the printed front tensioner bracket. The parts were designed to accommodate DIN 934 Nuts (Metric class 10) with a little bit of clearance. Nuts built to a different standard may not fit! Check the dimensions in the attached drawing to verify that you have purchased nuts that will fit!
Thread the M3 SHCS into the nuts, drop your sheet of glass in, and slowly apply tension in all directions with the (4) screws.
Similar models
thingiverse
free

Tevo Tarantula Large Bed Glass Tensioner by kkgian
...r various glass tensioner but none of them with handle to slide the bed. i have adjust the tolerance to fit my 200 x 280 nicely.
thingiverse
free

X tensioner for tevo tarantula by juanfy
...rew
updated: if you want to add a wire chain you should better download this one:https://www.thingiverse.com/thing:2829404
enjoy!
thingiverse
free

Tevo Tarantula in front Z axis endstop holder by kozakkiewicz
...d to rotate the parts before printing.
i used an m4x30 screw and a fittig spring i had.
you also need 4 m4x8 screws and m4 t-nuts
thingiverse
free
Tevo Tarantula Large Bed Glass Tensioner by cdeerinck
... included the f3d file so you can modify it if you wish.
you will need two m3 12 bolts and two m3 nuts for the adjustable corner.
thingiverse
free

Tevo Tarantula glass bed bracket tensioner by Hoodoo
...design by this one to have a mechanism to hold tight your glass.
simply insert two nuts in the slots and two screws in the holes.
thingiverse
free

Glass plate tensioner bracket for Tevo black widow by Rovex
...
designed by roel versteeg
feeling generous? feel free to tip me, this helps covering the costs of waisted prototyping fillament.
thingiverse
free

TEVO Tarantula X & Y axis belts tensioners by alejandrosnz
...d the belt through the hole on the other piece. to mount the tensioner onto the y axis you have to ziptie it into the belt hole.
thingiverse
free

Tevo Tarantula belt tensioner by JohnFrenken
...r for m3 thread. dril the other part, if necesary, so the screw turns well inside this parts. picture should be self explanatory.
thingiverse
free

Tevo Tarantula heated bed cable management by JohnFrenken
... is especially designed for the aluminium taralu bed carrier (https://taralu.net) and will not fit the stock acrylic bed carrier.
thingiverse
free
Universal silicon damper by seaspotter
... 4 dampers with your prefered silicone to the top and enjoy your new heat bed dampers which are a way better than normal springs.
Tarantula
turbosquid
$5

tarantula
...rbosquid
royalty free 3d model tarantula for download as c4d on turbosquid: 3d models for games, architecture, videos. (1690032)
3d_ocean
$8
Tarantula
...rantula 3d model. perfect for animations or still image. textures psd and jpeg files included. modelled using autodesk maya 2011.
turbosquid
$50

tarantula
... available on turbo squid, the world's leading provider of digital 3d models for visualization, films, television, and games.
turbosquid
$45

Tarantula
... available on turbo squid, the world's leading provider of digital 3d models for visualization, films, television, and games.
turbosquid
$12

Spider black widow tarantula tarantula Insects
... black widow tarantula tarantula insects for download as max on turbosquid: 3d models for games, architecture, videos. (1582101)
3ddd
$1
Журнальный столик - tarantula
... бионика , tarantula
журнальный столик tarantula
h=600
d=2000
3d_export
$35

Tarantula
...: zbrush 3ds max ztool obj fbx dae 3ds stl properties : 20*20*8 production time : 23 hours 328 gram models are drawn with zbrush.
3d_ocean
$20

Tarantula spider
...igged, animated, uv textured. particle system for the fur. very easy to animate. a 250 frames animation is available in the pack.
turbosquid
$45

Tarantula Spider
... available on turbo squid, the world's leading provider of digital 3d models for visualization, films, television, and games.
3d_export
$5

spider tarantula
...spider tarantula
3dexport
3d model of a steppe spider for your ideas and projects.
Tevo
thingiverse
free

TEVO Logo by limwenyao
...verse
tevo logo - for customizing your builds to look cooler with the tevo logo! pdf version is editable with adobe illustrator.
thingiverse
free
Tevo Tornado e3d Tevo Flash Style fan Mount by DemolitionX
...an mount by demolitionx
thingiverse
just messing around and made a tevo flash style fan mount for the e3d v6 on the tevo tornado
thingiverse
free
BODEN TUBE CLAMP FOR TEVO TARANTULA PRO AND TEVO TORNADO
... and tevo tornado
thingiverse
bodwen tube clamp. printable adjustable tension clamp for tevo tarantula pro and tornado extruder.
thingiverse
free
TEVO Tornado Model by JMDesigns
...tevo tornado model by jmdesigns
thingiverse
tevo tornado model
thingiverse
free
Tevo Tarantula FanDuct by hkgary_g
...tevo tarantula fanduct by hkgary_g
thingiverse
fanduct for tevo tarantula
thingiverse
free
FAN TEVO TARANTULA by llprokall
...fan tevo tarantula by llprokall
thingiverse
fan tevo tarantula
thingiverse
free
Tevo Tarantula filament by Xbertus
...tevo tarantula filament by xbertus
thingiverse
suport for filamente tevo tarantula
thingiverse
free
TEVO Top Brackets by _Godoy_
...tevo top brackets by _godoy_
thingiverse
top brackets for tevo tarantula
thingiverse
free
Tevo Tarantula Spool Holder
...tevo tarantula spool holder
thingiverse
strong spool holder for tevo tarantula
thingiverse
free

tevo tarantula spacer by poundskinnyboy
...tevo tarantula spacer by poundskinnyboy
thingiverse
it's a tevo tarantula spacer
Tensioner
3d_export
$5

adjustable tension lock
...adjustable tension lock
3dexport
adjustable tension lock
turbosquid
$5
tension ring
...oyalty free 3d model tension ring for download as fbx and stl on turbosquid: 3d models for games, architecture, videos. (1553452)
turbosquid
$3

Tension Chair
...free 3d model tension chair for download as obj, c4d, and fbx on turbosquid: 3d models for games, architecture, videos. (1251503)
3d_export
$5
transformador de tension
...transformador de tension
3dexport
transformador de tension entrada 460vac salida 220vac marca audax
turbosquid
$20
Motorbike Chain Tensioner
...y free 3d model motorbike chain tensioner for download as stl on turbosquid: 3d models for games, architecture, videos. (1428322)
turbosquid
$25
TENSION-WOOD-CHAIR
... available on turbo squid, the world's leading provider of digital 3d models for visualization, films, television, and games.
turbosquid
$25

tension-bentwood-chair
... available on turbo squid, the world's leading provider of digital 3d models for visualization, films, television, and games.
turbosquid
$19

Tension engagement ring
...n engagement ring for download as obj, fbx, 3dm, dwg, and stl on turbosquid: 3d models for games, architecture, videos. (1491631)
3d_export
$10

Ruby Tension set Ring 3D Model
...ruby tension set ring 3d model
3dexport
tension set ruby ring in 18k
ruby tension set ring 3d model rehansheikh 25254 3dexport
turbosquid
$20
Superficial Tension Exp. Image.max
... available on turbo squid, the world's leading provider of digital 3d models for visualization, films, television, and games.
Remix
turbosquid
$5

MODA Collection Remix Chair
... available on turbo squid, the world's leading provider of digital 3d models for visualization, films, television, and games.
3d_export
$12

remix yamaha rm1x
...remix yamaha rm1x
3dexport
geometry triangles 15.2k vertices 7.6k pbr no textures 1 materials 1 uv layers yes
3d_ocean
$5

Vray fabric Kvadrat remix green - tileable
...th vray and 3dsmax. high-resolution texture images (2000×2000 px) file included: shader vray 2.40 texture image 3ds max 2011 file
turbosquid
$20

Gerrit Rietveld 1938 Zig Zag Chair Remix
... available on turbo squid, the world's leading provider of digital 3d models for visualization, films, television, and games.
3d_export
$10

multicolored remix parametric table furniture
... fbx, obj, mtl, archive with textures. the model has no glitches. render and materials - vray . without using plugins. good use!
3ddd
$1

Barovier&Toso / Manhattan Remix 7192
... 004293-142405
в коллекции есть люстры 7, 9, 12 рожковые. диаметр соответственный 1000, 1250, 1500 мм.
3ddd
$1

Muuto fiber chair
...grey/grey, dusty green/dusty green, nature/oak, natural white/oak upholstery options remix 183/black, remix 133/grey, remix 643/dusty red leather options black...
3ddd
$1

Barovier&Toso 7190-7195
...7190-7195 3ddd barovier&toso потолочнай люстра фабрики barovier&toso;, коллекция manhattan remix артикул 7190-7195. размеры в inches: 39"...
3d_export
$5

3D Locking Handle Weatherproof Storage Box Container
...handle weatherproof storage box container 3dexport new, improved and remixd! no screws required. print-in-place. weatherproof. parametric. 2 parts. easy...
cg_studio
$49

HTC One Mini 2 Amber Gold3d model
...cell phone mobile cellular super lcd touchscreen touch screen remix amber gold .max .obj .mb .lwo .fbx .c4d .3ds...
Large
3d_export
$15
large excavator
...large excavator
3dexport
large excavator
design_connected
$22

Daydream large
...daydream large
designconnected
dedon daydream large computer generated 3d model. designed by frinier, richard.
design_connected
$7
Laccio Large
...laccio large
designconnected
knoll laccio large computer generated 3d model. designed by breuer, marcel.
3ddd
$1
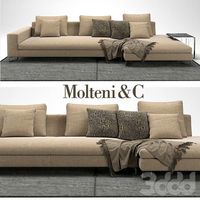
MOLTENI LARGE
... подушка , плед
диван molteni&c; модель large
3ddd
$1
Molteni Large
... подушка , плед
диван molteni&c; модель large
3ddd
$1
CLAUDINE LARGE
...audine large
3ddd
claudine large , arflex
модель сделана в размерах и цветах аналога ...
design_connected
$11
Ovo Large
...ovo large
designconnected
cor ovo large armchairs computer generated 3d model. designed by studio vertijet.
design_connected
$4
Cu Large
...cu large
designconnected
kristalia cu large coffee tables computer generated 3d model. designed by monica graffeo.
3d_ocean
$18
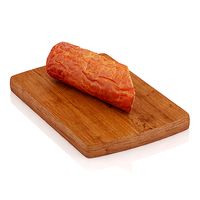
Large sausage
...rge meat mental ray obj photorealistic sausage scanned vray
scanned 3d model of large sausage placed on rectangular wooden board.
design_connected
$16
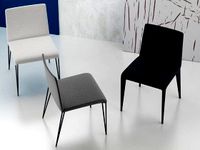
Filly Large
...onnected
photo-realistic 3d models of the filly large chair from bonaldo for 3d architectural and interior design presentations.
Bed
3ddd
$1

bed
...bed
3ddd
bed , постельное белье
bed
3ddd
$1

bed
...bed
3ddd
bed , постельное белье
bed
3ddd
$1

bed
...bed
3ddd
bed , постельное белье
bed
3ddd
$1

bed
...bed
3ddd
bed , постельное белье
bed
3ddd
$1

bed
...bed
3ddd
bed , постельное белье
bed
3ddd
$1

bed
...bed
3ddd
bed , постельное белье
bed
3ddd
free

bed
...bed
3ddd
bed , постельное белье
bed
3ddd
free

bed
...bed
3ddd
bed , постельное белье
bed
3ddd
$1

Bed
...bed
3ddd
bed , постельное белье , постель
bed
3d_export
$7

bed adairs bed
...rs bed
3dexport
bed adairs bed in modern style. if you want a smoother surface, please turn on turbosmooth in the modifier list.
Glass
archibase_planet
free
Glasses
...glasses
archibase planet
glass wine-glass liqueur-glass
glasses- 3d model for interior 3d visualization.
archibase_planet
free
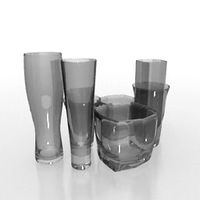
Glass
...archibase planet
glass cocktail glass tall wine glass martini glass
glass - 3d model (*.gsm+*.3ds) for interior 3d visualization.
archibase_planet
free
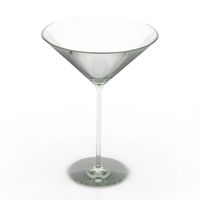
Glass
...glass
archibase planet
glass wine-glass glass-ware
glass n030209 - 3d model (*.gsm+*.3ds) for interior 3d visualization.
archibase_planet
free

Glass
...glass
archibase planet
glass-ware glass glass ware
glass n141109 - 3d model (*.gsm+*.3ds) for interior 3d visualization.
3d_ocean
$2
Glass
...liquid container low-poly glass nice glass obj r15 water glass
3d model of a beautiful glass. created the model in cinema 4d r15.
archibase_planet
free
Glass
...glass
archibase planet
glass tall wine glass wine-glass
glass n300514 - 3d model (*.gsm+*.3ds) for interior 3d visualization.
archibase_planet
free

Glass
...glass
archibase planet
glass wine-glass tall wine glass
glass n091210 - 3d model (*.gsm+*.3ds) for interior 3d visualization.
archibase_planet
free
Glass
...glass
archibase planet
glass tall wine glass glass-ware
glass n081011 - 3d model (*.gsm+*.3ds) for interior 3d visualization.
3d_ocean
$9
glasses
...glasses
3docean
glasses
max glasses v-ray
archibase_planet
free
Glass
...glass
archibase planet
glass-ware glass
glass - 3d model (*.gsm+*.3ds) for interior 3d visualization.