Thingiverse
Tevo Little Monster Octopi & External Stepper Enclosure by IdefixRC
by Thingiverse
Last crawled date: 3 years ago
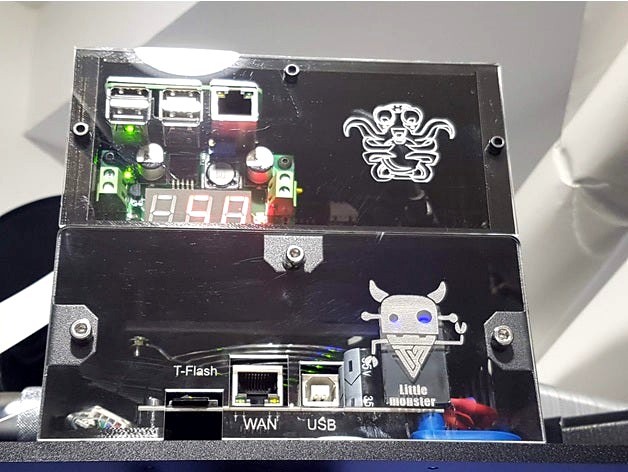
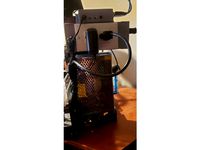
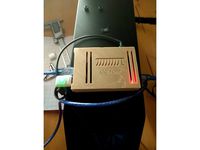
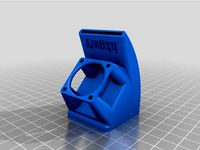
Here is my take on an external stepper driver and Octoprint/OctoPi housing for the Tevo Little Monster.
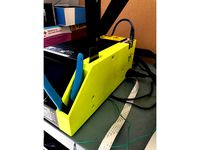
I followed the same approach as e.g. dot_bob and bodog here on Thingiverse and designed a box which will sit on top of the existing Tevo Little Monster controller casing to provide active cooling to the TMC2100 Silent Step Stick drivers through the existing cooling fan inside the TLM controller box.
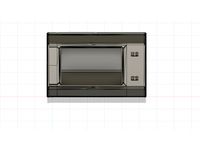
In order to house all the equipment I wanted to stuff into the box (and to make the front panel seamless) I also made the box bigger to take up the full real estate on top of the stock controller housing and design a modular front plate to provide different installation choices.
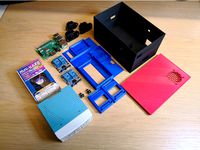
At full capacity (with some room to spare) the following equipment can be comfortably housed inside the enclosure:
4x TMC2100 Silent Step Stick external stepper drivers
2x Power relays (e.g. for LED lighting or even for TLM mains power control)
1x DCDC converter with display
1x Raspberry Pi 3, 3B or 3B+ (Pi 2 should also fit)
2x Power distribution PCB to reduce the cable mess
In addition it is possible to breakout one (or more) Pi USB connectors internally to provide a clean USB connection between OctoPi and MKS SBase board internally (note: soldering required)
Following files are included in the package:
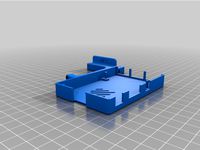
Main Enclosure - 3D Printable files (no raft, support required):
Enclosure_Top.stl -> top plate with all the mounting points for stepper drivers, Pi and Relays
Enclosure_Bottom.stl -> bottom box to be mounted on top of the TLM enclosure with the help of the existing fan screws (stock screws are long enough)
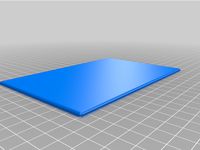
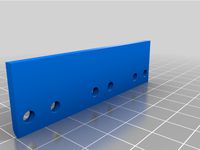
4 Face Plate options depending on the equipment you want to install – 3D Printable (no raft, support required):
Face Plate_Pi & DCDC.stl -> full feature face plate with cut outs for both Raspberry Pi and DCDC converter display
Face Plate_Pi half USB & DCDC.stl -> same as Face Plate_Pi & DCDC above but with one of the Pi USB slots blocked off in case you want to route it internally (prevents you from accidentally plugging stuff into the USB port)
Face Plate_Pi half USB only.stl -> Face plate without the DCDC Display cutout and with one of the Pi USB slots blocked off
Face Plate_Pi only.stl -> Face plate without DCDC Display cutout and all Pi USB connectors accessible
3 Face Plate options depending on the equipment you want to install – Files for CNC/Laser cutter
For those with access to a CNC mill or a laser cutter you can cut the face plate out of 2.5mm acrylic to get uniform enclosure front together with the existing TLM enclose face plate.
Note: The files are mirrored so that the Octoprint logo can be engraved from the back instead of the front
Face_Pi full.dxf -> face plate with all Pi USB ports exposed
Face_Pi half USB.dxf -> one Pi USB port blocked off in case you want to route it internally (prevents you from accidentally plugging stuff into the USB port)
Face_no Pi.dxf -> just the Octoprint logo with no cutouts for the Pi
Additional notes:
All holes are for M3 screws. Using a M3 tap after printing to pre cut the threads is recommended
Internal USB to USB connections require you to solder a USB extension cable to both the MKS SBase and the Pi USB header pins on the bottom of each board. Drop a note here if you would like the pinpout and I will be happy to provide it.
I suggest to connect all 4 wired (5V, GND, Data – and Data +) on the sBase to a USB cable with female connector and connect only GND, Data+, Data- to a male USB cable on the Pi. This will allow you to easily disconnect the Pi and Sbase from each other in case you require access to the sBase USB port (only one can be connected at the same time)
To reduce wiring mess I recommend to install a project board inside the bottom enclosure and use it as simple power rail for 24, 5V and GND. The bottom enclosure has 4 “rails” on each side to allow you to mount the board
Other suggestions:
To reduce cabling mess between the TLM enclosure and the external driver box only route one 24V power cable up and use the power rail as mentioned above to break out 24 v and 5v from the DCDC converter
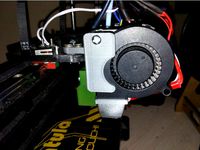
Rewire your case fan from the cooling fan connectors to the sBase 24v main connector so it is always on when the machine is powered. This will ensure constant cooling even if the printer is not printing (e.g. after G28 the drivers will still be powered and hold the head in place and require cooling even if the hot end is not in operation)
Links to equipment used:
TMC2100 Silent Step Stick Drivers: https://www.watterott.com/de/SilentStepStick-TMC2100-5V
Silent Step Stick Heat Sink: https://www.watterott.com/de/Kuehlkoerper-9-x-9-x-12
External Stepper Board: https://www.aliexpress.com/item/3D-Printer-parts-A4988-8825-External-stepper-motor-driver-board-panel-additional-adapter-Extended-Interface-good/32809136512.html
Wires: https://www.aliexpress.com/item/RepRap-wire-70cm-4pin-female-female-10pcs-lot-Dupont-Cable-jumper-cable-for-3D-printer-wire/32808974115.html
DCDC Converter: https://www.banggood.com/4V-40V-DC-DC-Step-Down-LM2596-Voltage-Regulator-Converter-Module-p-80885.html
Raspberry Pi: https://www.aliexpress.com/item/2016-New-Raspberry-Pi-3-Model-B-BCM2837-1-2G-with-WIFI-and-Bluetooth/32615114907.html
Dual Relay (select 2 Channel relay): https://www.aliexpress.com/item/4-channel-relay-module-4-channel-relay-control-board-with-optocoupler-Relay-Output-4-way-relay/32649659086.html
Update 10/08/2018:
Added V2 of the top cover featuring a slot for a SD Card extension allowing way easier access to the octoprint SD card for maintenance and backup.
SD card extension used: https://www.aliexpress.com/item/Kebidu-25CM-micro-SD-card-Flex-cable-Extender-Adapter-reader-car-GPS-mobile-25CM-Memory-Card/32731755112.html
As there are now many variants incl. CNC router files for the faceplates I have only uploaded one 3D Printable variant with the SD card opening. If you need a different version please drop a note in the comments and I will upload the file for you.
1 additional Face Plate added:
Face Plate_Pi & DCDC & SD.stl -> full feature face plate with cut outs for Raspberry Pi, DCDC converter display and SD Card extension
I followed the same approach as e.g. dot_bob and bodog here on Thingiverse and designed a box which will sit on top of the existing Tevo Little Monster controller casing to provide active cooling to the TMC2100 Silent Step Stick drivers through the existing cooling fan inside the TLM controller box.
In order to house all the equipment I wanted to stuff into the box (and to make the front panel seamless) I also made the box bigger to take up the full real estate on top of the stock controller housing and design a modular front plate to provide different installation choices.
At full capacity (with some room to spare) the following equipment can be comfortably housed inside the enclosure:
4x TMC2100 Silent Step Stick external stepper drivers
2x Power relays (e.g. for LED lighting or even for TLM mains power control)
1x DCDC converter with display
1x Raspberry Pi 3, 3B or 3B+ (Pi 2 should also fit)
2x Power distribution PCB to reduce the cable mess
In addition it is possible to breakout one (or more) Pi USB connectors internally to provide a clean USB connection between OctoPi and MKS SBase board internally (note: soldering required)
Following files are included in the package:
Main Enclosure - 3D Printable files (no raft, support required):
Enclosure_Top.stl -> top plate with all the mounting points for stepper drivers, Pi and Relays
Enclosure_Bottom.stl -> bottom box to be mounted on top of the TLM enclosure with the help of the existing fan screws (stock screws are long enough)
4 Face Plate options depending on the equipment you want to install – 3D Printable (no raft, support required):
Face Plate_Pi & DCDC.stl -> full feature face plate with cut outs for both Raspberry Pi and DCDC converter display
Face Plate_Pi half USB & DCDC.stl -> same as Face Plate_Pi & DCDC above but with one of the Pi USB slots blocked off in case you want to route it internally (prevents you from accidentally plugging stuff into the USB port)
Face Plate_Pi half USB only.stl -> Face plate without the DCDC Display cutout and with one of the Pi USB slots blocked off
Face Plate_Pi only.stl -> Face plate without DCDC Display cutout and all Pi USB connectors accessible
3 Face Plate options depending on the equipment you want to install – Files for CNC/Laser cutter
For those with access to a CNC mill or a laser cutter you can cut the face plate out of 2.5mm acrylic to get uniform enclosure front together with the existing TLM enclose face plate.
Note: The files are mirrored so that the Octoprint logo can be engraved from the back instead of the front
Face_Pi full.dxf -> face plate with all Pi USB ports exposed
Face_Pi half USB.dxf -> one Pi USB port blocked off in case you want to route it internally (prevents you from accidentally plugging stuff into the USB port)
Face_no Pi.dxf -> just the Octoprint logo with no cutouts for the Pi
Additional notes:
All holes are for M3 screws. Using a M3 tap after printing to pre cut the threads is recommended
Internal USB to USB connections require you to solder a USB extension cable to both the MKS SBase and the Pi USB header pins on the bottom of each board. Drop a note here if you would like the pinpout and I will be happy to provide it.
I suggest to connect all 4 wired (5V, GND, Data – and Data +) on the sBase to a USB cable with female connector and connect only GND, Data+, Data- to a male USB cable on the Pi. This will allow you to easily disconnect the Pi and Sbase from each other in case you require access to the sBase USB port (only one can be connected at the same time)
To reduce wiring mess I recommend to install a project board inside the bottom enclosure and use it as simple power rail for 24, 5V and GND. The bottom enclosure has 4 “rails” on each side to allow you to mount the board
Other suggestions:
To reduce cabling mess between the TLM enclosure and the external driver box only route one 24V power cable up and use the power rail as mentioned above to break out 24 v and 5v from the DCDC converter
Rewire your case fan from the cooling fan connectors to the sBase 24v main connector so it is always on when the machine is powered. This will ensure constant cooling even if the printer is not printing (e.g. after G28 the drivers will still be powered and hold the head in place and require cooling even if the hot end is not in operation)
Links to equipment used:
TMC2100 Silent Step Stick Drivers: https://www.watterott.com/de/SilentStepStick-TMC2100-5V
Silent Step Stick Heat Sink: https://www.watterott.com/de/Kuehlkoerper-9-x-9-x-12
External Stepper Board: https://www.aliexpress.com/item/3D-Printer-parts-A4988-8825-External-stepper-motor-driver-board-panel-additional-adapter-Extended-Interface-good/32809136512.html
Wires: https://www.aliexpress.com/item/RepRap-wire-70cm-4pin-female-female-10pcs-lot-Dupont-Cable-jumper-cable-for-3D-printer-wire/32808974115.html
DCDC Converter: https://www.banggood.com/4V-40V-DC-DC-Step-Down-LM2596-Voltage-Regulator-Converter-Module-p-80885.html
Raspberry Pi: https://www.aliexpress.com/item/2016-New-Raspberry-Pi-3-Model-B-BCM2837-1-2G-with-WIFI-and-Bluetooth/32615114907.html
Dual Relay (select 2 Channel relay): https://www.aliexpress.com/item/4-channel-relay-module-4-channel-relay-control-board-with-optocoupler-Relay-Output-4-way-relay/32649659086.html
Update 10/08/2018:
Added V2 of the top cover featuring a slot for a SD Card extension allowing way easier access to the octoprint SD card for maintenance and backup.
SD card extension used: https://www.aliexpress.com/item/Kebidu-25CM-micro-SD-card-Flex-cable-Extender-Adapter-reader-car-GPS-mobile-25CM-Memory-Card/32731755112.html
As there are now many variants incl. CNC router files for the faceplates I have only uploaded one 3D Printable variant with the SD card opening. If you need a different version please drop a note in the comments and I will upload the file for you.
1 additional Face Plate added:
Face Plate_Pi & DCDC & SD.stl -> full feature face plate with cut outs for Raspberry Pi, DCDC converter display and SD Card extension
Similar models
thingiverse
free

Raspberry Pi 2 and Relay Board Enclosure for Octoprint by Help3d
...board. no more messy cables around the 3d printer.
i use the relay board to switch on/off off the printer remotely. very useful!
thingiverse
free
Raspberry Zero Case with Ethernet/Lan Adapter
...ount
https://www.aliexpress.com/item/4000289078353.html
micro usb lan adapter
https://www.aliexpress.com/item/4000299266700.html
thingiverse
free

Network Ethernet Relay Box (Raspberry Pi Zero) by Z__Y
...tml?spm=a2g0s.9042311.0.0.27424c4dtkppsk
5x 6mm m2 screws: (can find on ebay or hardware store)
some wires to connect relay to pi
thingiverse
free

Little Monster External Stepper Driver Box by dot_bob
...e little monster.
the board you see in the back is just a 20mm x 80mm generic perf board used to couple the power wires together.
thingiverse
free
OctoPrint Dual instances control box by Sp4wN
...fit in the box, or you can buy a similar one:https://www.aliexpress.com/item/ugreen-usb-2-0-type-a-male-to-b-male-printer-cable-sync-data-charger-cable/32416310263.html dupont wires:https://www.aliexpress.com/item/wavgat-dupont-line-120pcs-20cm-male-to-male-male-to-female-and-female-to-female-jumper/32501238474.html usb hub i have used is...
thingiverse
free

Raspberry Pi Model 3 Case for Lulzbot Taz 6 by ApertureEngineering
...y pi 2. it has the sd cutout for removing the sd card with the pi 3 friction slot.
this pi is used with octoprint print manager.
thingiverse
free

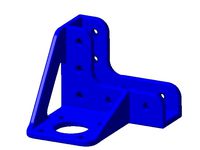
Tevo Delta (Little Monster) TMC2100 bracket by Spirit00
...
works great in combination with my lm cable (management) bracket: https://www.thingiverse.com/thing:2509575
you are welcome! ;-)
thingiverse
free
Creality CR-10 Raspberry Pi Sidebar with relay by Jahislove
...pi 3
with the relay you can power on/off printer and led light from octoprint
added 3 formats from fusion 360 : obj , dwg and dxf
thingiverse
free

7" LCD desktop stand for Raspberry Pi by toSvenson
...w.aliexpress.com/item/white-short-v8-micro-usb-sync-data-charger-cable-cable-for-samsung-galaxy-i9300-i9500-note2/1404552843.html
thingiverse
free

Anycubic Kossel OctoPrint System Mounter by KABCO
...eries if same holes design.
*2https://www.aliexpress.com/item/32641300009.html
*3https://www.aliexpress.com/item/32961915881.html
Idefixrc
thingiverse
free

Quanum 4K Action Cam Lenscover by IdefixRC
...quanum 4k action cam lenscover by idefixrc
thingiverse
lens cover for the hobbyking quanum 4k action camera
thingiverse
free

Wardrobe rail mount by IdefixRC
... with a round or oval rail of max 16mm diameter.
to be installed with 4x 3.5mm countersunk wood screws.
print with 100% infill.
thingiverse
free

Hovership MHQ2 Taranis Radio Icon by IdefixRC
...hingiverse
simple taranis and taranis plus icon of the mhq2.
download and rename: hovership_mhq2.bmp.eps to hovership_mhq2.bmp
thingiverse
free

Pico Cam Mount for RotorX Raiju by IdefixRC
...efixrc
thingiverse
25, 30 and 35 degree pico camera mount for the rotorx raiju.
print it with 10% infill to save weight.
enjoy !
thingiverse
free

Consew Sewing Machine Motor Cover by IdefixRC
...tor (same as csm3000). should fit the 500watt motor as well (csm1000 and csm2000). made it a bit thicker to withstand more abuse.
thingiverse
free

TBS Caipirinha - Winglet mounts by IdefixRC
...ews each to the wing for a secure but modular fit.
use the templates to determine the right position of the holes in the winglet.
thingiverse
free

Nespresso Citiz Capsule Container by IdefixRC
...i, magimix and others as well.
print with 20% infill, 0.2-0.27mm layer height and 3 shells.
(drink responsibly..... :-).....)
thingiverse
free

Dividers for Shuter - Vogue small parts organizer by IdefixRC
...ough dividers included with these organizers, i designed these printable versions to quickly increase the number of compartments.
thingiverse
free

Arduino Nano Lux Sensor Case (www.mysensors.org) by IdefixRC
... how to build the sensor and homeautomation gateway interface (e.g. vera) can be found here: http://www.mysensors.org/build/light
thingiverse
free

Kickflip210 / Katak SMA Mount by IdefixRC
...epending on your printer settings. if necessary use a 5mm drill to enlarge the standoff holes and a 6.5mm drill for the sma hole.
Octopi
thingiverse
free
Octopi by TimDooley
...octopi by timdooley
thingiverse
octopi
thingiverse
free
Octopi Geocache by MasterFun1
...octopi geocache by masterfun1
thingiverse
an octopi geocache, remixed by request.
thingiverse
free
OctoPI and AC enclosure
...octopi and ac enclosure
thingiverse
octopi enclosure for a raspberry pi 4, relay, a/c outlet and a/c inlet.
thingiverse
free
OctoPi 3.5inch touchscreen by FabZ26
...octopi 3.5inch touchscreen by fabz26
thingiverse
a simple housing for octopi with a pen holder
thingiverse
free
Octopi case by Bishamon1987
...topi case by bishamon1987
thingiverse
i made this case because i wanted the alternative octopi icon (8 connected π's) on it.
thingiverse
free
OctoPi - camera and Raspberry Pi stand by Botland
...octopi - camera and raspberry pi stand by botland
thingiverse
octopi - camera and raspberry pi stand
thingiverse
free
OctoPi - Ender v2 by iammurdock
...m/thing:3294512
andhttps://www.thingiverse.com/thing:1415895
to fit the ender 3 v2 with a raspberry pi 3 b+ and camera for octopi
thingiverse
free
![OctoPi OLED Monitor [WemOled] by theveel_com](/t/8164180.jpg)
OctoPi OLED Monitor [WemOled] by theveel_com
...ed] by theveel_com
thingiverse
https://youtu.be/9vxapyzjko4
more about designhttps://theveel.com/3d/octopi-oled-monitor-wemoled/
thingiverse
free

OctoPi with TFT and Camera Case by PhilipC
...n octopi using a raspberry pi model b+, a tft 2.8" screen from adafruit (1601), and a raspberry pi camera
ready to print!
thingiverse
free

Bucket O' Octopi Packaging by LucidOne
...pi this holiday season, you may be interested in this fine packaging solution.
inkscape svg file is ready for your customization.
Tevo
thingiverse
free

TEVO Logo by limwenyao
...verse
tevo logo - for customizing your builds to look cooler with the tevo logo! pdf version is editable with adobe illustrator.
thingiverse
free
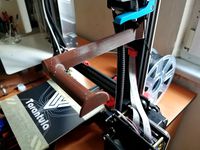
Tevo Tornado e3d Tevo Flash Style fan Mount by DemolitionX
...an mount by demolitionx
thingiverse
just messing around and made a tevo flash style fan mount for the e3d v6 on the tevo tornado
thingiverse
free
BODEN TUBE CLAMP FOR TEVO TARANTULA PRO AND TEVO TORNADO
... and tevo tornado
thingiverse
bodwen tube clamp. printable adjustable tension clamp for tevo tarantula pro and tornado extruder.
thingiverse
free
TEVO Tornado Model by JMDesigns
...tevo tornado model by jmdesigns
thingiverse
tevo tornado model
thingiverse
free
Tevo Tarantula FanDuct by hkgary_g
...tevo tarantula fanduct by hkgary_g
thingiverse
fanduct for tevo tarantula
thingiverse
free
FAN TEVO TARANTULA by llprokall
...fan tevo tarantula by llprokall
thingiverse
fan tevo tarantula
thingiverse
free

Tevo Tarantula filament by Xbertus
...tevo tarantula filament by xbertus
thingiverse
suport for filamente tevo tarantula
thingiverse
free
TEVO Top Brackets by _Godoy_
...tevo top brackets by _godoy_
thingiverse
top brackets for tevo tarantula
thingiverse
free
Tevo Tarantula Spool Holder
...tevo tarantula spool holder
thingiverse
strong spool holder for tevo tarantula
thingiverse
free

tevo tarantula spacer by poundskinnyboy
...tevo tarantula spacer by poundskinnyboy
thingiverse
it's a tevo tarantula spacer
Stepper
turbosquid
$85

Stepper
... available on turbo squid, the world's leading provider of digital 3d models for visualization, films, television, and games.
3d_ocean
$22

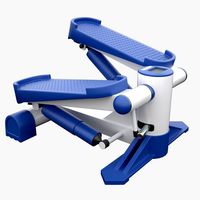
Mini Stepper
...gymnastic indoor legs machine mini silver sport stepper trainer workout
3d model of silver and black mini stepper with a counter.
turbosquid
$3

stepper deluxe
...osquid
royalty free 3d model stepper deluxe for download as on turbosquid: 3d models for games, architecture, videos. (1284335)
turbosquid
$49
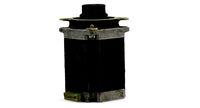
Stepper Motor
... available on turbo squid, the world's leading provider of digital 3d models for visualization, films, television, and games.
turbosquid
$5
Fitness Stepper
... available on turbo squid, the world's leading provider of digital 3d models for visualization, films, television, and games.
turbosquid
$1

stepper motor driver
...stepper motor driver for download as , fbx, dae, obj, and stl on turbosquid: 3d models for games, architecture, videos. (1688860)
turbosquid
$1

Stepper motor driver
... model stepper motor driver for download as obj, stl, and ige on turbosquid: 3d models for games, architecture, videos. (1577811)
3d_export
$5
Stepper motor Nema17 17HS4401
...stepper motor nema17 17hs4401
3dexport
turbosquid
$1

Nema 17 Stepper motor
... available on turbo squid, the world's leading provider of digital 3d models for visualization, films, television, and games.
turbosquid
$1
Nema 17 Stepper Motor 59Nm
... available on turbo squid, the world's leading provider of digital 3d models for visualization, films, television, and games.
External
3ddd
free

External wall
...external wall
3ddd
забор
external wall of the villa in a classic style
3d_export
$7
mt external tee
...mt external tee
3dexport
mt external tee
turbosquid
$8

External mirror
...id
royalty free 3d model external mirror for download as fbx on turbosquid: 3d models for games, architecture, videos. (1638607)
turbosquid
$1
External HDD
...squid
royalty free 3d model external hdd for download as c4d on turbosquid: 3d models for games, architecture, videos. (1250314)
turbosquid
$10

Extern HDD
... available on turbo squid, the world's leading provider of digital 3d models for visualization, films, television, and games.
3d_ocean
$10

External hard drive
... is a detailed model of a trekstor external hard drive. you can easily modify the label on the top. simply edit the text objects.
turbosquid
$4

External Hard Drive
...royalty free 3d model external hard drive for download as fbx on turbosquid: 3d models for games, architecture, videos. (1298038)
cg_studio
$10

External HDD3d model
...odel
cgstudio
.3dm .3ds .c4d .max .obj - external hdd 3d model, royalty free license available, instant download after purchase.
turbosquid
$5

External Hard Drive
...free 3d model external hard drive for download as c4d and fbx on turbosquid: 3d models for games, architecture, videos. (1520823)
turbosquid
$2

External hard disk
... free 3d model external hard disk for download as 3ds and obj on turbosquid: 3d models for games, architecture, videos. (1251009)
Enclosure
3d_export
free

electrical enclosure
...l enclosure where electrical devices like (relays, contactors, busbars ) are kept in order to protect from hazardous environment.
turbosquid
$100

GPU Enclosure
...yalty free 3d model gpu enclosure for download as obj and stl on turbosquid: 3d models for games, architecture, videos. (1381061)
3d_export
$5

Electrical Enclosure
...ed. also has tower lights attaced on the top.<br>file format that are available:<br>.step<br>.obj<br>.stl
archive3d
free

Enclosure 3D Model
...closure 3d model
archive3d
shower enclosure-acquarius- 3d model for interior 3d visualization.
archive3d
free

Enclosure 3D Model
...enclosure 3d model
archive3d
shower enclosure-omega- 3d model for interior 3d visualization.
archive3d
free

Enclosure 3D Model
...enclosure 3d model
archive3d
shower enclosure-vega - 3d model for interior 3d visualization.
archive3d
free

Enclosure 3D Model
...enclosure 3d model
archive3d
shower enclosure-zenith - 3d model for interior 3d visualization.
turbosquid
$20

shower enclosure
... available on turbo squid, the world's leading provider of digital 3d models for visualization, films, television, and games.
turbosquid
$14

Dumpster Enclosure
... available on turbo squid, the world's leading provider of digital 3d models for visualization, films, television, and games.
turbosquid
$25

3d printer enclosure
... model 3d printer enclosure for download as ipt, skp, and fbx on turbosquid: 3d models for games, architecture, videos. (1634310)
Monster
3d_export
$5
monster
...monster
3dexport
very realistic monster
3d_export
free

monster
...monster
3dexport
bloody monster! (looks terrifying)
3d_ocean
$12

Monster
... this code “envatoguest2016” . visit our store high details 3d character model for small monster , useful for animations, movi...
3d_ocean
$15
Monster
...monster
3docean
android game ios java main model monster playdesign
polycount :1118 texture :1024×1024png
3d_ocean
$8

Monster Man
...monster man
3docean
giant monster
monster man software: 3ds max, mental ray.
turbosquid
$60

MONSTER
...turbosquid
royalty free 3d model monster for download as max on turbosquid: 3d models for games, architecture, videos. (1220728)
turbosquid
$60

Monster
...turbosquid
royalty free 3d model monster for download as fbx on turbosquid: 3d models for games, architecture, videos. (1320840)
turbosquid
$19

Monster
...turbosquid
royalty free 3d model monster for download as max on turbosquid: 3d models for games, architecture, videos. (1248452)
turbosquid
$15

Monster
...turbosquid
royalty free 3d model monster for download as max on turbosquid: 3d models for games, architecture, videos. (1293042)
turbosquid
$15

Monster
...turbosquid
royalty free 3d model monster for download as ztl on turbosquid: 3d models for games, architecture, videos. (1417804)
Little
3d_ocean
$8

Little Zombie
...little zombie
3docean
little zombie
little zombie
3d_export
$60
Little Badger
...little badger
3dexport
little badger
3d_export
$5

little house
...little house
3dexport
little house
3d_ocean
$10
Little Wolf
...little wolf
3docean
wolf
little wolf for game
3d_export
$5
a little home
...a little home
3dexport
a little home for your games)
3d_export
$5

little monster
...little monster
3dexport
little toothy funny monster
3ddd
$1

little squirt
...little squirt
3ddd
детская
коллекция обоев little squirt
design_connected
$20

Little Bloom
...little bloom
designconnected
devon&devon little bloom computer generated 3d model.
design_connected
$16

Little Albert
...little albert
designconnected
moroso little albert computer generated 3d model. designed by arad, ron.
3d_ocean
$5

Little Bag
...little bag
3docean
accessory bag bundle design fashion handbag interior
a little bag model.