Thingiverse
TAZ 6 Upgrade and Modifications by keithjjones
by Thingiverse
Last crawled date: 3 years ago
If you are like me, you upgrade your TAZ any time new improvements are announced. Lulzbot has released the TAZ 6 parts at http://devel.lulzbot.com/TAZ/Olive/ and https://ohai.lulzbot.com/group/taz-6/
I purchased my TAZ back around the AO and TAZ 1 days, so most of my mechanical parts do not match the TAZ6 parts. However, there is no reason you cannot print the improvements and enjoy the best technology offers. This "thing" contains all of the parts I used to modify my TAZ 1 up to a TAZ 5, and now a TAZ 6.
Make sure you have updated your printer to at least TAZ 5 to use these mods. Specifically, you need the hexagon hotend and the 24v system.
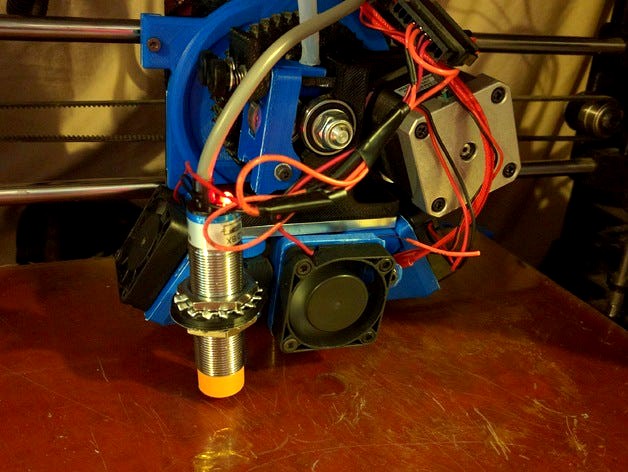
Basically, anything printed in blue ABS in the pictures, plus the Z probe mount, are parts that I modified for my printer.
My modifications:
I reduced all of the insert holes from the Lulzbot size down to 4.8mm so I could use my cheaper inserts from http://www.amazon.com/uxcell%C2%AE-M3x5mmx5mm-Threaded-Knurled-Embedded/dp/B01BHDGTQ2?ie=UTF8&psc=1&redirect=true&ref_=oh_aui_search_detailpage
I added an end stop to the extruder mount on the left side. This is because the older TAZ Z axis used a lead screw that is in the area that is now occupied by the left side extruder fan. You have to move the X carriage to the right approximately 20mm.
I added bed corners that moved the bed 20mm to the right.
I added autoleveling. I didn't particularly like the 4 corner auto leveling mechanism because I've noticed my glass can bow in the middle when it is heated. I added a simple capacitive Z probe with the following parts: http://www.amazon.com/uxcell-1-10mm-Capacitance-Proximity-Sensor/dp/B00542U3M4?ie=UTF8&psc=1&redirect=true&ref_=oh_aui_search_detailpage and http://www.amazon.com/Numato-Lab-Opto-Isolator-Breakout/dp/B00N0TKYOK?ie=UTF8&psc=1&redirect=true&ref_=oh_aui_search_detailpage
I modified the stock Marlin v1.1 firmware to match my specifications of my printer. Note: my printer may not have the same parts as yours, so use at your own risk! In particular, not many people have the 1mm pitch lead screws I received on my TAZ when I bought it. You may need to change a few parameters in Marlin for it to work on your printer. That is why I am not providing a compiled firmware, so you change the values to suit your printer before you upload it. You can find the source code at https://github.com/keithjjones/Marlin/tree/TAZ6
I used a PEI sheet from http://www.amazon.com/Polyetherimide-Standard-Tolerance-PEI0113-Thickness/dp/B0013HQ7B0?ie=UTF8&psc=1&redirect=true&ref_=oh_aui_search_detailpage to cover a spot on my glass that delaminated. You could probably use a thinner sheet if you do not have any problems with your bed glass. I used http://www.amazon.com/TapeCase-squares-Converted-Adhesive-Transfer/dp/B007Y7D5NQ?ie=UTF8&psc=1&redirect=true&ref_=oh_aui_search_detailpage to stick the PEI to the glass.
As you can see, I am a sucker for Amazon Prime shipping when it is available, so I try to get all my parts off of Amazon.
I used Fusion360 (free for hobbyists!) to modify the parts.
You should need to print the modified parts for this thing, any additional parts from devel.lulzbot.com, and install the newest Marlin firmware to get started.
I also lowered the ABS bed temperature from 110C to 95C as it was burning the ABS before long prints finished. I think that is also why some prints would warp.
My results? My prints are looking 100% better than before. I am extremely impressed with the results from these modifications. Some of my ABS parts are better than PLA. ABS has always been problematic for me. I added my Cura profiles for ABS that I tweaked slightly from Lulzbot's versions.
All objects and data from Lulzbot or Marlin carry their license agreements. I just modified them for my purposes and am giving them back to the community in case anyone finds them useful.
Update 4/24/2016: I added a capacitive sensor and changed everything accordingly. This seems to work really well. This let me ditch the touch sensor technology.
Update 4/19/2016: I added the Step files in case you want to remix my work.
I purchased my TAZ back around the AO and TAZ 1 days, so most of my mechanical parts do not match the TAZ6 parts. However, there is no reason you cannot print the improvements and enjoy the best technology offers. This "thing" contains all of the parts I used to modify my TAZ 1 up to a TAZ 5, and now a TAZ 6.
Make sure you have updated your printer to at least TAZ 5 to use these mods. Specifically, you need the hexagon hotend and the 24v system.
Basically, anything printed in blue ABS in the pictures, plus the Z probe mount, are parts that I modified for my printer.
My modifications:
I reduced all of the insert holes from the Lulzbot size down to 4.8mm so I could use my cheaper inserts from http://www.amazon.com/uxcell%C2%AE-M3x5mmx5mm-Threaded-Knurled-Embedded/dp/B01BHDGTQ2?ie=UTF8&psc=1&redirect=true&ref_=oh_aui_search_detailpage
I added an end stop to the extruder mount on the left side. This is because the older TAZ Z axis used a lead screw that is in the area that is now occupied by the left side extruder fan. You have to move the X carriage to the right approximately 20mm.
I added bed corners that moved the bed 20mm to the right.
I added autoleveling. I didn't particularly like the 4 corner auto leveling mechanism because I've noticed my glass can bow in the middle when it is heated. I added a simple capacitive Z probe with the following parts: http://www.amazon.com/uxcell-1-10mm-Capacitance-Proximity-Sensor/dp/B00542U3M4?ie=UTF8&psc=1&redirect=true&ref_=oh_aui_search_detailpage and http://www.amazon.com/Numato-Lab-Opto-Isolator-Breakout/dp/B00N0TKYOK?ie=UTF8&psc=1&redirect=true&ref_=oh_aui_search_detailpage
I modified the stock Marlin v1.1 firmware to match my specifications of my printer. Note: my printer may not have the same parts as yours, so use at your own risk! In particular, not many people have the 1mm pitch lead screws I received on my TAZ when I bought it. You may need to change a few parameters in Marlin for it to work on your printer. That is why I am not providing a compiled firmware, so you change the values to suit your printer before you upload it. You can find the source code at https://github.com/keithjjones/Marlin/tree/TAZ6
I used a PEI sheet from http://www.amazon.com/Polyetherimide-Standard-Tolerance-PEI0113-Thickness/dp/B0013HQ7B0?ie=UTF8&psc=1&redirect=true&ref_=oh_aui_search_detailpage to cover a spot on my glass that delaminated. You could probably use a thinner sheet if you do not have any problems with your bed glass. I used http://www.amazon.com/TapeCase-squares-Converted-Adhesive-Transfer/dp/B007Y7D5NQ?ie=UTF8&psc=1&redirect=true&ref_=oh_aui_search_detailpage to stick the PEI to the glass.
As you can see, I am a sucker for Amazon Prime shipping when it is available, so I try to get all my parts off of Amazon.
I used Fusion360 (free for hobbyists!) to modify the parts.
You should need to print the modified parts for this thing, any additional parts from devel.lulzbot.com, and install the newest Marlin firmware to get started.
I also lowered the ABS bed temperature from 110C to 95C as it was burning the ABS before long prints finished. I think that is also why some prints would warp.
My results? My prints are looking 100% better than before. I am extremely impressed with the results from these modifications. Some of my ABS parts are better than PLA. ABS has always been problematic for me. I added my Cura profiles for ABS that I tweaked slightly from Lulzbot's versions.
All objects and data from Lulzbot or Marlin carry their license agreements. I just modified them for my purposes and am giving them back to the community in case anyone finds them useful.
Update 4/24/2016: I added a capacitive sensor and changed everything accordingly. This seems to work really well. This let me ditch the touch sensor technology.
Update 4/19/2016: I added the Step files in case you want to remix my work.
Similar models
thingiverse
free

Kameraturm MK1 by Scorch1262
...ste-überwachungskamera-juwelier-finanz-zimmer/dp/b00iextoma?ie=utf8&psc=1&redirect=true&ref_=oh_aui_search_detailpage
thingiverse
free

Capacitive Touch Sensor Holder by mmigchelb
...https://forum.lulzbot.com/viewtopic.php?f=16&t=2123&start=130http://mig-tech.com/index.php/case-studies/150-autobed-level
thingiverse
free

EAGLE MK3 (Quadrocopter) by Scorch1262
...azon.de/goliton®-kamera-600tvl-module-dupont/dp/b00vslhqzm?ie=utf8&psc=1&redirect=true&ref_=oh_aui_detailpage_o04_s00
thingiverse
free
Raspberry Pi NoIR Schwenker MK1 by Scorch1262
...ct=true&ref_=oh_aui_search_detailpage
https://www.conrad.de/de/reely-radial-chromstahl-kugellager-19-mm-5-mm-6-mm-214450.html
thingiverse
free

Zahnriemenrad 10Zähne MK1 by Scorch1262
...de/sodial-stueck-servos-hubschrauber-flugzeug/dp/b00l8wn8gw?ie=utf8&psc=1&redirect=true&ref_=oh_aui_search_detailpage
thingiverse
free

EAGLE MK5 by Scorch1262
...;ref_=oh_aui_detailpage_o01_s00
gimbal:https://www.amazon.de/gp/product/b008jyb3u0/ref=oh_aui_search_detailpage?ie=utf8&psc=1
thingiverse
free

Peli Case 1200 Deckelplatte 7Zoll MK1 by Scorch1262
...box-1200-kunststoffbox-mit-schaumstoffeinsatz/dp/b000l45b18?ie=utf8&psc=1&redirect=true&ref_=oh_aui_search_detailpage
thingiverse
free

Laser Pointer Gehäuse MK1 by Scorch1262
.../verkabelt-kupfer-laser-lasermodul-laserdiode/dp/b00kkg89pc?ie=utf8&psc=1&redirect=true&ref_=oh_aui_search_detailpage
thingiverse
free

Messer Clip Columbia Knife MK1 by Scorch1262
...ww.amazon.de/columbia-river-knife-tool-2030cw/dp/b001iostxw?ie=utf8&psc=1&redirect=true&ref_=oh_aui_search_detailpage
thingiverse
free

Messer Clip Columbia Knife MK2 by Scorch1262
...ww.amazon.de/columbia-river-knife-tool-2030cw/dp/b001iostxw?ie=utf8&psc=1&redirect=true&ref_=oh_aui_search_detailpage
Keithjjones
thingiverse
free

Basic outdoor drain by keithjjones
...basic outdoor drain by keithjjones
thingiverse
this is a basic outdoor drain i made in freecad.
thingiverse
free

Goalie Ballerina Gymnast Mom Present by keithjjones
...goalie ballerina gymnast mom present by keithjjones
thingiverse
i made this for my wife in freecad.
thingiverse
free

Various Cigar Molds for By Hand Cigar Rolling by keithjjones
...gar molds for by hand cigar rolling by keithjjones
thingiverse
my try at making some cigar molds for various hand rolled cigars.
Taz
3d_ocean
$19

TAZ RIGGED
...ax version only texture is used only for wb logo, taz dont need texture no special render engine needed, just unzip and render...
3d_export
$5

Taz character 3D Model
...taz character 3d model
3dexport
taz toon character cartoon
taz character 3d model supercigale 22095 3dexport
cg_studio
$10

Taz 3D3d model
...taz 3d3d model
cgstudio
.3ds .max - taz 3d 3d model, royalty free license available, instant download after purchase.
cg_studio
$15

Taz Rigged3d model
...ged3d model
cgstudio
.3ds .fbx .max .obj - taz rigged 3d model, royalty free license available, instant download after purchase.
3d_export
$10

Taz Toy Calendar 3D Model
... 3d model
3dexport
taz toy calendar day month year looney tunes cartoon kid child
taz toy calendar 3d model nkfrds 49687 3dexport
3d_export
$10

Taz Tasmanian Devil RIGGED 3D Model
...y tunes anime bunny rigged material fantasy creature diable dessin
taz tasmanian devil rigged 3d model supercigale 28390 3dexport
3d_export
$19
Thylacine 3D Model
...animalia chordata mammalia marsupial dog extinct animals tiger tassie taz thylacine 3d model poly3dmodels 90790...
3d_export
$12

Bowl Decorated 3D Model
...bowl decorated 3d model 3dexport bowl tazn elements ceramics kitchen plastic cup container decorative cake biscuits...
3ddd
$1

Crate & Barrel Serveware
...crate & barrel поднос -http://www.crateandbarrel.com/feast-platter/s186961 набор ножей для сыра -http://www.crateandbarrel.com/tazcheese-knife-3-piece-set/s681377 бокал...
thingiverse
free
TAZ by Taz8373
...taz by taz8373
thingiverse
my 1st print
Upgrade
turbosquid
$15

Upgraded Glock
...e 3d model upgraded glock for download as obj, fbx, and blend on turbosquid: 3d models for games, architecture, videos. (1185950)
3ddd
$1

Calligaris / UPGRADE
...calligaris / upgrade
3ddd
calligaris
c материалом
3d_export
free

cz upgrade
...cz upgrade
3dexport
https://www.buymeacoffee.com/mestrezen3d https://linktr.ee/mestrezen3
turbosquid
$80

Custer Tank upgrade
... available on turbo squid, the world's leading provider of digital 3d models for visualization, films, television, and games.
turbosquid
$39

Domestos 1 upgrade
... available on turbo squid, the world's leading provider of digital 3d models for visualization, films, television, and games.
3d_export
$10

Upgraded tea cup
...upgraded tea cup
3dexport
a cup with an unusual design and a unique shape for a more enjoyable tea experience
3d_export
$8

dixy outlander classic style upgraded poplar wood lounge chair
...utlander classic style upgraded poplar wood lounge chair
3dexport
dixy outlander classic style upgraded poplar wood lounge chair
turbosquid
free

AK-12 + Upgrades low-poly 3D model
...ow-poly 3d model for download as fbx, blend, and unitypackage on turbosquid: 3d models for games, architecture, videos. (1501145)
evermotion
$700

Upgrade from V-ray 1.5 to 3.5 for 3ds max
...here is no need to purchase a new dongle - your current dongles will be reprogrammed to carry v-ray 3. evermotion 3d models shop.
evermotion
$300

Upgrade from V-Ray 2.0 to V-ray 3.5 for 3ds Max
... interface (gui) for editing settings on one machine and one render node for rendering on one machine. evermotion 3d models shop.
Modifications
turbosquid
$12
AKMS (AK47 modification)
... available on turbo squid, the world's leading provider of digital 3d models for visualization, films, television, and games.
turbosquid
$79

BusTransForm - Modif Bus Thailand
...d model bustransform - modif bus thailand for download as obj on turbosquid: 3d models for games, architecture, videos. (1383303)
3d_export
$25

mitsubishi evo 9 modification
...mitsubishi evo 9 modification
3dexport
evo 9 has been modified with a nice and elegant look.
3d_ocean
$25

Dart Vader (modificated helm)
...niforms, as well as anatomical model of the character itself. the model is divided into groups for further editing. primarily ...
turbosquid
$15
FN SCAR-H modification low-poly game ready
...fication low-poly game ready for download as ma, obj, and fbx on turbosquid: 3d models for games, architecture, videos. (1386384)
3d_export
$5

sphere light
...sphere light
3dexport
the socket and light are modifables
3d_export
$5

Fabulous chest
...fabulous chest
3dexport
fabulous chest for your game or further modification
3d_export
free
cold coffee
...cold coffee 3dexport cold coffee can. any required modifications will be done at...
3d_ocean
$12

Cartoon Dump or Sand Truck
... wheels and piston already rig low poly modifier still in stack for modification unwrap uvw for material and colour modification
3d_ocean
$12

Cartoon Cement Mixer Truck
...r truck the wheels already rig low poly modifier still in stack for modification unwrap uvw for material and colour modification
6
3d_export
$18

tulip 6
...tulip 6
3dexport
tulip 6
3d_export
$5
hinge 6
...hinge 6
3dexport
hinge 6
3ddd
$1

MASIERO / FLASHWOOD STL 6 + 6
...6
3ddd
masiero
торшер flashwood stl 6 + 6 фабрики masiero
http://www.masierogroup.com/c87_697/it/flashwood%20stl%206%20+%206.ashx
turbosquid
$110

Atmos Cannon 2000 6*6
...yalty free 3d model atmos cannon 2000 6*6 for download as skp on turbosquid: 3d models for games, architecture, videos. (1528591)
turbosquid
$1

ae 6 6 electric locomotive
... free 3d model ae 6 6 electric locomotive for download as obj on turbosquid: 3d models for games, architecture, videos. (1707537)
turbosquid
$39

A-6
... available on turbo squid, the world's leading provider of digital 3d models for visualization, films, television, and games.
3ddd
$1
6 ковров
...6 ковров
3ddd
ковры , ковер
6 ковров
turbosquid
$12

Calligraphic Digit 6 Number 6
...hic digit 6 number 6 for download as max, obj, fbx, and blend on turbosquid: 3d models for games, architecture, videos. (1389336)
turbosquid
$19

Case For Phone 6 Girl 6
... available on turbo squid, the world's leading provider of digital 3d models for visualization, films, television, and games.
turbosquid
$35

Iphone 6 & 6 Plus All
... available on turbo squid, the world's leading provider of digital 3d models for visualization, films, television, and games.