Thingiverse
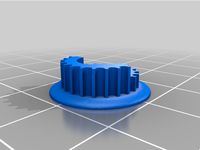
Taurus hard feet for Prusa MK3 and MK3s by jltx
by Thingiverse
Last crawled date: 3 years, 1 month ago
I updated these and rebranded to Taurus to complement the rest of that line. Even Prusa agrees you want your printer planted!
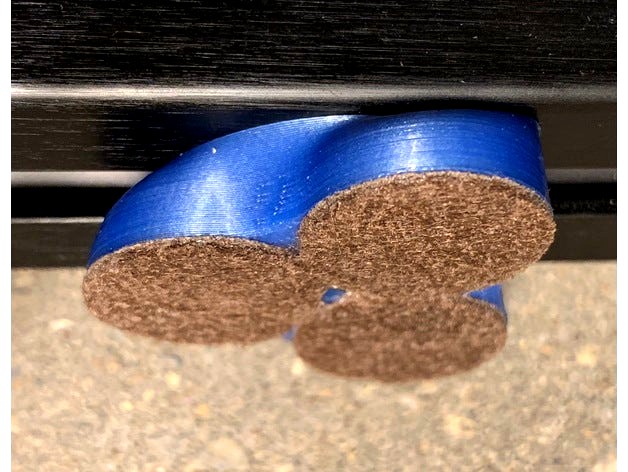
increased surface area 50%
wider stance
strengthen frame connection with new slot-lock system
I left the old feet available for those who prefer.
Print with 20% honeycomb infill. PETG recommended.
To use the slot-lock system, insert hex nut into wedge and fit into clip. Insert M3x12mm through clip and screw into nut. Push wedge out back out of clip using screw so there is a gap allowing clip to flex. Insert into extrusion slot and press clip until it snaps into place, also pressing screw to keep the wedge out of the clip. Now remove screw.Alternatively, you can snap in the clip to the frame by itself first without the wedge. I find it easiest to squeeze from both ends against the frame extrusion. The you slide the wedge in from the slot behind the clip. It's a little trickier to fish it in and then align the screw hole, but works.
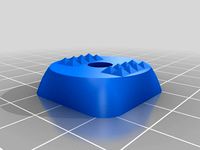
Clip should slide easily in slot but not come out. Slide up against frame and slide foot over the clip with the two pods against the frame. Should be snug. Now insert screw back through horn and screw down. Should lock in place with no play in any direction, including twisting. Do not over-tighten. Once it doesn't slide, maybe another 1/4 turn. I tried to design it so you can't over-tighten it, but I have learned the people will find a way. ;-)
Note the hole in the back is for removal, to facilitate sliding off the slot-lock; use small hex wrench to keep clip in place.
For concrete/stone base: designed for 3/4" (19 mm) heavy duty furniture pads, 3 per foot. Shave off as much felt as possible, down to where the adhesive starts. Gives you super stable, grippy pad with minimal give. See photo for example.
For smooth base (granite/marble): I found some thin 3/4” vinyl pads at HD that may work if they are grippy enough. They are for glass tables.
For older set:
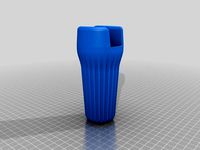
The stock rubber feet allow for some resonance on high accelerations. Some folks have seen better results with hard feet, helping reduce the prominence of ringing and vertical banding. I had good luck with the old MK2 feet that used felt since I use a paver stone as a base. So I made these to twist into the MK3 extrusions and accept 1" furniture felt pads.
Print as is with normal settings, 0.2 mm layer. Print 4 at once for ease.
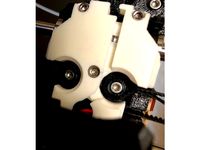
The two pieces snap together. Add M3x10 and nut and fully tighten, then back off 3/4 of a turn. Insert into extrusion and twist 90 degrees into position, slide up against frame and tighten down screw for ultimate stability (see photo). You could attach other adhesive feet like sorbothane.
For felt pads, drill 1/8" hole in center before attaching so you can access screw. I could not find thin enough pads, so after attaching, I used a razor blade to shave down to about 2mm thickness. This provides maximum grip with minimum flex.
BTW, the t-nut here is handy for other projects where you want to attach something to the 30mm extrusion. The hex coupler is inscribed 6.92mm and 2mm deep.
More parts
see Taurus line of upgrades for best performance.
I have many parts for MK3. I like them all, but here is what I recommend to tighten things up and improve reliability and print quality. This is based on my own experience using these parts and from others using the same or similar upgrades. YMMV.Z mounts - fix alignment, sturdierY endstop - fix layer shift, long term reliabilityhard feet - reduce vibrationsstable pulley - stabilize belt, longevityrunner - offload frame, poor man's reverse-bowden
increased surface area 50%
wider stance
strengthen frame connection with new slot-lock system
I left the old feet available for those who prefer.
Print with 20% honeycomb infill. PETG recommended.
To use the slot-lock system, insert hex nut into wedge and fit into clip. Insert M3x12mm through clip and screw into nut. Push wedge out back out of clip using screw so there is a gap allowing clip to flex. Insert into extrusion slot and press clip until it snaps into place, also pressing screw to keep the wedge out of the clip. Now remove screw.Alternatively, you can snap in the clip to the frame by itself first without the wedge. I find it easiest to squeeze from both ends against the frame extrusion. The you slide the wedge in from the slot behind the clip. It's a little trickier to fish it in and then align the screw hole, but works.
Clip should slide easily in slot but not come out. Slide up against frame and slide foot over the clip with the two pods against the frame. Should be snug. Now insert screw back through horn and screw down. Should lock in place with no play in any direction, including twisting. Do not over-tighten. Once it doesn't slide, maybe another 1/4 turn. I tried to design it so you can't over-tighten it, but I have learned the people will find a way. ;-)
Note the hole in the back is for removal, to facilitate sliding off the slot-lock; use small hex wrench to keep clip in place.
For concrete/stone base: designed for 3/4" (19 mm) heavy duty furniture pads, 3 per foot. Shave off as much felt as possible, down to where the adhesive starts. Gives you super stable, grippy pad with minimal give. See photo for example.
For smooth base (granite/marble): I found some thin 3/4” vinyl pads at HD that may work if they are grippy enough. They are for glass tables.
For older set:
The stock rubber feet allow for some resonance on high accelerations. Some folks have seen better results with hard feet, helping reduce the prominence of ringing and vertical banding. I had good luck with the old MK2 feet that used felt since I use a paver stone as a base. So I made these to twist into the MK3 extrusions and accept 1" furniture felt pads.
Print as is with normal settings, 0.2 mm layer. Print 4 at once for ease.
The two pieces snap together. Add M3x10 and nut and fully tighten, then back off 3/4 of a turn. Insert into extrusion and twist 90 degrees into position, slide up against frame and tighten down screw for ultimate stability (see photo). You could attach other adhesive feet like sorbothane.
For felt pads, drill 1/8" hole in center before attaching so you can access screw. I could not find thin enough pads, so after attaching, I used a razor blade to shave down to about 2mm thickness. This provides maximum grip with minimum flex.
BTW, the t-nut here is handy for other projects where you want to attach something to the 30mm extrusion. The hex coupler is inscribed 6.92mm and 2mm deep.
More parts
see Taurus line of upgrades for best performance.
I have many parts for MK3. I like them all, but here is what I recommend to tighten things up and improve reliability and print quality. This is based on my own experience using these parts and from others using the same or similar upgrades. YMMV.Z mounts - fix alignment, sturdierY endstop - fix layer shift, long term reliabilityhard feet - reduce vibrationsstable pulley - stabilize belt, longevityrunner - offload frame, poor man's reverse-bowden
Similar models
thingiverse
free

Taurus PSU relo frame brace for Prusa MK3 and MK3s by jltx
...cally for strength. do not reorient. add brim if needed.
i printed mine in thingiverse blue. j/k, it’s atomic pearl blue petg.
thingiverse
free
Prusa MK3 Extrusion Mount Locking Cam by raspeitia
...he screw.
note: print with a brim and the narrow cone side down, just like in the picture on the print bed. no need for supports.
thingiverse
free

Prusa MK2S & MK3/S feet (for sorbothane dampeners) by Foppemoa
...slightly modified to make them clip on to the frame itself. just enough so that they don't fall off when lifting the printer.
thingiverse
free
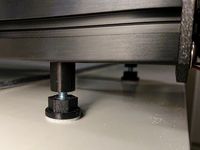
Adjustable printer feet
...t by turning the bottom part. it fits a 16 mm wrench.
i've included the freecad file in case someone would like to modify it.
thingiverse
free

Parametric 20 Series V-Slot Slide Nut by tailoffloof
...d stl files are for 3mm screw threads but you can also download the scad and dxf files to create your own.
print without support.
thingiverse
free

Rigid feet for Prusa i3 MK3 by steelfab
...aded the fusion360 file - so if you need another height or want to use different screws, you could adopt it now to your own needs
thingiverse
free

T-SLOT NUT,M3 FOR PRUSA FRAME by SethPrints
...ut is a standard m3 thread, and the t-slot nut fits into the aluminum rails which are the base of the prusa i3 mk3s (and others).
thingiverse
free

Prusa MK3 leg adapters for taller rubber feet
...rew insert slot facing up. supports are only needed for the tab coming off the top (the one that will insert into the extrusion).
thingiverse
free

Universal Frame Mount for MK3s by agenkin
...ersion (for clamping to the top of the frame), or a 50 mm m3 screw for the long version (for clamping to the sides of the frame).
thingiverse
free

Tee Nut w/ M3 nut insert | V-Slot compatible by Libfall
... so you can tighten the screw without stressing the printed part.
let me know if you print and use and so that i can improved it.
Jltx
thingiverse
free

TOSLink Adpater by jltx
... into a traditional plug, this is for you. plug this adapter in first the insert cable end. holds snug and sounds flawless. :-)
thingiverse
free
Freedom Wrench by jltx
...ose with strong hands
full-throated freedom, william wallace edition
leave a comment to let me know how it works for you. enjoy.
thingiverse
free

Sony Alpha accessory mount dust cap by jltx
...39;d like a dust cap for my accessory mount. so i made one. thought i'd share. designed to print vertically so add a brim.
thingiverse
free

72mm lens cap clip for neck strap by jltx
...f the three tabs. you'll have to work it a bit and pull from other side as it is designed to be snug. repeat for other two.
thingiverse
free
GT2 Idler Pulley for F693ZZ Bearing by Flex35
...by flex35 thingiverse i remixed the great design by jltx to fit in f693zz...
thingiverse
free

Prusa MK3 - toolbox by KurzyKocour
...prusa i3 mk3 reuses the t nuts designed by jltx works fine for storing your 3d printer...
thingiverse
free
Prusa MK3 hard feet (with spikes) by vaxxi
...hard feet (with spikes) by vaxxi thingiverse remix of jltx#39;s printer feet with two rows of 4 spikes (each...
thingiverse
free
Prusa i3 MK3 X carriage back plate with belt access by jltx
...
2/12/18 update prusa released r2 versions and i updated the back cover to give belt access. need to flip over before slicing.
thingiverse
free

Prusa MK3 Indirect filament sensor mod for stock extruder by jltx
...c with any improvements i make going forward. so i made this interposer to translate the mount to mine. see instructions below.
thingiverse
free
Taurus PSU relo frame brace for Prusa MK3 and MK3s by jltx
...cally for strength. do not reorient. add brim if needed.
i printed mine in thingiverse blue. j/k, it’s atomic pearl blue petg.
Taurus
3d_export
$25

taurus
...taurus
3dexport
taurus woman zodiac sign
turbosquid
$50

Taurus
...
turbosquid
royalty free 3d model taurus for download as max on turbosquid: 3d models for games, architecture, videos. (1269792)
turbosquid
$49

Taurus
... available on turbo squid, the world's leading provider of digital 3d models for visualization, films, television, and games.
turbosquid
$19

Taurus
... available on turbo squid, the world's leading provider of digital 3d models for visualization, films, television, and games.
turbosquid
$5

Taurus
... available on turbo squid, the world's leading provider of digital 3d models for visualization, films, television, and games.
turbosquid
$5

Taurus
... available on turbo squid, the world's leading provider of digital 3d models for visualization, films, television, and games.
3d_export
$29

Taurus 3D Model
...taurus 3d model
3dexport
zodiac taurus
taurus 3d model rmodeler 33885 3dexport
3d_ocean
$6

Zodiac Taurus Cartoon
...zodiac taurus cartoon
3docean
astrology bik horoscop horoskop lowpoly taurus zodiac zodiak
lowpoly model of zodiac taurus cartoon
turbosquid
$14

Ring Taurus
...osquid
royalty free 3d model ring taurus for download as stl on turbosquid: 3d models for games, architecture, videos. (1274054)
turbosquid
free

Taurus PT320
...squid
royalty free 3d model taurus pt320 for download as fbx on turbosquid: 3d models for games, architecture, videos. (1189749)
Mk3S
turbosquid
$50

cention mk3
...ty free 3d model cention mk3 for download as ma, obj, and fbx on turbosquid: 3d models for games, architecture, videos. (1454148)
turbosquid
$129

MK3 Tank
... available on turbo squid, the world's leading provider of digital 3d models for visualization, films, television, and games.
turbosquid
$100

Toyota Supra MK3
... available on turbo squid, the world's leading provider of digital 3d models for visualization, films, television, and games.
turbosquid
$44

cention mk3 low poly
...d model cention mk3 low poly for download as ma, obj, and fbx on turbosquid: 3d models for games, architecture, videos. (1454666)
turbosquid
$30

Challenger I Mk3 Falcon
... available on turbo squid, the world's leading provider of digital 3d models for visualization, films, television, and games.
turbosquid
$10

American Frag hand grenade MK3
...free 3d model american frag hand grenade mk3 for download as on turbosquid: 3d models for games, architecture, videos. (1393624)
turbosquid
$20

Mk3 US Navy Combat Knife
...ty free 3d model mk3 us navy combat knife for download as fbx on turbosquid: 3d models for games, architecture, videos. (1172791)
3d_export
$29

Ford Fiesta MK3 Modified 3D Model
...7 tumerfx mtumer mehmet t?mer 1993 1995 1996 wrc special modifed modifiye
ford fiesta mk3 modified 3d model mtumer 30698 3dexport
3d_export
$99

Toyota Supra Mk3 19861993 3D Model
...ort fast coupe japan 1986 1987 1988 1989 1990 1991 1992 1993 tuning turbo
toyota supra mk3 19861993 3d model squir 62530 3dexport
turbosquid
$5

Timothy Oulton Mars Chair MK3
...on mars chair mk3 for download as 3ds, max, obj, fbx, and dae on turbosquid: 3d models for games, architecture, videos. (1209782)
Mk3
turbosquid
$50
cention mk3
...ty free 3d model cention mk3 for download as ma, obj, and fbx on turbosquid: 3d models for games, architecture, videos. (1454148)
turbosquid
$129
MK3 Tank
... available on turbo squid, the world's leading provider of digital 3d models for visualization, films, television, and games.
turbosquid
$100
Toyota Supra MK3
... available on turbo squid, the world's leading provider of digital 3d models for visualization, films, television, and games.
turbosquid
$44
cention mk3 low poly
...d model cention mk3 low poly for download as ma, obj, and fbx on turbosquid: 3d models for games, architecture, videos. (1454666)
turbosquid
$30
Challenger I Mk3 Falcon
... available on turbo squid, the world's leading provider of digital 3d models for visualization, films, television, and games.
turbosquid
$10
American Frag hand grenade MK3
...free 3d model american frag hand grenade mk3 for download as on turbosquid: 3d models for games, architecture, videos. (1393624)
turbosquid
$20
Mk3 US Navy Combat Knife
...ty free 3d model mk3 us navy combat knife for download as fbx on turbosquid: 3d models for games, architecture, videos. (1172791)
3d_export
$29
Ford Fiesta MK3 Modified 3D Model
...7 tumerfx mtumer mehmet t?mer 1993 1995 1996 wrc special modifed modifiye
ford fiesta mk3 modified 3d model mtumer 30698 3dexport
3d_export
$99
Toyota Supra Mk3 19861993 3D Model
...ort fast coupe japan 1986 1987 1988 1989 1990 1991 1992 1993 tuning turbo
toyota supra mk3 19861993 3d model squir 62530 3dexport
turbosquid
$5
Timothy Oulton Mars Chair MK3
...on mars chair mk3 for download as 3ds, max, obj, fbx, and dae on turbosquid: 3d models for games, architecture, videos. (1209782)
Prusa
turbosquid
$2

Frame Filament Guide Clip-On for Prusa Mk3
...rame filament guide clip-on for prusa mk3 for download as stl on turbosquid: 3d models for games, architecture, videos. (1634730)
3d_export
free

prusa i3 mk3s laser mount for opt lasers
...to learn more about the blue laser technology that conceived the cutting and engraving laser heads from opt lasers, please visit:
turbosquid
free

Prusa small printer adapter holder
...er for download as ipt, skp, dwg, dxf, fbx, ige, obj, and stl on turbosquid: 3d models for games, architecture, videos. (1642936)
3d_export
$30

geisha by jonathan adler
...** i did a 3d printing test in the prusa software, you can find it among the attached images.<br>exchange:<br>.blend...
thingiverse
free

Prusa without Prusa (rc2) by madless
...prusa without prusa (rc2) by madless
thingiverse
just the main part of prusa rc2 faceshield, without writing.
enjoy :)
thingiverse
free

Prusa by acejbc
...prusa by acejbc
thingiverse
prusa knob info
m3 8mm screw
thingiverse
free

Prusa house
...prusa house
thingiverse
how prusa house could look like...
thingiverse
free

Prusa Mk2 "Fake Prusa" LCD cover by anraf1001
...r by anraf1001
thingiverse
version of prusa's lcd cover with "fake prusa" instead of "original prusa"
thingiverse
free

Prusa stabilizator by gutiueugen
...prusa stabilizator by gutiueugen
thingiverse
prusa stabilizator
thingiverse
free

Keychain Prusa by rbarbalho
...keychain prusa by rbarbalho
thingiverse
keychain with text prusa.
Feet
3d_export
$30
Legs and feet High feet 3D Model
...t high feet 3d model
3dexport
feet shoes sandal barefoot leg women
legs and feet high feet 3d model adrianaamerina 96817 3dexport
3ddd
$1
DUCK FEET LAMP
...duck feet lamp
3ddd
утка
duck feet lamp
turbosquid
$19
Feets 01
...3d model feets 01 for download as max, max, max, fbx, and obj on turbosquid: 3d models for games, architecture, videos. (1624047)
turbosquid
$2
Robo3D Feet
... available on turbo squid, the world's leading provider of digital 3d models for visualization, films, television, and games.
turbosquid
free

Feet study
... available on turbo squid, the world's leading provider of digital 3d models for visualization, films, television, and games.
turbosquid
free

Hands and Feet
... available on turbo squid, the world's leading provider of digital 3d models for visualization, films, television, and games.
turbosquid
$9

Female Feet 01
...oyalty free 3d model feet 01 for download as ma, obj, and fbx on turbosquid: 3d models for games, architecture, videos. (1446069)
turbosquid
$19

The feet of Hercules trainer
... feet of hercules trainer for download as , stl, fbx, and obj on turbosquid: 3d models for games, architecture, videos. (1684923)
turbosquid
$79
Hand and Feet (Rigged)
... available on turbo squid, the world's leading provider of digital 3d models for visualization, films, television, and games.
turbosquid
$15

Viabizzuno Big Feet
... available on turbo squid, the world's leading provider of digital 3d models for visualization, films, television, and games.
Hard
3d_ocean
$15

Hard Disk
...ard disk hard disk model hard disk obj high poly hard disk passport hard disk wd hard disk western digital
high poly wd hard disk
3ddd
$1
Светильник Long and Hard
...к long and hard
3ddd
flos , long and hard
светильник long and hard от flos, с текстурами
3d_export
$5

hard gauge protector
...hard gauge protector
3dexport
hard gauge protector
3d_ocean
$10

External hard drive
... is a detailed model of a trekstor external hard drive. you can easily modify the label on the top. simply edit the text objects.
turbosquid
$40

Hard Disc
...
royalty free 3d model hard disc for download as max and fbx on turbosquid: 3d models for games, architecture, videos. (1386268)
turbosquid
$1

Hard Hat
...d
royalty free 3d model hard hat for download as max and fbx on turbosquid: 3d models for games, architecture, videos. (1222575)
turbosquid
free

Hard Drive
...ty free 3d model hard drive for download as max, obj, and fbx on turbosquid: 3d models for games, architecture, videos. (1332637)
turbosquid
$29

hard hat
...free 3d model hard hat for download as 3ds, obj, c4d, and fbx on turbosquid: 3d models for games, architecture, videos. (1272864)
turbosquid
$29

hard HAT
... available on turbo squid, the world's leading provider of digital 3d models for visualization, films, television, and games.
turbosquid
$3
Hard Drive
... model hard drive for download as max, 3ds, fbx, obj, and stl on turbosquid: 3d models for games, architecture, videos. (1630728)