Thingiverse
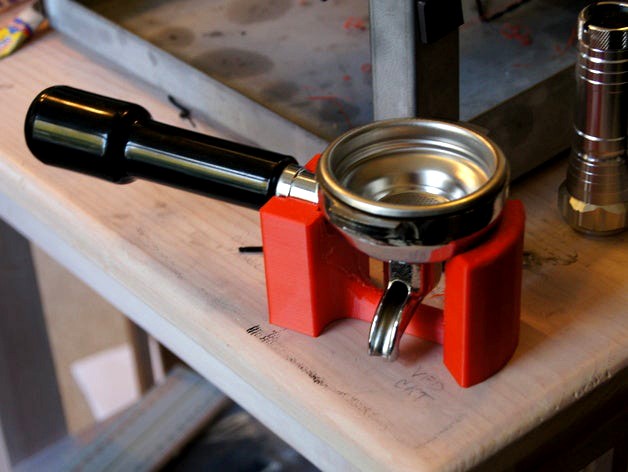
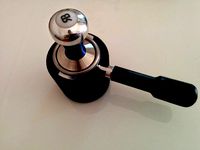
Tampstand for Rocket Espresso Portafilter (E61 brewhead) by rtrski
by Thingiverse
Last crawled date: 3 years ago
NOTE (Update 18 Mar 2021): Pictures of made item (Red ABS) are old version, please download at least v6 file for better single/dual spout compatibility!! "Tampstand Penetrated" file is v6 plus holes for reinforcement - see below.)
Espresso makes me happy. Tamping a single spout portafilter without a tamp stand makes me sad. Paying a ludicrous $80 or more for a stainless steel and marble-inlaid, buffed-with-virginal-baby-diaper-soft-cotton tampstand with some bozo logo on it makes me angry. Me without espresso with a rich thick crema from the perfect grind and tamp, angry, makes the world a scary place. I need to not be angry.
Hence, the swooshy blended just-strong-enough it flexes a little to let me know when I'm tamping just right, ABS tampstand. In red, because Rockets have red glare. :)
5/11/2014: Updated with a v6 file with less faceting. My original finally got overstressed and cracked, so rather than just reprint I did some redesign. The new version fits both the single and dual spout portafilters and provides a bit more strength. Since I needed an 'undercut' for the dual spout, the new file has integral support parts that are part of the print. I prefer to design these in rather than let my slicer provide them since I can better control contact points and removability without excessively marring the desired finished part.
03/18/2021: Well, after many years of use again, I broke my print mid tamp. Makes for a bitter cup. ;-) So finally did something I've been meaning to for some time, even though I no longer have the original Creo file made my stl from, so only had the mesh to work with. I was able to import the v6 file with integrated supports and Meshmix it to add a couple of 3.2mm holes thru the main body height. These might help with reinforcement on their own, but they're about right for 8d 2.5inch bright finish nails: coat them good with E6000 or drip some good liquid superglue into the holes (tape the bottoms!) then tap the tight heads down gently with a hammer, clean up any surface smears, and hopefully the nails will help prevent breakage in the future. (You could also use 0.125in dia rod stock if you can find it, or just trim lengths of 2.85mm filament and probably thread them in, not sure about glue technique in that case (insert all the way thru dry with plenty of excess, apply glue to protruding section and pull thru from other side, then trim both faces after?). Anyway, happy to see one of my early naive attempts at designing something useful has actually had several makes and many likes and collects over the years. Happy caffeination!
Similar models
thingiverse
free

Espresso Tamping Station (Vibiemme E61) by koochy_rat
...ation (vibiemme e61) by koochy_rat
thingiverse
resized to fit vibiemme e61 double spout portafilter (single spout does not fit).
thingiverse
free

Tamping Station LaSpaziale Portafilter by createch2
...aspaziale portafilter. a useful help especially for the single basket filter with its excentric outlet for tamping and weighing.
thingiverse
free

E61 Tamping Station by flyinggorilla
...lter there.
i printed with formfutura apollox (asa) as that material is termperature resistant enough and food contact certified.
thingiverse
free
Breville Espresso Spill Catcher And Tamper by MisterMcDuck
...source projects into a print that both tamps the espresso while holding the portafilter in place and catching any excess grounds.
thingiverse
free

Tamper for DeLonghi 51mm Portafilter
... a .sldprt file for customizing and if you do not have solidworks you can upload the file and edit it in onshape!
happy tamping!
thingiverse
free
De'Longhi Espresso Maker Tamp Base by rawisme
...ase by rawisme
thingiverse
simple portafilter base to support when tamping. specifically designed for my de'longhi ecp 3420.
thingiverse
free

DeLonghi portafilter holder tamper stand by bavarianinvader
...ostion for tamping i created this little helper.
it can be used for the portafilter of the delonghi 680 and others of the series.
thingiverse
free

Remixed Tamp Stand by Tekwhat
...t hole by 3mm to allow the portafilter to sit flush. the base design did not allow for a level tamp with the factory portafilter.
thingiverse
free

Rancilio bottomless portafilter tamping stand by jimhigson
...o portafilters, for machines such as the silvia.
only for bottomless portafilters, but could be remixed for spout-ed filters too.
grabcad
free

espresso tamper stand
...portafilter while tamping.
adjust dimensions to fit your portafilter.
i used stainless for weight but aluminum work work as well.
Brewhead
thingiverse
free

Espresso tamping station (E61 Brewhead) by Honex
...s integrated stand for tamper on the bottom (59 mm).
mk3 comes with two versions - one for large (20mm) and slim handles (17.5mm)
thingiverse
free
E61 Portafilter wall mount by wolfspyre
...by wolfspyre thingiverse a wall/shelf mount for your e61 brewhead portafilters. i'm still iterating on this, but at this...
Rtrski
thingiverse
free
Filament spool bearing-ring hub by rtrski
...rod, and provide a much lower friction filament supply than just putting your spool over a toilet paper holder or a piece of pvc.
thingiverse
free

Gitzo Tripod Head QR Cover - On Camera by rtrski
...oot comfortably. print at as low as 0.15 infill and you won't even know it's there, it's weight is so insignificant.
thingiverse
free

Snapmaker Enclosure Door Hinge Pull-tab (friendly-version) by k0riz0n
...is a friendly looking remix of this thing from rtrski ...
thingiverse
free

Snapmaker Enclosure Door Hinge Pull-tab by rtrski
...od adhesion (clean your bed, use hairspray, good heat, whatever) or the circular legs will attempt to curl up a bit during print.
thingiverse
free

Snapmaker 2.0 Filament Guide (A150, A250) by rtrski
...ccuracy. i have re-uploaded this part in a zip to see if that helps this thing not showing up in my profile list or in searches!
thingiverse
free

Simple Spool Roller for Snapmaker 2.0 by rtrski
...d" picture without the spool in the way when i can find a moment that i'm not printing so i'm not actively using it.
thingiverse
free

Rancilio Rocky Grinder Dome Cover Bean Rejector, Mark I by rtrski
...'quick clean' months - just dropping in grindz or some similar burr cleaner - won't end up with crap in these holes.)
thingiverse
free

Clean Silicone Covered Keyboard Wrist Rest by rtrski
...e not completed my printing and applied my coating yet so no finished pictures - consider this "in work" at the moment.
E61
humster3d
$75

3D model of BMW 5 Series touring (E61) 2007
...model of bmw 5 series touring (e61) 2007 in various file formats. all our 3d models were created maximally close to the original.
cg_studio
$99

BMW 5-Series e61 Touring 2004-20103d model
...4d .3ds .obj .max - bmw 5-series e61 touring 2004-2010 3d model, royalty free license available, instant download after purchase.
cg_studio
$99

BMW 5 Estate e613d model
...
cgstudio
.3ds .lwo .max .obj .xsi - bmw 5 estate e61 3d model, royalty free license available, instant download after purchase.
thingiverse
free

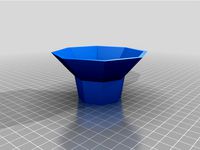
E61 Distribution Funnel by whiteyj
...e61 distribution funnel by whiteyj
thingiverse
dosing funnel for an e61 portafilter with an added crossbar for distribution.
thingiverse
free
E61 Espresso Tamp Stand by macropin
...o (rocket), isomac and naked e61 group handles.
oh and it's a parametric openscad design so you can change it if necessary!
thingiverse
free

Zigarettenanzünder Dummy for BMW E61
...zigarettenanzünder dummy for bmw e61
thingiverse
just a replacement for the original dummy.
thingiverse
free
Espresso Tamping Station (Vibiemme E61) by koochy_rat
...ation (vibiemme e61) by koochy_rat
thingiverse
resized to fit vibiemme e61 double spout portafilter (single spout does not fit).
thingiverse
free

Stihl E61 Vacuum to Makita LS0714 Attachment by Neph69
... e61 vacuum to makita ls0714 attachment by neph69
thingiverse
attachment for the stihl e61 vacuum to the makita ls0714 mitre saw
thingiverse
free
E61 Portafilter wall mount by wolfspyre
...ill iterating on this, but at this point it's functional.
this fits all three portafilters i have for my expobar brewtus iv
thingiverse
free

BMW E61 E60 Centerconsole catch repair
...g plastic and printed this piece. attach with two screws and it works perfectly again.
print with 100% infill for extra strength.
Portafilter
turbosquid
$29

LaSpaziale Vivaldi II Coffee Maker 2 Portafilter
...ee maker 2 portafilter for download as 3ds, max, obj, and fbx on turbosquid: 3d models for games, architecture, videos. (1252071)
3d_export
$10
ESPRESSO MACHINE GAME READY 3D MODEL
...some common elements, such as a grouphead and a portafilter an espresso machine may also have a steam wand...
thingiverse
free

Delonghi portafilter holder
...ith other but no idea.
designed to hold my naked / bottomless / unpressurized portafilter, but fits the stock one as well !
enjoy
thingiverse
free

Portafilter Holder by mkke
...r by mkke
thingiverse
holder for a 58mm portafilter.
there are no mounting holes, it is meant for gluing to tiles with silicone.
thingiverse
free

Funnel for 58mm Portafilter by yohannaftali
...funnel for 58mm portafilter by yohannaftali
thingiverse
funnel for 58mm portafilter
thingiverse
free

Portafilter Wallmount BZ10 by rd_subwoofer
...portafilter wallmount bz10 by rd_subwoofer
thingiverse
wallmount for portafilter for a bz10
thingiverse
free

58mm portafilter wall mount
...ape.
it's degined for sage bes 920 (or breville dual boiler) portafilter, but should work with any standard 58mm portafilter.
thingiverse
free

E61 Locking Portafilter Holder - For Angled ECM Portafilter by rirymate
...r and didn't find any so i made my own. please note that this is currently in the prototyping stage and changes may be made.
thingiverse
free

53mm Portafilter funnel by jabberwoku
... the funnel catches all the grind and won't get all over your table. it is also great for "tapping" redistribution.
thingiverse
free
Coffee Funnel for Portafilter 58mm by yohannaftali
...coffee funnel for portafilter 58mm by yohannaftali
thingiverse
funnel for portafilter 58mm
Espresso
3d_export
$10

espresso machine
...espresso machine
3dexport
espresso machine
turbosquid
$6

espresso
...d
royalty free 3d model espresso for download as 3dm and max on turbosquid: 3d models for games, architecture, videos. (1671021)
3d_ocean
$3

Espresso Cup
...espresso cup
3docean
a fully editable espresso cup with lathe and extrude objects.
3d_ocean
$9

Espresso set
...esso kitchen realistic studio
a espresso set in photorealsitic studio environment. created with blender and rendered with cycles.
3d_export
$10

Espresso 3D Model
...espresso 3d model
3dexport
espresso
espresso 3d model klamar 58936 3dexport
3ddd
$1

bugatti diva espresso
... , espresso , кофе-машина
bugatti diva espresso
3ddd
$1
Aqwella Espresso 50
...aqwella espresso 50
3ddd
aqwella espresso 50
3d_ocean
$3

Espresso Cup and Saucer
...cer drink espresso espresso cup foam saucer
an espresso cup with saucer. the foam is a seperate object and can easily be removed.
turbosquid
free
Espresso Machine
...bosquid
free 3d model espresso machine for download as blend on turbosquid: 3d models for games, architecture, videos. (1408871)
turbosquid
$7

espresso machine
...
royalty free 3d model espresso machine for download as blend on turbosquid: 3d models for games, architecture, videos. (1576009)
Rocket
3d_export
$5
rocket
...rocket
3dexport
rocket 3d model low poly
3d_export
$5

rocket
...rocket
3dexport
rocket low poly 3d model cartoon
archibase_planet
free

Rocket
...rocket
archibase planet
rocket toy
rocket tintin's n290813 - 3d model (*.gsm+*.3ds+*.max) for interior 3d visualization.
3d_export
$5

Rocket
...rocket
3dexport
the rocket is made from a cylinder made in blender 3.0
turbosquid
$6

Rocket Baby Rocket Stool
...el rocket baby rocket stool for download as max, obj, and fbx on turbosquid: 3d models for games, architecture, videos. (1502645)
turbosquid
$15

rocket
...ket
turbosquid
royalty free 3d model rocket for download as on turbosquid: 3d models for games, architecture, videos. (1340796)
turbosquid
$10
Rocket
...ket
turbosquid
royalty free 3d model rocket for download as on turbosquid: 3d models for games, architecture, videos. (1247547)
3d_export
$5

scifi rocket
...scifi rocket
3dexport
scifi rocket
turbosquid
$199

rockets
...turbosquid
royalty free 3d model rockets for download as max on turbosquid: 3d models for games, architecture, videos. (1233135)
turbosquid
$30
Rocket
...
turbosquid
royalty free 3d model rocket for download as fbx on turbosquid: 3d models for games, architecture, videos. (1290260)