Thingiverse
Switch Repair for Olympus ECS71 Paper Shredder by Cargy
by Thingiverse
Last crawled date: 4 years, 1 month ago
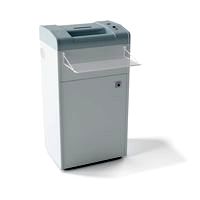
Back in around 2012 or 13, I bought an Olympus document shredder from Lidl. Since then, it has performed sterling work, despite occasional misuse by someone who shall remain nameless (but might possibly be me).
Sometime in late 2018, something failed, and there was no shredding despite the motor racing away lustily. Naturally I did what any practical minded DIYer would do, and dismantled it - secretly hoping, of course, that it would be something suitable for 3D design and printing, like a gear or a bearing holder.
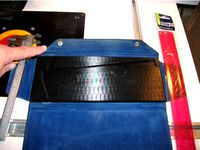
But, when I came to remove the covers from the mechanism, the case halves wouldn't separate. The trouble was that the switch was still holding it all together, and it refused to let go using reasonable pressure. I tried levering gently, to no avail. There was nothing for it, and I had to resort to levering forcefully. The case still carries the scars that resulted to this day, and visible in the attached picture!). But I was finally able to persuade it to give up its death grip, at last, and was able to carry out my diagnosis.
The shredder fault turned out to be nothing more elaborate than the motor screws working loose over time, causing the motor to separate from the drive mechanism. This was swiftly sorted with some Loctite and a screwdriver, with no need for 3D printing anything :'c .
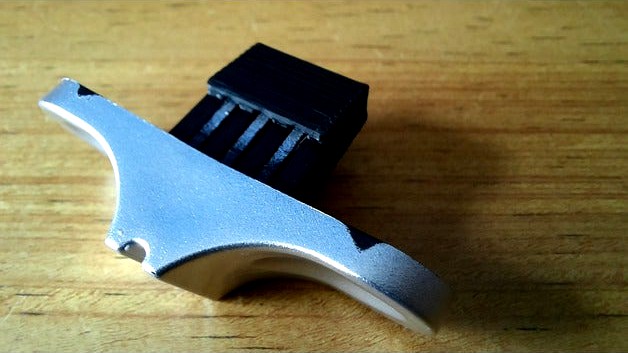
But when I came to reassemble the unit, I realised that my "brute force and ignorance" (TM BigCliveDotCom) approach had resulted in the flimsy retaining clip on the switch breaking off: As usual, the saving of a fraction of a penny's worth of plastic - making it effectively into 3 weak 1.5mm clips - had created a weak spot. In fairness, I was actually grateful for this economising by the manufacturers for once, as I doubt if I'd have got the shredder apart without it.
At the time, I simply popped the broken switch lever loosely back onto the shredder, and used it that way thereafter. But the damn thing was forever falling off, or getting sucked up in the vacuum cleaner, and driving me nuts whenever I used it.
Then, as I got into my 3D printer, I made a few attempts to design a replacement switch lever. But the complicated intercepting angles and compound curves involved always defeated me, and I ended up just carrying on with the switch lever as it was - accepting that it would be making the occasional bolt for freedom at the most inconvenient of times.
Until Today. As we're under virus lockdown at the moment, I was able to devote a little more thought to the problem. It didn't take too long to realise I'd been thinking about it all wrong. All it actually required was a small repair piece for the clip, instead of a whole new switch lever, c/w clip, printed from scratch.
After some measuring, and tinkering, it took around 3 iterations to get a result that worked AND I was happy with. It's a nice, tight, friction fit so that it doesn't need glue, so can be easily removed if I ever need to access the shredder internals again - but also not so loose that it can come adrift without conscious effort on the operator's part.
Another bonus is that it used such a small amount of filament (compared to printing a whole new switch lever) that I'm kicking myself for not hitting on it sooner.
So the moral of the story is this: Just because a big piece is broken, it doesn't mean a big piece is then needed to make repairs!
Happy lockdown printing folks!
Sometime in late 2018, something failed, and there was no shredding despite the motor racing away lustily. Naturally I did what any practical minded DIYer would do, and dismantled it - secretly hoping, of course, that it would be something suitable for 3D design and printing, like a gear or a bearing holder.
But, when I came to remove the covers from the mechanism, the case halves wouldn't separate. The trouble was that the switch was still holding it all together, and it refused to let go using reasonable pressure. I tried levering gently, to no avail. There was nothing for it, and I had to resort to levering forcefully. The case still carries the scars that resulted to this day, and visible in the attached picture!). But I was finally able to persuade it to give up its death grip, at last, and was able to carry out my diagnosis.
The shredder fault turned out to be nothing more elaborate than the motor screws working loose over time, causing the motor to separate from the drive mechanism. This was swiftly sorted with some Loctite and a screwdriver, with no need for 3D printing anything :'c .
But when I came to reassemble the unit, I realised that my "brute force and ignorance" (TM BigCliveDotCom) approach had resulted in the flimsy retaining clip on the switch breaking off: As usual, the saving of a fraction of a penny's worth of plastic - making it effectively into 3 weak 1.5mm clips - had created a weak spot. In fairness, I was actually grateful for this economising by the manufacturers for once, as I doubt if I'd have got the shredder apart without it.
At the time, I simply popped the broken switch lever loosely back onto the shredder, and used it that way thereafter. But the damn thing was forever falling off, or getting sucked up in the vacuum cleaner, and driving me nuts whenever I used it.
Then, as I got into my 3D printer, I made a few attempts to design a replacement switch lever. But the complicated intercepting angles and compound curves involved always defeated me, and I ended up just carrying on with the switch lever as it was - accepting that it would be making the occasional bolt for freedom at the most inconvenient of times.
Until Today. As we're under virus lockdown at the moment, I was able to devote a little more thought to the problem. It didn't take too long to realise I'd been thinking about it all wrong. All it actually required was a small repair piece for the clip, instead of a whole new switch lever, c/w clip, printed from scratch.
After some measuring, and tinkering, it took around 3 iterations to get a result that worked AND I was happy with. It's a nice, tight, friction fit so that it doesn't need glue, so can be easily removed if I ever need to access the shredder internals again - but also not so loose that it can come adrift without conscious effort on the operator's part.
Another bonus is that it used such a small amount of filament (compared to printing a whole new switch lever) that I'm kicking myself for not hitting on it sooner.
So the moral of the story is this: Just because a big piece is broken, it doesn't mean a big piece is then needed to make repairs!
Happy lockdown printing folks!
Similar models
thingiverse
free

Tantillus Extruder Motor Rest by Mirrikat
...upport the weight of the motor. i decided to design a part that would deal with the latter issue (if that was indeed the issue).
thingiverse
free

Hinged Coffee Bag Clip by thanekew
... so i didn't want a built-in scoop or pour spout.
this can be printed with limited or no support. i printed 4 in four hours.
thingiverse
free

Lotus Elise S2 indicator clip repair by SpoolsOut
...ir by spoolsout
thingiverse
repair piece for the broken indicator clip.
i had the final version professionally printed in nylon
thingiverse
free

Lego Train Track Switch Lever by gabeknuth
..., so i made this functional, but not identical, version.
prints flat on one end of the switch lever. i used solid infill and pla.
thingiverse
free

Hovership Motor Wire Clip by 3dcreatief
...ace the tie rap for the motor wires over the motor arm. not able to test fit, so if you test it i would like to know the results.
grabcad
free

Tandy 1000 EX Key Switch Replacement
...ing one yet, but i intend to soon with sla.
i only had calipers for this, so i had had to take a few liberties and guesstimates.
thingiverse
free

Nintendo Switch Dog Swoof Pin by Cainedna
...ch a pin backer to as well.
this was modeled just visually, so the dimensions may not be exact to the actual shape of the device.
thingiverse
free

HIctop i3 Y Carriage Limit Switch Belt Clip by chaoren
...ll break the abs part. i replace the switch with a arm that triggers the y limit switch.
i recommend 100% infill printed in abs.
thingiverse
free

WHAL 9966 Trimmer Guard by DrunkMonkey
...i can trim my goatee so i made one. this is not perfect as i had to heat and bend the tab at the back so it would clip on. enjoy
thingiverse
free

Hexagonal Mirror Clip by OpenLab
...d try using openscad and designing something that i wanted to print, and 25% so i could have mirror clips that aren't boring.
Cargy
thingiverse
free

Soft Jaws for Stanley 4" Vice (Model # 83-065) by Cargy
...uot; vice (model # 83-065) by cargy
thingiverse
yes, yellow again! thankfully, no lengthy explanation involved (for a change!).
thingiverse
free

Maglight Wall Mount Remix by Cargy
... its back to allow unsupported printing, as per the stl file.
probably overkill, but i went for a 30% fill because of the weight.
thingiverse
free

Filament Roller Endcaps for 15mm Tube by Cargy
...the 22mm tube instructions (and, of course, hugohuge's masterpiece, without which i'd have nothing to put my roller into)
thingiverse
free

Storage For TC1 Component Tester by Cargy
...ood?!
13th september 2020 :i've just added a small removable tray insert option for easier access to the accessories storage.
thingiverse
free

Basic Ender 3 Tool Holder by Cargy
...hook uppermost, and whack on a bit of support. job's a good 'un!
it simply slides on to the extrusion, no fixings needed.
thingiverse
free

Handle For Cake Slice by Cargy
...int, and i've no doubt i'll see it again. but, mean time, i reckon i've earned a slice of one of her delicious cakes!
thingiverse
free
Vernier Caliper Case Insert by Cargy
...gthy print.
if you are blessed with a larger build area, you should just be able to lay it flat and print it in the sensible way.
thingiverse
free

Guide for Bosch PHO100 Planer by Cargy
...his without my help, though!
so there ya go: if you've got a similarly ancient planer, you too could have a guide like mine!
thingiverse
free

Tray Insert For Drawer Unit (with update) by Cargy
...at's what you get when you design stuff when you're tired! the stl has now been corrected to centre these holes properly.
thingiverse
free

Ender 3 PSU Fan Cover by Cargy
...w, if only i can come up with a way of hushing the hotend and parts cooling fans, and i'll be a happy bunny!
happy printing!
Olympus
3ddd
$1
Olympus FE - 220
...olympus fe - 220
3ddd
olympus , фотоаппарат
olympus fe - 220
3ddd
$1

Кресло офисное Olympus
...кресло офисное olympus
3ddd
olympus , кресло
офисное кресло olympus chrom
turbosquid
$80

Submarine Olympus
... available on turbo squid, the world's leading provider of digital 3d models for visualization, films, television, and games.
turbosquid
$40

olympus u700
... available on turbo squid, the world's leading provider of digital 3d models for visualization, films, television, and games.
cg_studio
$49

Olympus SP570UZ3d model
...ympus sp570uz3d model
cgstudio
.lwo - olympus sp570uz 3d model, royalty free license available, instant download after purchase.
turbosquid
free

Olympus OM10.max
... available on turbo squid, the world's leading provider of digital 3d models for visualization, films, television, and games.
3d_export
$19

Blade Of Olympus 3D Model
...pon sharp knife razor battle ready gameready game fight fighter king queen
blade of olympus 3d model martialartist 22652 3dexport
cg_studio
$45

Olympus FE-1403d model
...olympus fe-1403d model
cgstudio
.obj - olympus fe-140 3d model, royalty free license available, instant download after purchase.
3d_export
$65

Olympus SP 570 UZ 3D Model
...l
3dexport
electronic olympus photo camera digital zoom ultra view compact lens
olympus sp 570 uz 3d model dbajurin 6643 3dexport
turbosquid
$59

Olympus VG120 Digital Camera 14MP
... available on turbo squid, the world's leading provider of digital 3d models for visualization, films, television, and games.
Shredder
turbosquid
$49

Shredder
...urbosquid
royalty free 3d model shredder for download as ige on turbosquid: 3d models for games, architecture, videos. (1464895)
turbosquid
$10

Shredder
...3d model wood shredder for download as obj, fbx, skp, and stl on turbosquid: 3d models for games, architecture, videos. (1467415)
turbosquid
$39

Soap shredder
...y free 3d model soap shredder for download as sldpr and sldas on turbosquid: 3d models for games, architecture, videos. (1423317)
3d_export
$5

Low speed universal shredder
...low speed universal shredder
3dexport
low speed universal shredder
turbosquid
$50

mini shredder and crusher
...odel shredder for download as ige, obj, stl, sldpr, and sldas on turbosquid: 3d models for games, architecture, videos. (1410906)
evermotion
$12
paper shredder 09 AM87
...r shredder with all textures, shaders and materials. it is ready to use, just put it into your scene.. evermotion 3d models shop.
evermotion
$10
paper shredder 06 AM87
...r shredder with all textures, shaders and materials. it is ready to use, just put it into your scene.. evermotion 3d models shop.
evermotion
$10

paper shredder 08 AM87
...r shredder with all textures, shaders and materials. it is ready to use, just put it into your scene.. evermotion 3d models shop.
evermotion
$10

paper shredder 07 AM87
...r shredder with all textures, shaders and materials. it is ready to use, just put it into your scene.. evermotion 3d models shop.
turbosquid
$10

Shredder Blade shuriken
... available on turbo squid, the world's leading provider of digital 3d models for visualization, films, television, and games.
Repair
3d_export
$5

Phone repair
...phone repair
3dexport
turbosquid
$9

Repair Drone
... free 3d model repair drone for download as max, obj, and fbx on turbosquid: 3d models for games, architecture, videos. (1237490)
turbosquid
$10

Future Repair
... available on turbo squid, the world's leading provider of digital 3d models for visualization, films, television, and games.
turbosquid
$1

auto repair
... available on turbo squid, the world's leading provider of digital 3d models for visualization, films, television, and games.
3d_ocean
$8

Dove Intense Repair
...ense repair 3d model dove product dove product 3d model pack pack shot product
dove intense repair is dove 3d model product pack.
turbosquid
$30

Auto Repair Service
...royalty free 3d model auto repair service for download as c4d on turbosquid: 3d models for games, architecture, videos. (1292504)
turbosquid
$19

Military Repair kit
...free 3d model military repair kit for download as obj and fbx on turbosquid: 3d models for games, architecture, videos. (1235658)
turbosquid
$24

Schwarzkopf Gliss Kur Hair Repair Shampoo Ultimate Repair 400ml 2019
...repair shampoo ultimate repair 400ml 2019 for download as max on turbosquid: 3d models for games, architecture, videos. (1450103)
turbosquid
$24

Schwarzkopf Gliss Kur Hair Repair Shampoo Total Repair 400ml 2019
...ir repair shampoo total repair 400ml 2019 for download as max on turbosquid: 3d models for games, architecture, videos. (1450101)
turbosquid
$10

Repair Drone Class A
... available on turbo squid, the world's leading provider of digital 3d models for visualization, films, television, and games.
Paper
archibase_planet
free

Paper
...paper
archibase planet
toilet paper lavatory paper toilet-paper
paper - 3d model (*.gsm+*.3ds) for interior 3d visualization.
archibase_planet
free

Paper
...r
archibase planet
toilet paper lavatory paper sanitary ware
toilet paper - 3d model (*.gsm+*.3ds) for interior 3d visualization.
archibase_planet
free
Paper
...paper
archibase planet
toilet paper lavatory paper bumf
paper 1 n120508 - 3d model (*.gsm+*.3ds) for interior 3d visualization.
turbosquid
free

Paper Planes and Crumpled Paper
... available on turbo squid, the world's leading provider of digital 3d models for visualization, films, television, and games.
3d_ocean
$8
Kitchen-Paper / Toilet-Paper
...e horizontal tileable and in three different resolutions. each texture has a color/diffuse, bump, normal and specular map. inc...
3d_ocean
$5

Paper Textures
...6×4096. these were acquired using a scanner and edited in photoshop for seamless property. the paper bag visible in the render...
3d_export
$5

paper bin
...paper bin
3dexport
paper bin
3ddd
$1

Paper Chandelier
...paper chandelier
3ddd
moooi
paper chandelier
3ddd
$1
Toilet paper
...toilet paper
3ddd
туалетная бумага
toilet paper
turbosquid
$15

the paper
... available on turbo squid, the world's leading provider of digital 3d models for visualization, films, television, and games.
Switch
archibase_planet
free

Switch
...switch
archibase planet
switch cluster switch
light switch 1 - 3d model for interior 3d visualization.
archibase_planet
free
Switch
...switch
archibase planet
switches switch
switch 1 - 3d model (*.gsm+*.3ds) for interior 3d visualization.
archibase_planet
free
Switch
...switch
archibase planet
closer button switch cluster switch
switch - 3d model (*.3ds) for interior 3d visualization.
archibase_planet
free

Switch
...switch
archibase planet
switch closer
light switch 2 - 3d model for interior 3d visualization.
archibase_planet
free

Switch
...switch
archibase planet
closer button switch
switch n300808 - 3d model (*.gsm+*.3ds) for interior 3d visualization
archibase_planet
free
Switch
...switch
archibase planet
closer button switch
switch n141108 - 3d model (*.gsm+*.3ds) for interior 3d visualization.
archibase_planet
free

Switch
...switch
archibase planet
cluster switch closer
switch n260609 - 3d model (*.gsm+*.3ds) for interior 3d visualization.
archibase_planet
free

Switch
...switch
archibase planet
button switch closer
switch 2 - 3d model (*.gsm+*.3ds) for interior 3d visualization.
archibase_planet
free

Switch
...switch
archibase planet
button switch closer
switch n070510 - 3d model (*.gsm+*.3ds) for interior 3d visualization.
3d_export
$5

switch
...switch
3dexport
3d model of a low-poly switch